Installing, Configuring, and Using the rkhunter Server Vulnerability Scanner
- Tutorial
More than once an application called rkhunter was mentioned on the hub I would like to dwell on it in more detail.
Rkhunter is a scanner of various types of local (potential) vulnerabilities (backdoors, exploits and rootkits) with its regularly updated database.
It is written in bash and perl, so it will work under any unix-based server OS without any problems.

For installation, you can use the official repositories of the OS on which you want to scan, or by downloading the archive from the official site http://rkhunter.sourceforge.net/
Installation
The first start-up and preparation
The first start-up is required to check the system for compatibility and the correct installation of rkhunter itself.
First,
check the relevance of the installed version of rkhunter --versioncheck.
There will be such information that can be used to judge the relevance of the version
[Rootkit Hunter version 1.4.2]
Checking rkhunter version ...
This version: 1.4.2
Latest version: 1.4.2
To maintain the relevance of the tool for To search for vulnerabilities on the server, run rkhunter with the key --update
rkhunter --update
[Rootkit Hunter version 1.4.2]
Checking rkhunter data files ...
Checking file mirrors.dat [No update]
Checking file programs_bad.dat [No update]
Checking file backdoorports.dat [No update]
Checking file suspscan.dat [Updated]
Checking file i18n / cn [No update]
Checking file i18n / de [Updated]
Checking file i18n / en [No update]
Checking file i18n /
tr.utf8 [Updated]
Checking file i18n / zh [Updated]
Checking file i18n / zh.utf8 [Updated] The
second step is to create a snapshot of the installed system for rkhunter with the command:
rkhunter --propupd
[Rootkit Hunter version 1.4.2]
File created: searched for 171 files, found 139
So, the database has been updated and now we are ready to make the first launch of rkhunter for scanning.
rkhunter -c --enable all --disable none
The system will be tested and various messages will be displayed for each check item. After each step, you will need to press Enter to continue. At the very end, the final information of the system check will appear:
System checks summary
=====================
File properties checks ...
Files checked: 139
Suspect files: 23
Rootkit checks ...
Rootkits checked : 381
Possible rootkits: 0
Applications checks ...
Applications checked: 3
Suspect applications: 0
The system checks took: 2 minutes and 39 seconds
All results have been written to the log file: /var/log/rkhunter/rkhunter.log
One or more warnings have been found while checking the system.
Please check the log file (/var/log/rkhunter/rkhunter.log)
Please note that rkhunter keeps a log file and you can see the data that was displayed on the screen during the verification.
The first launch and verification is done, now let's move on to finer tuning this wonderful tool.
Configuring rkhunter
The rkhunter configuration file may be located in /etc/rkhunter.conf or /usr/local/etc/rkhunter.conf depending on the OS and distribution.
First of all, we’ll set up an alert to the email address in the MAIL-ON-WARNING = “mail @ box” parameter
In the event of a false positive on files of type / bin / which, you can use the SCRIPTWHITELIST parameter and add files to it that do not need to be checked / signal a problem. You should add one at a time to the parameter on the line:
SCRIPTWHITELIST = "/ usr / sbin / adduser"
SCRIPTWHITELIST = "/ bin / which
If you use root for ssh access and do not intend to disable it, you can disable this check:
ALLOW_SSH_ROOT_USER = yes
After editing the configuration file, save it and check for problems by running rkhunter with the -C switch:
rkhunter -C
Run rkhunter to check the system, but add the -rwo switch so that only warnings are displayed :
rkhunter -c --enable all --disable none --rwo
Automatically starting a scan.
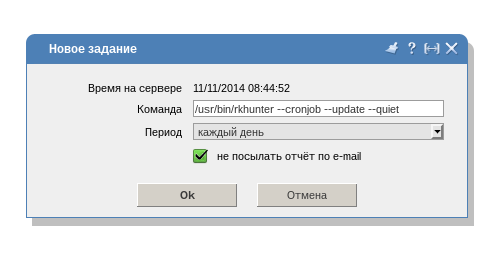
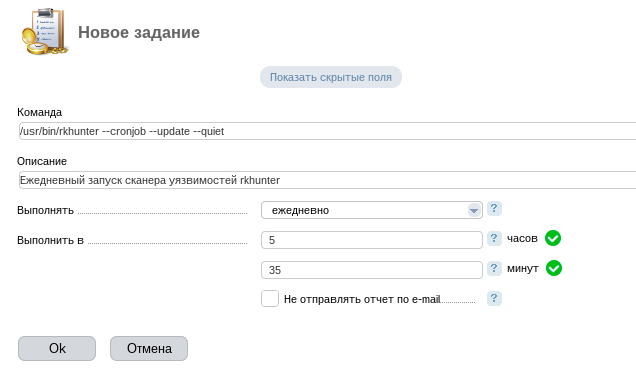
You can configure the scheduler both from the console and in the ISPmanager control panel.
In the console, you need to run the crontab -e command and add a line for daily scanning:
@daily / usr / bin / rkhunter --cronjob --update --quiet
In ISPmanager4, the scheduler is located in the menu item “Tools” -> “Scheduler (cron)”
In ISPmanager5, this is the menu item “Scheduler” in the “System” section.
As a conclusion, I want to remind you. Remember to run rkhunter --propupd after every configuration file change or OS update. This way you will avoid false positives.
Rkhunter is a scanner of various types of local (potential) vulnerabilities (backdoors, exploits and rootkits) with its regularly updated database.
It is written in bash and perl, so it will work under any unix-based server OS without any problems.
For installation, you can use the official repositories of the OS on which you want to scan, or by downloading the archive from the official site http://rkhunter.sourceforge.net/
Installation
- Centos: yum install rkhunter
- Debian / Ubuntu: apt-get install rkhunter
- FreeBSD: make all install clean -C / usr / ports / security / rkhunter or pkg install rkhunter
The first start-up and preparation
The first start-up is required to check the system for compatibility and the correct installation of rkhunter itself.
First,
check the relevance of the installed version of rkhunter --versioncheck.
There will be such information that can be used to judge the relevance of the version
[Rootkit Hunter version 1.4.2]
Checking rkhunter version ...
This version: 1.4.2
Latest version: 1.4.2
To maintain the relevance of the tool for To search for vulnerabilities on the server, run rkhunter with the key --update
rkhunter --update
[Rootkit Hunter version 1.4.2]
Checking rkhunter data files ...
Checking file mirrors.dat [No update]
Checking file programs_bad.dat [No update]
Checking file backdoorports.dat [No update]
Checking file suspscan.dat [Updated]
Checking file i18n / cn [No update]
Checking file i18n / de [Updated]
Checking file i18n / en [No update]
Checking file i18n /
tr.utf8 [Updated]
Checking file i18n / zh [Updated]
Checking file i18n / zh.utf8 [Updated] The
second step is to create a snapshot of the installed system for rkhunter with the command:
rkhunter --propupd
[Rootkit Hunter version 1.4.2]
File created: searched for 171 files, found 139
So, the database has been updated and now we are ready to make the first launch of rkhunter for scanning.
rkhunter -c --enable all --disable none
The system will be tested and various messages will be displayed for each check item. After each step, you will need to press Enter to continue. At the very end, the final information of the system check will appear:
System checks summary
=====================
File properties checks ...
Files checked: 139
Suspect files: 23
Rootkit checks ...
Rootkits checked : 381
Possible rootkits: 0
Applications checks ...
Applications checked: 3
Suspect applications: 0
The system checks took: 2 minutes and 39 seconds
All results have been written to the log file: /var/log/rkhunter/rkhunter.log
One or more warnings have been found while checking the system.
Please check the log file (/var/log/rkhunter/rkhunter.log)
Please note that rkhunter keeps a log file and you can see the data that was displayed on the screen during the verification.
The first launch and verification is done, now let's move on to finer tuning this wonderful tool.
Configuring rkhunter
The rkhunter configuration file may be located in /etc/rkhunter.conf or /usr/local/etc/rkhunter.conf depending on the OS and distribution.
First of all, we’ll set up an alert to the email address in the MAIL-ON-WARNING = “mail @ box” parameter
In the event of a false positive on files of type / bin / which, you can use the SCRIPTWHITELIST parameter and add files to it that do not need to be checked / signal a problem. You should add one at a time to the parameter on the line:
SCRIPTWHITELIST = "/ usr / sbin / adduser"
SCRIPTWHITELIST = "/ bin / which
If you use root for ssh access and do not intend to disable it, you can disable this check:
ALLOW_SSH_ROOT_USER = yes
After editing the configuration file, save it and check for problems by running rkhunter with the -C switch:
rkhunter -C
Run rkhunter to check the system, but add the -rwo switch so that only warnings are displayed :
rkhunter -c --enable all --disable none --rwo
Automatically starting a scan.
You can configure the scheduler both from the console and in the ISPmanager control panel.
In the console, you need to run the crontab -e command and add a line for daily scanning:
@daily / usr / bin / rkhunter --cronjob --update --quiet
In ISPmanager4, the scheduler is located in the menu item “Tools” -> “Scheduler (cron)”
In ISPmanager5, this is the menu item “Scheduler” in the “System” section.
As a conclusion, I want to remind you. Remember to run rkhunter --propupd after every configuration file change or OS update. This way you will avoid false positives.