Room weather station on Arduino
Once, while exploring the Internet, I came across an interesting Arduino board. I was very interested in this board. With its help, you can make the robot itself, a weather station, an alarm, and even something more serious, for example - "Smart Home".
Having bought this device, I began to study its features. Having played enough with LEDs, a temperature sensor and an LCD display, I decided to do something so interesting and something that could come in handy at home.
And here’s what came of it ...
Today I want to talk about my small home project, namely, about an indoor weather station on Arduino. I think everyone would like to see, for example, what is his room temperature or humidity, and so, my project will allow you to do this.
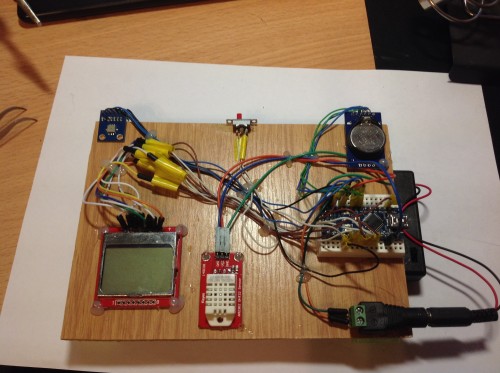
This is how the weather station will look like in assembly:
You probably wanted to assemble the same device, well, let's not pull it.
But first, let's see what our weather station can do:
1) Show the current date and time;
2) Show the current temperature;
3) Show current humidity;
4) Show current atmospheric pressure.
What we need to implement this weather station:
1) The Arduino microcontroller itself (I used Arduino nano v3);
2) Temperature and humidity sensor Dht22 (small errors in readings);
3) The BMP085 barometer, it can do a lot of things, for example, measuring atmospheric pressure, temperature, level above sea level;
4) Real-time clock DS3231 (it is very accurate and easy to configure);
5) We still need to get this somewhere; I was chosen by everyone as a well-known screen from Nokia 5110;
6) Straight arms, without this in any way.
As needed:
7) Battery box, to power the entire structure. I am powered by usb. From batteries does not live a couple of days;
8) The switch, it is here in order to turn on the backlight on the screen as necessary;
9) A piece of plywood and legs.
10) A connector for connecting the power supply.
Now let's look at where and how to connect what.
1) Our screen will be the first:
pin 3 - Serial clock out (SCLK)
pin 4 - Serial data out (DIN)
pin 5 - Data / Command select (D / C)
pin 7 - LCD chip select (CS)
pin 6 - LCD reset (RST)
Power 3.3V
2) Next, the temperature and humidity sensor Dht22:
pin 10 - DAT
Power 5V
3) The third will be a barometer:
pin 4 - SDA
pin 5 - SCL
Power 5V
4) Next, the real time clock:
pin 4 - SDA
pin 5 - SCL
Power 5V
Do not forget to connect the power and ground.
Well, now the most interesting is our code.
I tried to comment it well, so that it was understandable, but there will be inserts in English from libraries. I think there will be no problems with the translation.
The necessary libraries and the program code itself are available at the
link .
If you have any questions or suggestions - write.
Having bought this device, I began to study its features. Having played enough with LEDs, a temperature sensor and an LCD display, I decided to do something so interesting and something that could come in handy at home.
And here’s what came of it ...
Today I want to talk about my small home project, namely, about an indoor weather station on Arduino. I think everyone would like to see, for example, what is his room temperature or humidity, and so, my project will allow you to do this.
This is how the weather station will look like in assembly:
You probably wanted to assemble the same device, well, let's not pull it.
Opportunities
But first, let's see what our weather station can do:
1) Show the current date and time;
2) Show the current temperature;
3) Show current humidity;
4) Show current atmospheric pressure.
Composition
What we need to implement this weather station:
1) The Arduino microcontroller itself (I used Arduino nano v3);
2) Temperature and humidity sensor Dht22 (small errors in readings);
3) The BMP085 barometer, it can do a lot of things, for example, measuring atmospheric pressure, temperature, level above sea level;
4) Real-time clock DS3231 (it is very accurate and easy to configure);
5) We still need to get this somewhere; I was chosen by everyone as a well-known screen from Nokia 5110;
6) Straight arms, without this in any way.
As needed:
7) Battery box, to power the entire structure. I am powered by usb. From batteries does not live a couple of days;
8) The switch, it is here in order to turn on the backlight on the screen as necessary;
9) A piece of plywood and legs.
10) A connector for connecting the power supply.
Connection
Now let's look at where and how to connect what.
1) Our screen will be the first:
pin 3 - Serial clock out (SCLK)
pin 4 - Serial data out (DIN)
pin 5 - Data / Command select (D / C)
pin 7 - LCD chip select (CS)
pin 6 - LCD reset (RST)
Power 3.3V
2) Next, the temperature and humidity sensor Dht22:
pin 10 - DAT
Power 5V
3) The third will be a barometer:
pin 4 - SDA
pin 5 - SCL
Power 5V
4) Next, the real time clock:
pin 4 - SDA
pin 5 - SCL
Power 5V
Do not forget to connect the power and ground.
The code
Well, now the most interesting is our code.
I tried to comment it well, so that it was understandable, but there will be inserts in English from libraries. I think there will be no problems with the translation.
The code
#include
#include "DHT.h"
#include
#include
#include "RTClib.h"
#define DHTPIN 10     // 10 pin для датчика DHT22
#define DHTTYPE DHT22
RTC_DS1307 RTC;
BMP085 dps = BMP085();
DHT dht(DHTPIN, DHTTYPE);
long temp3 = 0, Pressure = 0, Altitude = 0;
// pin 3 - Serial clock out (SCLK)
// pin 4 - Serial data out (DIN)
// pin 5 - Data/Command select (D/C)
// pin 7 - LCD chip select (CS)
// pin 6 - LCD reset (RST)
LCD5110 myGLCD(3, 4, 5, 6, 7);
extern unsigned char SmallFont[];
void setup() {
  myGLCD.InitLCD();
  myGLCD.setFont(SmallFont);
  Wire.begin();
  RTC.begin();
  dht.begin();
  delay(2000);
  dps.init(MODE_ULTRA_HIGHRES, 3200, true); // 3200 это 32 метра над уровнем моря (Питер на такой высоте располагается+ надо добавить несколько метров в зависимости от этажа на котором живете)
}
void loop() {
  dps.getPressure(&Pressure);
  dps.getAltitude(&Altitude);
  dps.getTemperature(&temp3);
  DateTime now = RTC.now();
  // Sensor readings may also be up to 2 seconds 'old' (its a very slow sensor)
  float h = dht.readHumidity();
  // Read temperature as Celsius
  float t = dht.readTemperature();
  myGLCD.setFont(SmallFont); // задаем маленький размер шрифта на экране
  myGLCD.clrScr(); // Очистка экрана
  myGLCD.print("Time=", LEFT, 0);  //задаем время
  myGLCD.printNumI(int(now.hour()), 32, 0); // 32,0 означет 32=номер пропуска в строке, те откуда будем печатать. 0=номер строки
  myGLCD.print(":", 45, 0);
  myGLCD.printNumI(int(now.minute()), 50, 0);
  myGLCD.print(":", 62, 0);
  myGLCD.printNumI(int(now.second()), 67, 0);
  myGLCD.print("Date=", LEFT, 10);       //задаем дату
  myGLCD.printNumI(int(now.day()), 32, 10);
  myGLCD.print("/", 44, 10);
  myGLCD.printNumI(int(now.month()), 50, 10);
  myGLCD.print("/", 62, 10);
  myGLCD.printNumI(int(now.year() - 2000), 68, 10);
  myGLCD.print("T=", LEFT, 20); //задаем температуру
  myGLCD.printNumF(t, 2, 13, 20);  //Это температура с DHT22
  myGLCD.print("/", 45, 20);
  myGLCD.printNumF(temp3 * 0.1, 2, 53, 20); //Это температура с барометра
  myGLCD.print("Hum=", LEFT, 30); // задаем влажность с DHT22
  myGLCD.printNumF(h, 2, 28, 30);
  myGLCD.print("%", 63, 30);
  myGLCD.print("Pres=", LEFT, 40); // задаем атмосферное давление
  myGLCD.printNumF(Pressure / 133.3, 2, 31, 40); //рассчет атмосферного давления
  myGLCD.print("mm", 68, 40);
  // Serial.print("  Alt(m):");          кому надо, это текущая высота над уровнем моря
  // Serial.print(Altitude / 100);
  myGLCD.update(); // Вывод вместимого буфера на дисплей
  delay (1000); // Задержка 1 с
}
Weather Station Operation Example
Device photos

Video
Source code
The necessary libraries and the program code itself are available at the
link .
If you have any questions or suggestions - write.