Import Spine 2D animations into Unity 3D and snap effects to bones using the 2D Toolkit
Here we will describe how to simplify the import of Spine animations into a Unity project, and what needs to be done to bind an arbitrary object (visual effect, collider, etc.) to the animation itself or its individual bones.
Let's look at an example of a particle system available in the Unity editor .
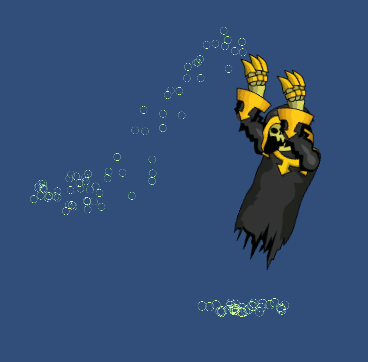
At the end of the article, ready-made animation and a test project are attached, the result of which will look something like this:
So, what will be needed to implement the plan:
Importing animations from the Spine editor manually is described in a simple video instruction , however, in the case when several people are working on a project, this can cause some difficulties. Therefore, a window was written for import into which it was enough to drag the animation export folder from the Spine editor and click “OK”.
The process of creating animations will not be described here, on the developer's site there is excellent documentation on this subject.
Each Spine project is actually a folder with used images and a file with project settings (* .spine file). In addition to this, we will also need the JSON file generated by the editor during export. Export settings are shown in the figure below. It is important here not to forget to indicate that we DO NOT need an atlas when exporting (the "Create atlas" field). Next, specify “[path to the Spine folder of the project] / Export” as the path, and click the export button.

As a result, we have the Spine project folder with what was already there, plus the necessary JSON file. The finished export folder with the source is in the “necr_2.zip” archive, which can be found at the end of this article.
If the source of the animation for some reason is not desirable to transfer along with the folder, then this is not important, the file “* .spine” is not required for import.
Now create a new 2D project in Unity, import the “2D Toolkit” package and the contents of the “spine_test.unitypackage” file into it, which can also be downloaded at the end of this article.
In the resulting project, you can open and run the finished scene, it lies in the “ExampleEffects” folder. In this scene, an animated ghost flies in front of the camera with an effect attached to one of the bones of the hands, if you can call it that.
But back to importing the animation.
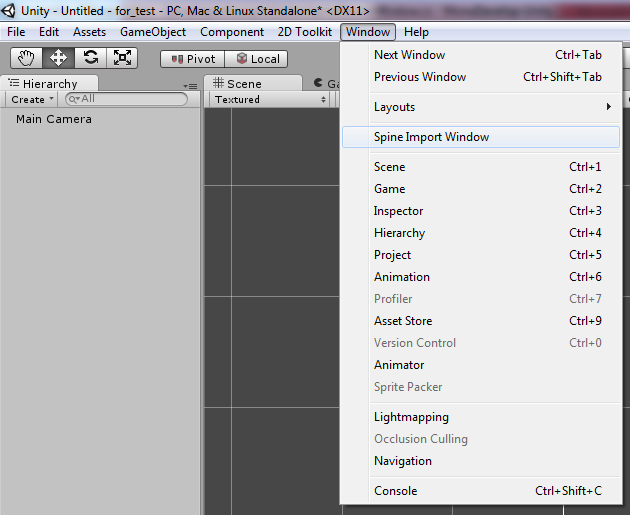
To open the import window in our Unity project, you need to find the “Window” item in the top menu and select “Spine Import Window” in the drop-down list, as shown in the figure below.
As a result, we will see a similar window:

Now we need the “necr_2.zip” file, it contains the export of animation from the Spine project. Unzip it and drag the resulting folder into the large field ">> Drag the folder export character here. <<". As a result, we see the generated atlas and a couple of settings, as in the figure below.
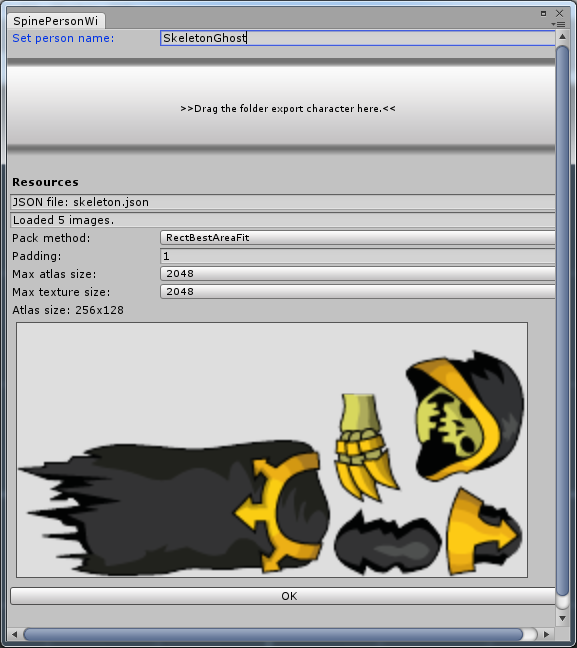
In the "Pack method" field, select the most optimal option, i.e. the one at which the Atlas size is less. The “Padding” field defines the gap between the textures in the atlas, with a value of 1 artifacts did not occur. "Max atlas size" exists only for debugging, there always needs a maximum value. And “Max texture size” sets the texture quality in Unity, the maximum value is also recommended.
The upper field “Set person name” also matters. Since all imported animations will be stored in one place, the name must be unique, otherwise the window will show a warning at the bottom instead of the “OK” button. By clicking this button, the import of the animation is completed.
By the way, the MaxRectsBinPack script , with a small add-in , was used to create the atlas .
In the process of creating and linking the necessary prefabs, several error messages may appear in the Unity console, but they do not affect the final result. As a result, we have a folder with the name specified during import, containing resources and a prefab called “animation”.

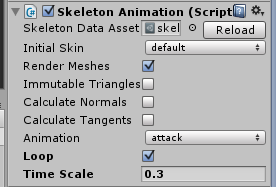
We pull it out onto the stage, press “Play” and watch the animated ghost. However, in order for the animation to turn on automatically, do not forget to set similar settings in the component shown in the image below (“Time Scale” is reduced for clarity).
For the test, you can use the prefabs “fx1_pref” and “fx2_pref” from the folder “ExampleEffects”. We find the “Spine Person” component in the object inspector and set the settings, as shown in the figure below.
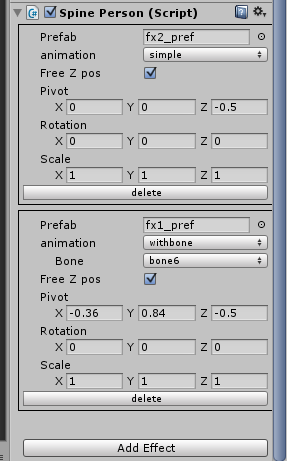
In the “Prefab” field, an object of the “GameObject” type is selected, i.e. almost any game object, in our case it is a container containing Particle system .
But the main field here is "animation". The “simple” option means a regular embedded object that is not attached to any bone. Selecting the “withbone” value will make it possible to select a bone from the list to which the object will be attached. In the case of a ghost, the names of the bones are not very original, so you can experiment.
The “Free Z pos” field appeared due to the fact that for some effects a two-dimensional analogue of lighting was used, which always had to be between the interface and the game field. So if you uncheck this box, then the z coordinate of the effect will always be equal to the fixed_z parameter (which will appear in the inspector).
Using the “Pivot”, “Rotation”, “Scale” fields, you can adjust the position, turn and size of the effect relative to the bone (in our case, scaling does not matter).
After the settings are set, you can start the scene, drag the object in different coordinates and look at the result.
What of all this can come out is demonstrated by this video.
There are a couple more functions in the SpinePerson.cs script that might be useful to someone:
SpinePerson.setSpineImageActive
SpinePerson.replaceSpineImage
Using these functions, you can hide / show or replace a specific texture in the animation.
All scripts are located in the “SpineImport / scripts” folder; if desired, they are not difficult to change for the needs of a particular project.
Below is the attached Unity project and archive with animation:
- spine_test.unitypackage [updated, fix scale factor and rotate] ;
- necr_2.zip .
Let's look at an example of a particle system available in the Unity editor .
At the end of the article, ready-made animation and a test project are attached, the result of which will look something like this:
So, what will be needed to implement the plan:
- Free version of the Unity editor (v 4.5.3f3 at the time of writing).
- 2D Toolkit (v 2.4.0 at the time of writing).
- Spine Animation Editor .
- Csharp library, which can be downloaded here (but it already exists in the attached project).
Importing animations from the Spine editor manually is described in a simple video instruction , however, in the case when several people are working on a project, this can cause some difficulties. Therefore, a window was written for import into which it was enough to drag the animation export folder from the Spine editor and click “OK”.
The process of creating animations will not be described here, on the developer's site there is excellent documentation on this subject.
Let's start with the export
Each Spine project is actually a folder with used images and a file with project settings (* .spine file). In addition to this, we will also need the JSON file generated by the editor during export. Export settings are shown in the figure below. It is important here not to forget to indicate that we DO NOT need an atlas when exporting (the "Create atlas" field). Next, specify “[path to the Spine folder of the project] / Export” as the path, and click the export button.
As a result, we have the Spine project folder with what was already there, plus the necessary JSON file. The finished export folder with the source is in the “necr_2.zip” archive, which can be found at the end of this article.
If the source of the animation for some reason is not desirable to transfer along with the folder, then this is not important, the file “* .spine” is not required for import.
Now create a new 2D project in Unity, import the “2D Toolkit” package and the contents of the “spine_test.unitypackage” file into it, which can also be downloaded at the end of this article.
In the resulting project, you can open and run the finished scene, it lies in the “ExampleEffects” folder. In this scene, an animated ghost flies in front of the camera with an effect attached to one of the bones of the hands, if you can call it that.
But back to importing the animation.
To open the import window in our Unity project, you need to find the “Window” item in the top menu and select “Spine Import Window” in the drop-down list, as shown in the figure below.
As a result, we will see a similar window:
Now we need the “necr_2.zip” file, it contains the export of animation from the Spine project. Unzip it and drag the resulting folder into the large field ">> Drag the folder export character here. <<". As a result, we see the generated atlas and a couple of settings, as in the figure below.
In the "Pack method" field, select the most optimal option, i.e. the one at which the Atlas size is less. The “Padding” field defines the gap between the textures in the atlas, with a value of 1 artifacts did not occur. "Max atlas size" exists only for debugging, there always needs a maximum value. And “Max texture size” sets the texture quality in Unity, the maximum value is also recommended.
The upper field “Set person name” also matters. Since all imported animations will be stored in one place, the name must be unique, otherwise the window will show a warning at the bottom instead of the “OK” button. By clicking this button, the import of the animation is completed.
By the way, the MaxRectsBinPack script , with a small add-in , was used to create the atlas .
In the process of creating and linking the necessary prefabs, several error messages may appear in the Unity console, but they do not affect the final result. As a result, we have a folder with the name specified during import, containing resources and a prefab called “animation”.
We pull it out onto the stage, press “Play” and watch the animated ghost. However, in order for the animation to turn on automatically, do not forget to set similar settings in the component shown in the image below (“Time Scale” is reduced for clarity).
Remains the binding of objects to the bones
For the test, you can use the prefabs “fx1_pref” and “fx2_pref” from the folder “ExampleEffects”. We find the “Spine Person” component in the object inspector and set the settings, as shown in the figure below.
In the “Prefab” field, an object of the “GameObject” type is selected, i.e. almost any game object, in our case it is a container containing Particle system .
But the main field here is "animation". The “simple” option means a regular embedded object that is not attached to any bone. Selecting the “withbone” value will make it possible to select a bone from the list to which the object will be attached. In the case of a ghost, the names of the bones are not very original, so you can experiment.
The “Free Z pos” field appeared due to the fact that for some effects a two-dimensional analogue of lighting was used, which always had to be between the interface and the game field. So if you uncheck this box, then the z coordinate of the effect will always be equal to the fixed_z parameter (which will appear in the inspector).
Using the “Pivot”, “Rotation”, “Scale” fields, you can adjust the position, turn and size of the effect relative to the bone (in our case, scaling does not matter).
After the settings are set, you can start the scene, drag the object in different coordinates and look at the result.
What of all this can come out is demonstrated by this video.
Project Release Movie
There are a couple more functions in the SpinePerson.cs script that might be useful to someone:
SpinePerson.setSpineImageActive
SpinePerson.replaceSpineImage
Using these functions, you can hide / show or replace a specific texture in the animation.
All scripts are located in the “SpineImport / scripts” folder; if desired, they are not difficult to change for the needs of a particular project.
Below is the attached Unity project and archive with animation:
- spine_test.unitypackage [updated, fix scale factor and rotate] ;
- necr_2.zip .