Guide to animating table views in Swift
- Transfer
- Tutorial
The standard UITableView is a powerful and at the same time flexible way to present data in your applications; chances are that most of the applications you create will use a tabular view in one form or another. However, there is a drawback that without some level of customization, applications will look pale and merge with thousands of similar ones. In order to avoid “boring” tables, you can add several suitable animated images that “liven up” the application. You may have seen something like this in the Google+ application, where cells in a table literally fly around the screen along with cool animations. If you did not pay attention to it, you can download here (for free)! An introduction to the design guidelines can also be useful and interesting.), which Google released at the 2014 I / O Conference. It contains many tips and examples on how to efficiently and correctly use animation in your applications.
In this article, we will use the Swift enhancement programming language for an existing application when scrolling through table cells and moving the image vertically. The methods of conversion to UIKit are also described, and their convenient use in order to avoid overloading with too many actions that occur simultaneously on the screen. You will receive tips on how to organize the program code so that the tasks are simple and clear, and your main controller is simple.
To get started, you should familiarize yourself with how to work with UITableView and basic elements in Swift. If you need to familiarize yourself with this, then you can start familiarizing yourself with the Swift Tutorial series , which will teach you the basics of working in the Swift language regarding applications in a table view.
Let's get started.
Download the starter project and open it in Xcode 6. You will see a simple description of the project (UITableViewController) subclass (MainViewController) and setting UITableViewCell (CardTableViewCell) to display the developers. You will also find an example of the Member class that describes all the information about the team member and knows how to extract this information from the JSON file that is inside our application.
Compile and run the project. You will see the following:

Excellent design, ready to give it a special flavor and refinement. The
application is ready to use, but could contain a little more individualism, so to speak, have its own “highlight”. This is your job; Use some tricks with Core Animation to spice up the data cell.
Define the easiest possible animation method.
To get the basic structure of the application, start by creating a simple helper class. Go to File \ New \ File ... and select the type of iOS \ Source \ Swift File for an empty Swift file. Click Next, name the file TipInCellAnimator.swift and then click Create.
Replace the contents of the file with the following code:
This simple class contains an algorithm that takes a cell with data, accesses its contents (contentView), and sets the initial transparency of the layer to 0.1. Then, after 1.4 seconds, the program code in the closing expression converts the transparency of the layer back to 1.0.
Note: an expression in Swift is just a block of code that can also span external variables. For example, {} is a simple expression. Functions designated as func are examples of named expressions. In Swift, you can open functions inside other functions.
If you passed an expression as the last argument to a function, you can use the special trailing closure syntax (final expression) and move the expression outside the function call.
Read more about expressions in the Swift Programming Language book or read the rich history of closures article on Wikipedia.
When the animation code is ready, you need to configure the table to start a new animation when a data cell appears.
Starting the animation
To start the animation, open the MainViewController.swift file and add the following method:
This algorithm is defined in the UITableViewDelegate protocol and is called before the cell appears on the screen. Then the TipInCellAnimator class algorithm is called for each cell in order to start the animation.
Compile and run the application. Scroll through the table of information and see how the cell slowly disappears:

The rotation effect
Let's make our application even more attractive, add rotation. This works the same as pop-up animations, but you specify both the start and end of the transformations.
Open the TipInCellAnimator.swift file and replace the contents with the following:
This time the movement will be faster (0.4 seconds), the floating will be more convenient and you will get an interesting rotation effect. The key to the above animation is determined by the startTransform matrix, which brings the cell back to its original position. Let's see how this happens:
1. This class requires that QuartzCore be imported, because it uses key animation transformations.
2. Start by recognizing the transformation, which is the arithmetic expression for a “dummy operation”. This is the default image conversion.
3. Go to CATransform3DRotate to get 15 degrees rotation, where a negative sign indicates counterclockwise rotation. The movement is carried out around the axes 0.0, 0.0, 1.0 and represents the vertical axis z, where x = 0, y = 0 and z = 1.
4. The use of rotation alone is insufficient, as the table / graph rotates relative to its center. In order to make the effect of a flip from an angle, add a shift or offset, where negative values indicate a move up and to the left.
5. Set the conversion result to its original view.
6. Move the image and return the original values.
Please note that you can create the final transformation, as shown in the figure below:

Note:an arbitrary chain of transformations can ultimately be represented by a single matrix. If you studied matrix algebra at school, then remember the action of multiplication of matrices. Each step multiplies a new change until you reach the final matrix.
You will also notice that the “childish” appearance of the cell is changing, so to speak, and not the cell itself. Rotation of the whole cell will cause the part above and below to be inaccessible for viewing, and we will get strange visual effects, such as vibrations and cropping of the cell. ContentView cells contain all the constituent parts.
Not all properties support animation. The Core Animation Programming Guide provides a list of list of animatable properties) for clarification.
Compile and run the applications. See how data cells tilt:

Refactoring in Swift
The genuine version of Objective-C provides a one-time determination of the start of a conversion. In the aforementioned version of the source code, it is computed animate () every time in a new way. How to do it in Swift?
One way is to use immutable storage, which is determined by the transition to the expression. Replace the contents of the TipInCellAnimator.swift file with:
Pay attention to the program code that generates startTransform; it is now as a property of the TipIn class CellAnimatorStartTransform. Instead of defining the properties of the creation method and changes for each request, set the default transform property by assigning it an expression and assigning a pair of empty brackets. Brackets allow you to immediately call an expression and assign a return value to a property. This initialization idiom is discussed in Apple's Swift's book in the initialization section. For more information, see “Setting the default value of an expression or function”.
Note: it would be nice to make the TipInCellAnimator property in the TipInCellAnimatorStartTransform class, but at the time of writing, class properties are not yet implemented in Swift.
Adding restrictions to transformations
Although the animation effect is pretty concise, use it carefully. If you have ever experienced discomfort while watching a presentation due to abuse of sound effects or animation effects, then you have an idea of what glut or abuse is. In your projects, try to ensure that the animation is present only when the cell first appears - when it scrolls from the bottom up. When scrolling back up, the cells should be without animation.
It is necessary to develop such a method in order to avoid repeated animation of the previously shown cells. To do this, you will see the Swift Dictionary (Dictionary), which provides a quick search by key.
Note:a set of instructions is an unordered collection of unique records that do not have duplicates, and an array is an ordered set that allows duplicates. The Swift Library (The Swift Standard Library) does not include a set of instructions, but can easily play the Dictionary of Bools.
The penalties for using the Dictionary are thus small, so the Swift development team may have removed them from the first release. A common drawback of a set of instructions or dictionary keys is that they do not guarantee consistency, however, the ordering of your cells is done by the data generator, so this is not a problem.
Open MainViewController.swift and add the following class property:
Here we create an empty dictionary (dictionary) that recognizes NSIndexPath as a key and Bools as properties. Then replace the tableView method (tableView :, willDisplayCell :, forRowAtIndexPath :) with the following:
Instead of animating a cell every time it appears when scrolling up or down a table, make sure that the indexPath of the cell is stored in the dictionary. If this is not the case, then the cell was shown for the first time, so you should start the animation and add indexPath to your instruction set. If it is already in the kit, you should not do anything.
Compile and run your project; swipe up and down the Tableview and you will see only those cells that were animated when they first appeared on the screen:
What should I do next?
In this tutorial, you have added animations to standard visualization control methods. Details of the animation implementation were not specified in the MainViewController class; on the contrary, they were transferred to the auxiliary class. Maintaining class responsibilities in an active state, in particular for display controllers, is one of the main challenges for the development of IOS. You can download the finished project
Now that you have learned the basics of adding animation to cells, try changing the values of your transformation to see what other effects you can create. Some ideas:
1. Faster or slower animation.
2. Greater tilt angle.
3. Different offsets: if you change the angle of rotation, then most likely you will need to change the offset so that the picture looks straight. What will the image look like if you completely omit the offset and use the value of the parameters (0, 0)?
4. Be creative and create original images.
5. For advanced users: can you get the effect of turning the table on the horizontal or vertical axis? Can you make it seem like a complete coup?
6. For advanced users: add an else clause to tableView (tableView :, willDisplayCell :, forRowAtIndexPath :) and get different animation effects when data cells are displayed a second time.

Crazy twists that you can apply to data cells.
Even having studied the simple guide to creating animations from this article, you can create an infinite number of variations based on this information. Animation can be a great addition to user actions, for example, flipping a cell in a circle, fading out or appearing on presentation or deleting a cell.
ps The translation does not pretend to be the most correct and best translation on the Habré, if there is any comment, write in a personal, I will edit. Thank you for understanding.
In this article, we will use the Swift enhancement programming language for an existing application when scrolling through table cells and moving the image vertically. The methods of conversion to UIKit are also described, and their convenient use in order to avoid overloading with too many actions that occur simultaneously on the screen. You will receive tips on how to organize the program code so that the tasks are simple and clear, and your main controller is simple.
To get started, you should familiarize yourself with how to work with UITableView and basic elements in Swift. If you need to familiarize yourself with this, then you can start familiarizing yourself with the Swift Tutorial series , which will teach you the basics of working in the Swift language regarding applications in a table view.
Let's get started.
Download the starter project and open it in Xcode 6. You will see a simple description of the project (UITableViewController) subclass (MainViewController) and setting UITableViewCell (CardTableViewCell) to display the developers. You will also find an example of the Member class that describes all the information about the team member and knows how to extract this information from the JSON file that is inside our application.
Compile and run the project. You will see the following:
Excellent design, ready to give it a special flavor and refinement. The
application is ready to use, but could contain a little more individualism, so to speak, have its own “highlight”. This is your job; Use some tricks with Core Animation to spice up the data cell.
Define the easiest possible animation method.
To get the basic structure of the application, start by creating a simple helper class. Go to File \ New \ File ... and select the type of iOS \ Source \ Swift File for an empty Swift file. Click Next, name the file TipInCellAnimator.swift and then click Create.
Replace the contents of the file with the following code:
import UIKit
class TipInCellAnimator {
  // placeholder for things to come -- only fades in for now
  class func animate(cell:UITableViewCell) {
    if let view = cell.contentView {
      view.layer.opacity = 0.1
      UIView.animateWithDuration(1.4) {
        view.layer.opacity = 1
      }
    }
  }
}
This simple class contains an algorithm that takes a cell with data, accesses its contents (contentView), and sets the initial transparency of the layer to 0.1. Then, after 1.4 seconds, the program code in the closing expression converts the transparency of the layer back to 1.0.
Note: an expression in Swift is just a block of code that can also span external variables. For example, {} is a simple expression. Functions designated as func are examples of named expressions. In Swift, you can open functions inside other functions.
If you passed an expression as the last argument to a function, you can use the special trailing closure syntax (final expression) and move the expression outside the function call.
Read more about expressions in the Swift Programming Language book or read the rich history of closures article on Wikipedia.
When the animation code is ready, you need to configure the table to start a new animation when a data cell appears.
Starting the animation
To start the animation, open the MainViewController.swift file and add the following method:
override func tableView(tableView: UITableView!, willDisplayCell cell: UITableViewCell!,
    forRowAtIndexPath indexPath: NSIndexPath!) {
  TipInCellAnimator.animate(cell)
}
This algorithm is defined in the UITableViewDelegate protocol and is called before the cell appears on the screen. Then the TipInCellAnimator class algorithm is called for each cell in order to start the animation.
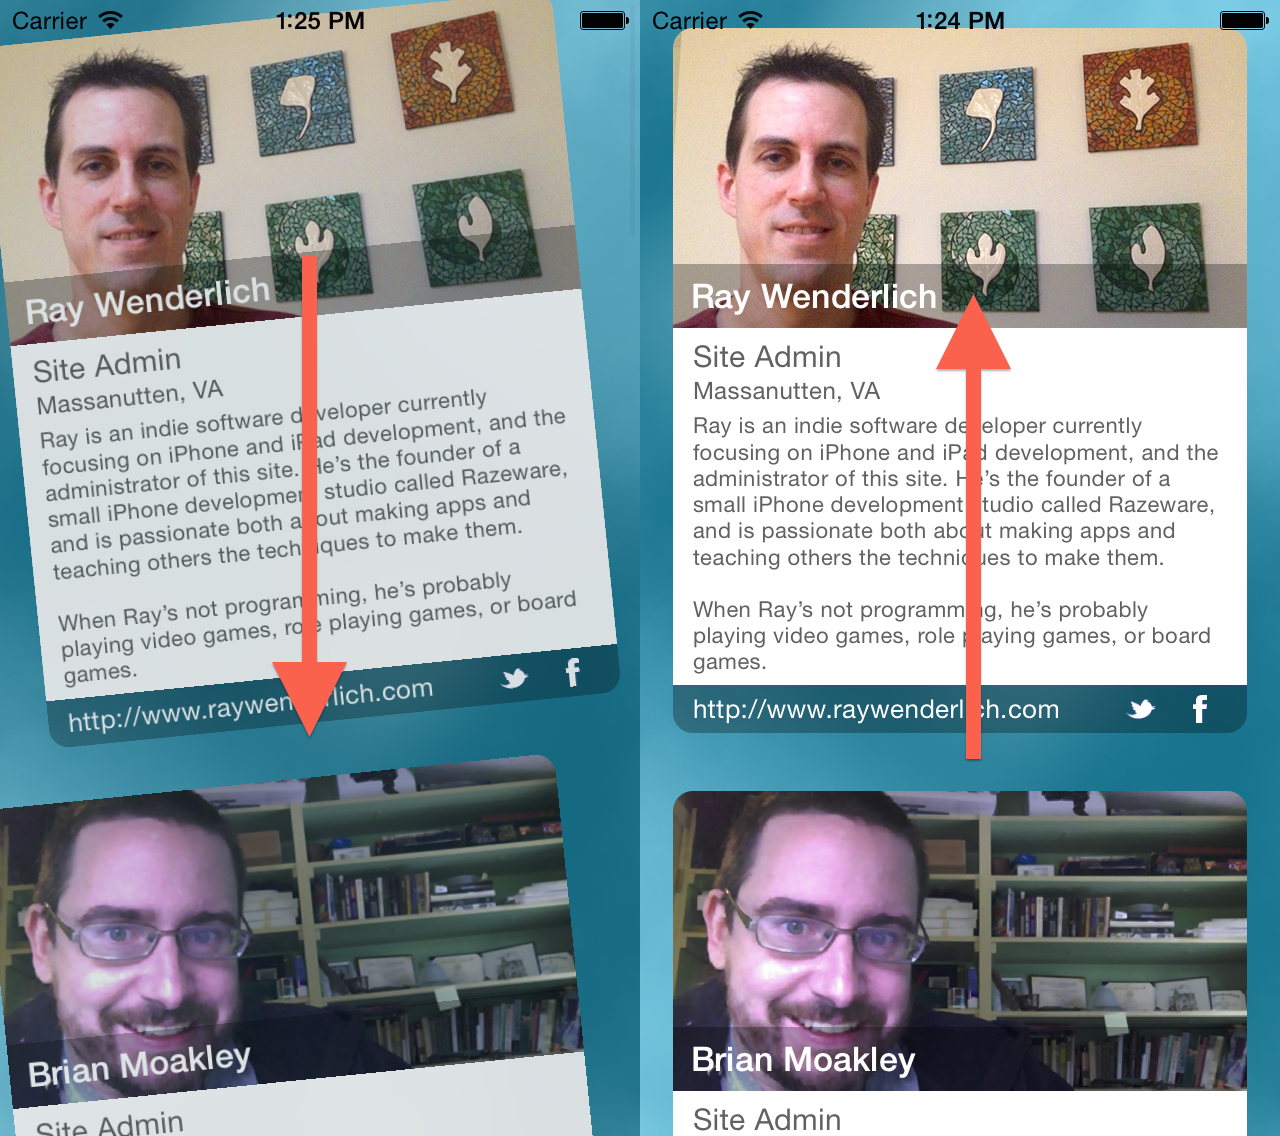
Compile and run the application. Scroll through the table of information and see how the cell slowly disappears:
The rotation effect
Let's make our application even more attractive, add rotation. This works the same as pop-up animations, but you specify both the start and end of the transformations.
Open the TipInCellAnimator.swift file and replace the contents with the following:
import UIKit
import QuartzCore // 1
class TipInCellAnimator {
  class func animate(cell:UITableViewCell) {
    if let view = cell.contentView {
      let rotationDegrees: CGFloat = -15.0
      let rotationRadians: CGFloat = rotationDegrees * (CGFloat(M_PI)/180.0)
      let offset = CGPointMake(-20, -20)
      var startTransform = CATransform3DIdentity // 2
      startTransform = CATransform3DRotate(CATransform3DIdentity,
        rotationRadians, 0.0, 0.0, 1.0) // 3
      startTransform = CATransform3DTranslate(startTransform, offset.x, offset.y, 0.0) // 4
      // 5
      view.layer.transform = startTransform
      view.layer.opacity = 0.8
      // 6
      UIView.animateWithDuration(0.4) {
        view.layer.transform = CATransform3DIdentity
        view.layer.opacity = 1
      }
    }
  }
}
This time the movement will be faster (0.4 seconds), the floating will be more convenient and you will get an interesting rotation effect. The key to the above animation is determined by the startTransform matrix, which brings the cell back to its original position. Let's see how this happens:
1. This class requires that QuartzCore be imported, because it uses key animation transformations.
2. Start by recognizing the transformation, which is the arithmetic expression for a “dummy operation”. This is the default image conversion.
3. Go to CATransform3DRotate to get 15 degrees rotation, where a negative sign indicates counterclockwise rotation. The movement is carried out around the axes 0.0, 0.0, 1.0 and represents the vertical axis z, where x = 0, y = 0 and z = 1.
4. The use of rotation alone is insufficient, as the table / graph rotates relative to its center. In order to make the effect of a flip from an angle, add a shift or offset, where negative values indicate a move up and to the left.
5. Set the conversion result to its original view.
6. Move the image and return the original values.
Please note that you can create the final transformation, as shown in the figure below:
Note:an arbitrary chain of transformations can ultimately be represented by a single matrix. If you studied matrix algebra at school, then remember the action of multiplication of matrices. Each step multiplies a new change until you reach the final matrix.
You will also notice that the “childish” appearance of the cell is changing, so to speak, and not the cell itself. Rotation of the whole cell will cause the part above and below to be inaccessible for viewing, and we will get strange visual effects, such as vibrations and cropping of the cell. ContentView cells contain all the constituent parts.
Not all properties support animation. The Core Animation Programming Guide provides a list of list of animatable properties) for clarification.
Compile and run the applications. See how data cells tilt:
Refactoring in Swift
The genuine version of Objective-C provides a one-time determination of the start of a conversion. In the aforementioned version of the source code, it is computed animate () every time in a new way. How to do it in Swift?
One way is to use immutable storage, which is determined by the transition to the expression. Replace the contents of the TipInCellAnimator.swift file with:
import UIKit
import QuartzCore
let TipInCellAnimatorStartTransform:CATransform3D = {
  let rotationDegrees: CGFloat = -15.0
  let rotationRadians: CGFloat = rotationDegrees * (CGFloat(M_PI)/180.0)
  let offset = CGPointMake(-20, -20)
  var startTransform = CATransform3DIdentity
  startTransform = CATransform3DRotate(CATransform3DIdentity,
    rotationRadians, 0.0, 0.0, 1.0)
  startTransform = CATransform3DTranslate(startTransform, offset.x, offset.y, 0.0)
  return startTransform
}()
class TipInCellAnimator {
  class func animate(cell:UITableViewCell) {
    if let view = cell.contentView {
      view.layer.transform = TipInCellAnimatorStartTransform
      view.layer.opacity = 0.8
      UIView.animateWithDuration(0.4) {
        view.layer.transform = CATransform3DIdentity
        view.layer.opacity = 1
      }
    }
  }
}
Pay attention to the program code that generates startTransform; it is now as a property of the TipIn class CellAnimatorStartTransform. Instead of defining the properties of the creation method and changes for each request, set the default transform property by assigning it an expression and assigning a pair of empty brackets. Brackets allow you to immediately call an expression and assign a return value to a property. This initialization idiom is discussed in Apple's Swift's book in the initialization section. For more information, see “Setting the default value of an expression or function”.
Note: it would be nice to make the TipInCellAnimator property in the TipInCellAnimatorStartTransform class, but at the time of writing, class properties are not yet implemented in Swift.
Adding restrictions to transformations
Although the animation effect is pretty concise, use it carefully. If you have ever experienced discomfort while watching a presentation due to abuse of sound effects or animation effects, then you have an idea of what glut or abuse is. In your projects, try to ensure that the animation is present only when the cell first appears - when it scrolls from the bottom up. When scrolling back up, the cells should be without animation.
It is necessary to develop such a method in order to avoid repeated animation of the previously shown cells. To do this, you will see the Swift Dictionary (Dictionary), which provides a quick search by key.
Note:a set of instructions is an unordered collection of unique records that do not have duplicates, and an array is an ordered set that allows duplicates. The Swift Library (The Swift Standard Library) does not include a set of instructions, but can easily play the Dictionary of Bools.
The penalties for using the Dictionary are thus small, so the Swift development team may have removed them from the first release. A common drawback of a set of instructions or dictionary keys is that they do not guarantee consistency, however, the ordering of your cells is done by the data generator, so this is not a problem.
Open MainViewController.swift and add the following class property:
var didAnimateCell:[NSIndexPath: Bool] = [:]
Here we create an empty dictionary (dictionary) that recognizes NSIndexPath as a key and Bools as properties. Then replace the tableView method (tableView :, willDisplayCell :, forRowAtIndexPath :) with the following:
override func tableView(tableView: UITableView!, willDisplayCell cell: UITableViewCell!,
                        forRowAtIndexPath indexPath: NSIndexPath!) {
    if didAnimateCell[indexPath] == nil || didAnimateCell[indexPath]! == false {
        didAnimateCell[indexPath] = true
        TipInCellAnimator.animate(cell)
    }
}
Instead of animating a cell every time it appears when scrolling up or down a table, make sure that the indexPath of the cell is stored in the dictionary. If this is not the case, then the cell was shown for the first time, so you should start the animation and add indexPath to your instruction set. If it is already in the kit, you should not do anything.
Compile and run your project; swipe up and down the Tableview and you will see only those cells that were animated when they first appeared on the screen:
What should I do next?
In this tutorial, you have added animations to standard visualization control methods. Details of the animation implementation were not specified in the MainViewController class; on the contrary, they were transferred to the auxiliary class. Maintaining class responsibilities in an active state, in particular for display controllers, is one of the main challenges for the development of IOS. You can download the finished project
Now that you have learned the basics of adding animation to cells, try changing the values of your transformation to see what other effects you can create. Some ideas:
1. Faster or slower animation.
2. Greater tilt angle.
3. Different offsets: if you change the angle of rotation, then most likely you will need to change the offset so that the picture looks straight. What will the image look like if you completely omit the offset and use the value of the parameters (0, 0)?
4. Be creative and create original images.
5. For advanced users: can you get the effect of turning the table on the horizontal or vertical axis? Can you make it seem like a complete coup?
6. For advanced users: add an else clause to tableView (tableView :, willDisplayCell :, forRowAtIndexPath :) and get different animation effects when data cells are displayed a second time.
Crazy twists that you can apply to data cells.
Even having studied the simple guide to creating animations from this article, you can create an infinite number of variations based on this information. Animation can be a great addition to user actions, for example, flipping a cell in a circle, fading out or appearing on presentation or deleting a cell.
ps The translation does not pretend to be the most correct and best translation on the Habré, if there is any comment, write in a personal, I will edit. Thank you for understanding.