IoT example: Making a bitcoin monitor from a screen from Nokia, a board from Netduino and a cloud
- Transfer
My intern and I were asked to speak to third-year students at Durban University of Technology in order to inspire them with the possibilities of using Netduino and / or Windows Phone in their projects.
We wanted to show not just a flashing LED, but something that would be relevant to real-life live scenarios. And we decided to demonstrate this:

Sorry for the awful GIF. You can call it the Bitcoin price change tracker. The graph reflects the change, and the LED changes color to green when the price rises and to red when the price drops. (On the screen, you may find a typo - instead of USD, BTC should be displayed).

The first obvious step for us is to determine where the data will come from. One of the simple and easy-to-use APIs is provided by mtgox (note: due to various kinds of conflicting discussions around them, it might make sense to use something like Bitstamp). The problem is that, together with the price data we need, the source produces a lot of other data that will be too expensive to download and process on Netduino. The solution is to create an intermediate service between the device and the API, which cuts out unnecessary data. And to do it with Azure is REALLY easy.
Let's create a new website on the Azure portal: Specify any URL as desired and start creating the site, then going to Visual Studio. Create a new ASP.NET MVC web application:


We are going to download the latest price data from the mtgox API and send abbreviated price data. To do this, we need to deserialize the JSON data into .NET objects. Access the API and copy the JSON result. Then create a new .cs file in the Models folder called MtGoxTicker.cs . Remove the default class definition and use the command Edit> Paste Special> Paste JSON as classes to paste the copied text. A whole bunch of classes that displays the structure of the API will be created automatically. Rename the RootObject to MtGoxTicker.
In the Controllers folder, create a new WebAPI controller or use one of the existing ones. You can delete all methods except Get. All that is required of this method is to download the latest price data from the API and return the one BUY value that we need.
Change the return type of Get to double, then cast the method to the following form:
Simply put, when someone calls the Get method, he loads prices from the API, deserializes them, and returns only the data we need.
The last thing we need to do is make our API always return a response in JSON. Go to the last line of the Appication_Start method in Global.asax.cs and add the following code after the existing lines:
At this point, your website in Azure should have been created, so we can move on and host the site directly from Visual Studio. The easiest way to do this is to right-click on a project in Solution Explorer and select the Publsh command. Then click Import and go through the login and import process of the details of your Azure subscription (this process looks much nicer in Visual Studio 2013). Publishing your site can take a minute or two, after which you can go to it.
In order to test how your site should look, you can go to my http://bitcoinpusher.azurewebsites.net/api/Price (note: I can not guarantee that this link will work forever).
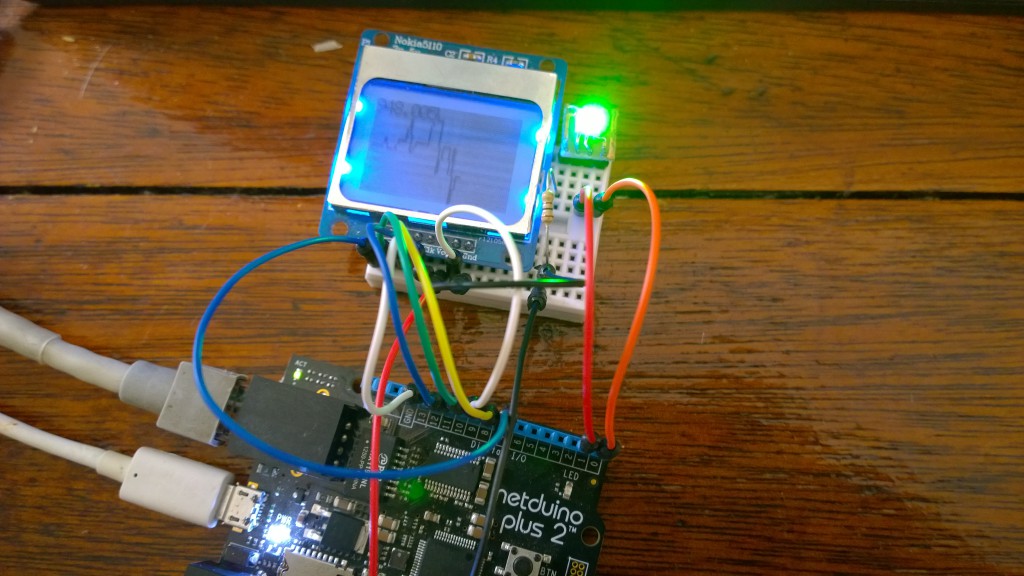
- Netduino Plus (or Plus 2)

- Nokia 5110 LCD ($ 4 on the DX portal)
- RGB LED - we used the SMD 5050, but any RGB LED will do.
Netduino will download the latest price data from a service in Azure, display it and draw a graph. This process will be repeated periodically in an endless cycle and will update the data as quickly as it can (it will depend on the speed of the Internet).
To write on the screen of the Nokia 5110 LCD, we will use a library developed by a member of the Netduino community, about which you can read here . Keep in mind that there is an error in the line drawing algorithm, so you may need to download the source codes (at the end of this article) in order to use my corrected version.
To simplify network calls, we can use the HTTP client from the .NET MF Toolbox .
Instead of describing the code line by line, I publish all the Program.cs code with comments. It is simple enough to understand:
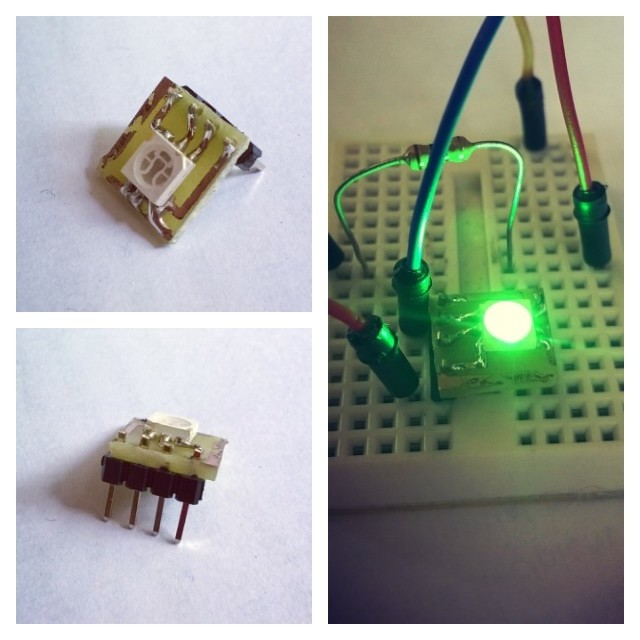
Below is the connection diagram: I left this circuit connected at night and it worked fine. Disconnection from the network and reverse connection are also processed normally.

The Windows Phone application does exactly the same thing as Netduino itself: it loads the price, displays it and then draws a chart.
The UI is just a TextBlock to display the price and a Grid that will contain the lines.

Below you will find the code. Please note that since the code is completely based on the code for Netduino, I did not comment on it in detail. Refer to the code for Netduino if you don’t understand something.
That's all. Let me know if you have questions or concerns in the comments (original article - approx. Transl.) Or on Twitter .
We wanted to show not just a flashing LED, but something that would be relevant to real-life live scenarios. And we decided to demonstrate this:
Sorry for the awful GIF. You can call it the Bitcoin price change tracker. The graph reflects the change, and the LED changes color to green when the price rises and to red when the price drops. (On the screen, you may find a typo - instead of USD, BTC should be displayed).

Azure
The first obvious step for us is to determine where the data will come from. One of the simple and easy-to-use APIs is provided by mtgox (note: due to various kinds of conflicting discussions around them, it might make sense to use something like Bitstamp). The problem is that, together with the price data we need, the source produces a lot of other data that will be too expensive to download and process on Netduino. The solution is to create an intermediate service between the device and the API, which cuts out unnecessary data. And to do it with Azure is REALLY easy.
Let's create a new website on the Azure portal: Specify any URL as desired and start creating the site, then going to Visual Studio. Create a new ASP.NET MVC web application:


We are going to download the latest price data from the mtgox API and send abbreviated price data. To do this, we need to deserialize the JSON data into .NET objects. Access the API and copy the JSON result. Then create a new .cs file in the Models folder called MtGoxTicker.cs . Remove the default class definition and use the command Edit> Paste Special> Paste JSON as classes to paste the copied text. A whole bunch of classes that displays the structure of the API will be created automatically. Rename the RootObject to MtGoxTicker.
Hidden text
   public class MtGoxTicker
    {
        public string result { get; set; }
        public Data data { get; set; }
    }
    public class Data
    {
        public High high { get; set; }
        public Low low { get; set; }
        public Avg avg { get; set; }
        public Vwap vwap { get; set; }
        public Vol vol { get; set; }
        public Last_Local last_local { get; set; }
        public Last_Orig last_orig { get; set; }
        public Last_All last_all { get; set; }
        public Last last { get; set; }
        public Buy buy { get; set; }
        public Sell sell { get; set; }
        public string item { get; set; }
        public string now { get; set; }
    }
    public class High
    {
        public string value { get; set; }
        public string value_int { get; set; }
        public string display { get; set; }
        public string display_short { get; set; }
        public string currency { get; set; }
    }
    public class Low
    {
        public string value { get; set; }
        public string value_int { get; set; }
        public string display { get; set; }
        public string display_short { get; set; }
        public string currency { get; set; }
    }
    public class Avg
    {
        public string value { get; set; }
        public string value_int { get; set; }
        public string display { get; set; }
        public string display_short { get; set; }
        public string currency { get; set; }
    }
    public class Vwap
    {
        public string value { get; set; }
        public string value_int { get; set; }
        public string display { get; set; }
        public string display_short { get; set; }
        public string currency { get; set; }
    }
    public class Vol
    {
        public string value { get; set; }
        public string value_int { get; set; }
        public string display { get; set; }
        public string display_short { get; set; }
        public string currency { get; set; }
    }
    public class Last_Local
    {
        public string value { get; set; }
        public string value_int { get; set; }
        public string display { get; set; }
        public string display_short { get; set; }
        public string currency { get; set; }
    }
    public class Last_Orig
    {
        public string value { get; set; }
        public string value_int { get; set; }
        public string display { get; set; }
        public string display_short { get; set; }
        public string currency { get; set; }
    }
    public class Last_All
    {
        public string value { get; set; }
        public string value_int { get; set; }
        public string display { get; set; }
        public string display_short { get; set; }
        public string currency { get; set; }
    }
    public class Last
    {
        public string value { get; set; }
        public string value_int { get; set; }
        public string display { get; set; }
        public string display_short { get; set; }
        public string currency { get; set; }
    }
    public class Buy
    {
        public string value { get; set; }
        public string value_int { get; set; }
        public string display { get; set; }
        public string display_short { get; set; }
        public string currency { get; set; }
    }
    public class Sell
    {
        public string value { get; set; }
        public string value_int { get; set; }
        public string display { get; set; }
        public string display_short { get; set; }
        public string currency { get; set; }
    }
In the Controllers folder, create a new WebAPI controller or use one of the existing ones. You can delete all methods except Get. All that is required of this method is to download the latest price data from the API and return the one BUY value that we need.
Change the return type of Get to double, then cast the method to the following form:
Hidden text
  public double Get()
        {
            try
            {
                var wc = new WebClient();
                var response = JsonConvert.DeserializeObject(wc.DownloadString("https://data.mtgox.com/api/2/BTCUSD/money/ticker"));
                if (response != null)
                {
                    return double.Parse(response.data.buy.value);
                }
            }
            catch (Exception)
            {
            }
            return -1;
        }
Simply put, when someone calls the Get method, he loads prices from the API, deserializes them, and returns only the data we need.
The last thing we need to do is make our API always return a response in JSON. Go to the last line of the Appication_Start method in Global.asax.cs and add the following code after the existing lines:
GlobalConfiguration.Configuration.Formatters.Clear();
GlobalConfiguration.Configuration.Formatters.Add(new JsonMediaTypeFormatter());
At this point, your website in Azure should have been created, so we can move on and host the site directly from Visual Studio. The easiest way to do this is to right-click on a project in Solution Explorer and select the Publsh command. Then click Import and go through the login and import process of the details of your Azure subscription (this process looks much nicer in Visual Studio 2013). Publishing your site can take a minute or two, after which you can go to it.
In order to test how your site should look, you can go to my http://bitcoinpusher.azurewebsites.net/api/Price (note: I can not guarantee that this link will work forever).
Hardware
- Netduino Plus (or Plus 2)
- Nokia 5110 LCD ($ 4 on the DX portal)
- RGB LED - we used the SMD 5050, but any RGB LED will do.
Netduino
Netduino will download the latest price data from a service in Azure, display it and draw a graph. This process will be repeated periodically in an endless cycle and will update the data as quickly as it can (it will depend on the speed of the Internet).
To write on the screen of the Nokia 5110 LCD, we will use a library developed by a member of the Netduino community, about which you can read here . Keep in mind that there is an error in the line drawing algorithm, so you may need to download the source codes (at the end of this article) in order to use my corrected version.
To simplify network calls, we can use the HTTP client from the .NET MF Toolbox .
Instead of describing the code line by line, I publish all the Program.cs code with comments. It is simple enough to understand:
Hidden text
    public class Program
    {
        //the red and green pins of the RGB LED
        private static OutputPort _redPin = new OutputPort(Pins.GPIO_PIN_D1, false);
        private static OutputPort _greenPin = new OutputPort(Pins.GPIO_PIN_D0, false);
        public static void Main()
        {
            //setup the LCD with appropriate pins.
            var lcd = new Nokia_5110(true, Pins.GPIO_PIN_D10, Pins.GPIO_PIN_D9, Pins.GPIO_PIN_D7, Pins.GPIO_PIN_D8)
            {
                BacklightBrightness = 100
            };
            //create these to store values
            var history = new Queue();
            double lastValue = 0;
            var nextUpdateTime = DateTime.MinValue;
            while (true)
            {
                try
                {
                    //download the price from our API
                    var WebSession = new HTTP_Client(new IntegratedSocket("bitcoinpusher.azurewebsites.net", 80));
                    var response = WebSession.Get("/api/price/");
                    if (response.ResponseCode == 200)
                    {
                        //convert the price to a double from a string
                        var result = double.Parse(response.ResponseBody);
                        //if the value went up, change the LED to green, if it went down change to red
                        if (result > lastValue)
                        {
                            _greenPin.Write(true);
                            _redPin.Write(false);
                        }
                        else if (result < lastValue)
                        {
                            _greenPin.Write(false);
                            _redPin.Write(true);
                        }
                        //store this value so we can compare it to the next one
                        lastValue = result;
                        //only add points to the graph every x seconds, else it will barely move
                        if (DateTime.Now > nextUpdateTime)
                        {
                            history.Enqueue(result);
                            //store a max of 80 data points as each point will take up 1 pixel, and the screen is
                            //only 80 wide
                            if (history.Count > 80)
                            {
                                history.Dequeue();
                            }
                            //store a value of what time we should add the next data point to the list
                            nextUpdateTime = DateTime.Now.AddSeconds(15);
                        }
                        var high = 0d;
                        var low = double.MaxValue;
                        //find the max and min value to determine our range (for the graph).
                        //The reason for this is so that the min value will be the very bottom of the graph, and
                        //the max value will be the very top of the graph regardless of what the values are
                        foreach (double item in history)
                        {
                            if (item < low)
                            {
                                low = item;
                            }
                            if (item > high)
                            {
                                high = item;
                            }
                        }
                        if (high == low)
                        {
                            //if all numbers are the same, artificially seperate high and low so that the
                            //graph will draw in the middle of the screen. Without doing this the
                            //point will be at the very top.
                            high--;
                            low++;
                        }
                        double diff = high - low;
                        lcd.Clear();
                        short x = 1;
                        short prevY = -1;
                        //this loop draws a line from the previous point to the current point, which makes the graph
                        foreach (double item in history)
                        {
                            //work out the y value based on the min/max range, and the available height.
                            //We have 39 pixels height to work with, and shift it by 9 at the end so it doesn't
                            //overlap the text at the top
                            var thisY = (short)((39 - (((item - low) / diff) * 39)) + 9);
                            if (prevY != -1) //don't draw from 0,0
                            {
                                //draw a line from the previous point to this point
                                lcd.DrawLine((short)(x - 1), prevY, x, thisY, true);
                            }
                            //remember this pos so we can draw a line from it in the next iteration
                            prevY = thisY;
                            x++;
                        }
                        //Refresh pushes all DrawLine/Rect/Point calls to the screen
                        //Note that this does not apply to writing text, which pushes instantly
                        lcd.Refresh();
                        //there is no Math.Round(double,int) so use ToString to get 4 decimals
                        lcd.WriteText("$ " + result.ToString("f4") + " / BTC");
                    }
                    else
                    {
                        FlickerLEDForFaliure();
                    }
                }
                catch (Exception)
                {
                    FlickerLEDForFaliure();
                }
            }
        }
        private static void FlickerLEDForFaliure()
        {
            //if the downlaod of the new value fails then flicker the LED. After flickering turn the LED off
            for (int i = 0; i < 30; i++)
            {
                _redPin.Write(true);
                Thread.Sleep(100);
                _greenPin.Write(true);
                Thread.Sleep(100);
                _redPin.Write(false);
                Thread.Sleep(100);
                _greenPin.Write(false);
            }
        }
    }
Below is the connection diagram: I left this circuit connected at night and it worked fine. Disconnection from the network and reverse connection are also processed normally.


Windows phone
The Windows Phone application does exactly the same thing as Netduino itself: it loads the price, displays it and then draws a chart.
The UI is just a TextBlock to display the price and a Grid that will contain the lines.

Hidden text
Below you will find the code. Please note that since the code is completely based on the code for Netduino, I did not comment on it in detail. Refer to the code for Netduino if you don’t understand something.
Hidden text
    public partial class MainPage : PhoneApplicationPage
    {
        private Queue _history = new Queue();
        private double _lastValue = 0;
        private DateTime _nextUpdateTime = DateTime.MinValue;
        public MainPage()
        {
            InitializeComponent();
            DownloadAndPlotPrice();
        }
        private async void DownloadAndPlotPrice()
        {
            try
            {
                var WebSession = new HttpClient();
                var response = await WebSession.GetAsync("http://bitcoinpusher.azurewebsites.net/api/price/");
                if (response.IsSuccessStatusCode)
                {
                    var result = double.Parse(await response.Content.ReadAsStringAsync());
                    //if the value went up, change the back to green, if it went down change to red
                    if (result > _lastValue)
                    {
                        LayoutRoot.Background = new SolidColorBrush(Colors.Green);
                    }
                    else if (result < _lastValue)
                    {
                        LayoutRoot.Background = new SolidColorBrush(Colors.Red);
                    }
                    _lastValue = result;
                    //only add points to the graph every x seconds, else it will barely move
                    if (DateTime.Now > _nextUpdateTime)
                    {
                        _history.Enqueue(result);
                        if (_history.Count > 400)
                        {
                            _history.Dequeue();
                        }
                        _nextUpdateTime = DateTime.Now.AddSeconds(4);
                    }
                    var high = 0d;
                    var low = double.MaxValue;
                    //find the max and min value to determine our range (for the graph)
                    foreach (double item in _history)
                    {
                        if (item < low)
                        {
                            low = item;
                        }
                        if (item > high)
                        {
                            high = item;
                        }
                    }
                    if (high == low)
                    {
                        //if all numbers are the same, artificially seperate high and low so that the
                        //graph will draw in the middle of the screen
                        high--;
                        low++;
                    }
                    double diff = high - low;
                    //remove all previous lines in preperation for redrawing them
                    ContentPanel.Children.Clear();
                    short x = 1;
                    short prevY = -1;
                    foreach (double item in _history)
                    {
                        //we now have 300 pixels of vertical space to play with
                        var thisY = (short)(300 - (((item - low) / diff) * 300));
                        if (prevY != -1) //don't draw from 0,0
                        {
                            //draw a line from the previous point to this point
                            //Line is a XAML control that we use to display lines
                            ContentPanel.Children.Add(new Line
                            {
                                X1 = (x - 1),
                                Y1 = prevY,
                                X2 = x,
                                Y2 = thisY,
                                StrokeThickness = 4,
                                Stroke = new SolidColorBrush(Colors.White)
                            });
                        }
                        prevY = thisY;
                        x++;
                    }
                   PriceTextBlock.Text = ("$ " + result.ToString("f5") + " / BTC");
                }
                else
                {
                    ShowFaliureFaliure();
                }
            }
            catch (Exception)
            {
                ShowFaliureFaliure();
            }
            DownloadAndPlotPrice();
        }
        private async void ShowFaliureFaliure()
        {
            //if the download of the new value fails then flicker the background.
            for (int i = 0; i < 30; i++)
            {
                LayoutRoot.Background = new SolidColorBrush(Colors.Orange);
                await Task.Delay(100);
                LayoutRoot.Background = new SolidColorBrush(Colors.Black);
                await Task.Delay(100);
            }
        }
    }
That's all. Let me know if you have questions or concerns in the comments (original article - approx. Transl.) Or on Twitter .
You can download the source files from here !
Sitelinks
Try Azure for free for 30 days!
Download Free or Trial Visual Studio
Take training courses at Microsoft Virtual Academy (MVA)
- Microsoft Application Development
- Cross-platform application development for Windows Phone and Windows 8
- Application development with common code for Windows 8 and Windows Phone platforms
- Complicated Application Development Tricks for Windows Phone 8
- Advanced Development Features for Windows Phone 8
- or Azure cloud development courses
- or many other free MVA courses !
Become a Windows Phone Application Developer
Only registered users can participate in the survey. Please come in.
Material like this ...
- 49.5% I am interested in articles about the Internet of things (IoT) 100
- 25.2% I'm interested in cloud development articles 51
- 59.9% I'm interested in device development articles 121
- 79.7% I'm interested in Do It Yourself articles 161