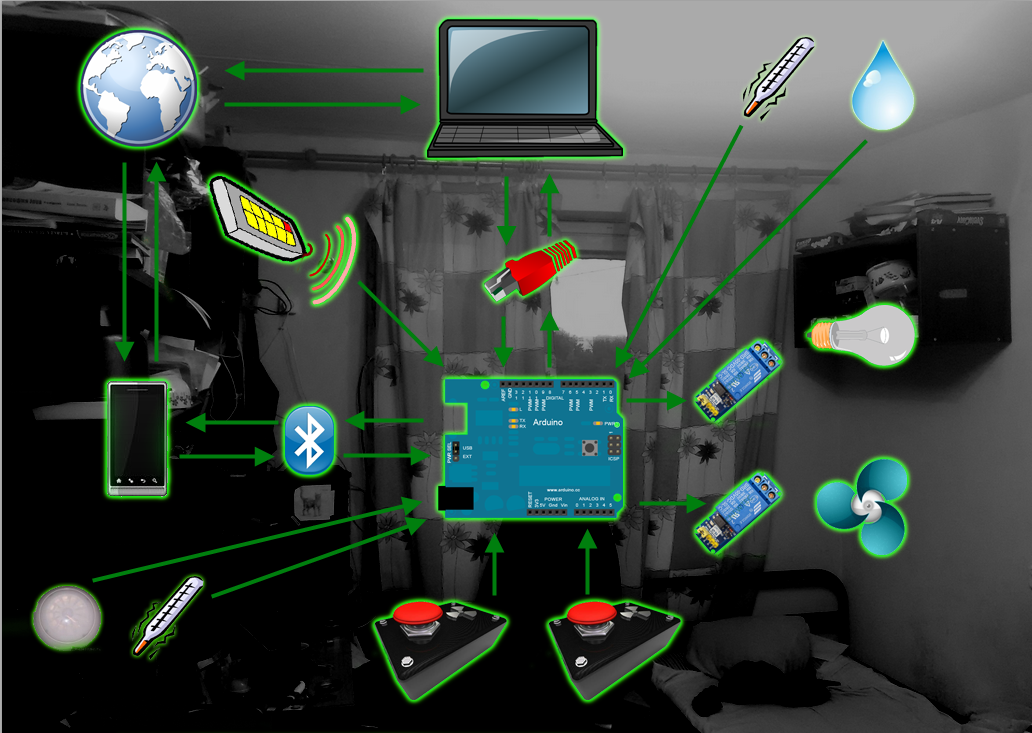
The basis for a smart room, or how Arduino lives in a hostel
Hello again, habrozhiteli! Every day reading Habr, I repeatedly came across articles about Arduino and DIY projects based on it. It is worth noting that I had no business with electronics, and all my experience was visiting a radio club based on the teenage club “Spark” (Petrozavodsk). Once I got together and decided to make an Arduino bracelet with sensors (temperature, pressure, pulse) for a smartphone (BT connection) But having made a mistake when ordering, I received only Arduino and a pressure sensor. To test the board, I went to the nearest radio components store for LEDs, and there I caught the eye with a magnetic door closure sensor. He gave me the idea that it would be possible to improve life in the room a little (not to be confused with the apartment). Without wasting time, I placed an order for Ali with a bunch of sensors and an Arduino Mega.
After ordering a gentleman's set of sensors (temperature, humidity, relays, StarterKit, BT, clock, range meter, IR sensor), I decided to look for how others represent the smart home. Most were limited to: controlling chandeliers and underfloor heating, although there were really cool articles . Some of the functions commonplace for apartments in the room were simply superfluous: for example, a gas leak or leak detector. I decided to compile the functionality necessary in a smart room myself:
- Light control
- Temperature control
- Manage many ways
- Door control
- Temperature monitoring
- Weather monitoring
It turned out that all the necessary sensors have already been ordered and can only wait. And now all the sensors have come!
First step
When you already blinked with LEDs and decided to build a smart home, it would be a logical step to blink light in the room, but the early heat made you take control of the temperature. For starters, I just tried connecting dht11 from StarterKita. What could be easier if the Internet is full of instructions? As it turned out, there are many libraries for connecting dht11 and not all of them are compatible with the latest versions of the IDE, but after a couple of hours I admired the temperature displayed in the console, and after a couple of minutes the LED blinking depending on it. (Disconnect the sensor, put it in the refrigerator, remove it from the refrigerator, connect ...) The
first problem was the low accuracy of the selected dht11: it lied by 2-3 degrees in both directions - I had to replace it (after that I try to order sensors in several versions )
Then I went to LeroyMerlin and purchased the simplest fan there . After a few minutes of fuss with wires and plug, the fan was assembled. Together with a neighbor, they removed the window and installed it (a fan, not a neighbor) in the vacant place. We stuck the plug in the socket and ... The fan began to spin. Slow. So slow.
Needless to say, we installed the plug incorrectly, and the fan rotated from the wind?
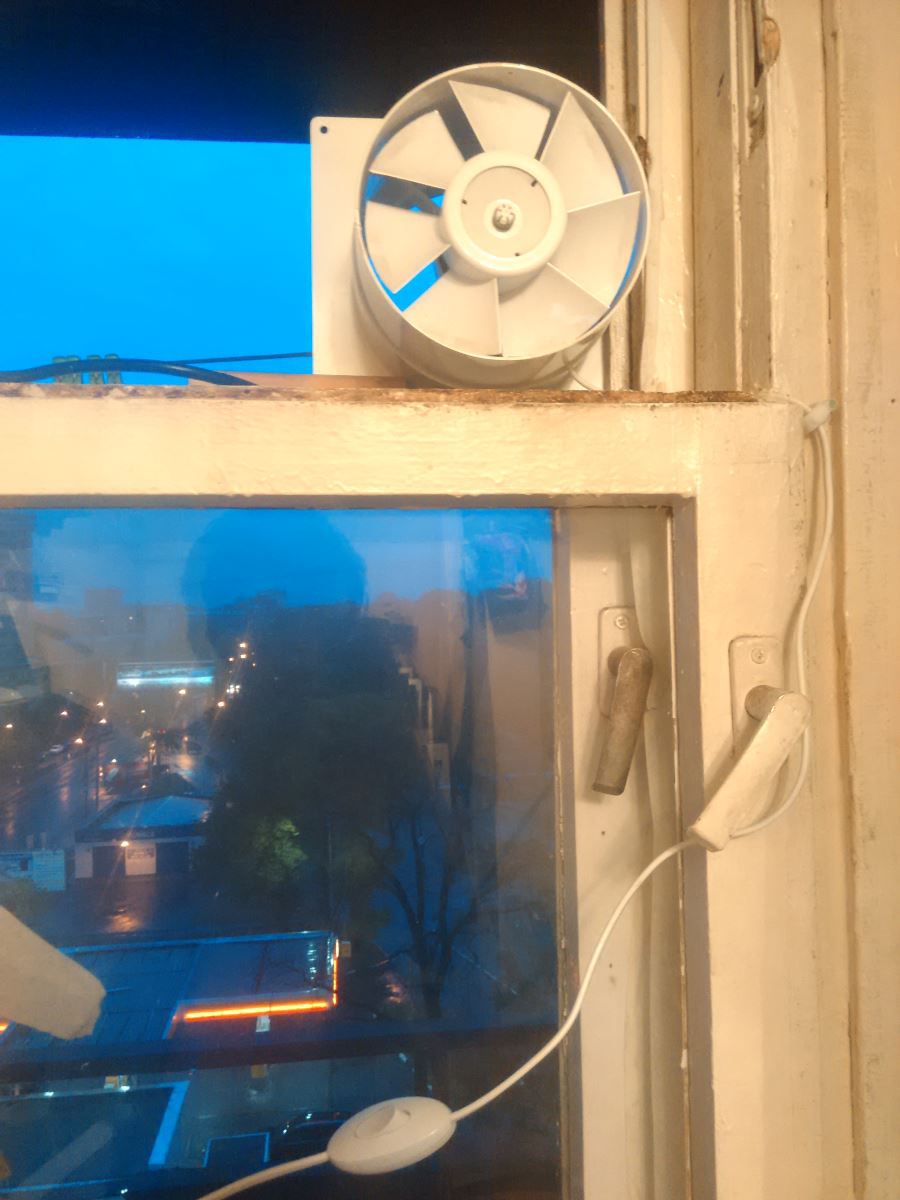
Of course, manual power off is available. But what is the best way to control a fan through a relay? Connect directly to the fan? I decided to connect the fan to the relay through the outlet: this gives flexibility to the system (you can replace the fan with something else).
Ventilation testing
And here the code is rewritten from the LED to the relay. The firmware is loaded, I monitor the temperature in anticipation of the necessary start - and here it is that moment! The relay clicks, and the COM port disappears. Apparently, at the time of switching, the load on USB increases and data is interfering. At first I thought that this was due to interference from 220V wires, but they are at a sufficient distance from the board. As a result, this caused me a lot of problems: when I try to upload a new sketch, Arduino goes into reboot, switches the relay and thereby takes out the COM port, and, therefore, the update process. I could not overcome this problem.
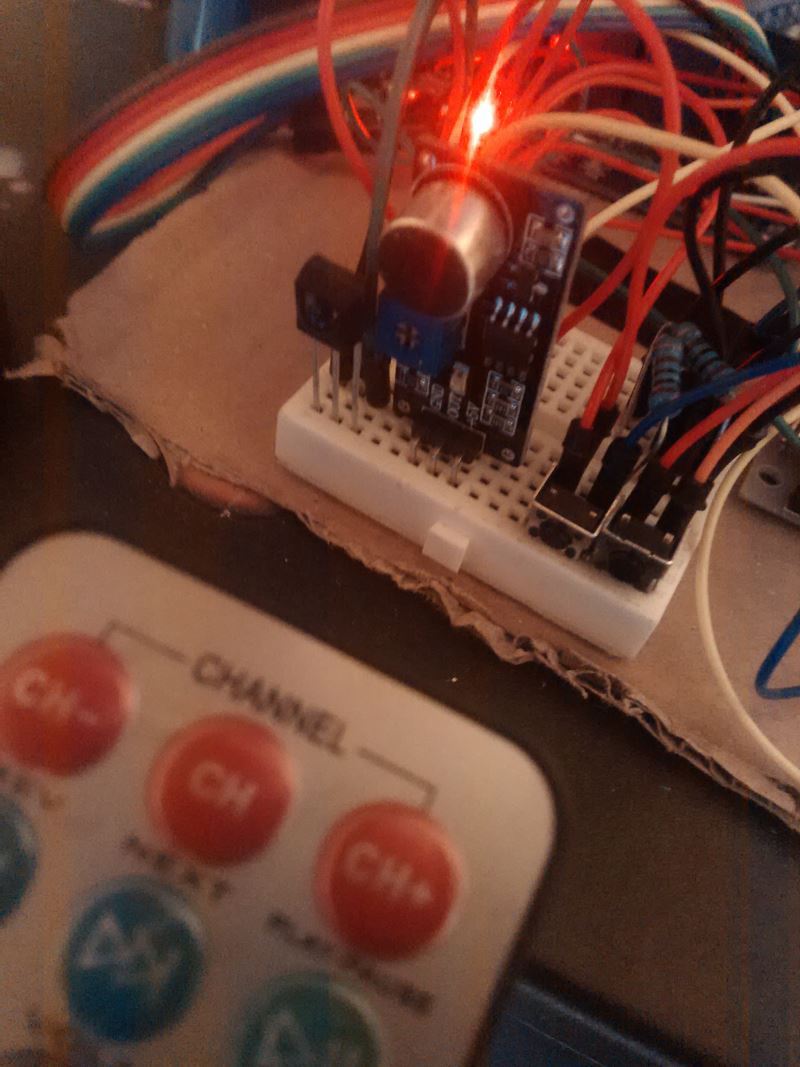
Remote control
Of course, the constant operation of the fan soon got bored, and turning it off through the switch was not cool! So I took out the Starter Kit and the remote control from there. Actually, from this moment the problems started: I had no idea what the receiver looked like. But a few minutes of googling helped me find it, and after another hour I had fun controlling the fan from the remote control.
At first it was a complex algorithm with several flags, but in the end I came to a small
timer algorithm
Если (пришёл сигнал){
время_ручного_управления = 1800;
режим_вентилятора =! режим_вентилятора;
}
Если (время_ручного_управления != 0){
время_ручного_управления--;
}иначе{
Если(температура < 26){
режим_вентилятора = false;
}иначе{
режим_вентилятора = true;
}
}
время_ручного_управления = 1800;
режим_вентилятора =! режим_вентилятора;
}
Если (время_ручного_управления != 0){
время_ручного_управления--;
}иначе{
Если(температура < 26){
режим_вентилятора = false;
}иначе{
режим_вентилятора = true;
}
}
But here it was not without problems: updating the wires, I applied 5V to DATA and very quickly lost the receiver. This pushed me to the next step ...
Management via BT module
Soon, I connected the HC-06 BT module, redirected the output there and added a command read. Thought it would be much harder, but thanks to the robocraft article.
Happened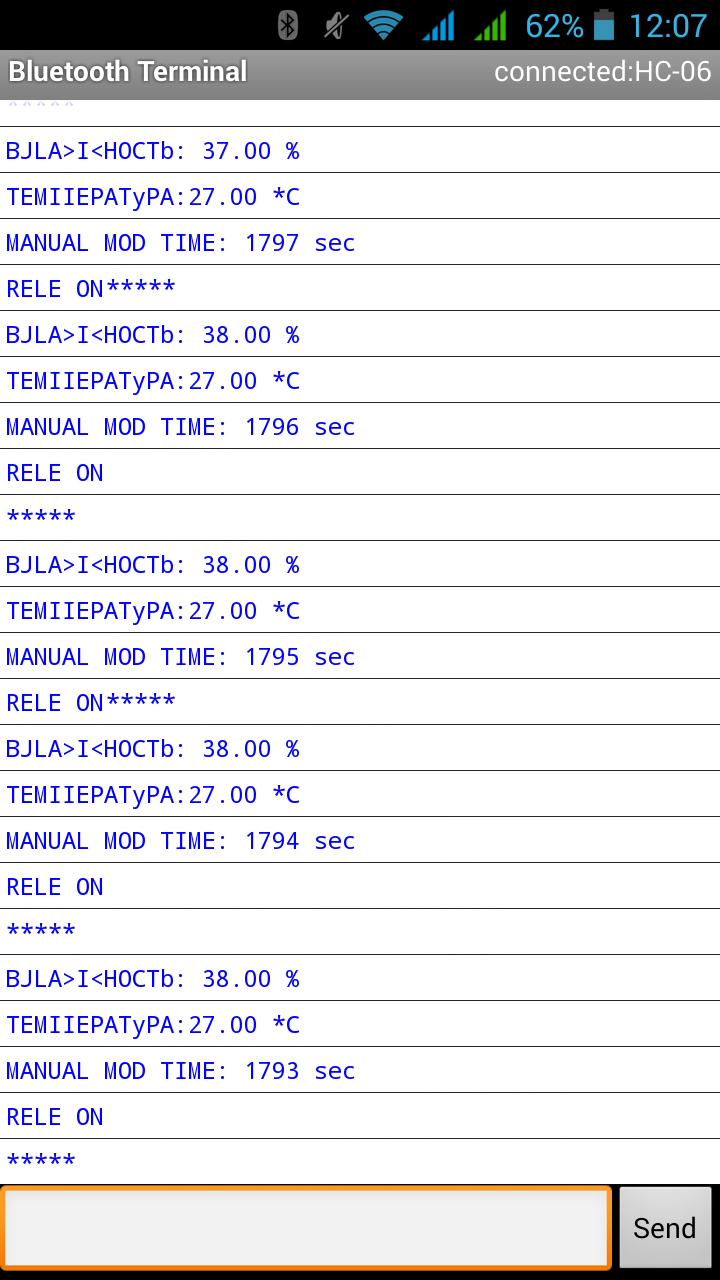
Neighbor and fan
I thought that by teaching a neighbor how to control the system from a smartphone, I will solve the problem “Hey, I’m cold,” but ... If I could turn off the fan power through the switch, but closing the window left me crazy. Why? The fan blew into the glass at a distance of several centimeters and droned terribly. Fortunately, I was littered with magnetic sensors, which prompted me to create a system. A closed sensor signals to the Arduino that the fan cannot be turned on. Alas, sometimes there was interference, so I had to make a simple check: if the close signal comes several times in a row - the window is really closed.

Light control
Now it was possible to take control of the light. After the fan, there’s nothing complicated: a box, a pair of terminal blocks - and the light is already controlled through Arduino (of course, with the ability to turn off through the old switch). The only thing that worries is that relays are not the best way to control light bulbs .
Sound problems
Well, what is the control of light without banging? I ordered a microphone. So I thought ... Remember inexperience? In fact, I ordered a sound detector with a manual threshold setting. It seems to be suitable for my purpose? But a couple of “buts” appeared:
- Short range: pops are processed only from a dozen centimeters
- Short signal delivery time: with a long code execution time, the signal from the sensor simply did not have time to fix Arduino
Console Return
A little googling, going to the store - and instead of the burned-out VS1838B, I purchased a more reliable TSOP1836. This time the installation was successful and everything worked right away.
Exit to the street
I figured out the window, but what's behind it? Armed with a soldering iron, I soldered a rain sensor and another dht11 to a five-meter VGA cable. A few U-shaped fasteners, black electrical tape, moss and the system goes on alert.
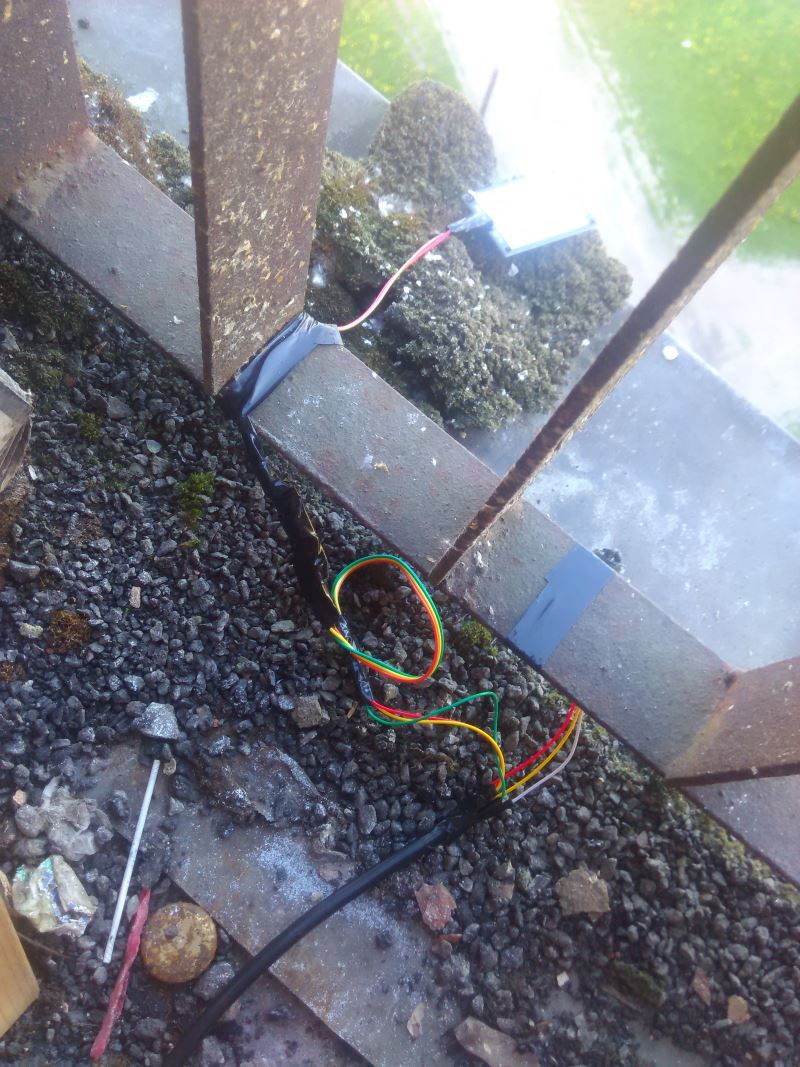
And I also learned that you can display the Russian text.
Has become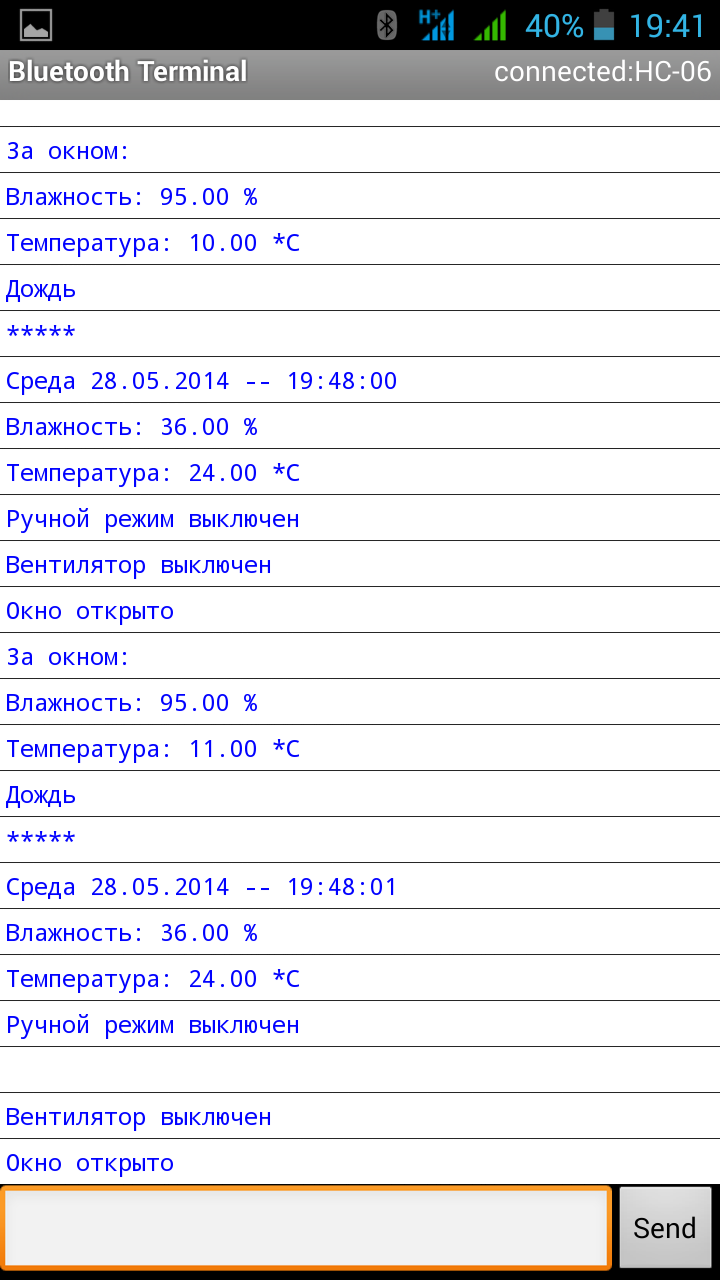
Little convenience
It seems that the smartphone is always at hand, but until you find it, connect it ... Sometimes it’s faster to turn off the light or the fan through the switch, but this makes it impossible to control via Arduino (pulse relays are too expensive), so I added two ordinary buttons.
A bit of security
Where without a fire alarm in the dormitory techies? Inexperience, I purchased a fire detector, not smoke. Determining a burning match at a distance of up to 30 cm is, of course, cool, but not enough. Therefore, so far I have managed without it.
Speaking of the fire alarm in the hostel ...
- Динамик, из которого иногда раздаётся сирена или хрип мертвеца
- Локальный датчик дыма
- Сетевой датчик дыма (подключён к пульту охраны)
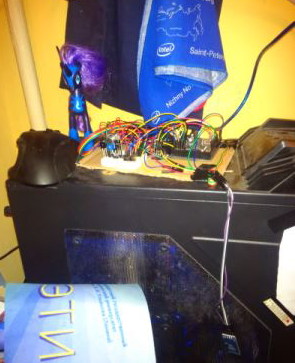
General form
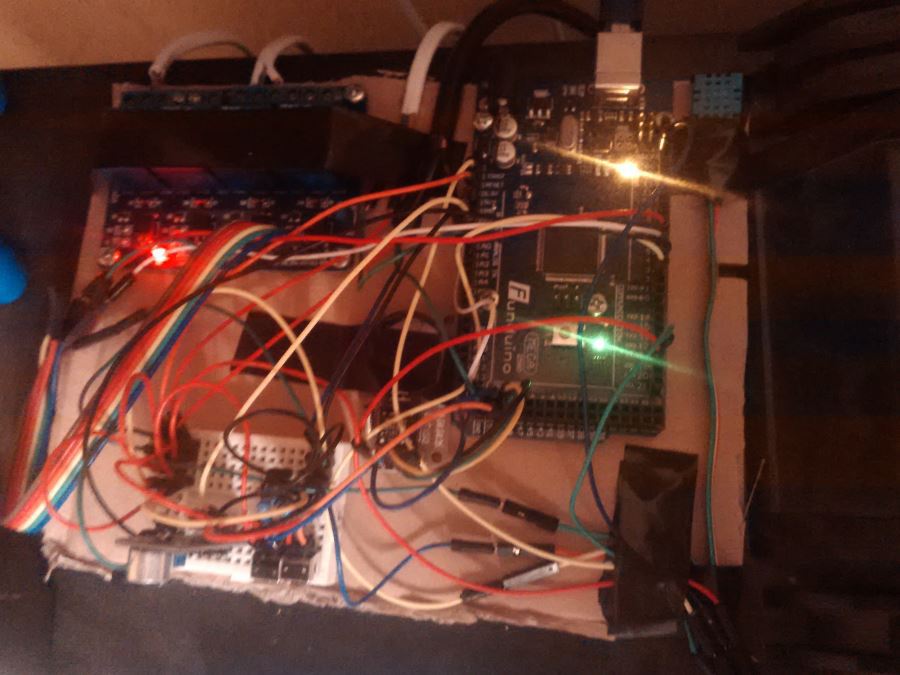
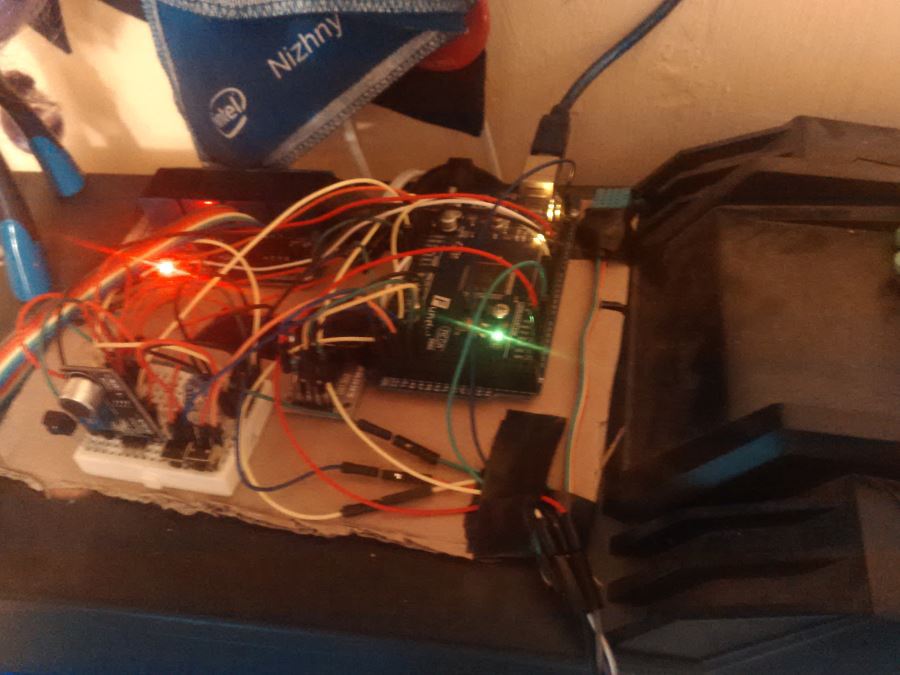
The placement on the computer case has a huge drawback: the ability to cause a short circuit. Therefore, soon the board will move to a personal shelf, and instead of cardboard there will be a makeshift case from a case for HDD.
Sketch code
Current state
#include <IRremote.h>
#include <IRremoteInt.h>
#include <DS1302.h>
#include <DHT.h>
#define DHT_PIN 2 //пин градусника…
#define DHT2_PIN 52 //пин уличного градусника…
#define RAIN_PIN 53 //пин датчика дождя
#define RECV_PIN 3 //пин подключения IR приёмника
#define FAN_PIN 4 //пин подключения реле
#define LAMP_PIN 5 //пин подключения реле
#define SOUND_PIN A0 //пин подключения микрофона
#define WINDOW_PIN A1 //пин окна
#define LAMP_BUT_PIN 50 //пин подключения микрофона
#define FAN_BUT_PIN 51 //пин окна
#define DHTTYPE DHT11
#define TIMER_FAN 0
#define TIMER_WINDOW 1
IRrecv irrecv(RECV_PIN);
decode_results results;
int timers[2];
bool FAN_FLAG = false;
bool LAMP_FLAG = true;
int WINDOW_VAL = 0;
bool WINDOW_OPEN = false;
bool WINDOW_FLAG = false;
bool RAIN_FLAG = false;
char incomingByte;
DHT dht(DHT_PIN, DHTTYPE);
DHT dht2(DHT2_PIN, DHTTYPE);
DS1302 rtc(49, 46, 48);
void setup() {
Serial1.begin(9600);
rtc.halt(false);
rtc.writeProtect(false);
//rtc.setDOW(SUNDAY); // Set Day-of-Week to FRIDAY
//rtc.setTime(0, 37, 40); // Set the time to 0:37:00 (24hr format)
//rtc.setDate(25, 5, 2014); // Set the date to 25 мая
timers[TIMER_FAN] = 0;
timers[TIMER_WINDOW] = 0;
pinMode(RAIN_PIN, INPUT);
pinMode(LAMP_BUT_PIN, INPUT);
pinMode(FAN_BUT_PIN, INPUT);
pinMode(FAN_PIN,OUTPUT);
pinMode(LAMP_PIN,OUTPUT);
digitalWrite(FAN_PIN,LOW);
irrecv.enableIRIn(); // Включаем ресивер
dht.begin();
dht2.begin();
}
int volume;
void loop() {
WINDOW_VAL = analogRead(WINDOW_PIN); //магнитный датчик
if(WINDOW_VAL > 950){
if(WINDOW_FLAG){
timers[TIMER_WINDOW]++;
if(timers[TIMER_WINDOW]>10){
WINDOW_OPEN = false;
}
}else{
WINDOW_FLAG=true;
}
}else{
WINDOW_OPEN = true;
WINDOW_FLAG = false;
timers[TIMER_WINDOW]=0;
}
if(digitalRead(RAIN_PIN)==HIGH){
RAIN_FLAG=true;
}else{
RAIN_FLAG=false;
}
volume = analogRead(SOUND_PIN);
if(volume<40){
LAMP_FLAG = !LAMP_FLAG;
}
if(digitalRead(LAMP_BUT_PIN)==HIGH){
input_signal(1);
}
if(digitalRead(FAN_BUT_PIN)==HIGH){
input_signal(0);
}
if (irrecv.decode(&results))
{
if (results.value == 16750695) //Код кнопки
{
input_signal(0);
}
if (results.value == 16756815) //Код кнопки
{
input_signal(1);
}
irrecv.resume(); // Получаем следующее значение
}
//Serial.println(rtc.getTime().hour);
//Serial.println(rtc.getTime().min);
Serial1.print(rtc.getDOWStr());
Serial1.print(" ");
Serial1.print(rtc.getDateStr());
Serial1.print(" — ");
Serial1.println(rtc.getTimeStr());
if (Serial1.available() > 0) {
incomingByte = Serial1.read();
if(incomingByte == '0') {
Serial1.println(«Ручной режим деактивирован»);
input_signal(0);
}else if(incomingByte == '1') {
Serial1.println(«Ручной режим активирован»);
input_signal(0);
}else if(incomingByte == '2') {
input_signal(1);
}
}
float h = dht.readHumidity();
float t = dht.readTemperature();
if (isnan(t) || isnan(h)) {
Serial1.println(«Ошибка чтения с внутреннего термометра»);
} else {
if(timers[TIMER_FAN]<=0){
if (t<26){
FAN_FLAG = false;
}else if (t>26){
FAN_FLAG = true;
}
}else{
timers[TIMER_FAN]--;
}
Serial1.print(«Влажность: „);
Serial1.print(h);
Serial1.println(“ %\t»);
Serial1.print(«Температура: „);
Serial1.print(t);
Serial1.println(“ *C»);
}
if(timers[TIMER_FAN]>0){
Serial1.print(«Ручному режиму осталось работать: „);
Serial1.print(timers[TIMER_FAN]);
Serial1.println(“ сек.»);
}else{
Serial1.println(«Ручной режим выключен»);
}
if (FAN_FLAG && WINDOW_OPEN){
digitalWrite(FAN_PIN,HIGH);
Serial1.println(«Вентилятор включён»);
}else{
digitalWrite(FAN_PIN,LOW);
Serial1.println(«Вентилятор выключен»);
}
if(WINDOW_OPEN){
Serial1.println(«Окно открыто»);
}else{
Serial1.println(«Окно закрыто»);
}
if(LAMP_FLAG){
digitalWrite(LAMP_PIN,HIGH);
}else{
digitalWrite(LAMP_PIN,LOW);
}
h = dht2.readHumidity();
t = dht2.readTemperature();
Serial1.println(«За окном:»);
if (isnan(t) || isnan(h)) {
Serial1.println(«Ошибка чтения с уличного термометра»);
} else {
Serial1.print(«Влажность: „);
Serial1.print(h);
Serial1.println(“ %\t»);
Serial1.print(«Температура: „);
Serial1.print(t);
Serial1.println(“ *C»);
}
if (RAIN_FLAG) {
Serial1.println(«Дождя нет»);
}else{
Serial1.println(«Дождь»);
}
Serial1.println("*****");
delay(100);
}
void input_signal(int signal){
switch(signal){
case 0:
if(rtc.getTime().hour> 1 && rtc.getTime().hour < 8){
timers[TIMER_FAN] = 1800;
}else{
timers[TIMER_FAN] = 18000;
}
FAN_FLAG = !FAN_FLAG;
Serial1.println(«Вентилятор переключён»);
break;
case 1:
LAMP_FLAG = !LAMP_FLAG;
Serial1.println(«Свет переключён»);
break;
}
}
What if the code fails
I use a normally closed relay. That is, by default, everything is on: you can disconnect the Arduino from the network and use simple switches.
Development plans
What I have listed is just the basis for a truly smart room. After all, all of her AI is turning the fan on and off, depending on the temperature. I plan the following to make the room more comfortable and "autonomous."
Alarm clock
After adding the clock to the system, the next alarm is next in line. As a signal, I assume: a pie picker, a blinking light, and a fan on. And of course, early awakening, if it rains outside (-10 to movement speed).
Add a system for saving alarms to an SD card using such a module (in case of power failure).
Application on a computer and smartphone + widgets
What is a smart home without control from a smartphone or computer?
I guess something like this:
Why not Wi-Fi? Too expensive.
Withdraw Arduino own food
I think the comments are superfluous: the danger of burning out USB and constant interference to other devices. In addition, I want to transfer power from the board to a special adapter.
Managing a router through a power outlet
Good old Asus RT56U loves to bask, especially in the summer. Therefore, I want to do an automatic shutdown for a couple of hours at night to allow it to cool.
Add Presence Monitoring
Now I have some good old pyroelectric infrared sensors and a couple of ultrasonic distance sensors. This may be enough for simple presence control.
Two people live in the room. Each has four states:
- At computer
- Is worth
- Lying on the bed
- Missing
Infrared sensors determine the presence in the room, and ultrasonic presence in the zones (bed / table) and monitor the number of people entering / leaving.
This will allow you to implement the simplest scenarios:
- I came in the evening and the neighbor is not sleeping: turn on the light
- All come out: turn off the light
- Everyone lay down and do not move: turn off the light
Add photosensitive resistor
Classics of the genre: automatic inclusion of light if someone in the room is in the zones “At the computer” and the room is dark.
Add electromechanical lock and closer
I don’t know about you, but I’m too lazy to look for keys all the time, so I really want to install an electromechanical lock, coupled with a proximity card reader or a fingerprint sensor . Entrance to the hostel is carried out using electronic passes - I know the frequency, and I can easily order a reader for Arduino, but the cards are very easy to clone (I myself have a device for this), so when the time comes, I will most likely focus on fingerprints fingers.
The neighbor often goes to the kitchen / toilet / bath and does not close the door. I am sitting in front of the entrance and I don’t like that everyone who passes by
Upgrade the window
As I already wrote, if the temperature is above a certain limit, the fan turns on. But what if there is no one in the room, and the temperature is already below 20? I would like to add a window opening / closing system. Perhaps it will be simple motors + fishing line.
It is known that if you cool the bulb and turn it on, it will most likely explode. Thus, it also saves nerves and bulbs.
a bulb that did not live up to the temperature control system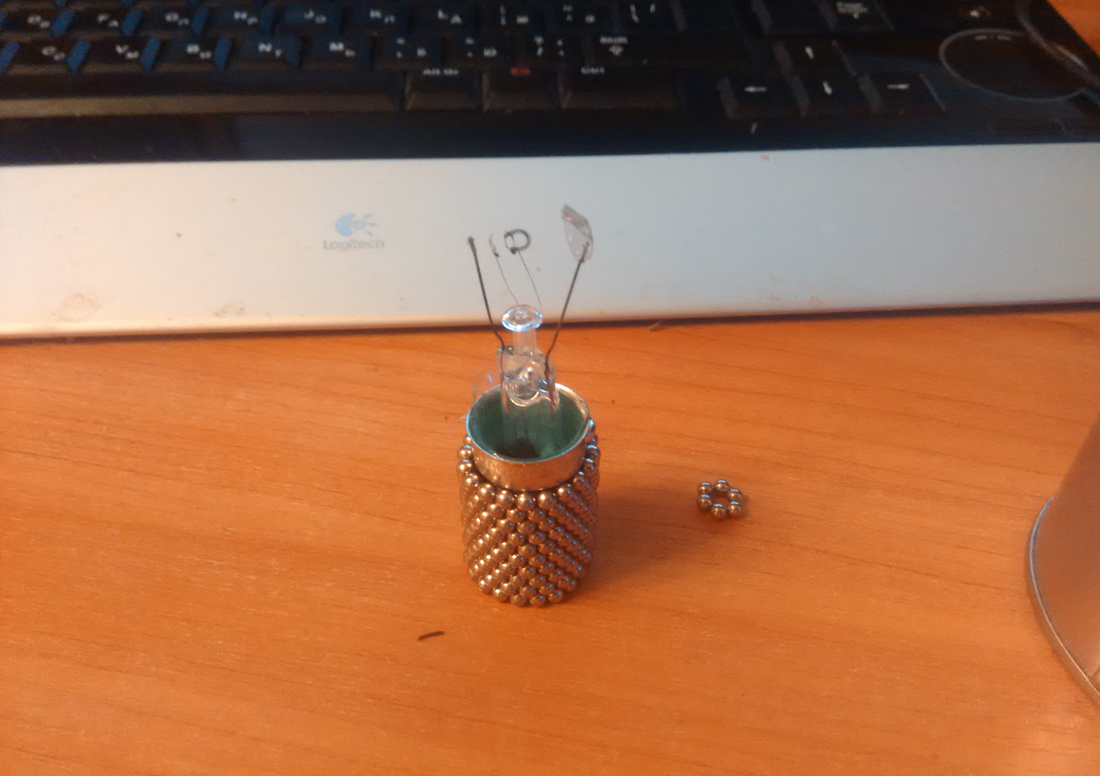
Replace DHT11
As I already wrote, I do not understand sensors, etc. So I bought the first temperature sensors I got: dht11. Now I want to replace them with dht22 for the room and dht21 for the street. Dht22 has a smaller margin of error, and dht21 has support for freezing temperatures and a protected case, which is important for the street. Street dht11 already sometimes began to get lost.
Add electric dimmer
I'd like to smoothly adjust the level of lighting in the room. If I didn’t have a smart room, I would buy and hang a simple dimmer, but now I want a dimmer that can exist within the current system. Unfortunately, I could not find a dimmer for 220V, adjustable 5V. All that I could come up with so far is a simple dimmer + a motor connected to it.
Voice control
I would like to add voice to the current management methods. Fortunately, systems like this exist . Of course, a voice reaction would also be in the subject, but these are simple speakers.
Links to purchased sensors
- Infrared sensors
- Ultrasonic sensors
- dht11
- Rain and snow sensor
- Fire sensor
- Special power module
- Clock module
- BT module HC-06
- Relay module
- Starter kit
Afterword
I think that it will be possible to write a new article at the end of some of the plans, but for now I just dream about an electromechanical lock and get ready for the session.
Have a great upcoming weekend: spend it profitably!