We are writing an Instagram widget for the site. Instructions for the curious. Complete solution for everyone else
 Recently, I needed to integrate a widget into an Instagram site. For users to see the latest published photos. Maybe they even signed up.
 It immediately became clear that Instagram has no official widget. Moreover, Instagram can be interacted exclusively through API requests. No JavaScript libraries, code generators or design for you. Everything needs to be done with your hands.
Immediately there were many third-party services of varying degrees of payment and free of charge. One thing united them - the client receives only the widget call code, everything else is pulled from the service. It didn’t suit me personally. Why is there no free openal standalone solution? Maybe I was looking badly? In general, I decided to pay my five cents.
Instructions for creating a widget and a ready-made solution under the cat.
A small note. Seven months have passed since this article was written. During this time, the widget was installed on about 80 resources, a repository on GitHub was created, a kind person gave me an invite, the widget changed the caching mechanism, got its own website, kind people based it made a plugin for Bitrix CMS, and I still could not find analogues in network.
1. Widget requirements:
To start, I’ll formulate what kind of widget I wanted to do.
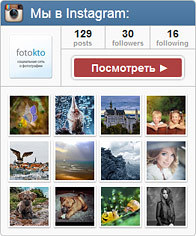
So the widget should have:
- Instagram icon;
- Headline
- Profile picture;
- Profile statistics;
- Button to go to the profile page;
- Clickable photos;
- Customizable number of photos (total number and how much to display per line);
- Rubber design and auto-scale photos depending on the desired width of the widget;
- Output photos by hash tag (added in the process);
- Insert a widget with one line in the HTML code.
Here's what happened in the end:
Demonstration of the work>
Example in pictures:

And so it is inserted into HTML:
If you are interested, then I invite you to get acquainted with the implementation details.
2. Registering a site on Instagram:
Instagram has API documentation. Here is a direct link:
http://instagram.com/developer/

First, we are interested in the "Manage Programs" section. In it, you need to register a new application (our site), on behalf of which the widget will work. So go to this section. Click the "Register a new program" button and fill out the form:
- Application Name - The name of our application. You can write the name of the site;
- Description - Description of the application;
- Website - the URL of our website;
- OAuth redirect_uri - URL to which the user will go after authorization. Because we just have a widget and we won’t authorize anyone, you can simply duplicate the address of our site.
Next, click the “Register” button.
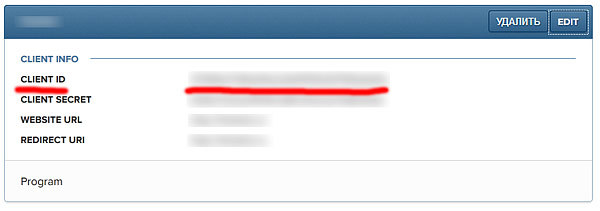
After registration, we get two keys. We are interested in CLIENT ID. We will work with him in the future.
3. Getting data through the API:
In order to receive data through the API, you need to use the so-called. "Endpoints" described in the documentation. This is just a list of URLs. Each address is responsible for issuing certain data. Data is given in JSON format. Since I wanted to broadcast photos and profile statistics, I immediately went to the "users" subsection. Authorization is unnecessary for this.

It turns out that in order to get any data about an account, you need to know the identifier of this account. Users only know their username, but not their ID. Where to get it?
The identifier can be seen in the HTML code of the profile page, or you can send a request to this URL:
https://api.instagram.com/v1/users/search?q=LOGIN&client_id=CLIENT_IDWhere LOGIN is the Instagram username you are looking for, and CLIENT_ID is the key that we received at the application registration stage. As a result, we get a JSON array, which along with the identifier will also contain the user's avatar URL.
Next, to get a list of new photos from our profile, you need to send a GET request to this URL:
https://api.instagram.com/v1/users/USER_ID/media/recent/?client_id=CLIENT_IDWhere USER_ID is the identifier that we received from the previous request. You can also add additional arguments to the request. You can find the list on the documentation page.
Well, the last request for obtaining profile statistics:
https://api.instagram.com/v1/users/USER_ID/?client_id=CLIENT_IDWith receiving data sorted out. Getting to the implementation.
4. Widget implementation
I'll start with the bad news. The Instagram API is clearly focused on full-fledged applications, rather than simple widgets for sites. Two problems come from here:
- Only 5,000 requests per hour from one CLIENT_ID or authorized user can be sent to the API ;
- It is undesirable for CLIENT_ID to be freely available, as anyone can make requests for data on behalf of your application.
Because to view the widget, it’s stupid to ask authorization from visitors, sending / receiving a request takes time, and our site has 700 thousand views per day (up to 80 000 request per hour in the evening), you need to implement a data caching mechanism.
As a result, I decided that the widget should be rendered by the server. Therefore, the release will be in PHP + HTML + CSS.
We will connect the widget through an iframe.
4.1 Caching:
The first version of the widget wrote the cache in the MySQL database, but then I changed my mind and moved the cache to a file.
As a result - higher speed, fewer gestures with settings, and not everyone has MySQL.
The cache is stored in JSON format. Relevance is checked by the date of the last file modification. If the cache is out of date, then a request is made to the API to obtain the latest data.
If an error occurs while sending the request, then it is written to the cache with plain text as plain text. If the cache has plain text, then it is displayed instead of the widget. Requests to the API will not be sent until the cache expires again. Thus, the widget will not load the server with regular requests to the API if something goes wrong. And you can understand why the widget stopped working.
4.2 Source code:
We send cURL requests, write data to the cache, draw a widget using HTML + CSS, write detailed instructions and do perfectionism for a few more sleepless nights. The result is this:
Repository on GitHub>
The most interesting thing happens in the
config.php inwidget.php file - it is responsible for the settings, and template.php for the layout.
And, of course, everything is free. All for the people.
4.3 How to connect a widget to a site ?:
Step by Step Instructions:
- Register your site on Instagram (discussed at the beginning of the article).
- Download the widget source code.
- Upload the folder with the widget to the server.
- Set write permissions for the / inwidget / cache folder.
- Configure widget settings (config.php file).
- Insert the widget into the site using the following code:
Insert examples with different widget displays
You can customize the insertion parameters to your taste, which are transmitted as GET parameters when accessing the script:
- width - widget width (default 260px).
- inline - the number of photos per line (4 by default).
- view - how many photos to display in the widget (by default 12 pcs., max. 30 pcs., can be fixed in confing.php).
- toolbar - display a toolbar with an avatar and statistics (true / false values, defaults to true).
- preview - image size and quality (small - small up to 150px, large - large up to 306px, fullsize - full size up to 640px, small by default).
- lang - widget language (ru / en values, default settings are taken from config.php). The priority of this parameter is higher than for settings in config.php.
When changing the width or number of photos, be sure to resize the iframe.
That, in fact, is all.
Widget site: http://inwidget.ru
Repository on GitHub: https://github.com/aik27/inwidget
P.S .: I will be glad to reviews, comments and feedback.
Easter egg!
This is my cat. Each line of the widget is written under its vigilant control. Several times, the kote made adjustments to the process by running on the keyboard. Spend more time with your pets! Catch funny moments with them. Take pictures more!