Valentine's Day Gift for 4 Nights and 1 Day
- From the sandbox
- Tutorial
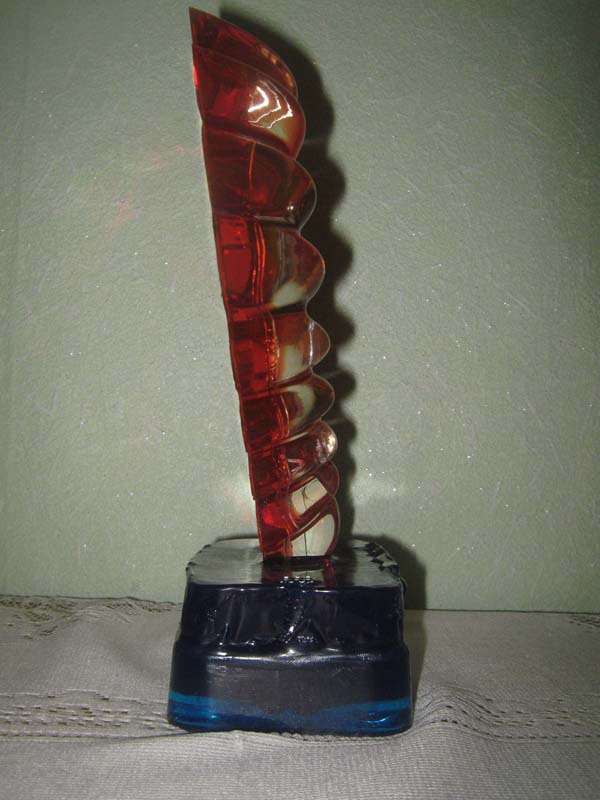
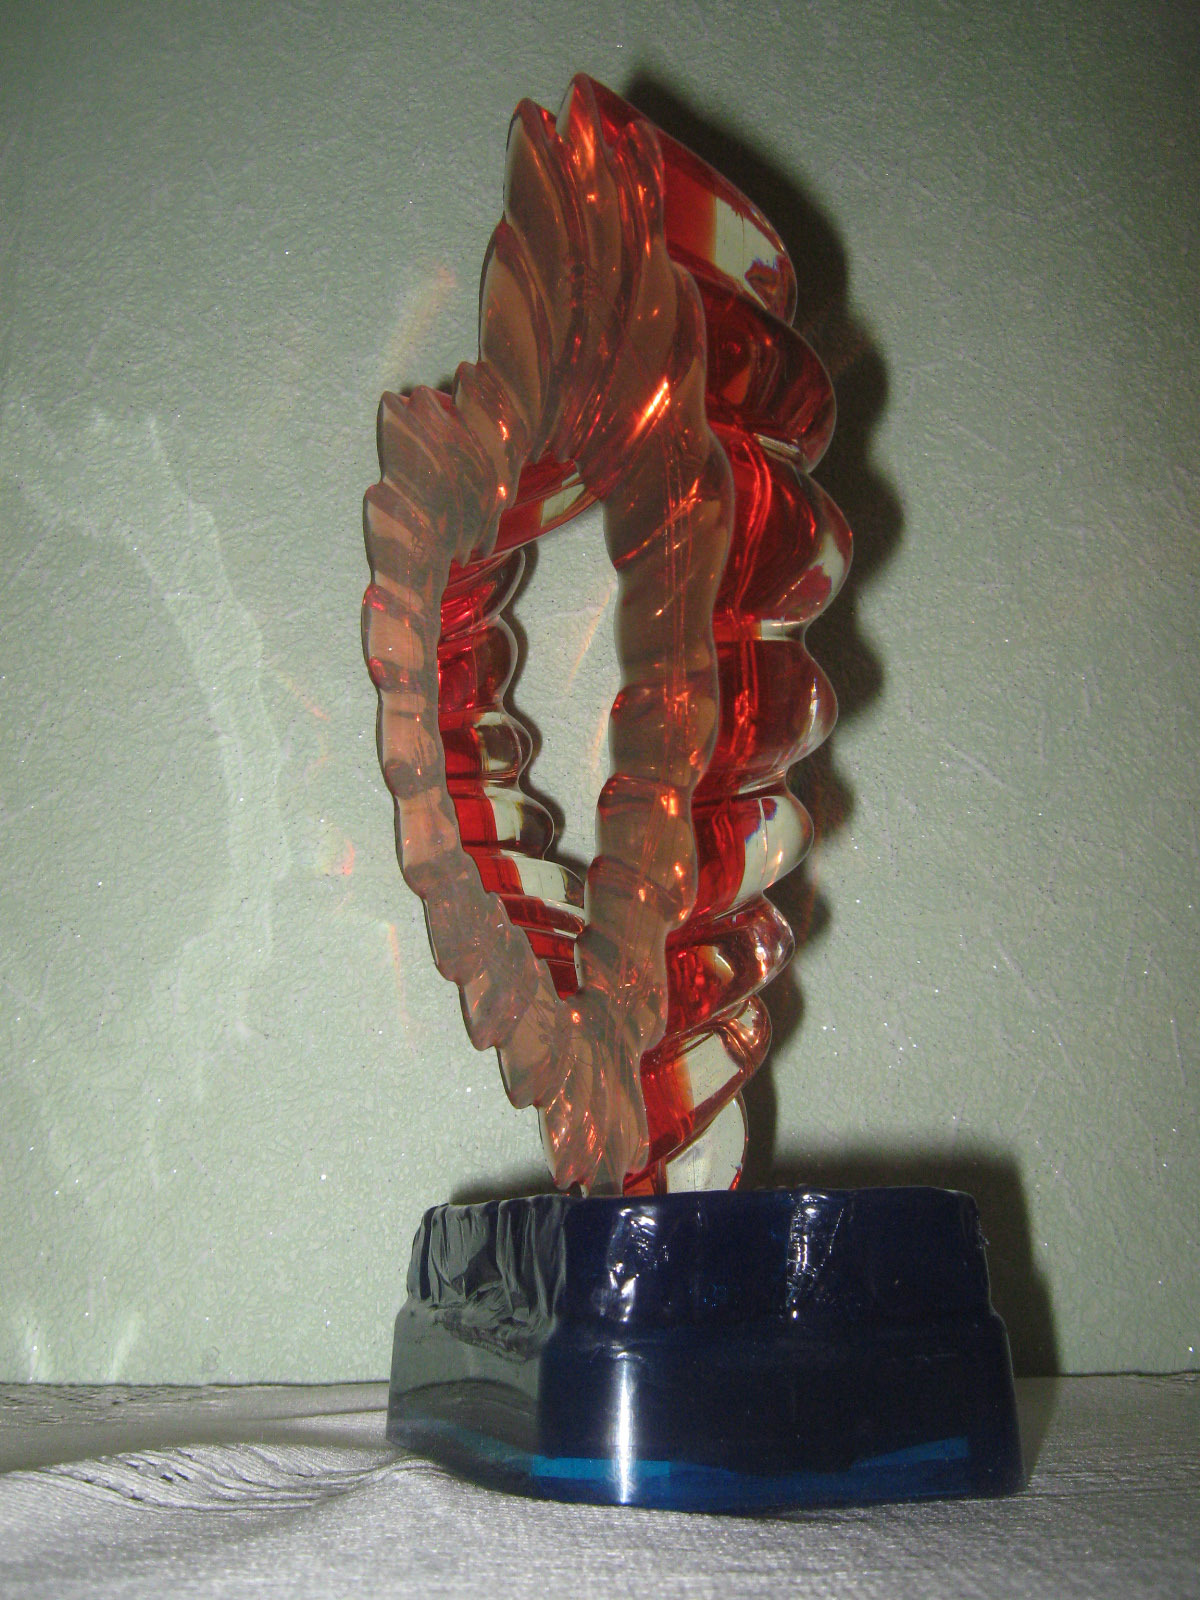
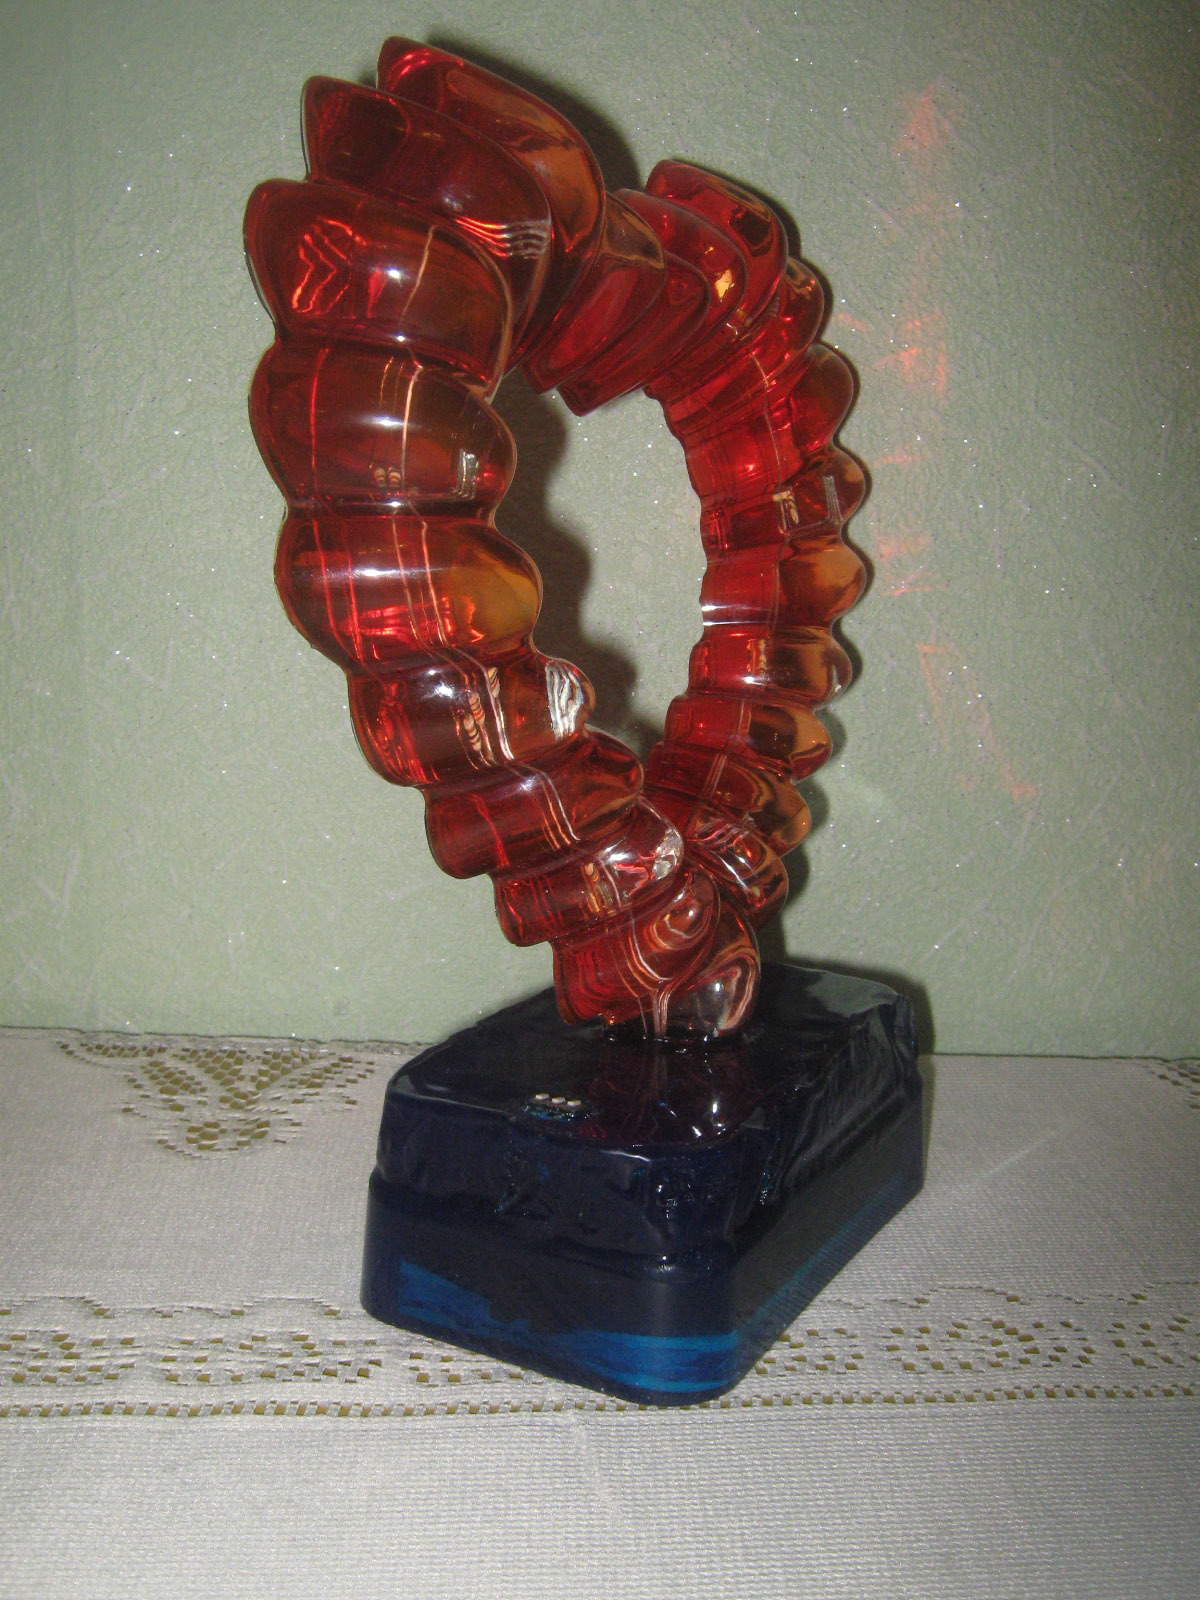
A couple of weeks ago, I decided to give my beloved Valentine's day a handmade gift. I did not like the home-made products found on the Internet, I wanted to do something beautiful, but at the same time my own, unique. He stopped at a transparent sculpture with LED backlight in the form of a heart, with the potential to use as a frame for a photo.
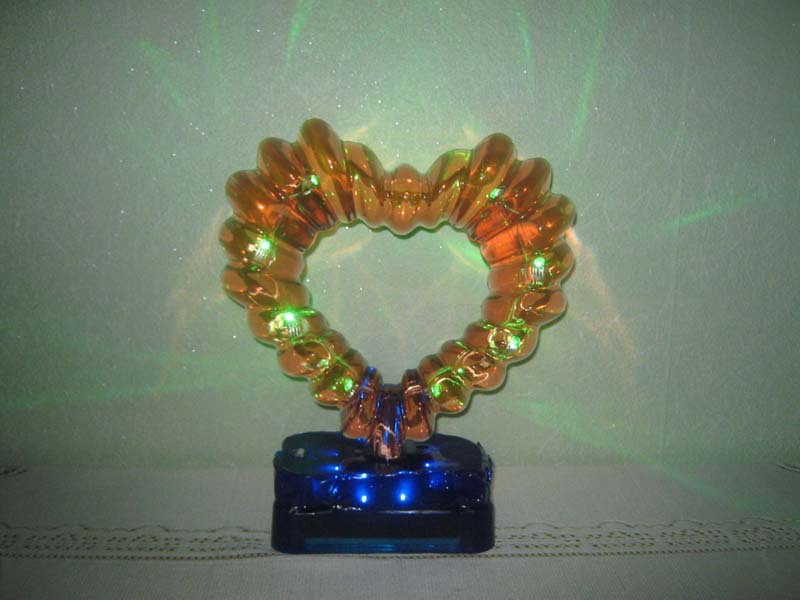
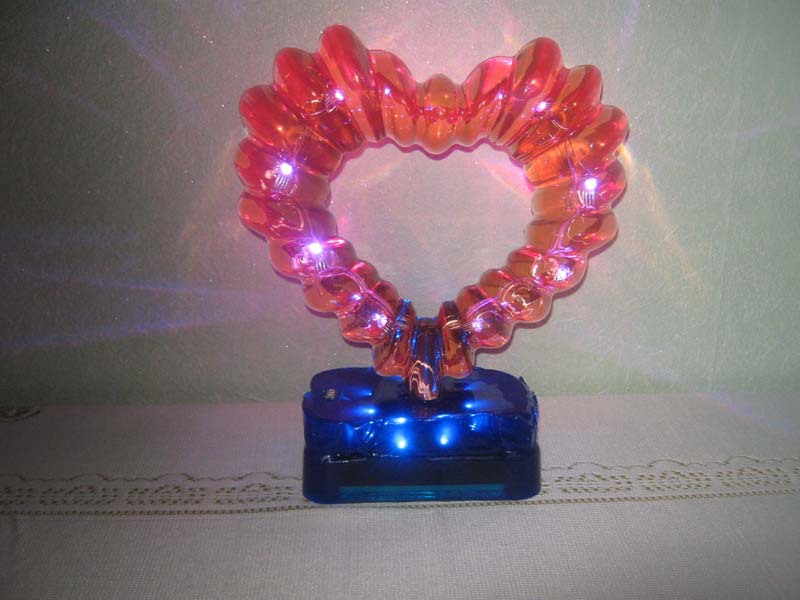
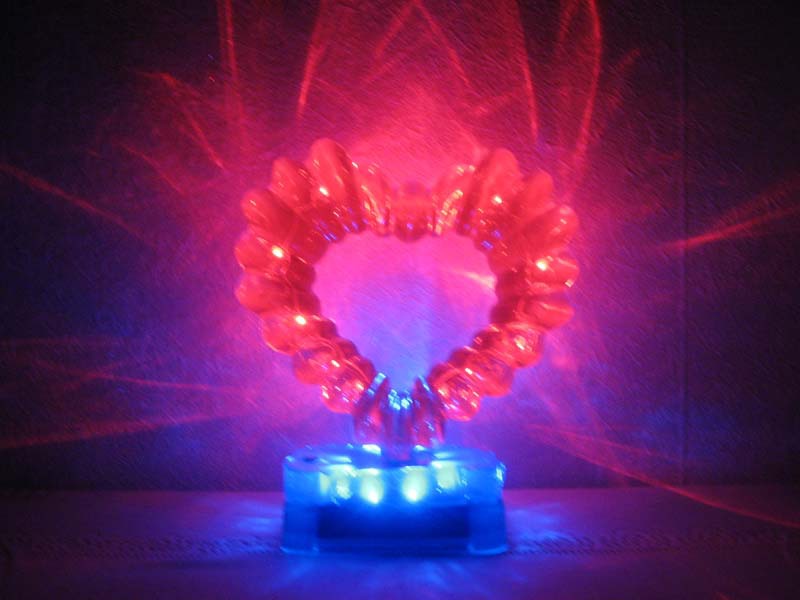
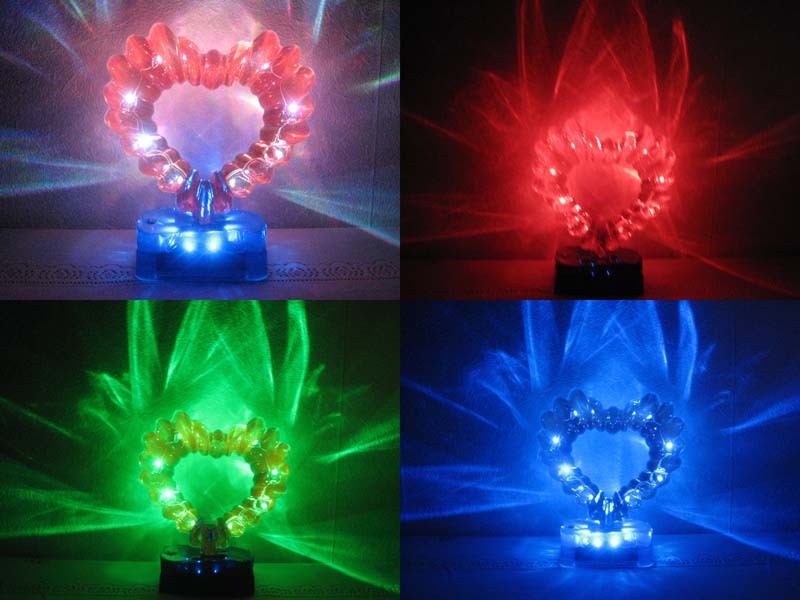
To attract attention, I will demonstrate the result: Well, now, for those who are interested in how to make such a gift in 4 nights and one day, I offer step-by-step instructions.
The first thing you need is a transparent epoxy resin, for pouring medium volumes (~ 300ml at a time), I was advised to use MagicFast resin. I used about a kilogram, I advise taking with a margin.
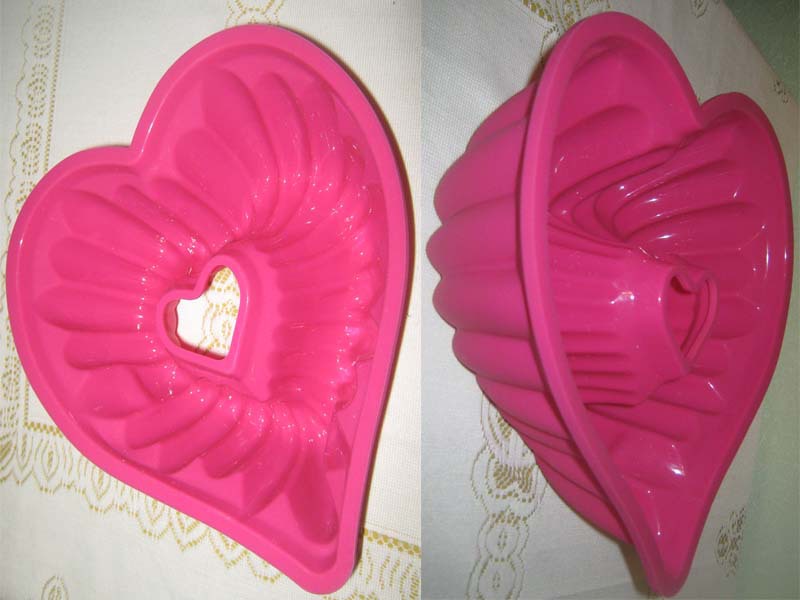
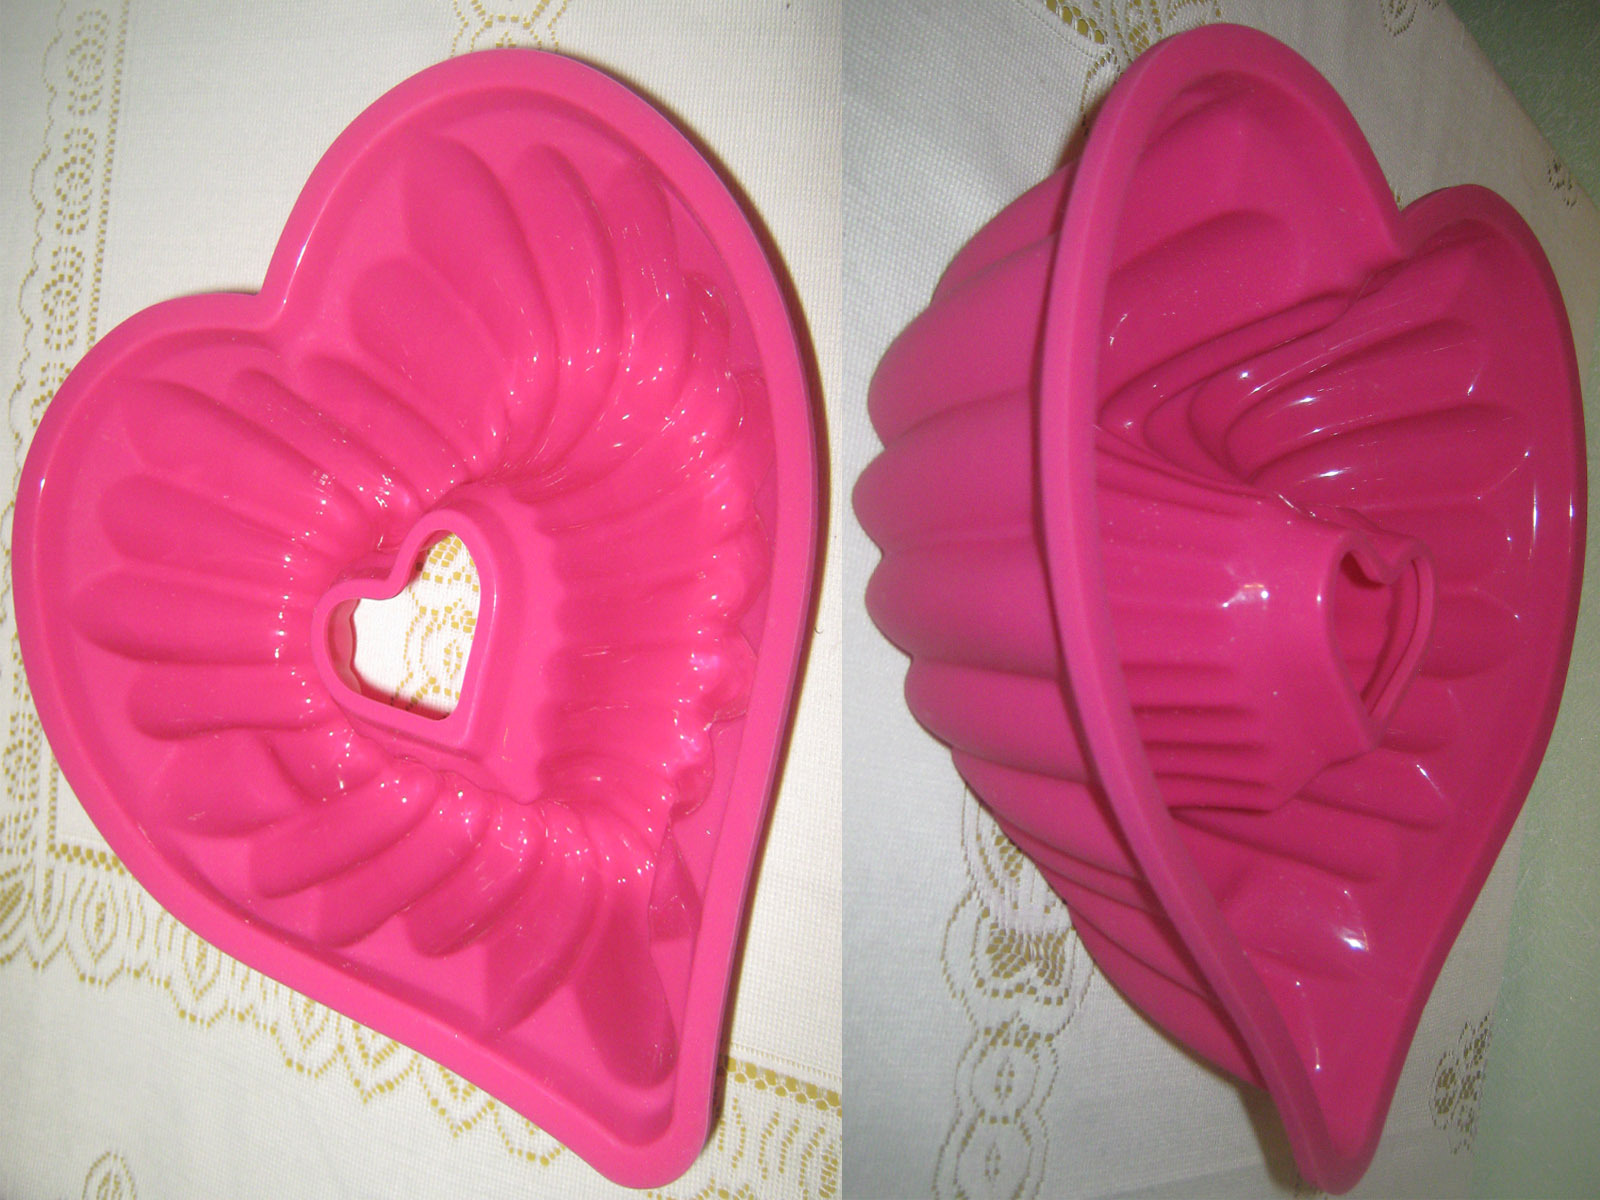
Forms are also needed. A 0.5l capacity was chosen for the stand, and a silicone baking dish for the sculpture itself. Still need LEDs. RGB diodes were selected with a common anode for the heart, and blue for the stand. I also advise you to use the MGTF wire, it will not be so noticeable. The list of materials for the sculpture (no control scheme):
The result of the preparation: 494UAH ~ $ 55.
In the afternoon I work, I made a gift late in the evening - at night, as a result, my production phases are divided. Independent actions can be combined, but do not forget that for mechanical operations, such as bending the legs of the LEDs in the sculpture, the last layer of resin should harden well. And re-filling the transparent layer after installing the LEDs can be done immediately.
Wash and dry forms well.
Stir the epoxy, pour into a new container, and mix well again.
Fill the first layer, it should cover all the irregularities of the form and prepare the basis for the LEDs, I needed 150-200 ml.
In order not to waste time in vain, we bend the legs of the LEDs and distribute them at the same distance, for this we use board connectors with a pitch of 2.54 mm.
To fix the LEDs in the resin, which has started to harden, temporarily connect the diodes of four at the same distance, for stiffness I recommend using soldering.
After sufficient thickening of the resin, you can arrange the LEDs, in my case I had to wait four hours.
Re-fill the mold with transparent resin so that it completely covers the LED housing.
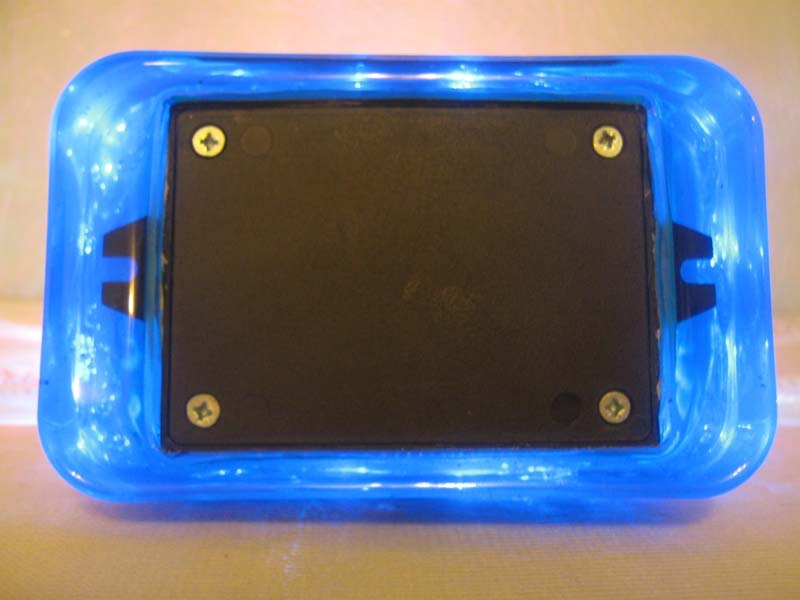
The electronics case needs to be modified to be able to open after pouring, for example, I made a side using tape.
Tint the hardener, and then perform the usual operation of mixing the resin.
We fill it in the capacity for the stand and immerse the electronics housing with the lid up.
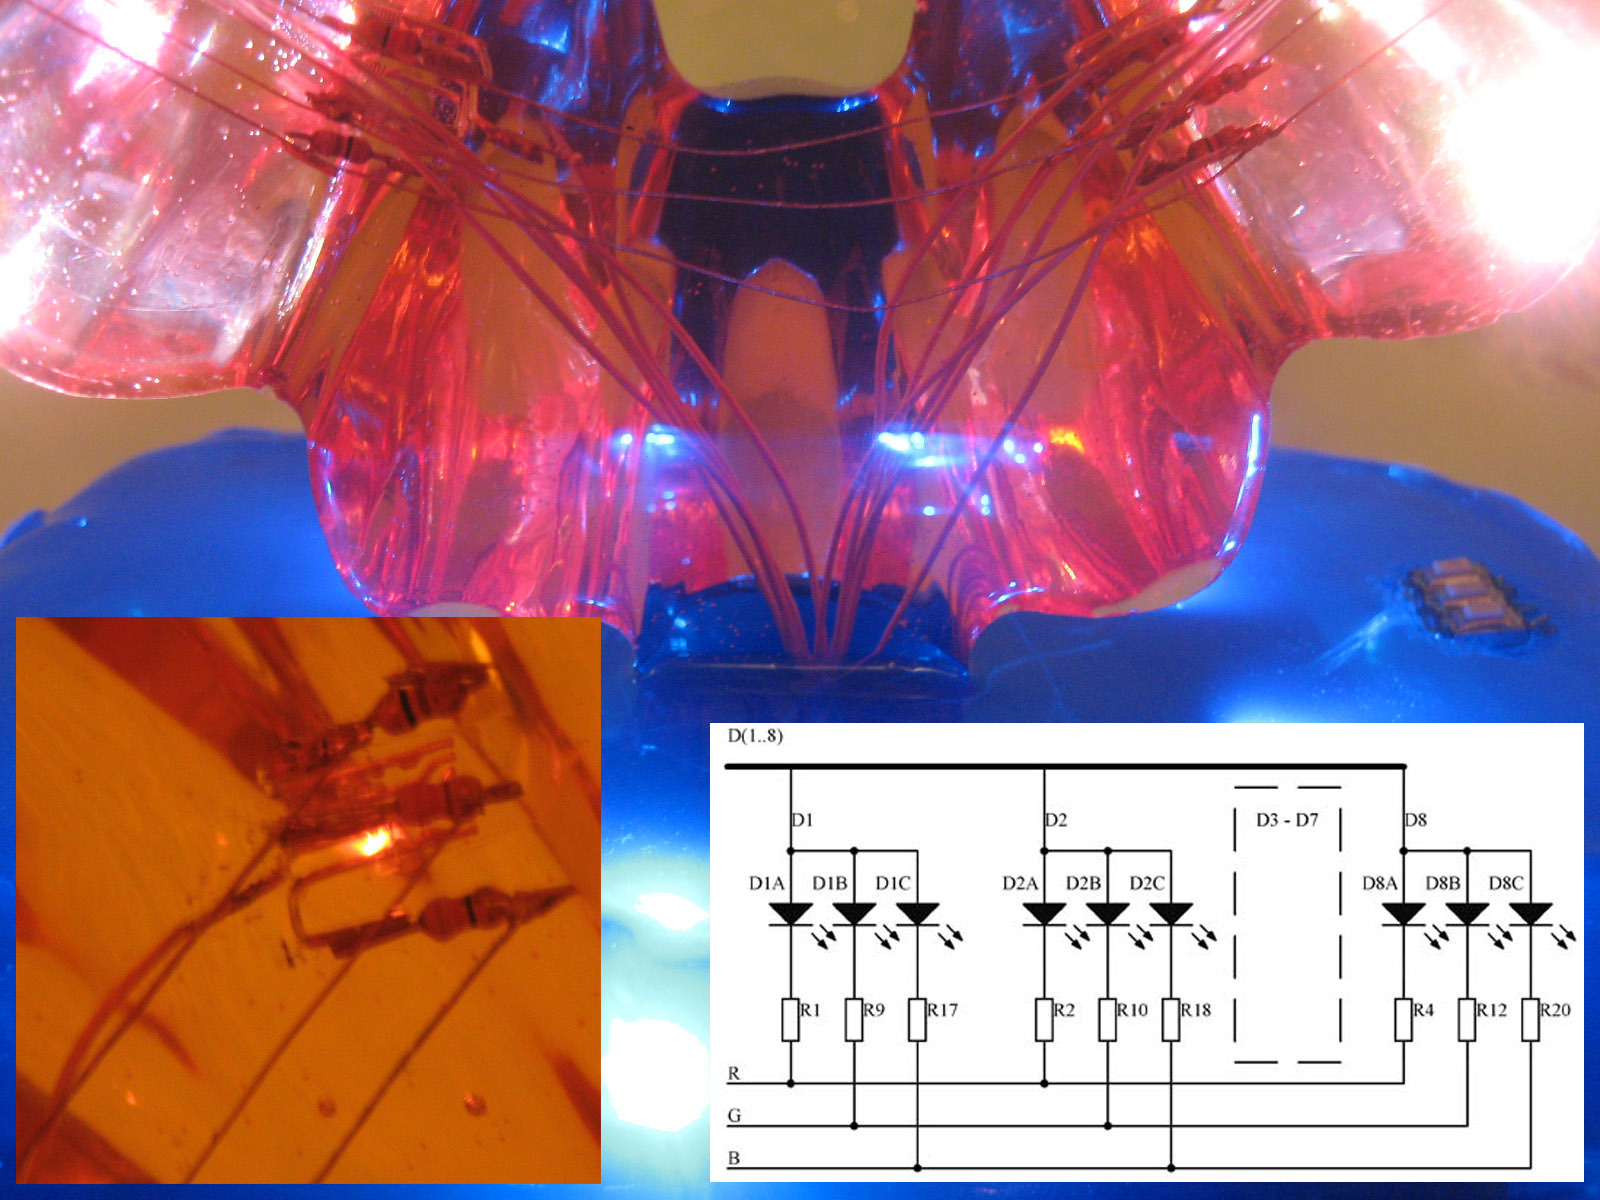
We remove the temporary fixation of the LEDs, bend the legs, solder, selected resistors of 3 for each diode, and then connect the resistors for each color to each other. We also make bends from the anodes, as a result we have 11 wires.
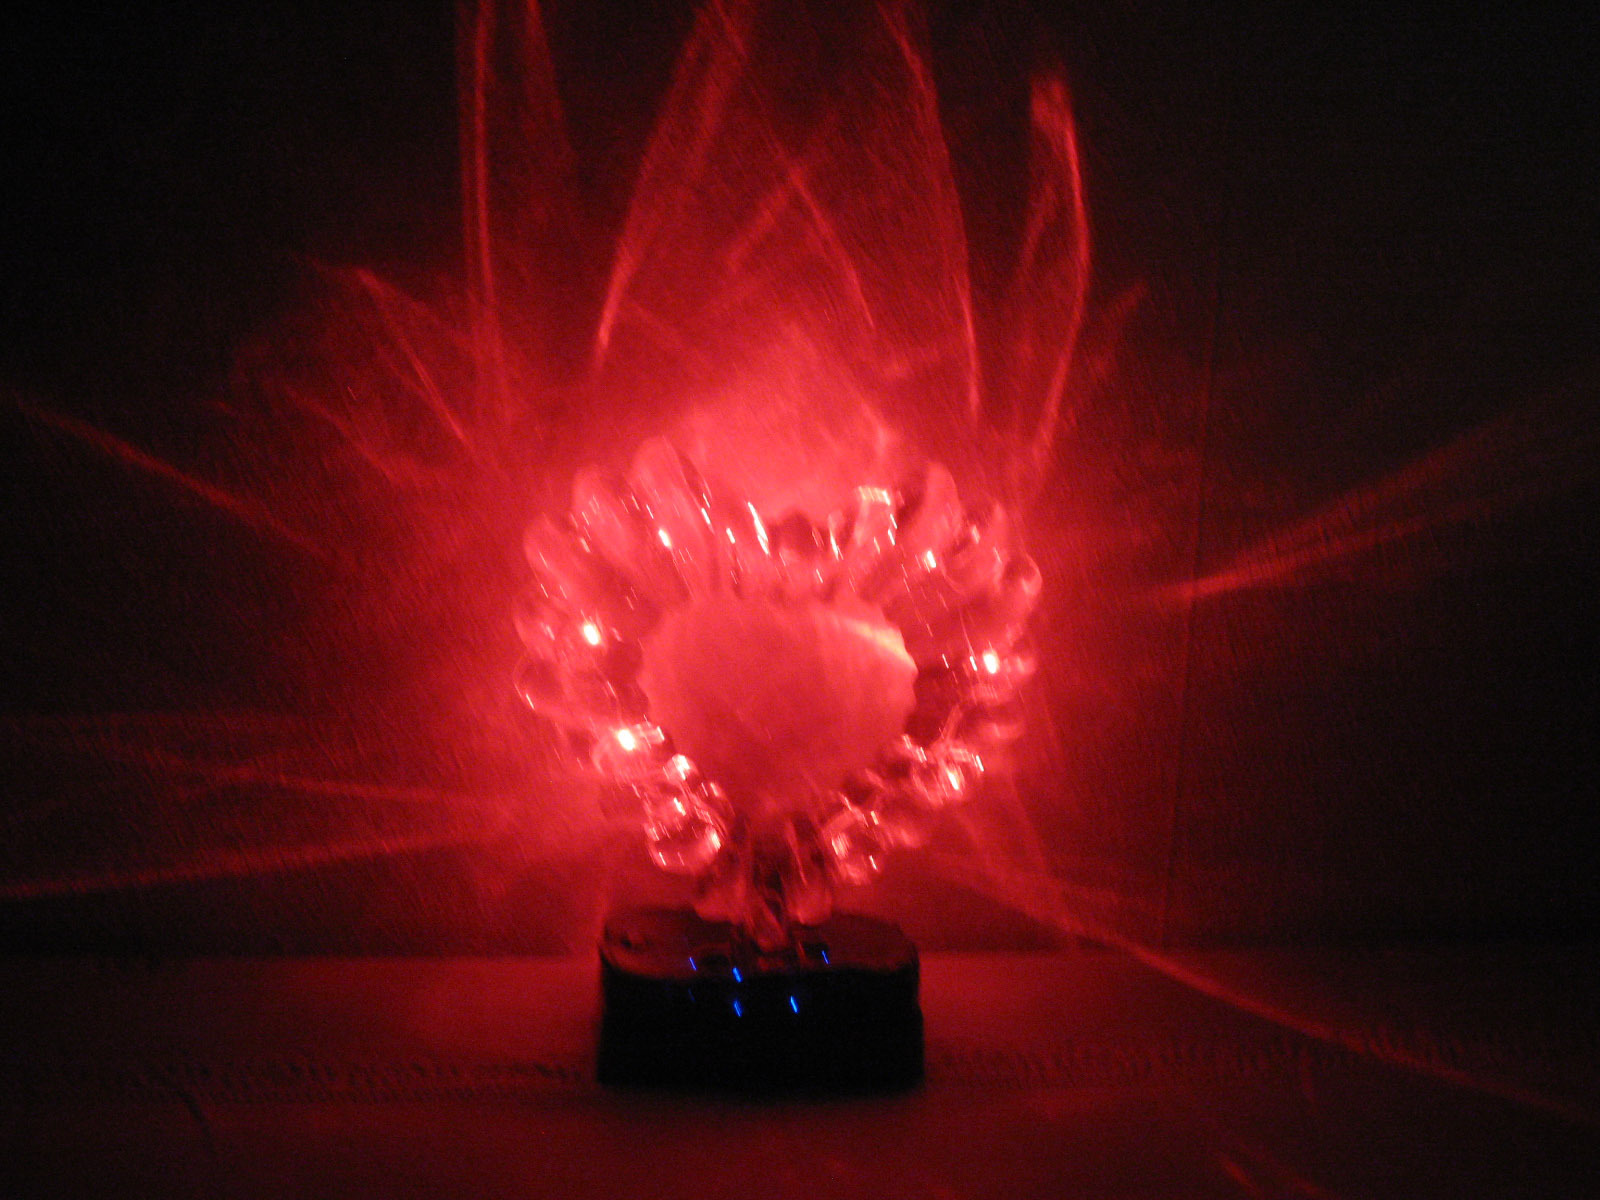
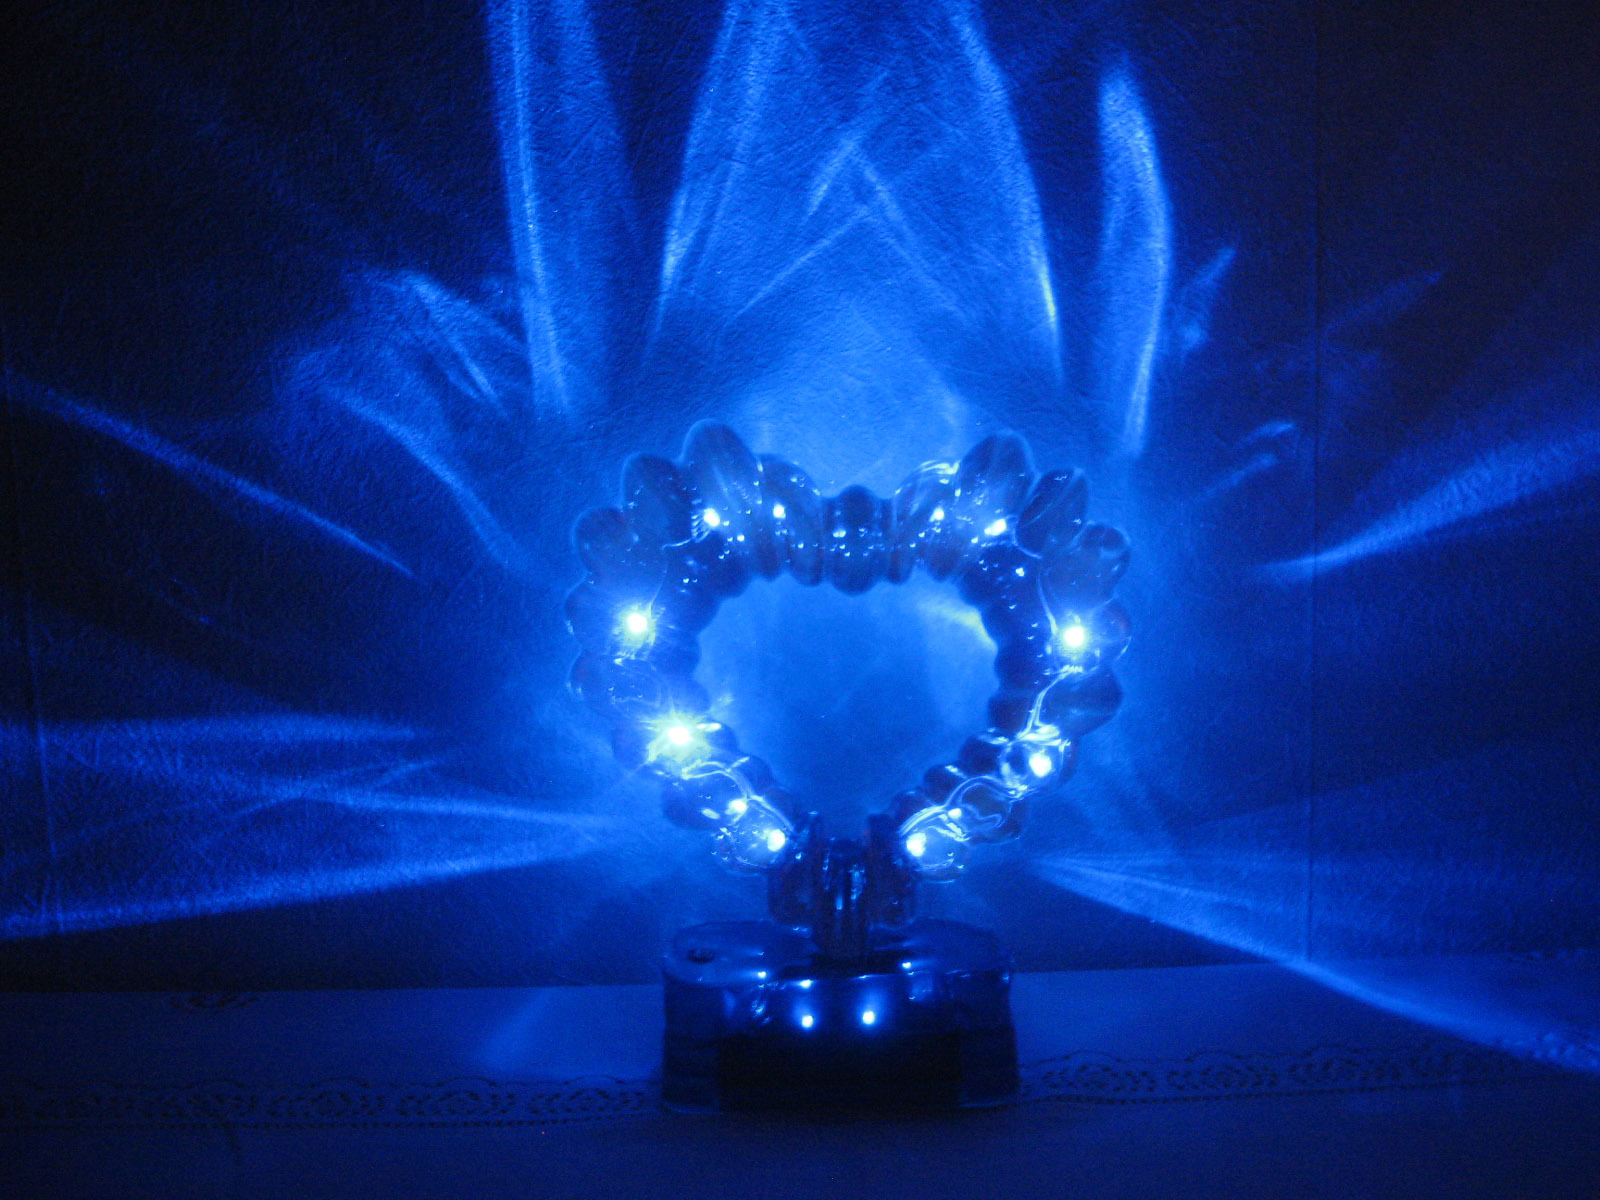
After which you can perform the last fill of the heart, I used a red dye.
The stand can be removed from the mold, freed from excess tape and polished the bottom. In it, we make holes for the wire from buttons and LEDs, we also form LEDs to illuminate the stand.
We solder the buttons and prepare the mount for them.
Lengthening the shape, to fill the docking layer, I used adhesive tape glued to meet with a slight offset.

We take out the heart from the form.
We pass the wires into the holes, and fill it with transparent glue so that the resin does not leak, I do not advise using hot melt glue, since the resin heats up during polymerization.
We are preparing a support for the heart, I used a package of juice, screwing in two 20cm screws.
Fill the tinted resin.
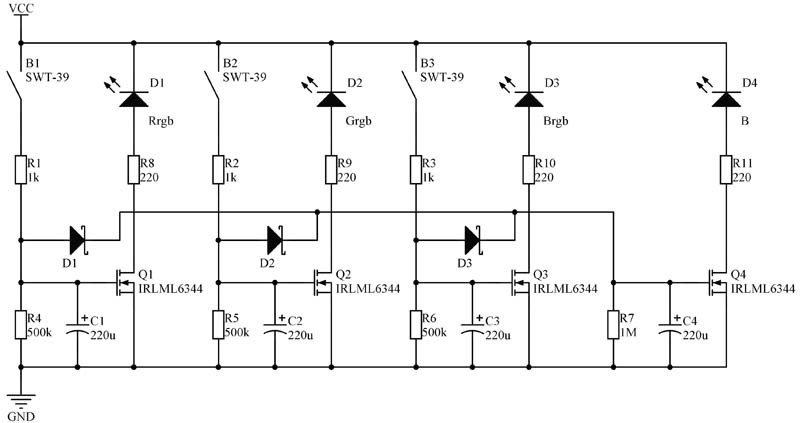
I had a failure with the control circuit. Several errors were found in it, as a result of which it was necessary to refuse.
As a result, it was decided by pressing a button - to turn on one of the colors for 1 minute, and turn on the backlight of the stand when you click on any button.
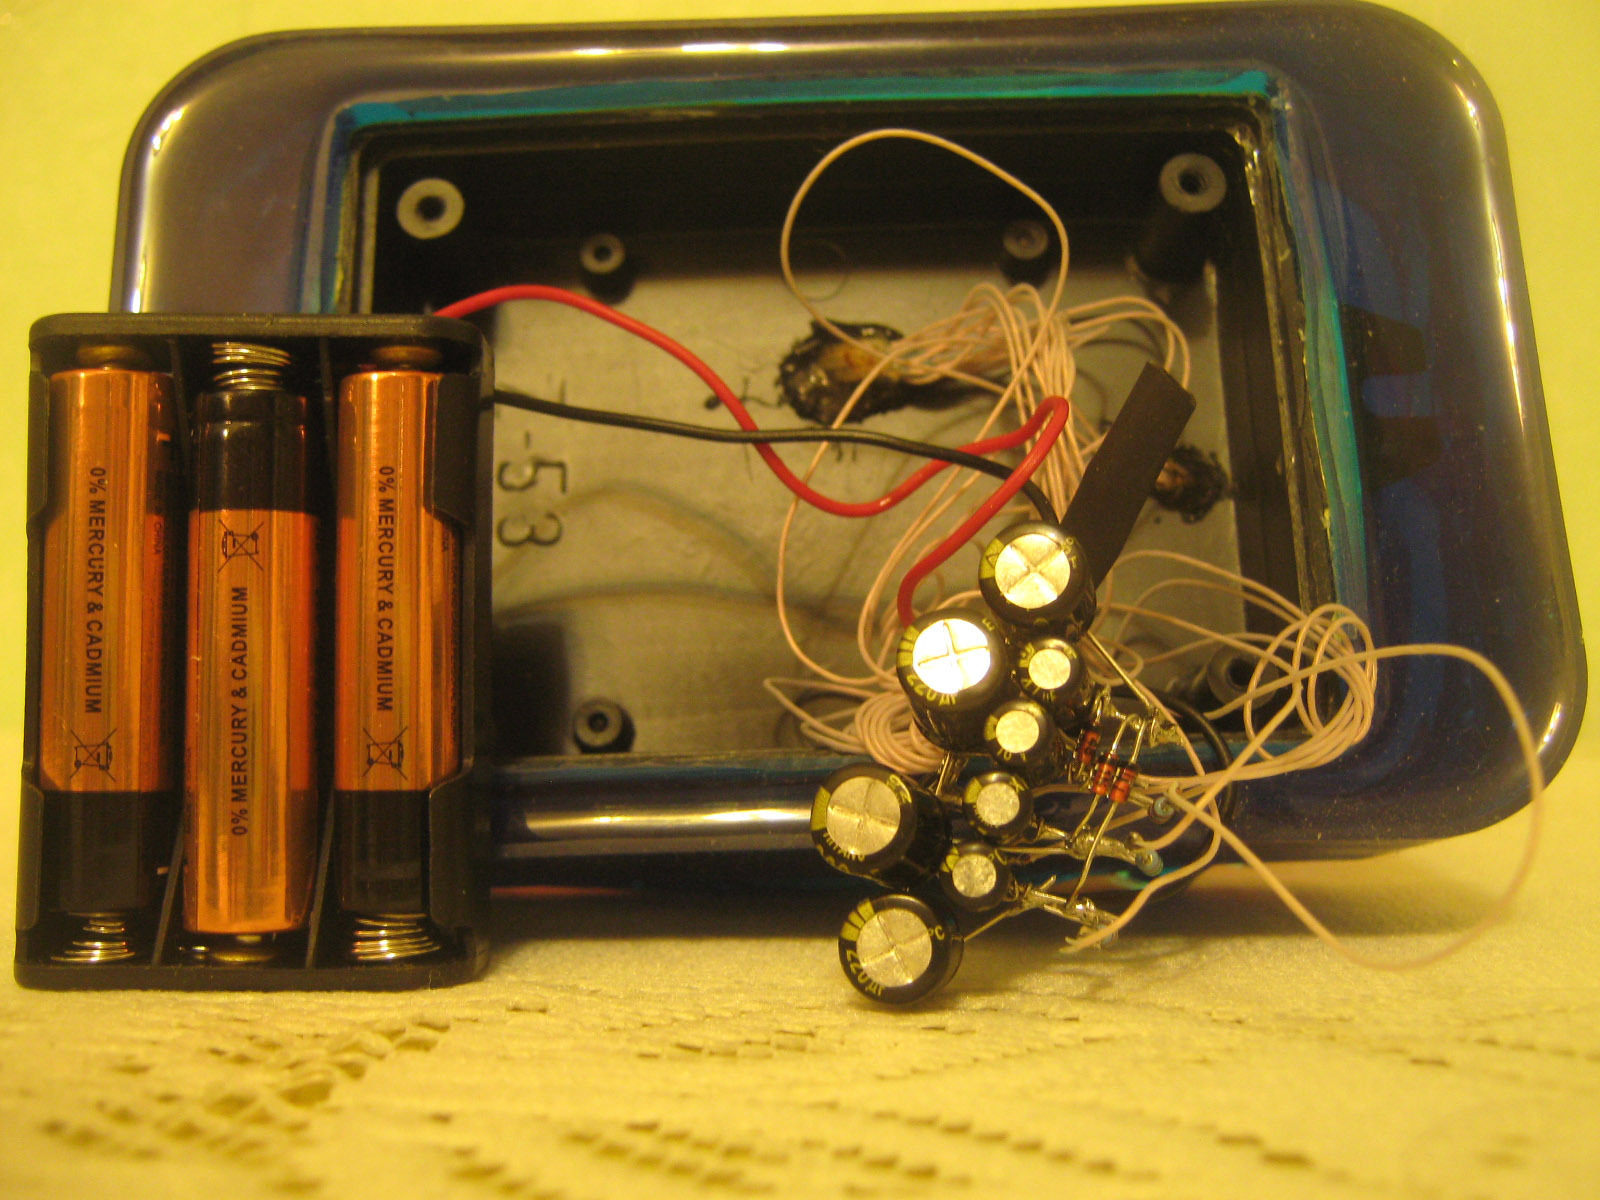
Also, I had to make food from 3x AAA batteries, instead of the planned 2x.
Scheme:

The girl really liked the gift, and she agreed to temporarily return the figurine for improvements by March 8. The plans include a control circuit, in particular, add diode brightness control and a voltage regulator.
To attract attention, I will demonstrate the result: Well, now, for those who are interested in how to make such a gift in 4 nights and one day, I offer step-by-step instructions.

Training
The first thing you need is a transparent epoxy resin, for pouring medium volumes (~ 300ml at a time), I was advised to use MagicFast resin. I used about a kilogram, I advise taking with a margin.
Forms are also needed. A 0.5l capacity was chosen for the stand, and a silicone baking dish for the sculpture itself. Still need LEDs. RGB diodes were selected with a common anode for the heart, and blue for the stand. I also advise you to use the MGTF wire, it will not be so noticeable. The list of materials for the sculpture (no control scheme):
- epoxy resin 1.5l 288UAH,
- dyes for epoxy resins 50UAH,
- silicone baking dish 80UAH,
- 0.5l capacity for stand 3UAH,
- 8 RGB LEDs 20UAH,
- 8 blue LEDs 8UAH,
- MGTF wire ~ 4m 6UAH,
- resistors 10UAH,
- 3 buttons 6UAH,
- case for control circuit with batteries 10UAH,
- battery compartment 3UAH,
- batteries 10UAH
The result of the preparation: 494UAH ~ $ 55.
Sculpture making
In the afternoon I work, I made a gift late in the evening - at night, as a result, my production phases are divided. Independent actions can be combined, but do not forget that for mechanical operations, such as bending the legs of the LEDs in the sculpture, the last layer of resin should harden well. And re-filling the transparent layer after installing the LEDs can be done immediately.
1 night
Wash and dry forms well.
Stir the epoxy, pour into a new container, and mix well again.
Fill the first layer, it should cover all the irregularities of the form and prepare the basis for the LEDs, I needed 150-200 ml.
In order not to waste time in vain, we bend the legs of the LEDs and distribute them at the same distance, for this we use board connectors with a pitch of 2.54 mm.
To fix the LEDs in the resin, which has started to harden, temporarily connect the diodes of four at the same distance, for stiffness I recommend using soldering.
After sufficient thickening of the resin, you can arrange the LEDs, in my case I had to wait four hours.
2 night
Re-fill the mold with transparent resin so that it completely covers the LED housing.
The electronics case needs to be modified to be able to open after pouring, for example, I made a side using tape.
Tint the hardener, and then perform the usual operation of mixing the resin.
We fill it in the capacity for the stand and immerse the electronics housing with the lid up.

3 night
We remove the temporary fixation of the LEDs, bend the legs, solder, selected resistors of 3 for each diode, and then connect the resistors for each color to each other. We also make bends from the anodes, as a result we have 11 wires.
After which you can perform the last fill of the heart, I used a red dye.
The stand can be removed from the mold, freed from excess tape and polished the bottom. In it, we make holes for the wire from buttons and LEDs, we also form LEDs to illuminate the stand.
We solder the buttons and prepare the mount for them.
Lengthening the shape, to fill the docking layer, I used adhesive tape glued to meet with a slight offset.
4 night
We take out the heart from the form.
We pass the wires into the holes, and fill it with transparent glue so that the resin does not leak, I do not advise using hot melt glue, since the resin heats up during polymerization.
We are preparing a support for the heart, I used a package of juice, screwing in two 20cm screws.
Fill the tinted resin.
5 day
I had a failure with the control circuit. Several errors were found in it, as a result of which it was necessary to refuse.
As a result, it was decided by pressing a button - to turn on one of the colors for 1 minute, and turn on the backlight of the stand when you click on any button.
Also, I had to make food from 3x AAA batteries, instead of the planned 2x.
Scheme:
Result
The girl really liked the gift, and she agreed to temporarily return the figurine for improvements by March 8. The plans include a control circuit, in particular, add diode brightness control and a voltage regulator.
photo results