About creating budget stereoscopic images on fingers (stereogram, anaglyph, stereoscope)
- Tutorial
Another weekend came, you need to write a couple of dozen lines of code and draw a picture, but better not one. So, last weekend and the day before last, I showed how to do ray tracing and even blow up anything. This is surprising to many, but computer graphics is a very simple thing, a couple of hundred lines of bare C ++ is enough to create interesting pictures.
The topic of today's conversation is binocular vision, and even today we will not reach even a hundred lines of code. Knowing how to render three-dimensional scenes, it would be foolish to walk past a stupar, today we will draw something like this:
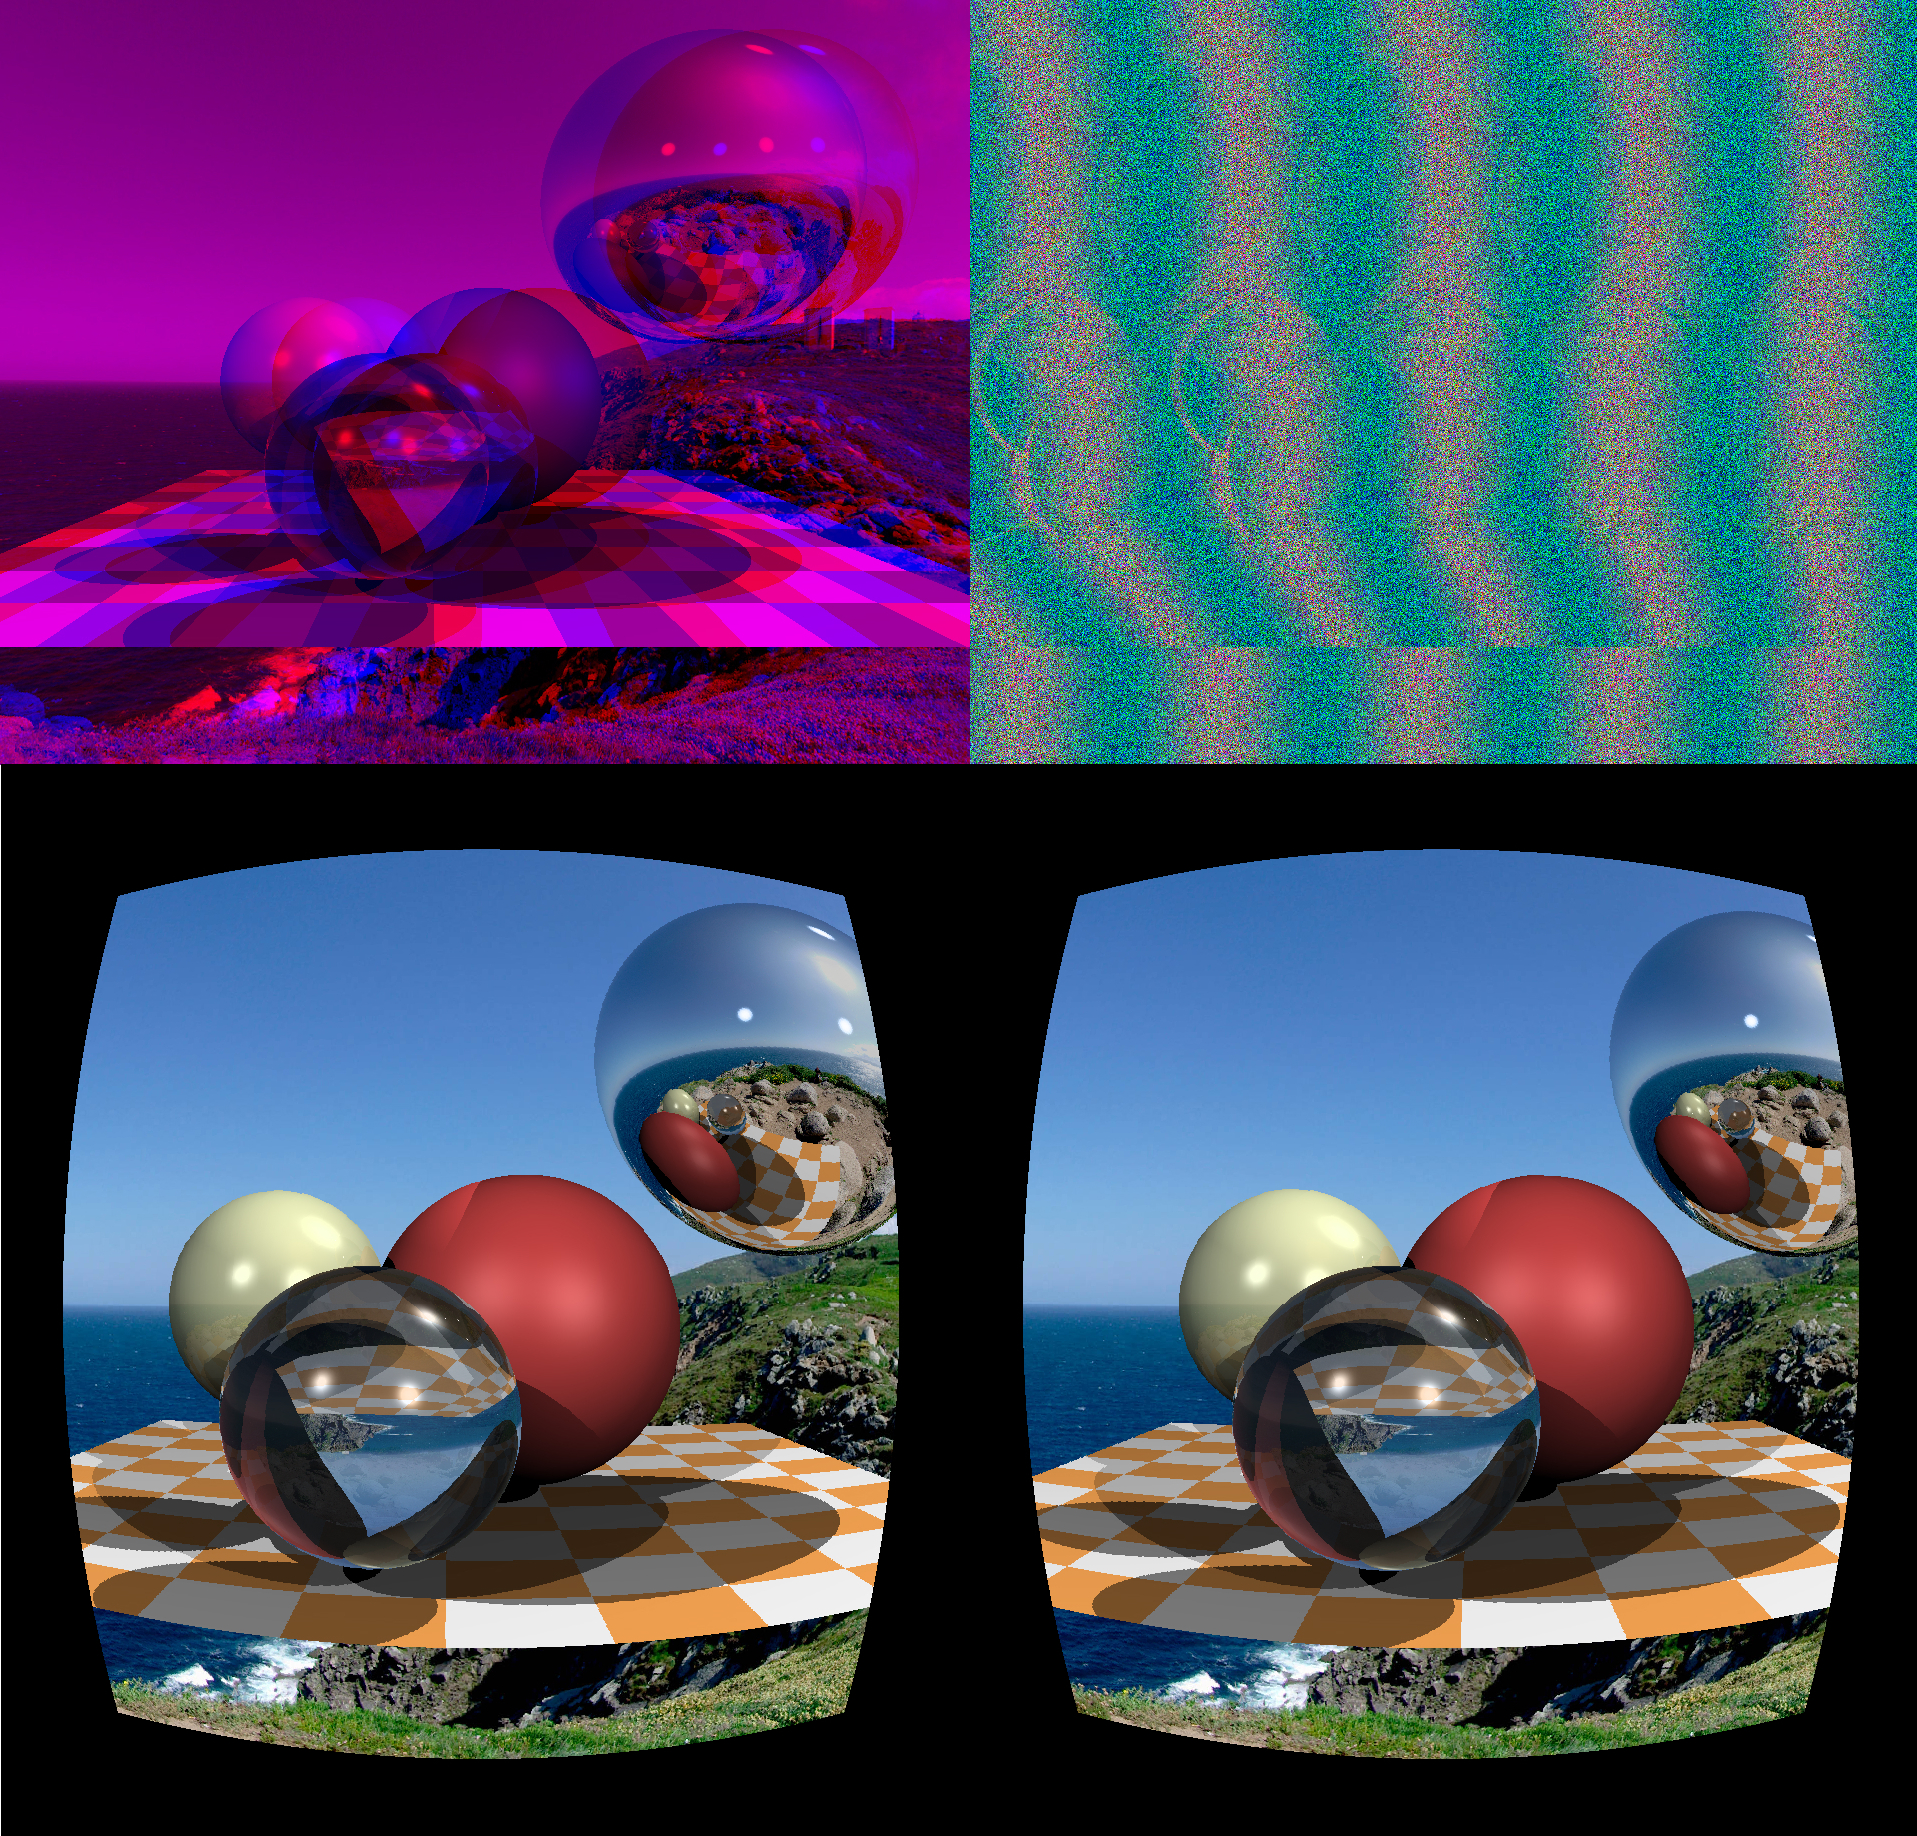
The madness of the Magic Carpet developers is haunting me. For those who did not find this game, it was possible to make a 3D render in both anaglyph and stereograms in the basic settings, just available in the menu! The brain just blew it up specifically.
So let's get started. For a start, thanks to what does our visual apparatus generally allow us to perceive depth? There is such a clever word "parallax". If on the fingers, then let's focus our eyes on the screen. Everything that is in the plane of the screen for our brain exists in a single copy. But if a fly suddenly flies in front of the screen, then (if we don’t change our eyes!) Our brain will register it in two copies. At the same time, the spider on the wall behind the screen also splits, and the direction of the split depends on whether the object is in front of the focal point or behind:

Our brain is a very effective machine for analyzing slightly different images. It uses disparity to obtain depth information from two-dimensional images of the retina for stereopsis.. Well, God bless them, with words, let's better draw pictures!
Let's assume that our screen is a window into the virtual world :)
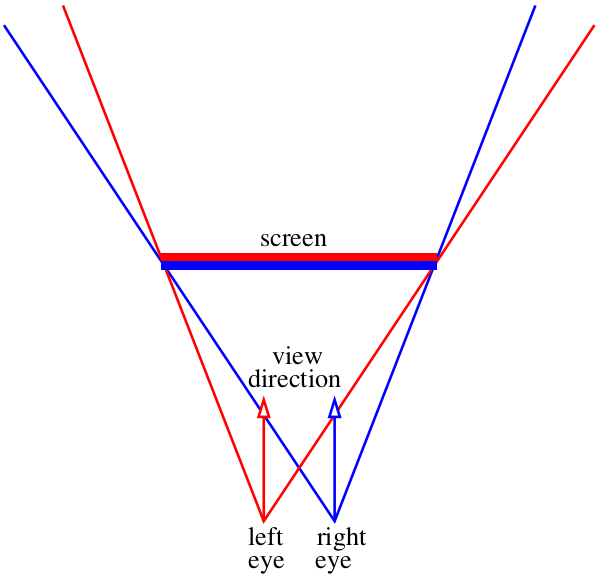
Our task is to draw two pictures with what will be visible through this “window”. There will be two pictures, one for each eye, in the diagram above I showed them with a red and blue “sandwich”. Let's not bother yet, how exactly we feed these pictures to the visual apparatus, we just need to save two files. Specifically, I am interested in how these images can be obtained with the help of our ray tracer .
Well, let's say, the direction does not change, this is a vector (0,0, -1). Suppose we can move the camera position to the inter-eye distance, what else? There is one small subtlety: the cone of a look through our “window” is asymmetric. And our raytracer is able to render only a symmetric cone of a look:
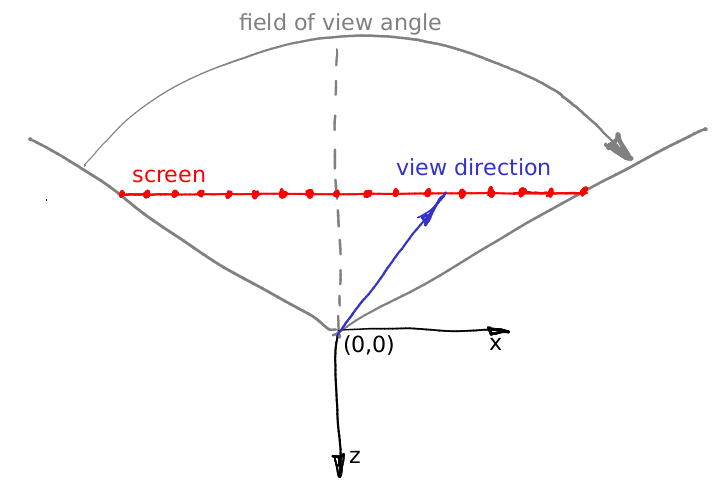
What to do? Read :)
In fact, we can render the pictures wider than we need, and just cut off the extra:
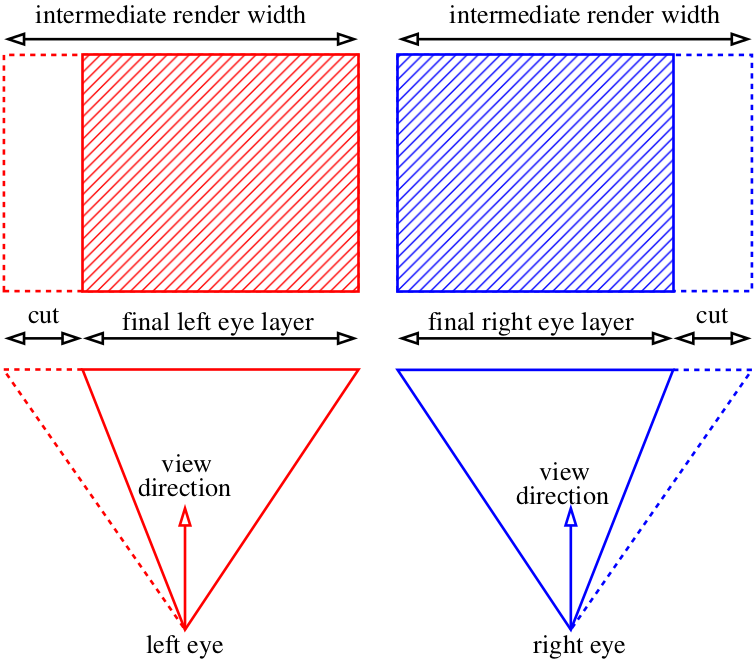
With the general rendering mechanism it should be clear, now is the time to wonder about the delivery of the image to our brain. One of the simplest options is red and blue glasses:
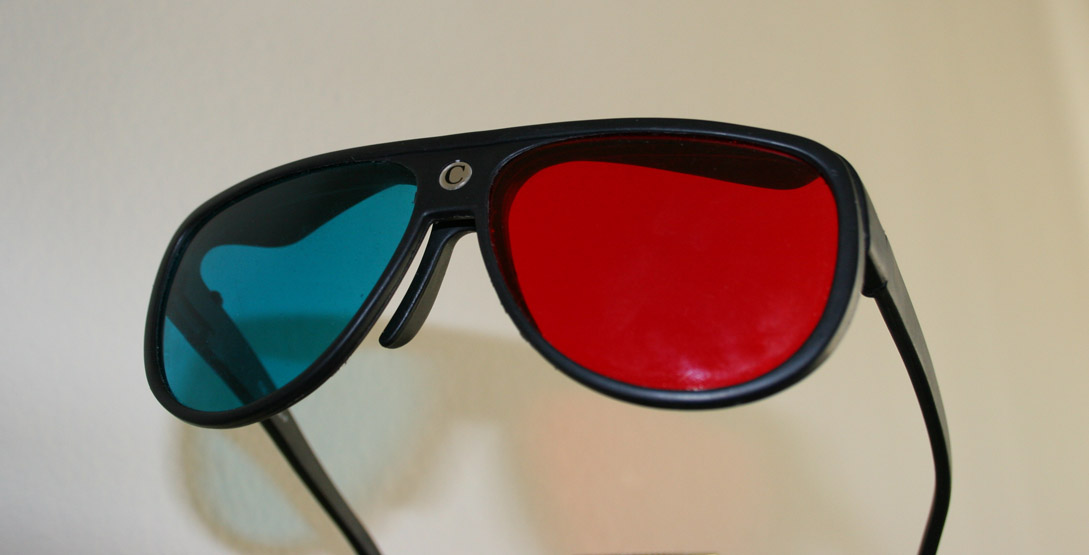
We’ll just make two pre-renders not colored, but black and white, we will write the left picture into the red channel and the right picture into the blue one. This picture
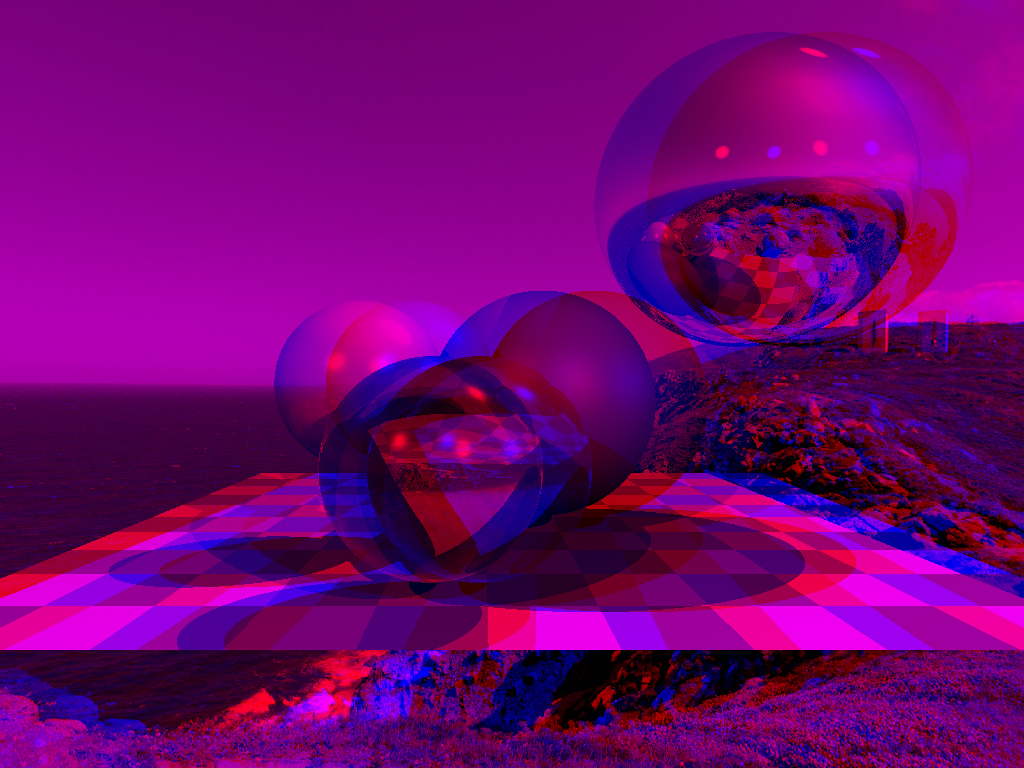
will turn out: Red glass will cut off one channel, and blue glass will cut off another, so everyone’s eyes will receive their own picture, and we can look at the world in 3D. Here are the changes to the main commit of the first article , which show both camera settings for both eyes and channel assembly.
Anaglyph renders are one of the most ancient ways to view (computer!) Stereo images. They have many drawbacks, for example, poor color rendering (by the way, try recording the green channel of the right eye into the green channel of the final picture). One benefit - these glasses are easy to make from scrap materials.
With the mass distribution of smartphones, we remembered what stereoscopes are (which, for a moment, were invented in the 19th century)! A few years ago, Google offered to use two penny lenses (unfortunately, they are not made on the knee), a little cardboard (lying everywhere) and a smartphone (lying in a pocket) to get quite tolerable virtual reality glasses:
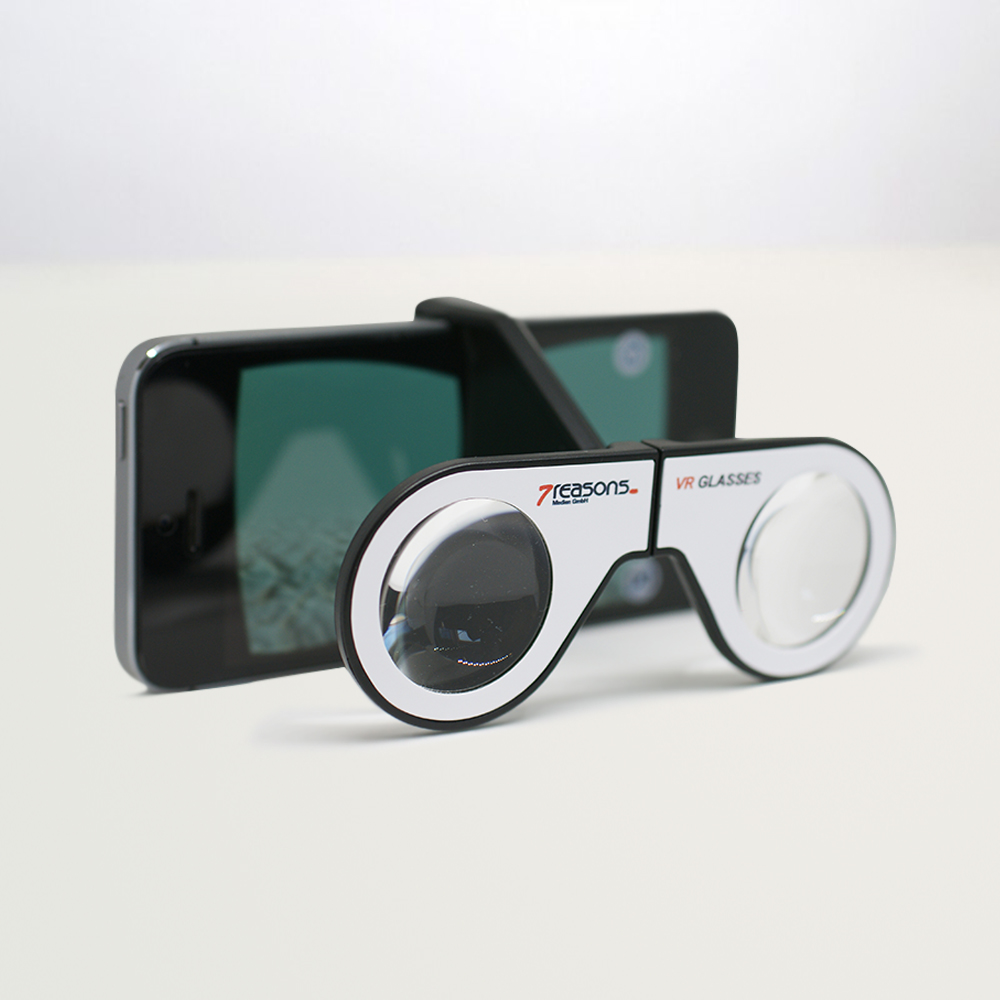
There were a lot of rubles on aliexpress. Compared to anaglyph, you don’t need to do anything at all, just take two pictures and make them side by side, here’s a commit .
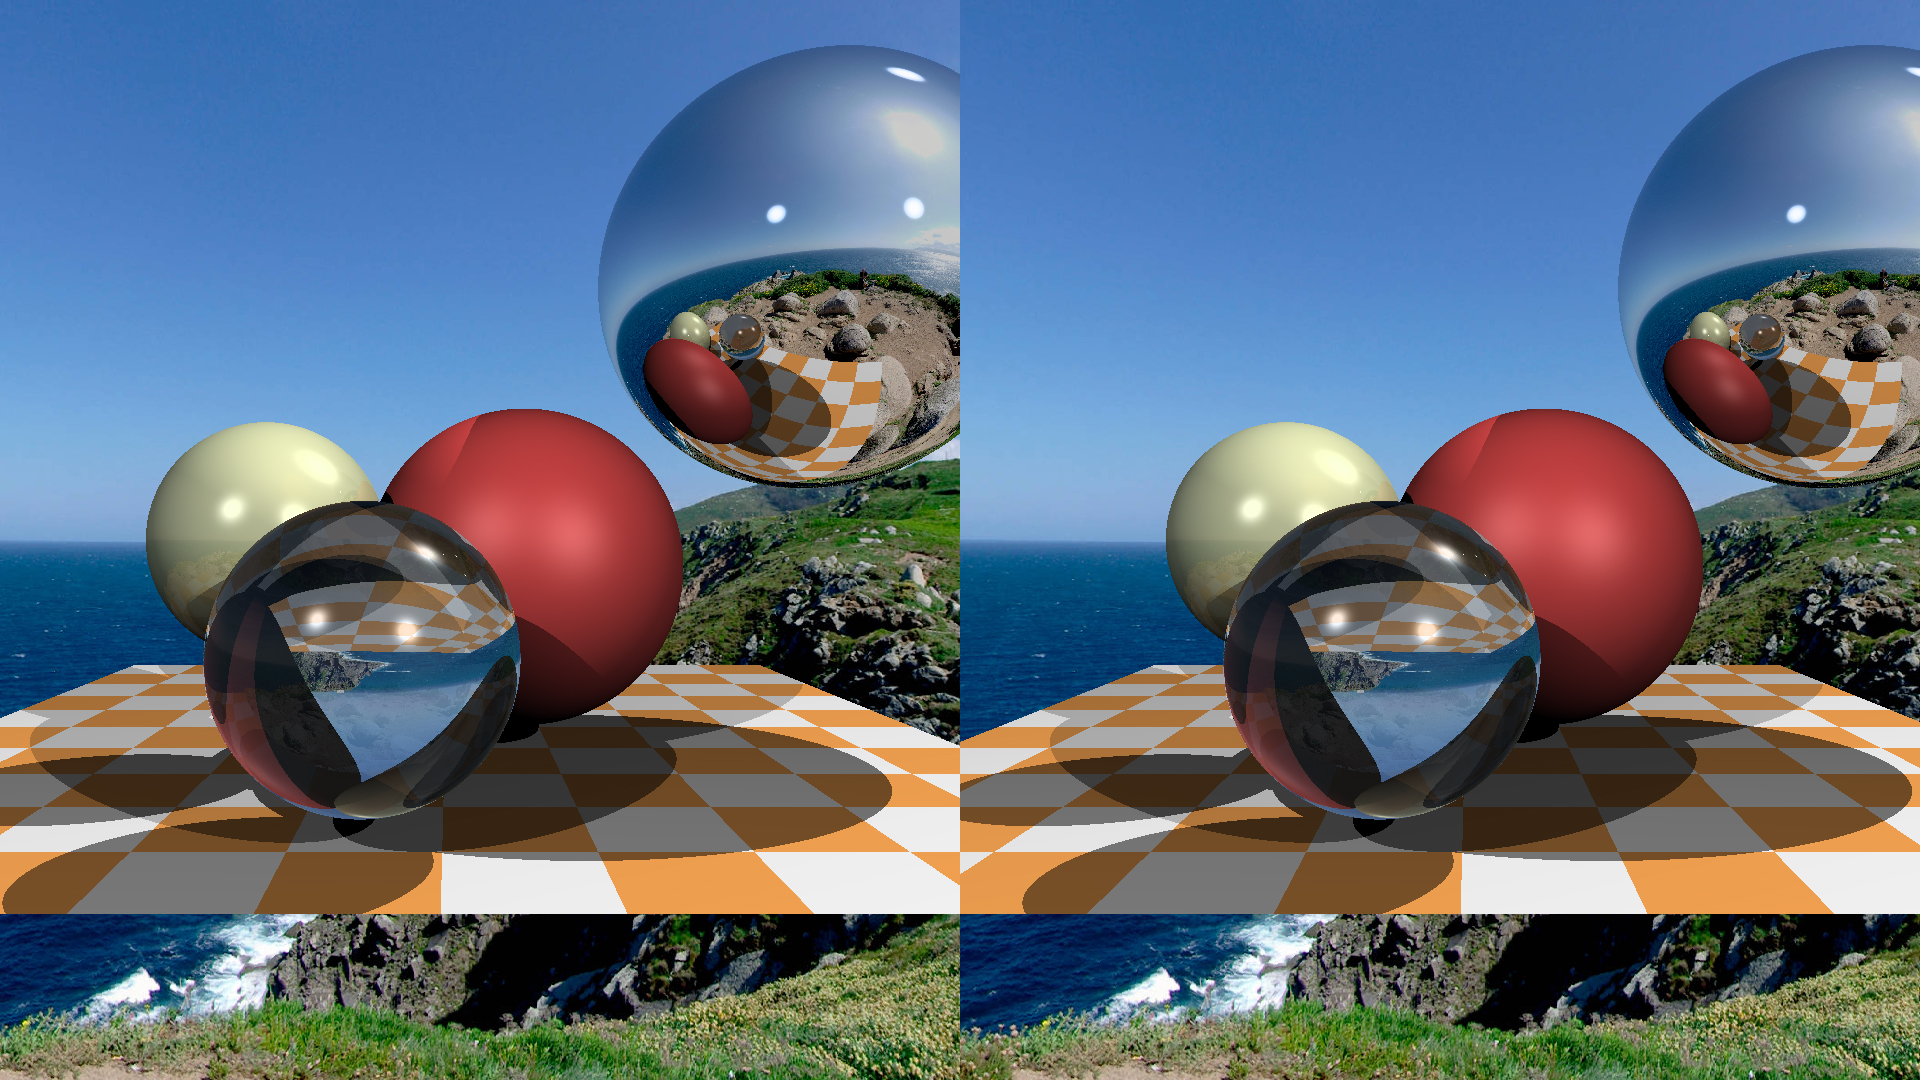
Strictly speaking, depending on the lens, lens distortion correction may be needed., but I didn’t bother at all, and it looks great on my glasses. But if you really need to apply a barrel-shaped pre-distortion, which compensates for the distortion from the lens, then this is how it looks for my smartphone and for my glasses:
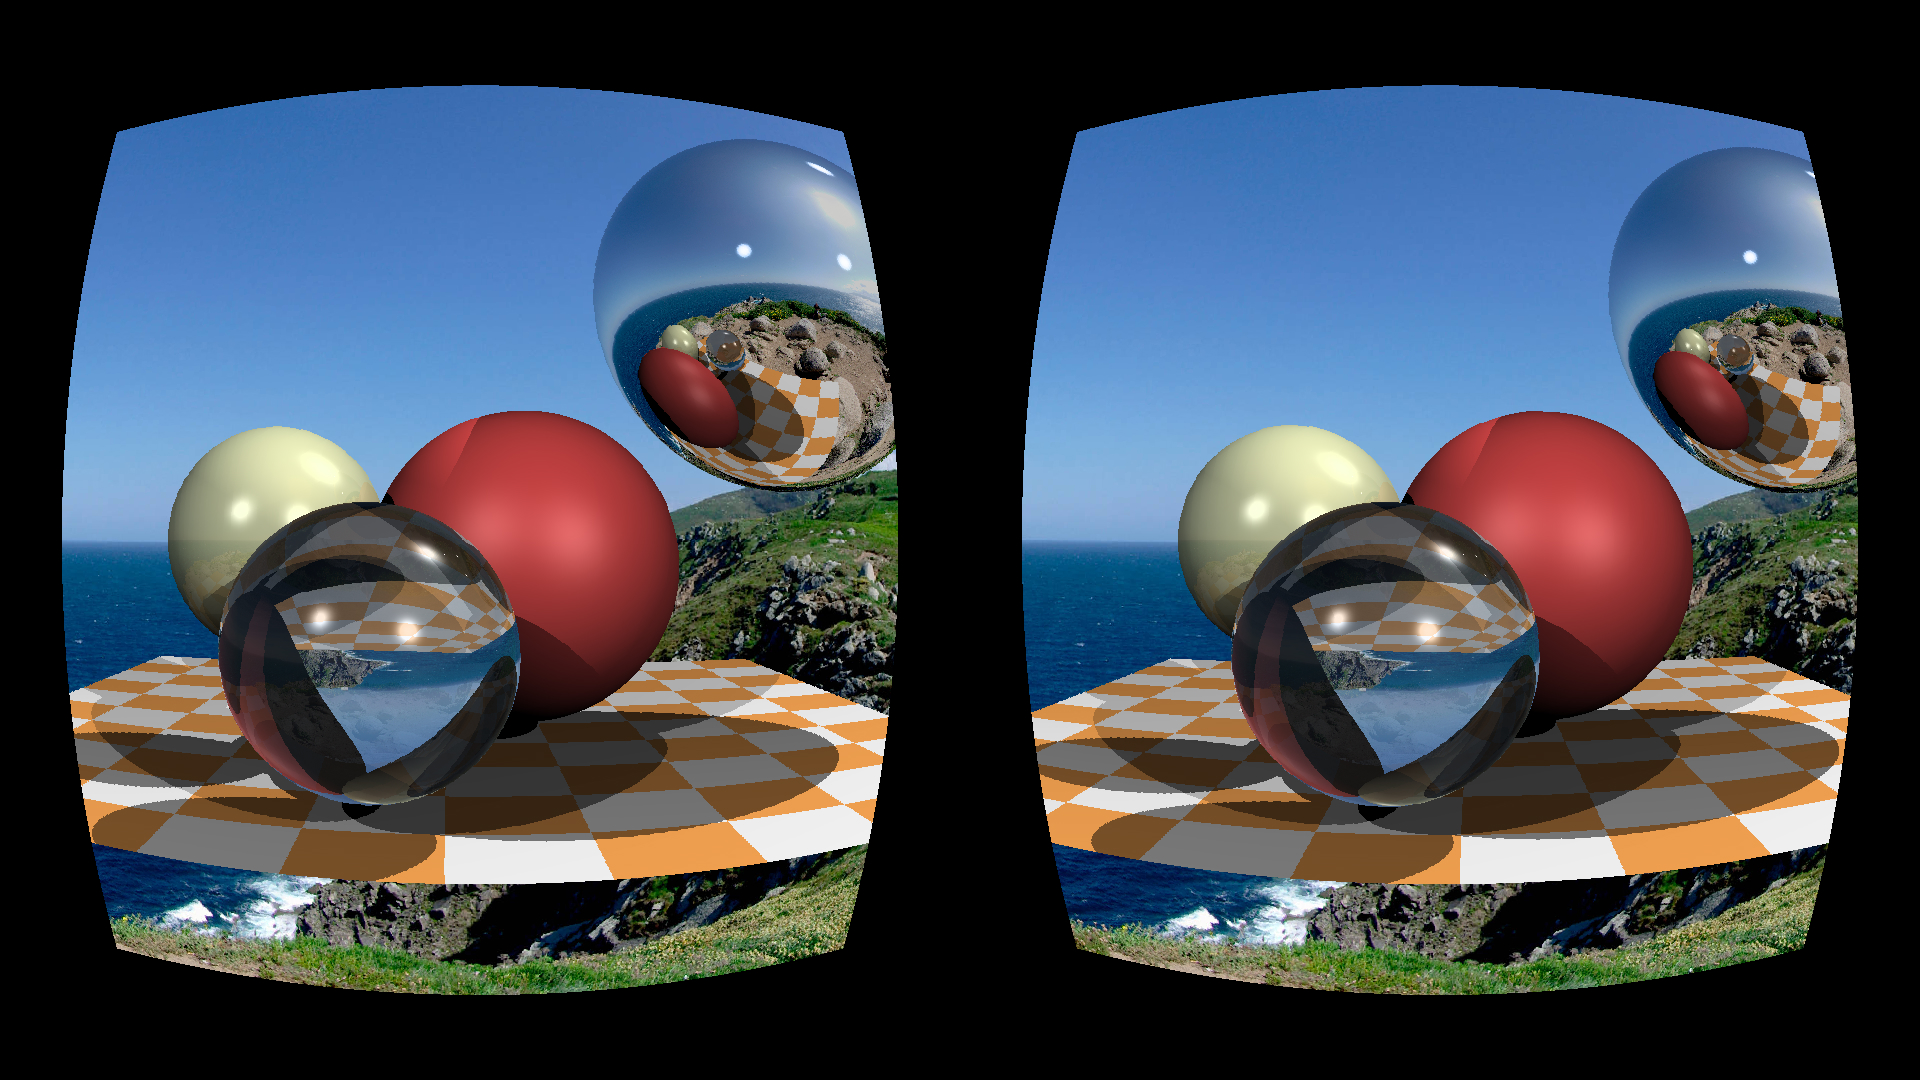
And what to do if you do not want to use additional devices at all? Then one option - ooset. Generally speaking, the previous picture is quite enough to view the stereo, just use the trick to view stereograms. There are two principles for viewing stereograms: either move your eyes or move apart. So I drew a diagram on which I show how you can look at the previous picture. The previous picture is double, two red lines on the diagram show two images on the left retina, two blue ones on the right one.

If we focus our gaze on the screen, then out of the four images we have two. If we squint to the nose, it is quite possible to show the brain "three" pictures. Conversely, if you open your eyes, you can also get “three” pictures. Overlaying central images will give the brain a stereo effect.
These methods are given to different people in different ways, for example, I do not know how to move my eyes at all, but I can easily spread them. It is important that a stereogram constructed for one method should be viewed in the same way, otherwise an inverted depth map is obtained (see negative and positive parallax). The problem with this way of viewing stereo is that it is very difficult to move the eyes relatively to the normal state, so you have to be content with small pictures. And what if you want big? Let's completely sacrifice color, and want to get only the perception of depth. Looking ahead, here is a picture that we get at the end of this part:
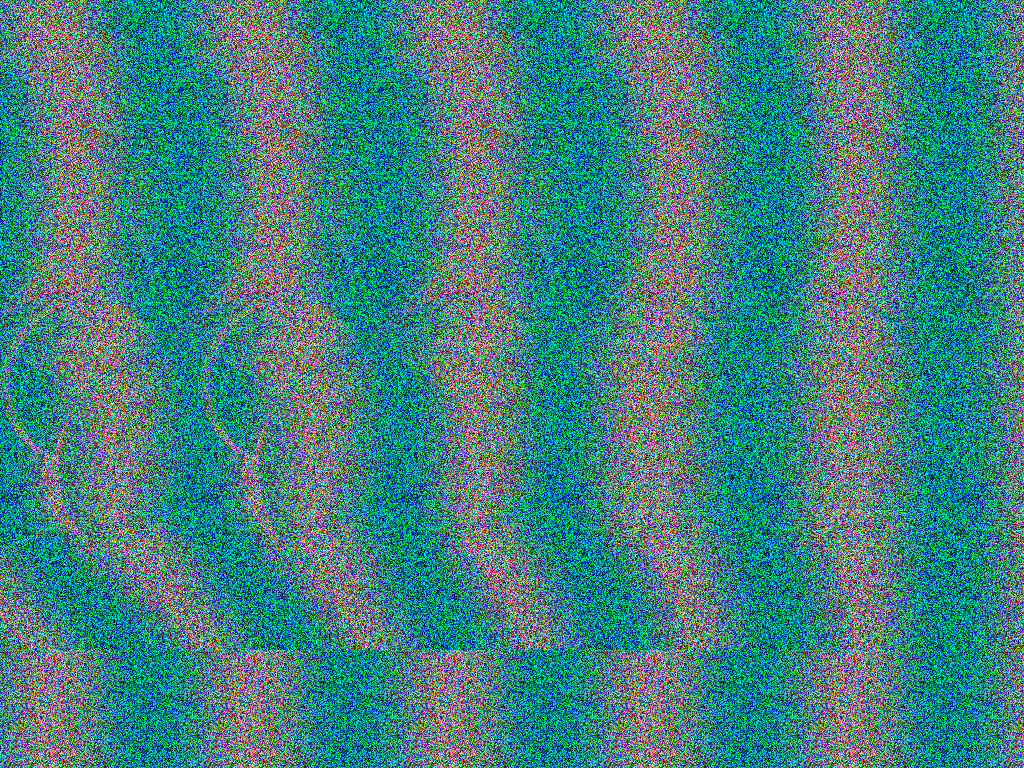
This stereogram is created for “diluting” the eyes (wall-eyed stereogram). Those who prefer the reverse way of browsing,take a picture here . If you are not used to stereograms, try different conditions: full-screen picture, small picture, bright light, darkness. The task is to separate the eyes so that the two adjacent vertix strips coincide. It is easiest to focus on the top left of the picture, because she is flat For example, I am hampered by the surroundings of the habr, I open the picture to full screen. Do not forget to remove the mouse from it!
Do not be satisfied with an inferior 3D effect. If you are only vaguely aware of rounded shapes in the midst of random points along with some weak 3D effects, this is, of course, an incomplete illusion! If you look correctly, the balls should obviously go out of the screen plane to the viewer, the effect should be stable and maintained due to the constant and detailed study of each part of the image, both the foreground and background. The stereopsis has a hysteresis: as soon as you can get a stable image, it becomes clearer the longer you look. The farther the screen from the eyes, the greater the effect of depth.
This stereogram is drawn according to the method proposed by Thimbleby and others a quarter of a century ago in their article " Displaying 3D Images: Algorithms for Single Random Image Dot Stereograms ".
The starting point for drawing stereograms is a depth map (we forgot about the color). Here is the commit that renders the following image: The
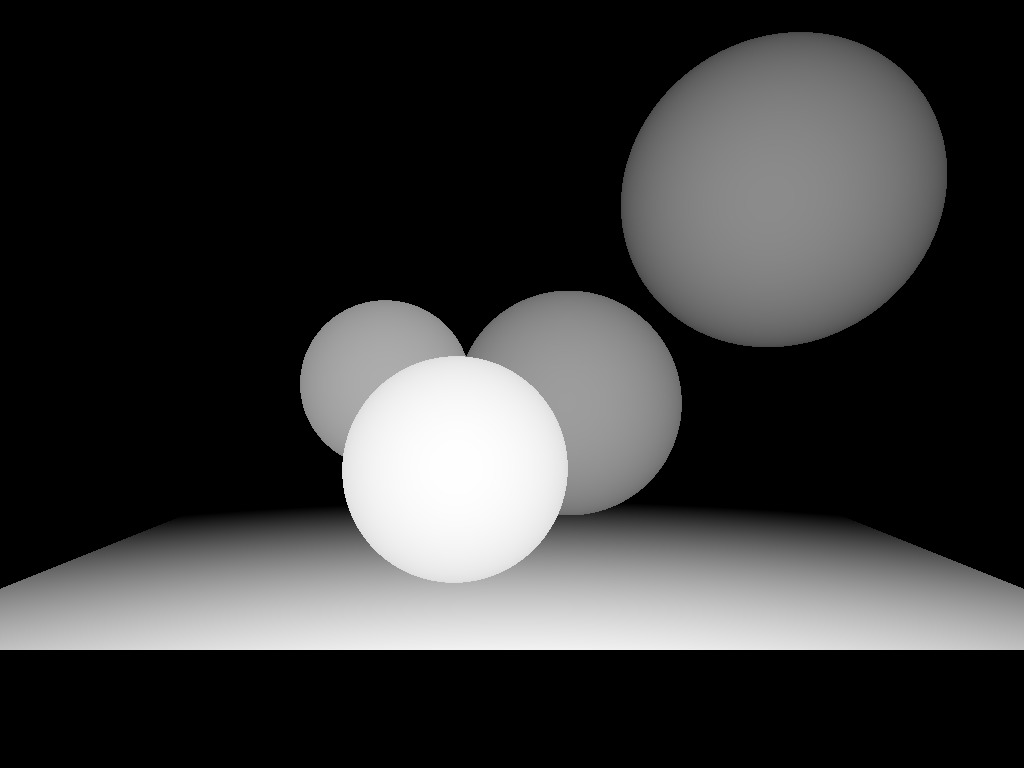
depths in our render are clipped to the near and far planes, that is, the furthest point in my map is 0, the closest one is 1.
Let our eyes be at a distance d from the screen. Place the (imaginary) far plane (z = 0) at the same distance behind the screen. Choose a constant μ, which will determine the position of the near plane (z = 0): it will be at a distance of μd from the far. I chose μ = 1/3 in my code. Total, our whole world lives at a distance from d-μd to d behind the screen. Suppose we have defined the distance e between the eyes (in pixels, in my code I chose 400 pixels).
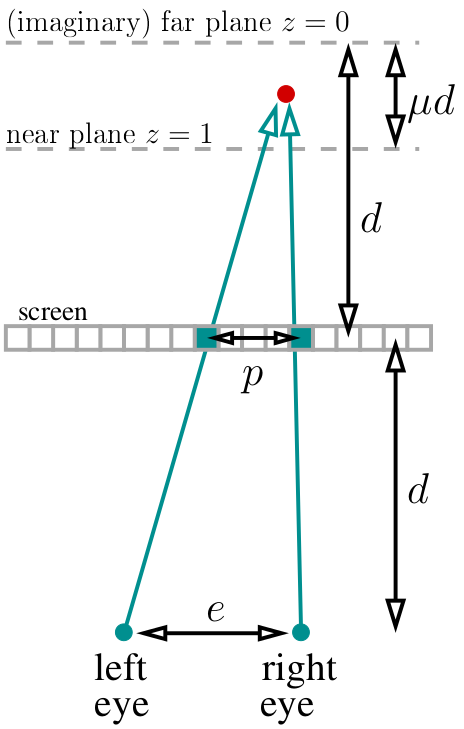
If we look at the point of our object marked in red in the scheme, then the two pixels marked in green should have the same color in the stereogram. How to find the distance between these pixels? Very simple. If the current projected point has a depth z, then the ratio of the parallax to the distance between the eyes is equal to the ratio of the corresponding depths: p / e = (d-dμz) / (2d-dμz). By the way, note that d is shrinking and not participating anywhere else! That is, p / e = (1-μz) / (2-μz), which means that the parallax equals p = e * (1-μz) / (2-μz) pixels.
That is, the basic principle of constructing a stereogram: we go through the entire depth map, for each depth value we determine which pixels should have the same color, and write this into our system of constraints. After that, we start with an arbitrary picture, and try to fulfill all previously imposed restrictions.
In this stage, we will prepare a picture, which later will impose parallax restrictions.
Here you can take a commit , he draws a picture like this:

Please note that, in general, the colors are just random, except that I put rand () * sin in the red channel to provide periodic waves. These waves are made with a distance of 200 pixels, this (with selected μ = 1/3 and e = 400) is the maximum parallax value in our world, it is also a far plane. These waves are optional, but they will facilitate the desired focusing of view.
Actually, the full code related to the stereogram looks like this:
If that, then commit to take here . The function int parallax (const float z) gives the distance between pixels of the same color for the current depth value. We render the stereogram line by line, as the lines are independent of each other (we do not have vertical parallax). Therefore, the main loop just runs through all the lines; for each of them, we start with a full unlimited set of pixels on which we will then impose pairwise equality constraints, and as a result we will have a certain number of clusters of (incoherent) pixels of the same color. For example, a pixel with a left index and a pixel with the right index should end up being the same.
How to store this set of restrictions? The simplest answer is union – find data structure. I will not describe it, it’s only three lines of code, you can read it in Wikipedia. The basic idea is that for each cluster we will have some kind of “responsible” for it, it’s the root pixel, we’ll leave it the same color as it was in the original image, and repaint all the other pixels in the cluster:
Well, actually, that's all. Twenty lines of code - and our stereogram is ready, break eyes and heads, draw pictures! By the way, just random colors in a stereogram is generally a luxury, in principle, if you try, you can also make a partial transfer of the color of our image.
Other stereo viewing systems, for example, related to polarization , I brought beyond the scope of the discussion, since they go out of the budget of one hundred rubles. If that is missed, add and correct!
The topic of today's conversation is binocular vision, and even today we will not reach even a hundred lines of code. Knowing how to render three-dimensional scenes, it would be foolish to walk past a stupar, today we will draw something like this:

The madness of the Magic Carpet developers is haunting me. For those who did not find this game, it was possible to make a 3D render in both anaglyph and stereograms in the basic settings, just available in the menu! The brain just blew it up specifically.
Parallax
So let's get started. For a start, thanks to what does our visual apparatus generally allow us to perceive depth? There is such a clever word "parallax". If on the fingers, then let's focus our eyes on the screen. Everything that is in the plane of the screen for our brain exists in a single copy. But if a fly suddenly flies in front of the screen, then (if we don’t change our eyes!) Our brain will register it in two copies. At the same time, the spider on the wall behind the screen also splits, and the direction of the split depends on whether the object is in front of the focal point or behind:

Our brain is a very effective machine for analyzing slightly different images. It uses disparity to obtain depth information from two-dimensional images of the retina for stereopsis.. Well, God bless them, with words, let's better draw pictures!
Let's assume that our screen is a window into the virtual world :)

Our task is to draw two pictures with what will be visible through this “window”. There will be two pictures, one for each eye, in the diagram above I showed them with a red and blue “sandwich”. Let's not bother yet, how exactly we feed these pictures to the visual apparatus, we just need to save two files. Specifically, I am interested in how these images can be obtained with the help of our ray tracer .
Well, let's say, the direction does not change, this is a vector (0,0, -1). Suppose we can move the camera position to the inter-eye distance, what else? There is one small subtlety: the cone of a look through our “window” is asymmetric. And our raytracer is able to render only a symmetric cone of a look:

What to do? Read :)
In fact, we can render the pictures wider than we need, and just cut off the extra:

Anaglyph
With the general rendering mechanism it should be clear, now is the time to wonder about the delivery of the image to our brain. One of the simplest options is red and blue glasses:

We’ll just make two pre-renders not colored, but black and white, we will write the left picture into the red channel and the right picture into the blue one. This picture

will turn out: Red glass will cut off one channel, and blue glass will cut off another, so everyone’s eyes will receive their own picture, and we can look at the world in 3D. Here are the changes to the main commit of the first article , which show both camera settings for both eyes and channel assembly.
Anaglyph renders are one of the most ancient ways to view (computer!) Stereo images. They have many drawbacks, for example, poor color rendering (by the way, try recording the green channel of the right eye into the green channel of the final picture). One benefit - these glasses are easy to make from scrap materials.
Stereoscope
With the mass distribution of smartphones, we remembered what stereoscopes are (which, for a moment, were invented in the 19th century)! A few years ago, Google offered to use two penny lenses (unfortunately, they are not made on the knee), a little cardboard (lying everywhere) and a smartphone (lying in a pocket) to get quite tolerable virtual reality glasses:

There were a lot of rubles on aliexpress. Compared to anaglyph, you don’t need to do anything at all, just take two pictures and make them side by side, here’s a commit .

Strictly speaking, depending on the lens, lens distortion correction may be needed., but I didn’t bother at all, and it looks great on my glasses. But if you really need to apply a barrel-shaped pre-distortion, which compensates for the distortion from the lens, then this is how it looks for my smartphone and for my glasses:

Stereograms
And what to do if you do not want to use additional devices at all? Then one option - ooset. Generally speaking, the previous picture is quite enough to view the stereo, just use the trick to view stereograms. There are two principles for viewing stereograms: either move your eyes or move apart. So I drew a diagram on which I show how you can look at the previous picture. The previous picture is double, two red lines on the diagram show two images on the left retina, two blue ones on the right one.

If we focus our gaze on the screen, then out of the four images we have two. If we squint to the nose, it is quite possible to show the brain "three" pictures. Conversely, if you open your eyes, you can also get “three” pictures. Overlaying central images will give the brain a stereo effect.
These methods are given to different people in different ways, for example, I do not know how to move my eyes at all, but I can easily spread them. It is important that a stereogram constructed for one method should be viewed in the same way, otherwise an inverted depth map is obtained (see negative and positive parallax). The problem with this way of viewing stereo is that it is very difficult to move the eyes relatively to the normal state, so you have to be content with small pictures. And what if you want big? Let's completely sacrifice color, and want to get only the perception of depth. Looking ahead, here is a picture that we get at the end of this part:

This stereogram is created for “diluting” the eyes (wall-eyed stereogram). Those who prefer the reverse way of browsing,take a picture here . If you are not used to stereograms, try different conditions: full-screen picture, small picture, bright light, darkness. The task is to separate the eyes so that the two adjacent vertix strips coincide. It is easiest to focus on the top left of the picture, because she is flat For example, I am hampered by the surroundings of the habr, I open the picture to full screen. Do not forget to remove the mouse from it!
Do not be satisfied with an inferior 3D effect. If you are only vaguely aware of rounded shapes in the midst of random points along with some weak 3D effects, this is, of course, an incomplete illusion! If you look correctly, the balls should obviously go out of the screen plane to the viewer, the effect should be stable and maintained due to the constant and detailed study of each part of the image, both the foreground and background. The stereopsis has a hysteresis: as soon as you can get a stable image, it becomes clearer the longer you look. The farther the screen from the eyes, the greater the effect of depth.
This stereogram is drawn according to the method proposed by Thimbleby and others a quarter of a century ago in their article " Displaying 3D Images: Algorithms for Single Random Image Dot Stereograms ".
A starting point
The starting point for drawing stereograms is a depth map (we forgot about the color). Here is the commit that renders the following image: The

depths in our render are clipped to the near and far planes, that is, the furthest point in my map is 0, the closest one is 1.
The basic principle
Let our eyes be at a distance d from the screen. Place the (imaginary) far plane (z = 0) at the same distance behind the screen. Choose a constant μ, which will determine the position of the near plane (z = 0): it will be at a distance of μd from the far. I chose μ = 1/3 in my code. Total, our whole world lives at a distance from d-μd to d behind the screen. Suppose we have defined the distance e between the eyes (in pixels, in my code I chose 400 pixels).

If we look at the point of our object marked in red in the scheme, then the two pixels marked in green should have the same color in the stereogram. How to find the distance between these pixels? Very simple. If the current projected point has a depth z, then the ratio of the parallax to the distance between the eyes is equal to the ratio of the corresponding depths: p / e = (d-dμz) / (2d-dμz). By the way, note that d is shrinking and not participating anywhere else! That is, p / e = (1-μz) / (2-μz), which means that the parallax equals p = e * (1-μz) / (2-μz) pixels.
That is, the basic principle of constructing a stereogram: we go through the entire depth map, for each depth value we determine which pixels should have the same color, and write this into our system of constraints. After that, we start with an arbitrary picture, and try to fulfill all previously imposed restrictions.
Prepare the original image
In this stage, we will prepare a picture, which later will impose parallax restrictions.
Here you can take a commit , he draws a picture like this:

Please note that, in general, the colors are just random, except that I put rand () * sin in the red channel to provide periodic waves. These waves are made with a distance of 200 pixels, this (with selected μ = 1/3 and e = 400) is the maximum parallax value in our world, it is also a far plane. These waves are optional, but they will facilitate the desired focusing of view.
Render the stereogram
Actually, the full code related to the stereogram looks like this:
intparallax(constfloat z){
    constfloat eye_separation = 400.; // interpupillary distance in pixelsconstfloat mu = .33;              // if the far plane is a distance D behind the screen, then the near plane is a distance mu*D in front of the far planereturnstatic_cast<int>(eye_separation*((1.-z*mu)/(2.-z*mu))+.5);
}
size_t uf_find(std::vector<size_t> &same, size_t x) {
    return same[x]==x ? x : uf_find(same, same[x]);
}
voiduf_union(std::vector<size_t> &same, size_t x, size_t y){
    if ((x=uf_find(same, x)) != (y=uf_find(same, y))) same[x] = y;
}
intmain(){
[...]
    for (size_t j=0; j<height; j++) { // autostereogram rendering loopstd::vector<size_t> same(width);
        std::iota(same.begin(), same.end(), 0); // initialize the union-find data structure (same[i]=i)for (size_t i=0; i<width; i++) { // put the constraintsint par = parallax(zbuffer[i+j*width]);
            int left  = i - par/2;
            int right = left + par; // works better than i+par/2 for odd values of parif (left>=0 && right<(int)width)
                uf_union(same, left, right); // left and right pixels will have the same color
        }
        for (size_t i=0; i<width; i++) { // resolve the constraintssize_t root = uf_find(same, i);
            for (size_t c=0; c<3; c++)
                framebuffer[(i+j*width)*3+c] = framebuffer[(root+j*width)*3+c];
        }
    }
[...]
If that, then commit to take here . The function int parallax (const float z) gives the distance between pixels of the same color for the current depth value. We render the stereogram line by line, as the lines are independent of each other (we do not have vertical parallax). Therefore, the main loop just runs through all the lines; for each of them, we start with a full unlimited set of pixels on which we will then impose pairwise equality constraints, and as a result we will have a certain number of clusters of (incoherent) pixels of the same color. For example, a pixel with a left index and a pixel with the right index should end up being the same.
How to store this set of restrictions? The simplest answer is union – find data structure. I will not describe it, it’s only three lines of code, you can read it in Wikipedia. The basic idea is that for each cluster we will have some kind of “responsible” for it, it’s the root pixel, we’ll leave it the same color as it was in the original image, and repaint all the other pixels in the cluster:
for (size_t i=0; i<width; i++) { // resolve the constraintssize_t root = uf_find(same, i);
            for (size_t c=0; c<3; c++)
                framebuffer[(i+j*width)*3+c] = framebuffer[(root+j*width)*3+c];
        }
Conclusion
Well, actually, that's all. Twenty lines of code - and our stereogram is ready, break eyes and heads, draw pictures! By the way, just random colors in a stereogram is generally a luxury, in principle, if you try, you can also make a partial transfer of the color of our image.
Other stereo viewing systems, for example, related to polarization , I brought beyond the scope of the discussion, since they go out of the budget of one hundred rubles. If that is missed, add and correct!
