Hadoop Part 1: Cluster Deployment

The continuous growth of data and an increase in the speed of its generation pose a problem of their processing and storage. Not surprisingly, the topic of “Big Data” is one of the most talked about in the modern IT community.
Materials on the theory of "big data" in specialized journals and websites today published quite a lot. But it is far from always clear from theoretical publications how appropriate technologies can be used to solve specific practical problems.
One of the most well-known and discussed projects in the field of distributed computing is Hadoop - a freely distributed set of utilities, libraries, and a framework for developing and running distributed computing programs developed by the Apache Software Foundation.
We have been using Hadoop for a long time to solve our own practical problems. The results of our work in this area are worth telling the general public about them. This article is the first in a series about Hadoop. Today we will tell about the history and structure of the Hadoop project, and also show on the example of the Hadoop Cloudera distribution how the cluster is deployed and configured.
Caution, there is a lot of traffic under the cut.
A bit of history
The author of Hadoop is Doug Cutting, creator of the famous Apache Lucene text search library. The name of the project is the name that Doug's son came up with for his plush yellow elephant.
Cutting created Hadoop while working on the Nutch project, an open source web search engine. The Nutch project was launched in 2002, but very soon its developers realized that the existing architecture could hardly be scaled to billions of web pages. In 2003, an article was published describing the distributed file system GFS (Google File System) used in Google projects. Such a system could well cope with the task of storing large files generated by crawling and indexing sites. In 2004, the Nutch development team set about implementing such an open source system, NDFS (Nutch Distributed File System).
In 2004, Google introduced MapReduce technology to a wide audience. At the beginning of 2005, Nutch developers created a full-fledged implementation of MapReduce based on Nutch; shortly afterwards, all of the core Nutch algorithms were adapted to use MapReduce and NDFS. In 2006, Hadoop was singled out as an independent subproject under the Lucene project.
In 2008, Hadoop became one of the leading Apache projects. By then, it had already been used successfully in companies such as Yahoo !, Facebook and Last.Fm. Today, Hadoop is widely used both in commercial companies and in scientific and educational institutions.
Hadoop Project Structure
The Hadoop project includes the following subprojects:
- Common - a set of components and interfaces for distributed file systems and general input-output;
- Map Reduce - a distributed computing model designed for parallel computing over very large (up to several petabytes) data volumes;
- HDFS is a distributed file system that runs on large clusters of typical machines.
Hadoop previously included other subprojects, which are now stand-alone products from the Apache Software Foundation:
- Avro - a serialization system for inter-language RPC calls and long-term data storage;
- Pig - data flow control language and execution environment for analyzing large volumes of data;
- Hive - distributed data warehouse; it manages the data stored in HDFS and provides an SQL-based query language for working with this data;
- HBase - non-relational distributed database;
- ZooKeeper - distributed coordination service; provides primitives for building distributed applications;
- Sqoop - a tool for transferring data between structured storage and HDFS;
- Oozie is a service for recording and scheduling Hadoop tasks.
Hadoop Distributions
Today Hadoop is a complex system consisting of a large number of components. Installing and configuring such a system yourself is a very difficult task. Therefore, many companies today offer off-the-shelf Hadoop distributions, including deployment, administration, and monitoring tools.
Hadoop distributions are distributed both under commercial (products of companies such as Intel, IBM, EMC, Oracle), and under free (products of Cloudera, Hortonworks and MapR). We will talk about the Cloudera Hadoop distribution in more detail.
Cloudera hadoop
Cloudera Hadoop is a fully open source distribution created with the active participation of Apache Hadoop developers Doug Cutting and Mike Cafarella. It is distributed in both free and paid versions, known as Cloudera Enterprise.
When we became interested in the Hadoop project, Cloudera provided the most complete and comprehensive solution among the Hadoop open source distributions. For all the time of operation there was not a single significant malfunction, and the cluster successfully survived several major updates that passed completely automatically. And now, after almost a year of experiments, we can say that we are satisfied with the choice made.
Cloudera Hadoop includes the following main components:
- Cloudera Hadoop (CDH) - the actual distribution of Hadoop;
- Cloudera Manager is a tool for deploying, monitoring, and managing a Hadoop cluster.
Cloudera Hadoop components are distributed as binary packages called parcels . Compared to standard packages and package managers, parcels have the following advantages:
- ease of loading: each parcel is a single file in which all the necessary components are combined;
- internal consistency: all the components inside the parcel are thoroughly tested, debugged and consistent with each other, so the likelihood of problems with incompatibility of components is very small;
- differentiation of distribution and activation: you can first install parsels on all managed nodes, and then activate them with one action; thanks to this, the system update is carried out quickly and with minimal downtime;
- Updates “on the go”: when updating the minor version, all new processes (tasks) will automatically start under this version, already launched tasks will continue to be executed in the old environment until they are completed. However, updating to a newer major version is possible only through a complete restart of all cluster services, and accordingly all current tasks;
- simple rollback of changes: if you encounter any problems working with the new version of CDH, it can be easily rolled back to the previous one.
Hardware requirements
The hardware requirements for deploying Hadoop are a complex topic. Different nodes are presented with different requirements in the cluster. You can read more about this, for example, in Intel's recommendations or in the Cloudera company blog . General rule: more memory and disks! RAID-controllers and other enterprise joys are not necessary due to the architecture of Hadoop and HDFS, designed to work on typical simple servers. Using 10GB network cards is justified when data volumes are more than 12TB per node.
The Cloudera blog provides the following list of hardware configurations for various download options:
- “Light” configuration (1U) - 2 six-core processors, 24-64 GB of memory, 8 hard drives with a capacity of 1-2 TB;
- rational configuration (1U) - 2 six-core processors, 48-128 GB of memory, 12-16 hard drives (1 or 2 TB) connected directly through the motherboard controller;
- “Heavy” configuration for storage (2U): 2 six-core processors, 48-96 GB of memory, 16-24 hard drives. With multiple failures in the operation of nodes in this configuration, a sharp increase in network traffic occurs;
- configuration for intensive computing: 2 six-core processors, 64-512 GB of memory, 4-8 hard drives with a capacity of 1-2 TB.

Note that in the case of server rental, losses from an unsuccessfully selected configuration are not as terrible as when buying your own servers. If necessary, you can modify the leased servers or replace them with more suitable for your tasks.
We proceed directly to the installation of our cluster.
OS installation and setup
For all servers, we will use CentOS 6.4 in a minimal installation, but other distributions can also be used: Debian, Ubuntu, RHEL, etc. The required packages are publicly available at archive.cloudera.com and are installed by standard package managers.
On the Cloudera Manager server, we recommend using software or hardware RAID1 and one root partition, you can move it to a separate / var / log / partition. On servers that will be added to the hadoop cluster, we recommend creating two partitions:
- "/" With a size of 50-100GB for the OS and software Cloudera Hadoop;
- "/ Dfs" on top of LVM on all available disks for storing HDFS data;
- "Swap" is better to make very small, about 500MB. Ideally, servers should not swap at all, but if this happens, then a small swap will save processes from the OOM killer.
On all servers, including the Cloudera Manager server, SELinux and the firewall must be disabled. You can, of course, not do this, but then you will have to spend a lot of time and effort on fine-tuning security policies. To ensure security, it is recommended to isolate the cluster as much as possible from the outside world at the network level, for example, using a hardware firewall or an isolated VLAN (organize access to mirrors through a local proxy).
# vi / etc / selinux / config # turn off SElinux
SELINUX = disabled
# system-config-firewall-tui # turn off the firewall and save the settings
# reboot
We offer examples of ready-made kickstart files for the automatic installation of Cloudera Manager servers and cluster nodes.
Example cloudera_manager.ks
install
text
reboot
### General
url --url http://mirror.selectel.ru/centos/6.4/os/x86_64
# disable SELinux for CDH
selinux --disabled
rootpw supersecretpasswrd
authconfig --enableshadow --enablemd5
# Networking
firewall --disabled
network --bootproto = static --device = eth0 --ip = 1.2.3.254 --netmask = 255.255.255.0 --gateway = 1.2.3.1 --nameserver = 188.93.16.19,109.234.159.91,188.93.17.19 --hostname = cm.example.net
# Regional
keyboard us
lang en_US.UTF-8
timezone Europe / Moscow
### Partitioning
zerombr yes
bootloader --location = mbr --driveorder = sda, sdb
clearpart --all --initlabel
part raid. 11 --size 1024 --asprimary --ondrive = sda
part raid. 12 --size 1 --grow --asprimary --ondrive = sda
part raid.21 --size 1024 --asprimary --ondrive = sdb
part raid.22 --size 1 --grow --asprimary --ondrive = sdb
raid / boot --fstype ext3 --device md0 --level = RAID1 raid.11 raid.21
raid pv.01 --fstype ext3 --device md1 --level = RAID1 raid.12 raid.22
volgroup vg0 pv.01
logvol swap --vgname = vg0 --size = 12288 --name = swap --fstype = ext4
logvol / --vgname = vg0 --size = 1 --grow --name = vg0-root --fstype = ext4
% packages
@Base
wget
ntp
% post --erroronfail
chkconfig ntpd on
wget -q -O /etc/yum.repos.d/cloudera-manager.repo http://archive.cloudera.com/cm4/redhat/6/x86_64/cm/cloudera-manager.repo
rpm --import http://archive.cloudera.com/cdh4/redhat/6/x86_64/cdh/RPM-GPG-KEY-cloudera
yum -y install jdk
yum -y install cloudera-manager-daemons
yum -y install cloudera-manager-server
yum -y install cloudera-manager-server-db
Node.ks example
install
text
reboot
### General
url --url http://mirror.selectel.ru/centos/6.4/os/x86_64
# disable SELinux for CDH
selinux --disabled
rootpw nodeunifiedpasswd
authconfig --enableshadow --enablemd5
# Networking
firewall --disabled
network --bootproto = static --device = eth0 --ip = 1.2.3.10 --netmask = 255.255.255.0 --gateway = 1.2.3.1 --nameserver = 188.93.16.19,109.234.159.91,188.93.17.19 --hostname = node.example.net
# Regional
keyboard us
lang en_US.UTF-8
timezone Europe / Moscow
### Partitioning
zerombr yes
bootloader --location = mbr --driveorder = sda
clearpart --all --initlabel
part / boot --fstype ext3 --size 1024 --asprimary --ondrive = sda
part pv.01 --fstype ext3 --size 1 --grow --asprimary --ondrive = sda
# repeat for every hard drive
part pv.01 --fstype ext3 --size 1 --grow --asprimary --ondrive = sdb
part pv.01 --fstype ext3 --size 1 --grow --asprimary --ondrive = sdc
volgroup vg0 pv.01
logvol swap --vgname = vg0 --size = 512 --name = swap --fstype = ext4
logvol / --vgname = vg0 --size = 51200 --name = vg0-root --fstype = ext4
logvol / dfs --vgname = vg0 --size = 1 --grow --name = dfs --fstype = ext4
% packages
@Base
wget
ntp
% post --erroronfail
chkconfig ntpd on
Install Cloudera Manager
We'll start by installing Cloudera Manager, who will then deploy and configure our future Hadoop cluster on servers.
Before installation, you must make sure that:
- all servers in the cluster are accessible via ssh, and they have the same root password (or a public ssh key has been added);
- all nodes should have access to standard package repositories (have access to the Internet or access to a local repository / proxy);
- all servers included in the cluster have access to archive.cloudera.com or to the local repository with the necessary installation files;
- ntp is installed on all servers and time synchronization is configured;
- all nodes in the cluster and CM server have DNS and PTR records configured (or all hosts must be registered in / etc / hosts of all servers).
Add a Cloudera mirror and install the necessary packages:
# wget -q -O /etc/yum.repos.d/cloudera-manager.repo http://archive.cloudera.com/cm4/redhat/6/x86_64/cm/cloudera-manager.repo
# rpm --import http://archive.cloudera.com/cdh4/redhat/6/x86_64/cdh/RPM-GPG-KEY-cloudera
# yum -y install jdk
# yum -y install cloudera-manager-daemons
# yum -y install cloudera-manager-server
# yum -y install cloudera-manager-server-db
At the end of the installation, we launch the standard database (for simplicity we will use it, although any third-party can be connected) and the CM service itself:
# /etc/init.d/cloudera-scm-server-db start
# /etc/init.d/cloudera-scm-server start
Cloudera Hadoop Cluster Deployment
After installing Cloudera Manager, you can forget about the console; we will carry out all further interaction with the cluster using the Cloudera Manager web interface. By default, Cloudera Manager uses 7180 ports. You can use either the DNS name or the IP address of the server. Enter this address in the browser bar.
The login window will appear on the screen. Login and password are standard (admin, admin). Of course, they need to be changed immediately.
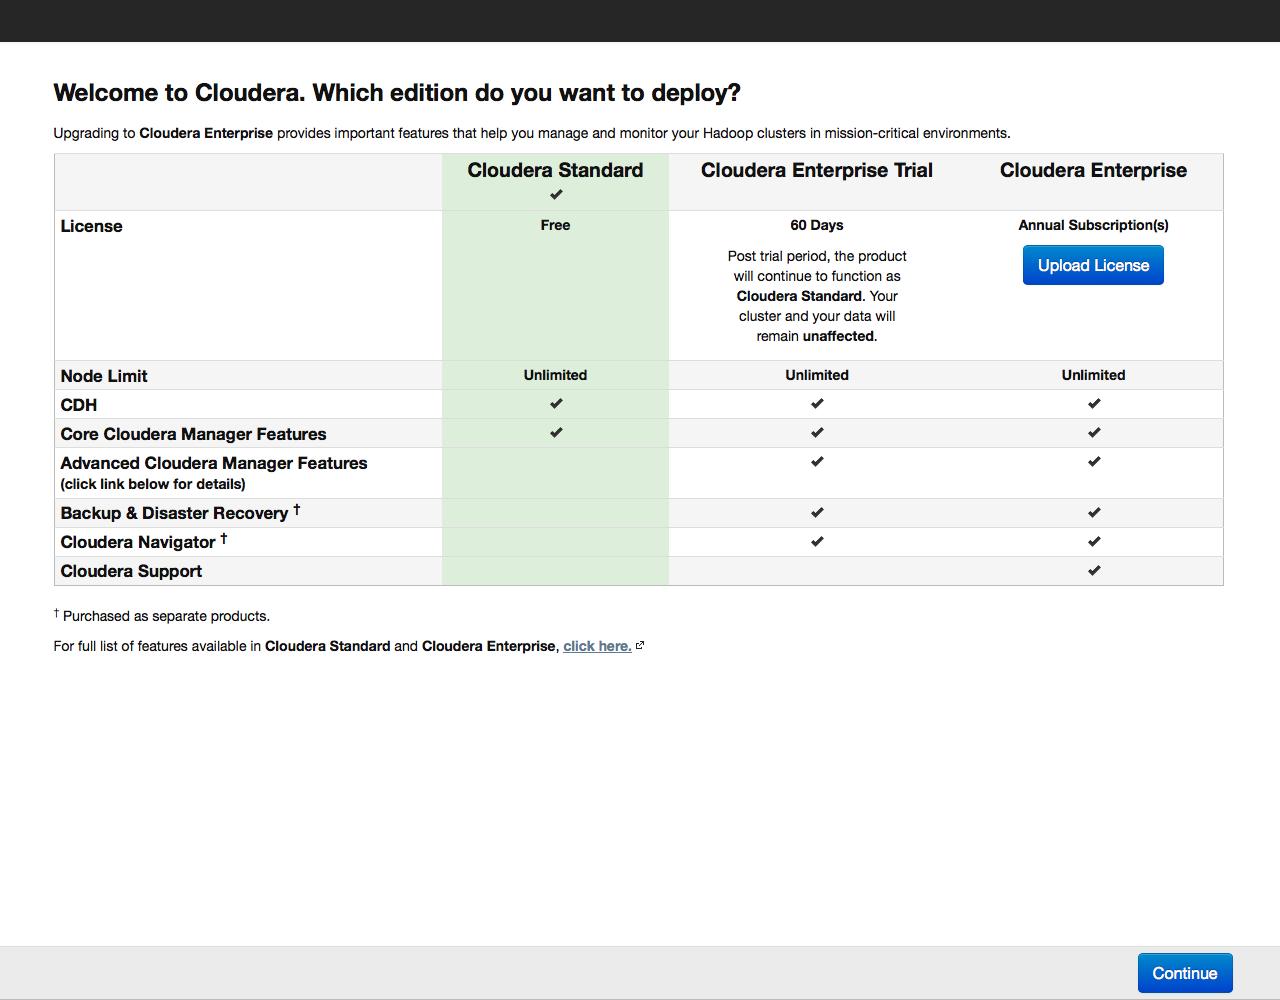
A window opens offering to select the version of Cloudera Hadoop: free, 60-day trial or paid license: Choose the free (Cloudera Standard) version. The trial or paid license can be activated later at any time when you are already comfortable with working with the cluster.
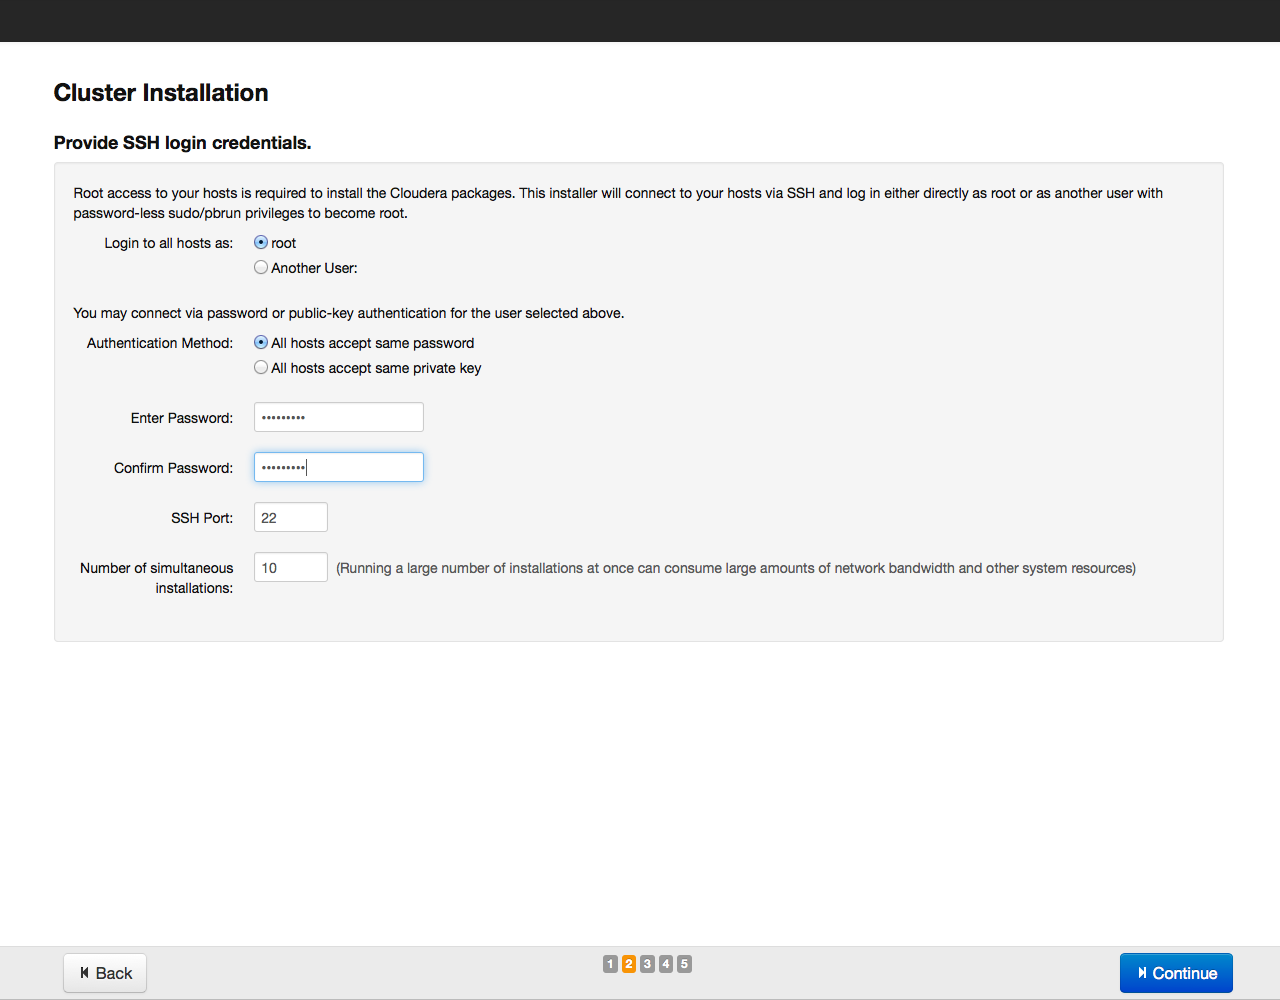
During installation, the Cloudera Manager service will connect via SSH to the servers in the cluster; he performs all actions on the servers on behalf of the user specified in the menu; by default, root is used.
Next, Cloudera Manager will ask you to specify the host addresses where Cloudera Hadoop will be installed: Addresses can be specified by list and by mask, for example like this:
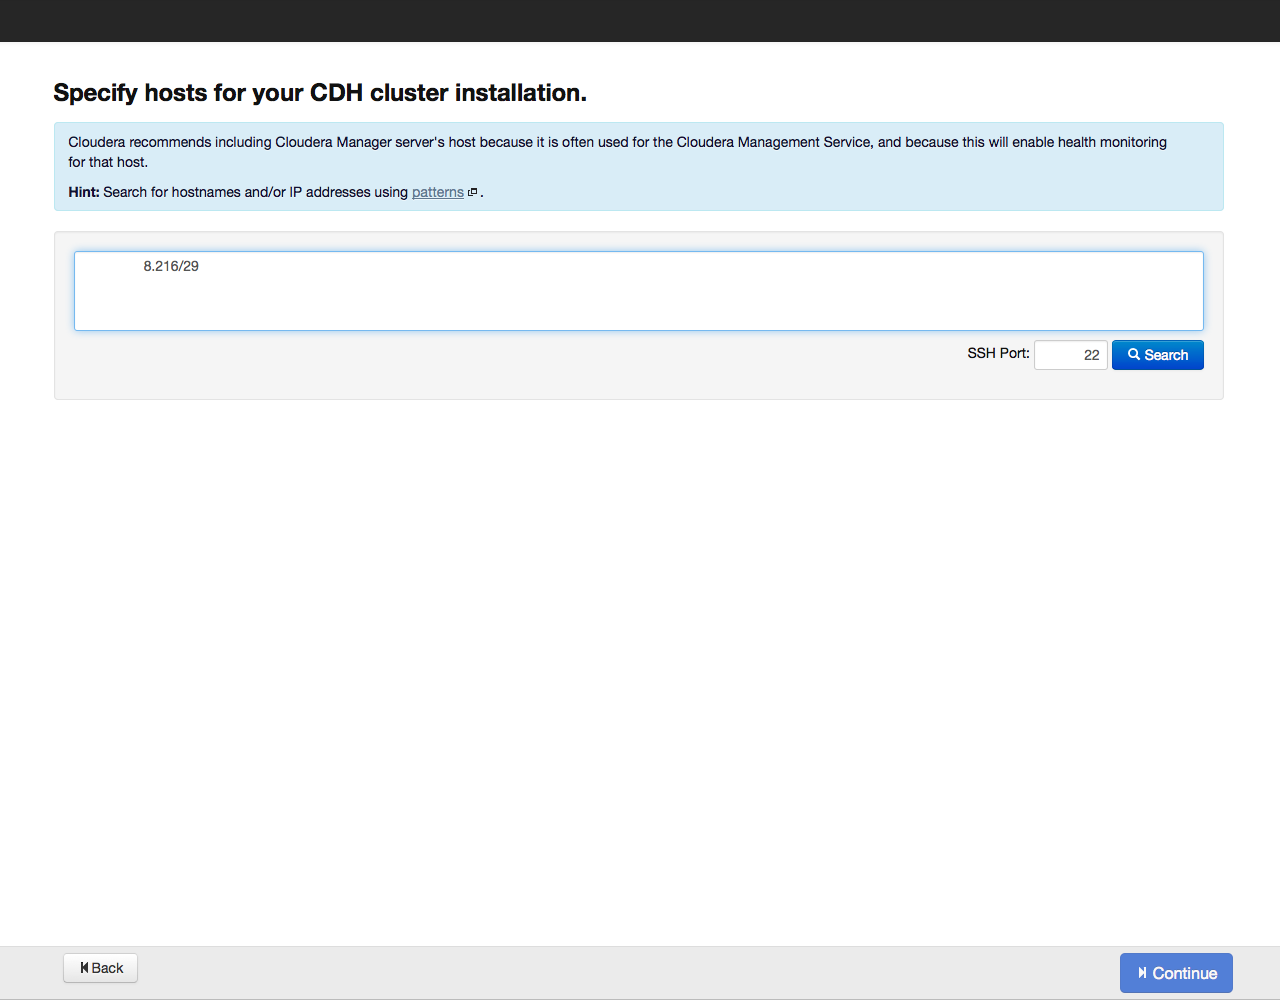
- 10.1.1. [1-4] means that the cluster will include nodes with IP addresses 10.1.1.1, 10.1.1.2, 10.1.1.3, 10.1.1.4
- host [07-10] .example.com - host07.example.com, host08.example.com, host09.example.com, host10.example.com.
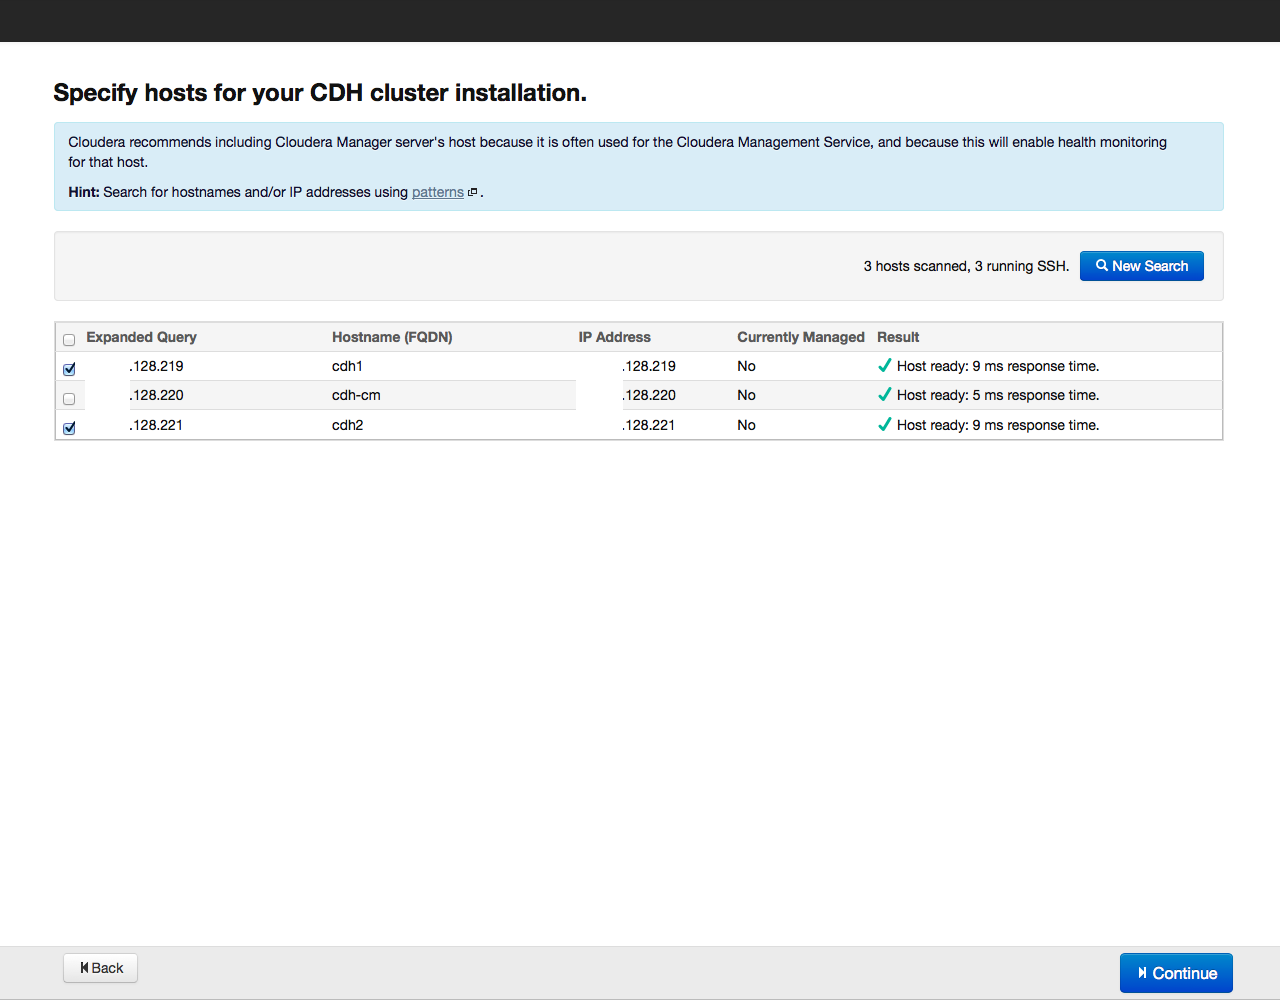
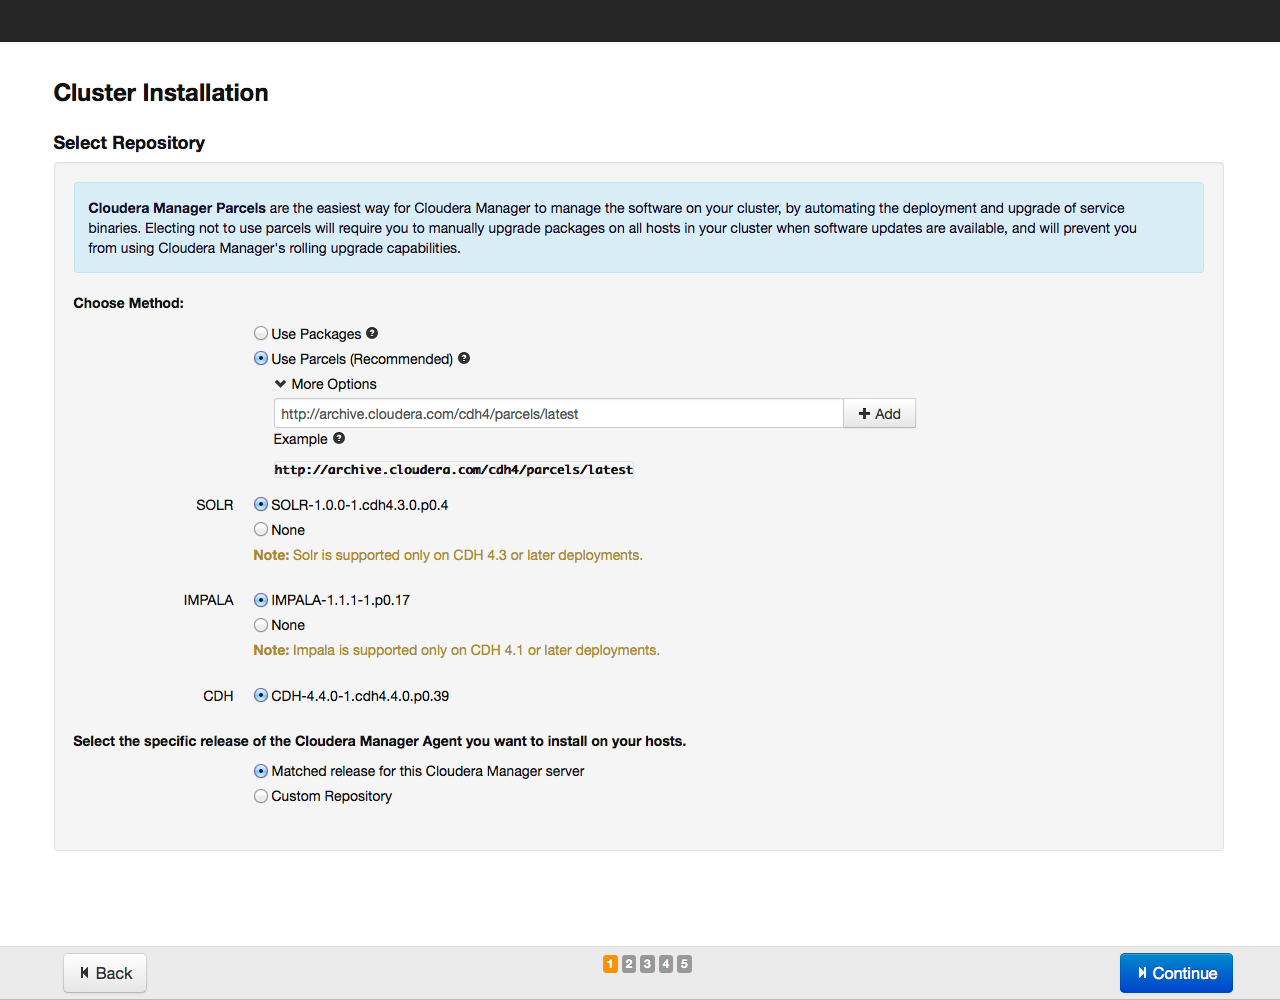
After that, click on the Search button. Cloudera Manager will detect the indicated hosts, and a list of them will be displayed on the screen: Once again we check whether all the necessary hosts are included in this list (you can add new hosts by clicking on the New Search button). Then click on the Continue button. The repository selection window opens: As a method of installation, we recommend choosing the installation with parsers, we have already described their advantages. Parcels are installed from the archive.cloudera.org repository. In addition to the CDH parsel, you can install the SOLR search tool and the Hadoop IMPALA database from the same repository. Having selected the parsels to install, click on the Continue button. In the next window, specify the parameters for access via SSH (login, password or private key, port number for connection):
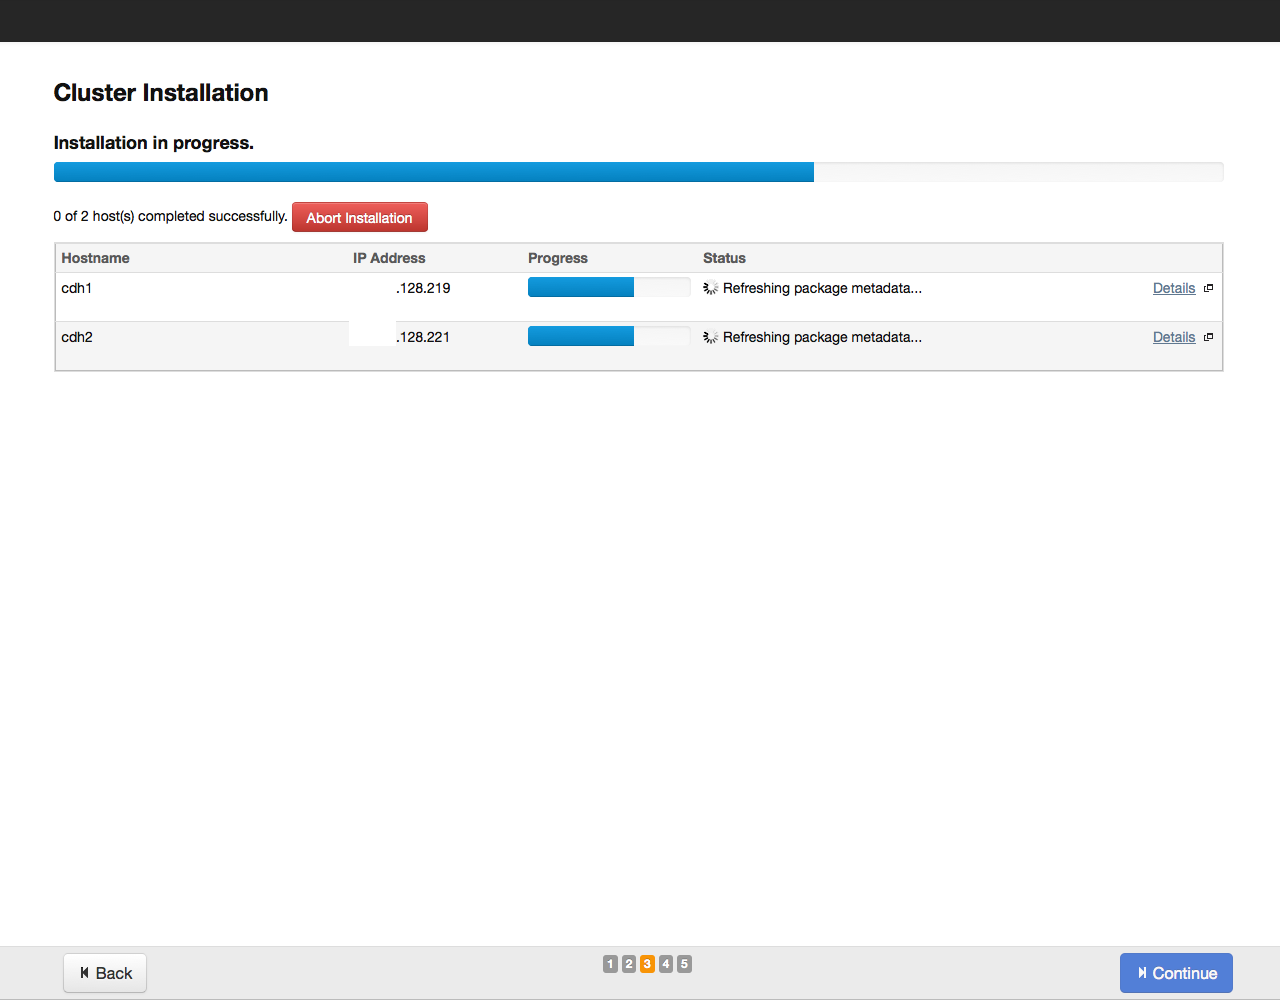
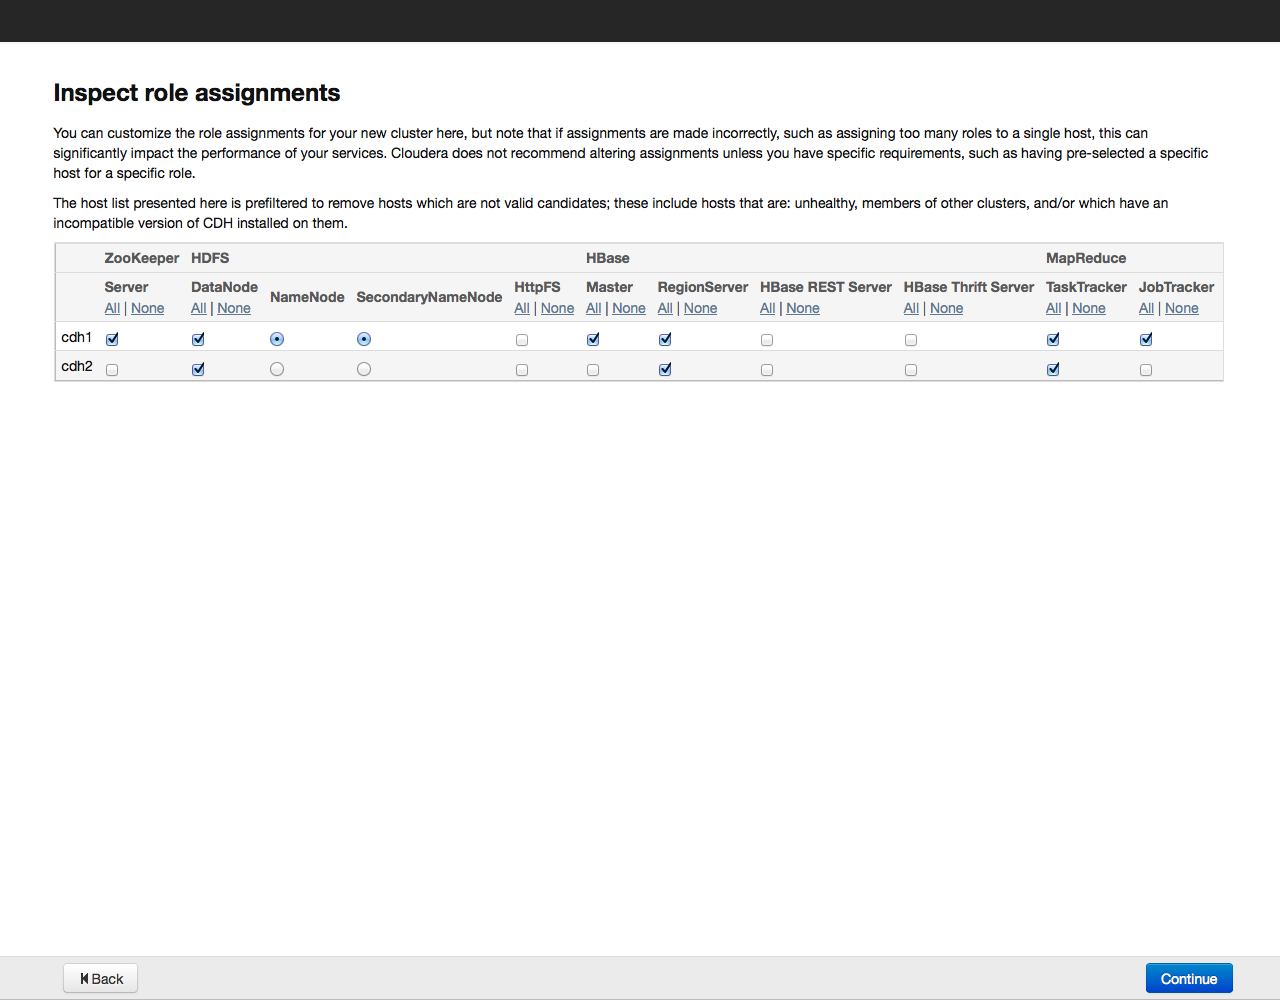
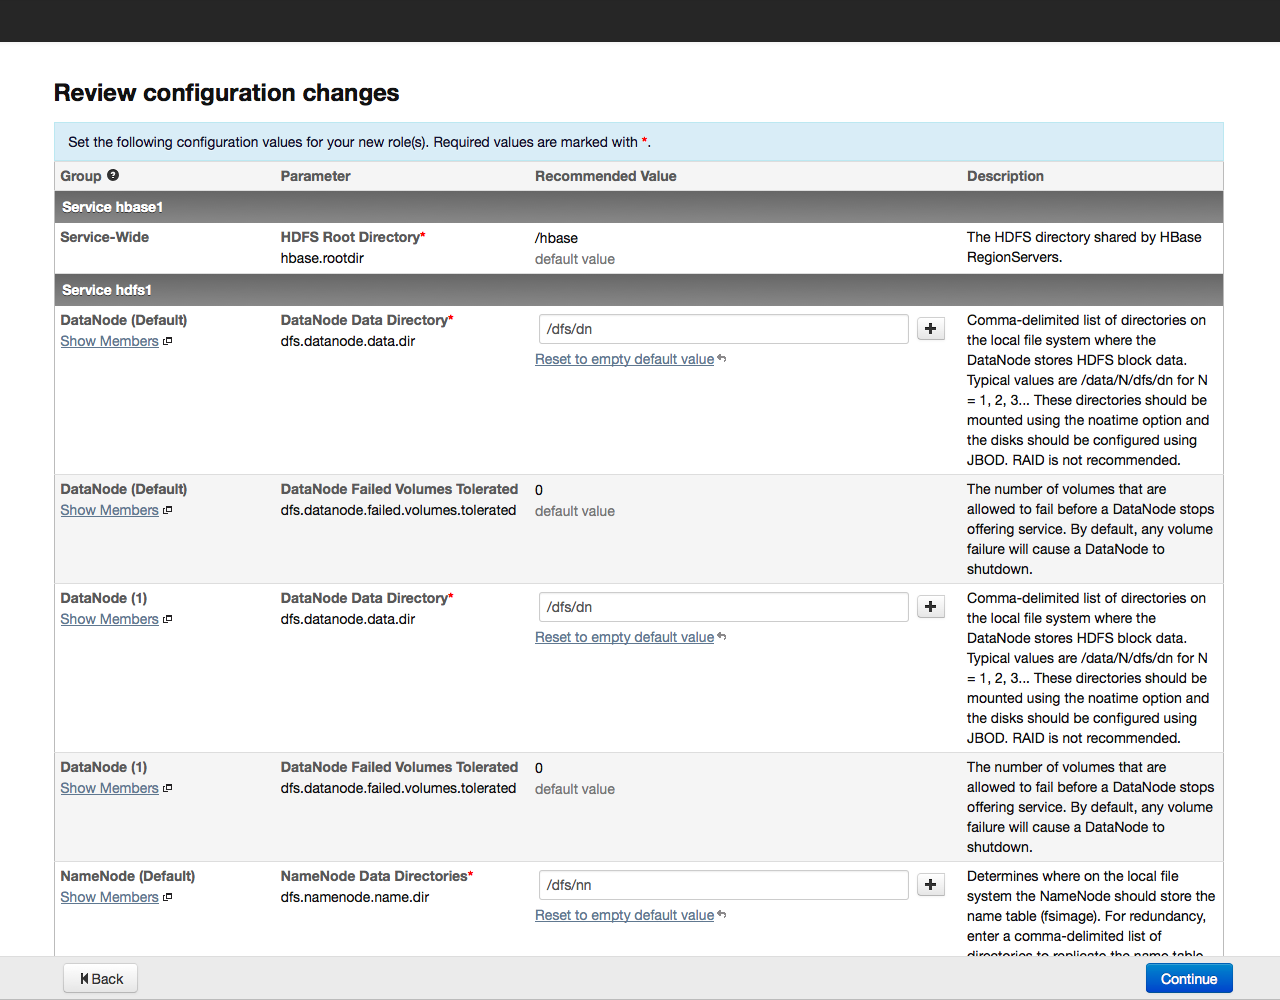
After that, click on the Continue button. The installation process will begin: Upon completion of the installation, a table with a summary of installed components and their versions will be displayed on the screen: Once again, we check whether everything is in order and click on the Continue button. A window appears prompting you to select the components and services of Cloudera Hadoop for installation: For example, we will install all the components by selecting the “All Services” option, later you can add or remove any services. Now you need to specify which components of Cloudera Hadoop will be installed on specific hosts. We recommend that you rely on the default choice, for more detailed recommendations on arranging roles on nodes, see the documentation for a specific service.


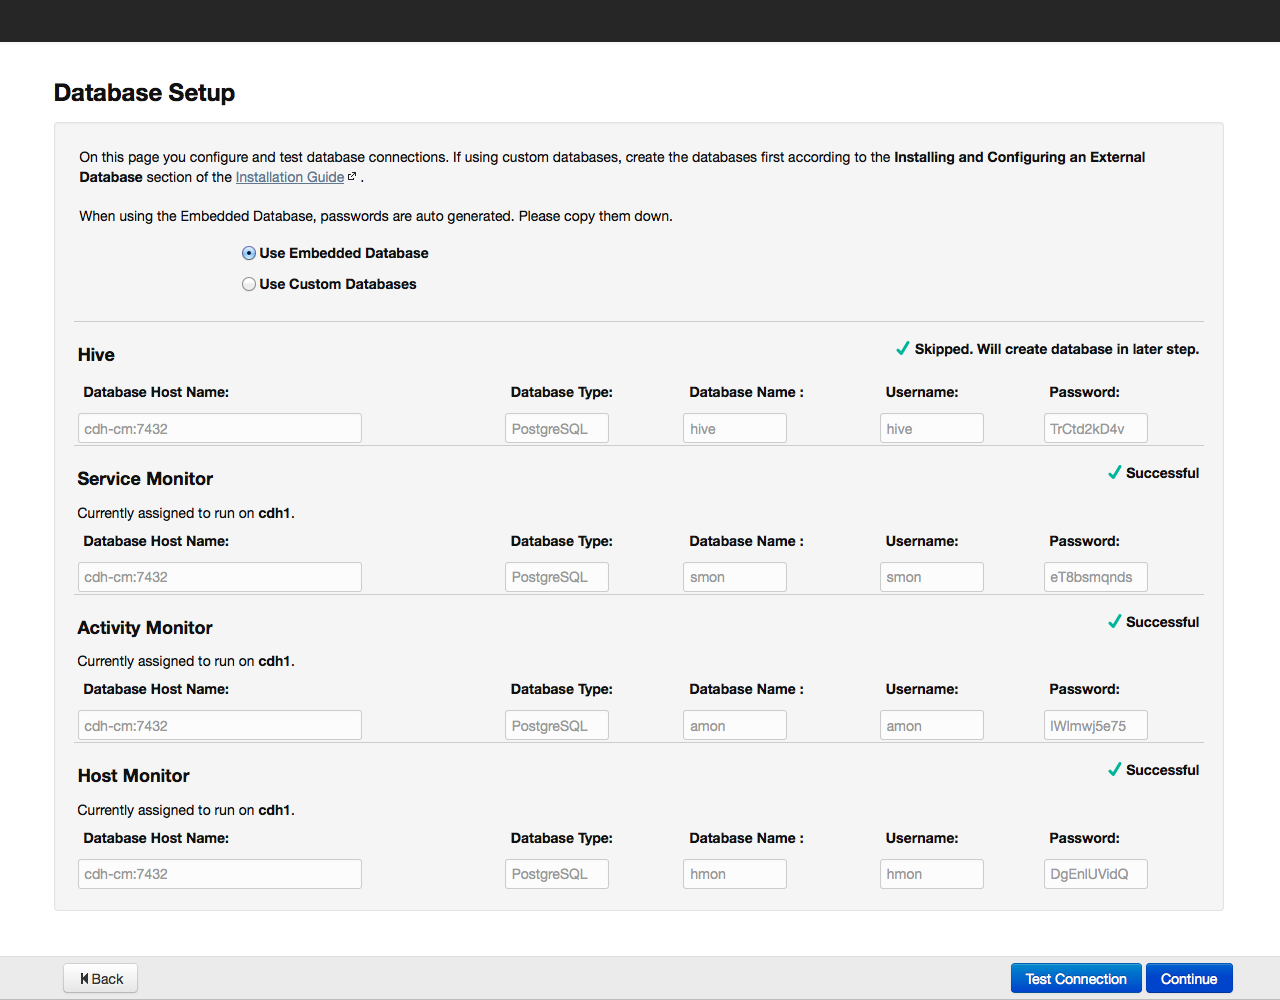
We click on the Continue button and proceed to the next step - setting up the database: By default, all information related to monitoring and system management is stored in the PostgreSQL database, which we installed with Cloudera Manager. You can use other databases - in this case, select Use Custom Database from the menu. Having set the necessary parameters, we check the connection with the “Test Connection” database, and if successful, click on the “Continue” button to proceed to the configuration of the elements in the cluster: Click on the Continue button and thereby start the cluster configuration process. The configuration progress is displayed on the screen: When the configuration of all components is completed, we proceed to the dashboard of our cluster. For example, here is the dashboard of our test cluster:


Instead of a conclusion
In this article, we tried to introduce you to the installation of a Hadoop cluster and show that using ready-made distributions, such as Cloudera Hadoop, it takes very little time and effort. I recommend continuing familiarity with Hadoop with Tom White’s book “Hadoop: The Definitive Guide”, there is a Russian edition.
Working with Cloudera Hadoop using specific usage scenarios will be discussed in the following articles of the series. The next publication will be devoted to Flume - a universal tool for collecting logs and other data.
For those who cannot comment on posts on Habré, we invite to our blog .