A quick way to add notifications to an Android application

Translated for you by Brandon Weaver 's article on working with notifications in the Android OS. The programmer explains how to quickly add this functionality to your application. The article, first of all, will be useful to novice Android developers.
Notifications - one of the easiest and fastest ways to make your application more interactive, which will attract more users. Notifications provide the user with brief information about what they may need right now. It is also a way to inform about upcoming events. Let's try to quickly add this feature to the app.
Skillbox рекомендует: Прикладной онлайн-курс «Аналитик данных Python».
Напоминаем:для всех читателей «Хабра» — скидка 10 000 рублей при записи на любой курс Skillbox по промокоду «Хабр».
Создание уведомления
The first step is to create a “Notification” object. For this we use NotificationCompat.Builder. The minimum notification content allowed by Android developers is a small icon. This is good, but small and not very useful for the user. Below is a standard notification scheme, which is well perceived.
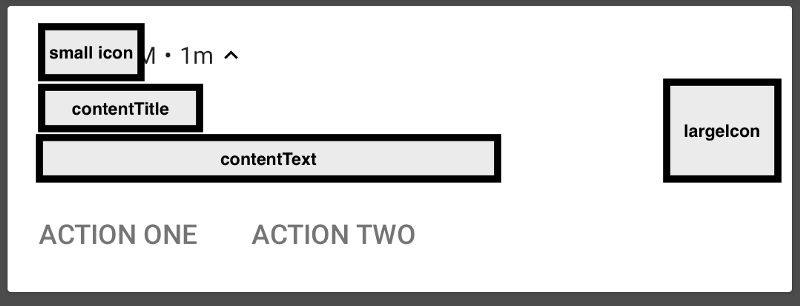
A small icon will be displayed constantly, and it is important to make it alpha-transparent. Without this, instead of the icon, you get a white box.
The notification header is also important. This should be a short description, which allows you to understand why the user is worried at all.
The body of the notification contains a detailed text with all the necessary information.
A large icon can be a company logo or something else.
Below are two options for the user.
To display all this you need a short code:
    .setSmallIcon(R.drawable.ic_announcement)
    .setContentTitle(title)
    .setContentText(body)
    .build()
Demonstrate notification
We created our notification, now the task is to show it. Android makes it possible to do this with the help of NotificationManagerCompat. To send a notification, you must use the notificationID and the notification itself.
with(NotificationManagerCompat.from(context)) {
    if (getNotificationChannel(CHANNEL_ID) == null) {
        createNotificationChannel(context)
    }
    notify(notificationId, builder.build())
}
Additional code is needed to check the existence of the notification channel.
Channels and importance
For the first time, the user was able to select the types of notifications from their applications in Oreo. Creating multiple channels is important because if everything goes through the same channel, the user will not be able to select the types of notifications he needs and will block everything.
teNotificationChannel(context: Context) {
    if (Build.VERSION.SDK_INT >= Build.VERSION_CODES.O) {
        val name = context.getString(R.string.channel_name)
        val descriptionText = context.getString(R.string.channel_description)
        val importance = NotificationManager.IMPORTANCE_HIGH
        val channel = NotificationChannel(CHANNEL_ID, name, importance).apply {
            description = descriptionText
        }
        NotificationManagerCompat.from(context).createNotificationChannel(channel)
    }
}
The channel should include the following information:
- ID - channel identifier;
- name - it should be short, for example, "Messages";
- importance - it can be high, by default, low or minimal;
- Description - it will be displayed in the Android settings. The developer should take care of the quality of the description.
User interaction
There are several ways for a user to interact with notifications. Fortunately, the APIs that allow you to control the process are quite similar. Intents and PendingIntents are used to provide feedback to the application, providing a specific processing logic.
The easiest way to handle a large number of notifications is to use BroadcastReceiver. When the user starts interacting with the notification, the Intent will work and the onReceive method of BroadcastReceiver will be called.
val builder = NotificationCompat.Builder(context, CHANNEL_ID)
    ...
    .setContentIntent(onContentTapped /** Pending intent */)
    .setDeleteIntent(onSwipedAway /** Pending intent */)
    .addAction(
        R.drawable.ic_announcement,
        actionTitle,
        onActionTapped /** Pending intent */
    )
ContentIntent will be launched by clicking on the notification. It is worth remembering that the notification will not be rejected unless you call setAutoCancel (true) in it.
DeleteIntent will run after the user deletes the notification.
Actions are buttons at the bottom of the notification. They also have badges and names.
To create a BroadcastReceiver, you need to extend the BroadcastReceiver class, override the onReceive method, and remember to declare Receiver in AndroidManifest.xml.
classNotificationBroadcastReceiver : BroadcastReceiver() {
    override fun onReceive(context: Context, intent: Intent){
        val action = intent.action
        when(action){
            ACTION_ONE -> {
                Toast.makeText(context, "Action One hit!", Toast.LENGTH_SHORT).show()
            }
            ACTION_TWO -> {
                Toast.makeText(context, "Action Two hit!", Toast.LENGTH_SHORT).show()
            }
        }
    }
}
object NotificationController {
    fun pendingIntent(context: Context, name: String, extras: Bundle?): PendingIntent {
        val intent = Intent(context, NotificationBroadcastReceiver::class.java).apply{
            action = name
            putExtra(EXTRA_NOTIFICATION_ID, extras)
        }
        return PendingIntent.getBroadcast(context, 0, intent, 0)
    }
}
NotificationController is a fast tool for creating PendingIntents for notifications. The most important thing is to set different names for actions in order to correctly handle user reactions to the notification. Also, if you are going to launch an Activity from BroadcastReceiver, you must use the NEW_TASK IntentFlag.
This is needed to process all notifications in one place. Intents can also be registered for different BroadcastReceivers, so you can limit the scope to one BroadcastReceiver for each type of notification.
All this is just the beginning of work. There are many great examples in the documentation, so don't forget to study it if you have questions or a desire to do something more advanced.
Skillbox recommends:
- Practical course "Mobile Developer PRO" .
- Online course "Profession Web Developer" .
- Two-year practical course "I am a web developer PRO" .