Using Hierarchy Viewer to optimize Android application
Hierarchy Viewer is a useful utility designed to optimize the UI of an Android application, as well as to visualize and verify the components that make up it. To start the Hierarchy Viewer, you need to register:
on the command line from the android-sdk \ platform-tools folder .
In IntelliJ IDEA, you can launch directly from the environment ( Tools - Android - Hierarchy Viewer ).
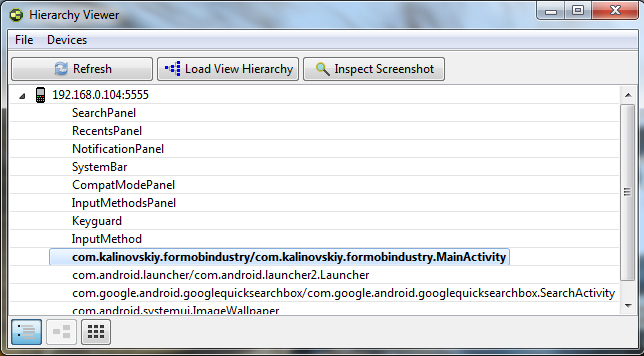
After the Hierarchy Viewer has been successfully launched, you need to connect the Android device (if this has not been done before) and the processes running on the device will appear on the screen.

After selecting the process that needs optimization, we will go to the hierarchy view window - Load View Hierarchy . All Layouts and Views of the active Activity are displayed in a tree view (from left to right).

Elements have multi-colored indicators that indicate the rendering speed of a given view / layout with respect to other objects in the tree. For detailed data, click on the item. Colors indicate the following relative indicators:
In the case of an excess of yellow and red indicators, it makes sense to make changes to the Activity structure, reduce the level of nesting, get rid of unnecessary View, use a different image format, etc.
The following actions are available on the toolbar:
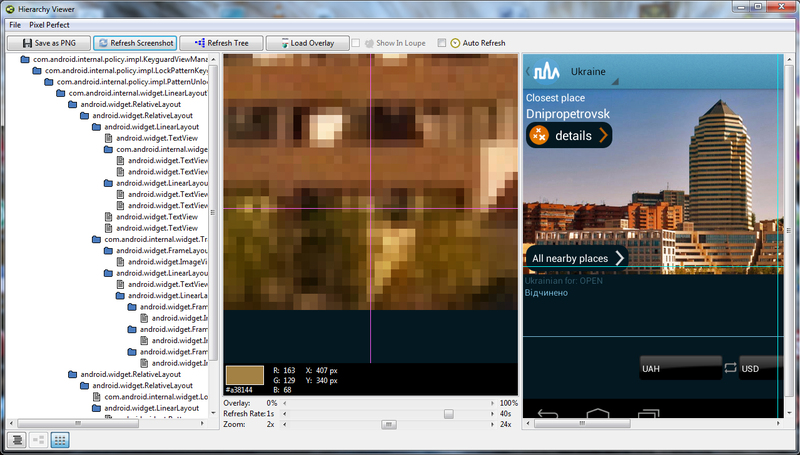
Hierarchy Viewer can also work with a screenshot of the Activity application. We return to the process window by clicking on the first of the three navigation buttons in the lower left corner, after which you will have to select the process and click Inspect Screehshot . In the screenshot, you can check each pixel, its color in RGB and coordinates.

The toolbar also has functions:
This is where the functionality of the Hierarchy Viewer ends. As you can see, the utility is quite simple to use, with its help you can improve the performance of the download speed of your application.
hierarchyviewerFor the convenience of starting the Hierarchy Viewer from the command line, you need to perform the following actions (relevant for Windows):
- Right click on My computer - Properties - Advanced system settings - Environment variables;
- In the system variables you need to find the Path variable , click "Change", and add at the end of the line:
;C:\[ваш_путь_к_android-sdk]\platform-tools- Now you can execute the start command directly through the "Start-Run".
After the Hierarchy Viewer has been successfully launched, you need to connect the Android device (if this has not been done before) and the processes running on the device will appear on the screen.
Hierarchy Viewer works only with rooted devices or an emulator.

After selecting the process that needs optimization, we will go to the hierarchy view window - Load View Hierarchy . All Layouts and Views of the active Activity are displayed in a tree view (from left to right).

Elements have multi-colored indicators that indicate the rendering speed of a given view / layout with respect to other objects in the tree. For detailed data, click on the item. Colors indicate the following relative indicators:
- Green means that the item is among the 50% of the fastest-loaded views in Activity.
- Yellow indicates that the item is among the 50% of the slowest to load.
- To load items with a red indicator, it takes the most time in the tree.
In the case of an excess of yellow and red indicators, it makes sense to make changes to the Activity structure, reduce the level of nesting, get rid of unnecessary View, use a different image format, etc.
The following actions are available on the toolbar:
- Save as PNG saves the whole tree to a png file;
- Capture Layers will save the screenshot in psd format, with each view will be located on a separate layer;
- Load View Hierarchy redraws the hierarchy tree;
- Display View will open a screenshot in a new window;
- Invalidate Layout will mark the view as one that will not be redrawn;
- Request Layout redraws view and all its inheritance;
- Dump DisplayList will dump the tree to load it through the Tree View - Load View Hierarchy menu.
Hierarchy Viewer can also work with a screenshot of the Activity application. We return to the process window by clicking on the first of the three navigation buttons in the lower left corner, after which you will have to select the process and click Inspect Screehshot . In the screenshot, you can check each pixel, its color in RGB and coordinates.

The toolbar also has functions:
- Save as PNG saves the screenshot to a png file;
- Refresh Screenshot will update it;
- Refresh Tree will update the hierarchy tree, which is displayed on the left side;
- Load Overlay will allow you to apply a translucent image to the screen, for example, to compare the mockup with the real application.
This is where the functionality of the Hierarchy Viewer ends. As you can see, the utility is quite simple to use, with its help you can improve the performance of the download speed of your application.
