Overview of the Dell EMC Unity File Part and Configuration Examples
- Tutorial
This article was conceived as a kind of cheat sheet for the file functionality of Dell EMC Unity storage systems for colleagues. I hope that in this capacity it will be useful not only to them. Most of the information in the article is my extract from quite extensive and scattered documentation from the vendor, plus a personal setup experience. Unity block functionality is not the topic of this article, so I will try to leave it “overboard”.
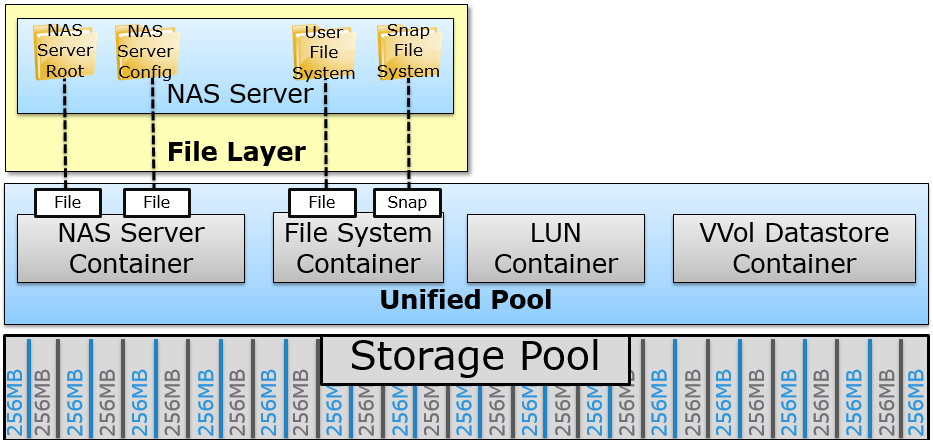
Unity systems (EMC 2 Unity in 2016 ) were originally released in Unified format. Those. these are systems that can provide access to data not only via block protocols, but also via file protocols. Supported file protocols are CIFS (SMB 1), SMB 2, SMB 3.0, SMB 3.02, SMB 3.1.1, NFS v3, NFS v4, NFS v4.1, Secure NFS, FTP, SFTP. At the same time, block and file access is supported on the same pair of controllers. Those. There are no separate physical controllers for organizing file access, as was the case on previous-generation VNX1 / VNX2 systems. Judging by the vendor's documentation, containerization is used to separate the functionality on the physical controller.
* All pictures in the article are clickable. In addition, the article has a certain amount of volume and not so spoilers.

Access to network folders is organized through the creation of virtual file servers (NAS servers) on storage controllers. Each file server has its own virtual Ethernet interface and network settings (ip / mask / default gateway / vlan). File systems created on disk pools are mounted in these NAS servers. The configuration of the NAS server itself is stored on the disk pool specified during creation. For a NAS server with SMB balls, you can join in MS AD and manage it remotely through native Windows snap-ins. Naturally, you can create single (standalone) servers that are not connected to MS AD, for example, for an NFS ball.
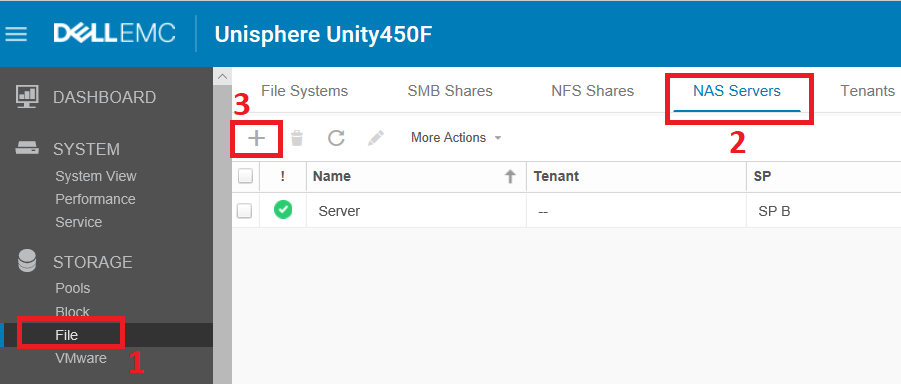
Go to the management interface (which is by the way written in HTML5) along the path Storage> File and select the NAS Servers tab . To create a new server, press the " + " and get to the wizard. Fill in the server name in the wizard. We select a disk pool on which the NAS server configuration will be stored. And we specify the physical controller (storage processor) on which the created server will work. What will happen to the NAS server if the selected SP fails or reboots will talk later.

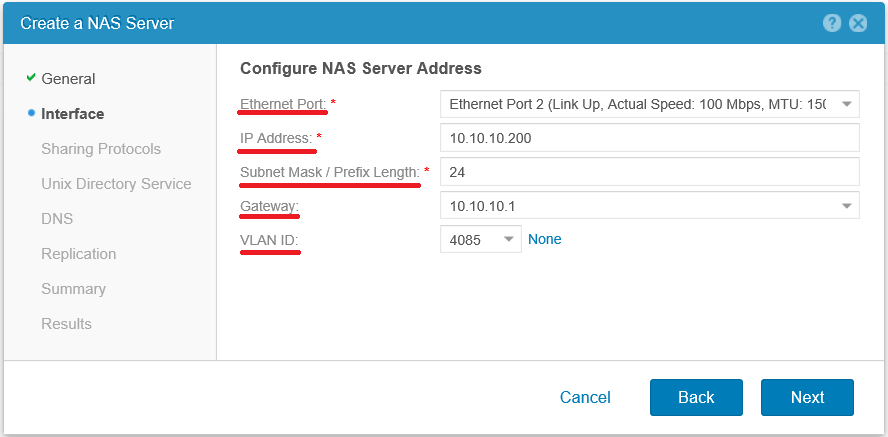
We pass on the wizard further and fill in the network details for the new NAS server. First of all, we specify the network interface on the controller to which we will bind our server. Next, specify the desired IP address, network mask (fully or through the prefix), the network gateway and optionally vlan. If necessary, these settings can be changed later, on an already created server. In the next step, we are asked to choose with which file protocols our NAS server will work. And I would recommend to allocate separate servers for various access protocols. And only in the case of the actual need to use one server to work with multiple protocols. If you want to give access to the same data on SMB and NFS at the same time, then you need to select the type of access Multiprotocol
. For example, if the network has both clients on Linux and on Windows. If within the same server both SMB and NFS will be used, then you may have to work hard and set up the correct mapping (association) of Windows users to unix uid / gid. You can read more here Configuring multiprotocol file sharing .
In our case, we choose Windows Shares with the simultaneous introduction of the server into the Microsoft domain. If you look into Advanced , you can configure which OU (Organizational Unit) in our Active Directory will get our server. If there is no OU in AD, it will be created automatically. The default is " ou = Computers, ou = EMC NAS servers ".
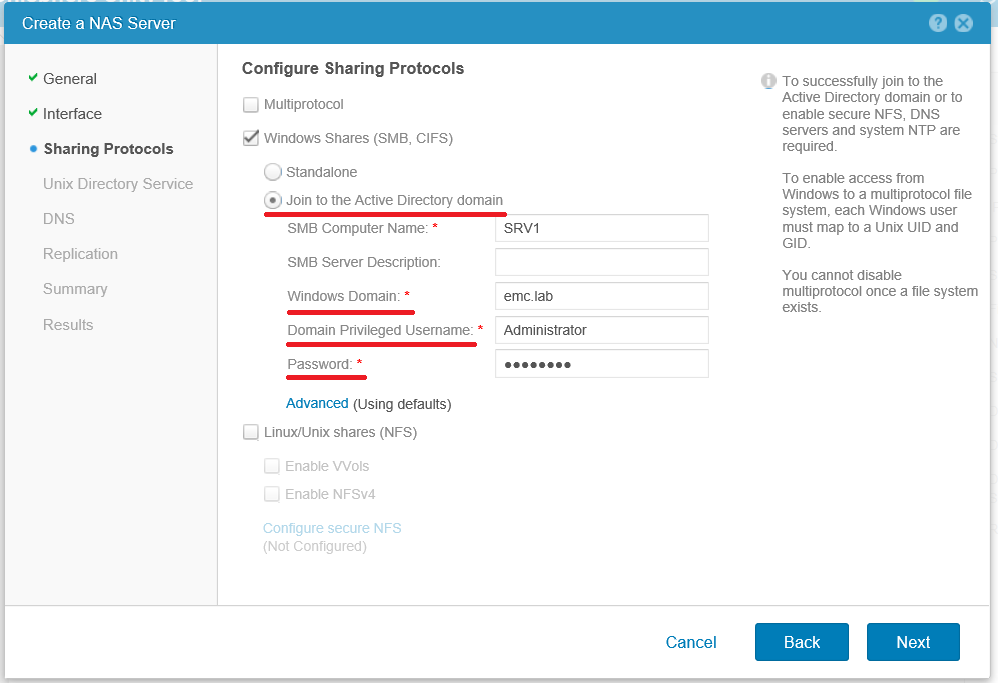

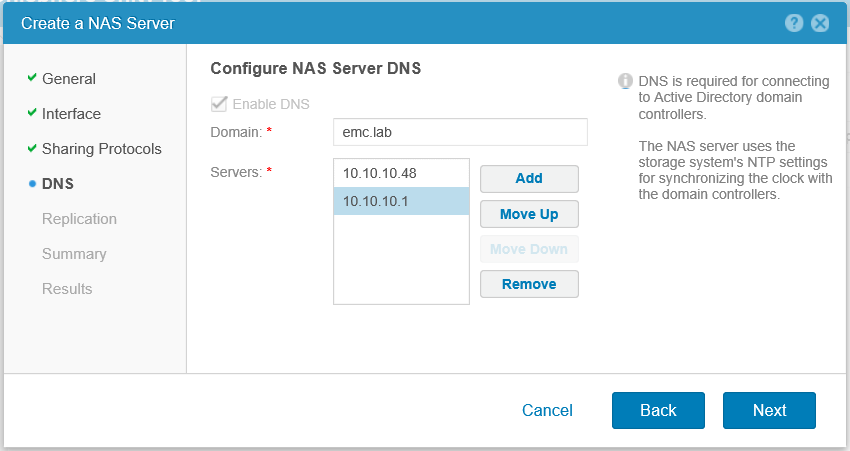
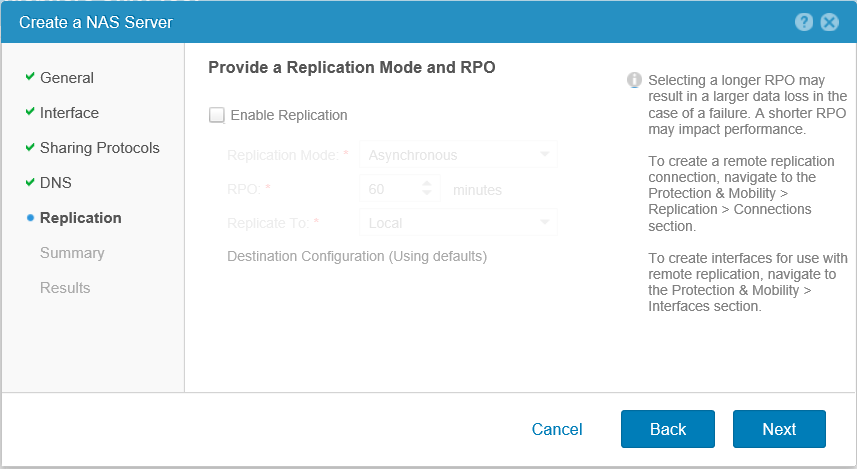
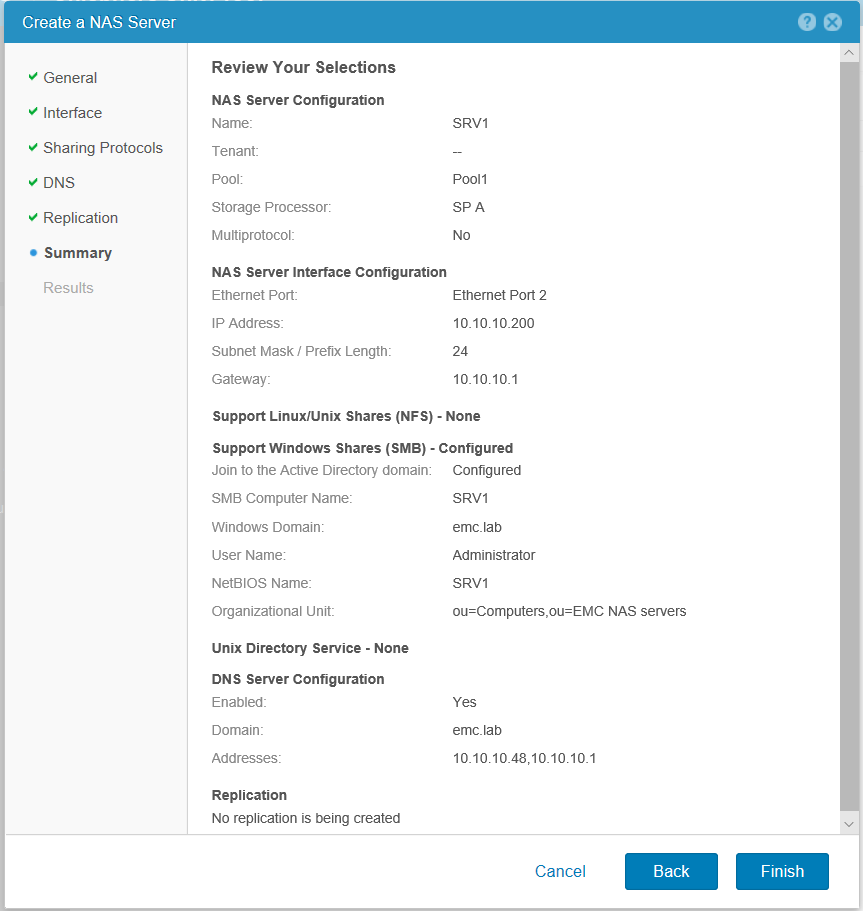
Go ahead and configure the domain DNS server for the NAS server, if they do not coincide with those that were specified during the initial configuration of Unty. Otherwise, just click Next . Let's talk about setting up replication below separately, so again Next . We check the settings and complete the creation of the NAS server. In general, immediately after the creation of the server is completed, we can check its availability by pinging. Naturally, for this physical Ethernet-port on the storage, to which we tied a NAS server, must already be connected to the local network. Checking: In the domain in the Active Directory Users and Computers snap-in, we check that the specified OUs were created
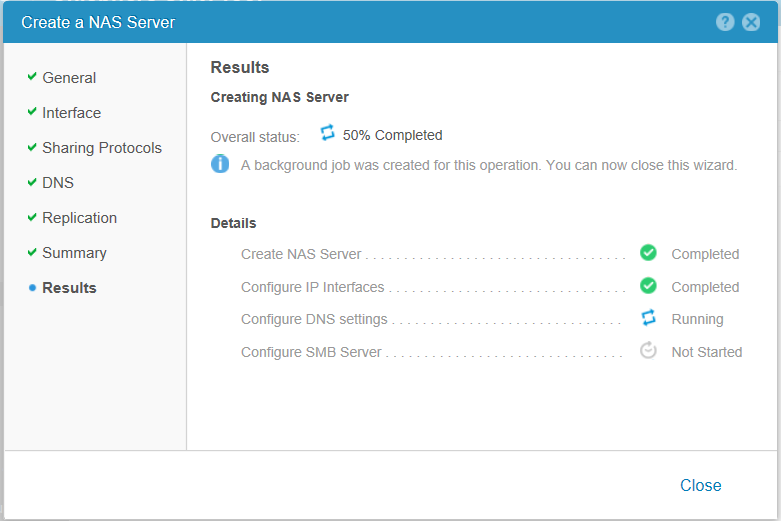

and our server successfully performed the join to the domain. If something went wrong the first time, then you can always re-join in AD from the already created NAS server. One of the most common problems is incorrect storage time settings. Setting local time or connecting to NTP servers is performed during the installation and initial configuration of Unity. Changing the system clock during storage operation may require a simultaneous reboot of both physical controllers. That accordingly will lead to a suspension in service. If the local time in Unity differs by more than 5 minutes (default setting in MS AD) from the time on domain controllers, then the NAS server will not be able to log in correctly to AD and connect to it.

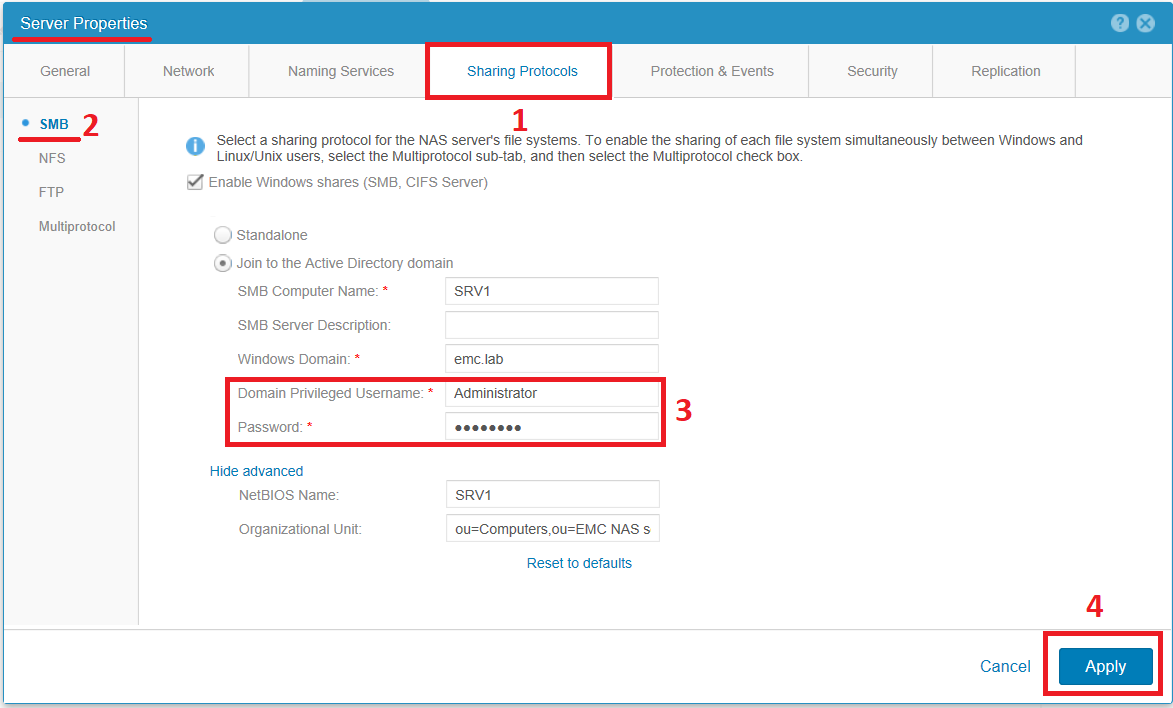
To retry connecting to AD, you can double-click on the NAS server to get into its settings. Go to the Sharing Protocols tab and in the SMB menu . Re-enter the login and password of the Active Directory administrator. After that click Apply .
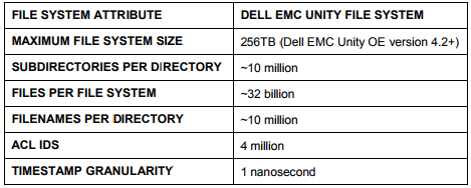
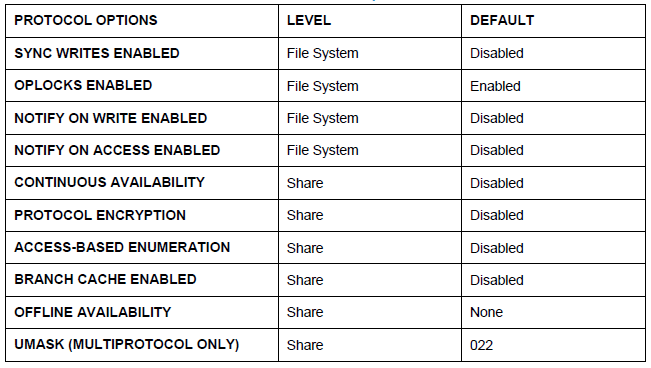
In Unity, the vendor uses its own proprietary file system UFS64. The main characteristics of this file system are presented below. I can only add that the maximum file size that UFS64 supports is also 256TB. The SMB functionality on Unity supports a number of features specific to this protocol. They are presented in the table below. I hid the small descriptions of options from the table below under the spoiler.
Dell EMC Unity supports Microsoft Distributed File System (DFS). In this case, the NAS server on the storage system can be configured as standalone DFS root, or as a leaf node in the Active Directory DFS root structure. However, unfortunately, DFS-R (Replication) mode is not supported. If organization of data replication to a remote resource is required, then you will have to
use the built-in replication functionality between two Unity arrays. In this case, one of the arrays or both can be virtual.
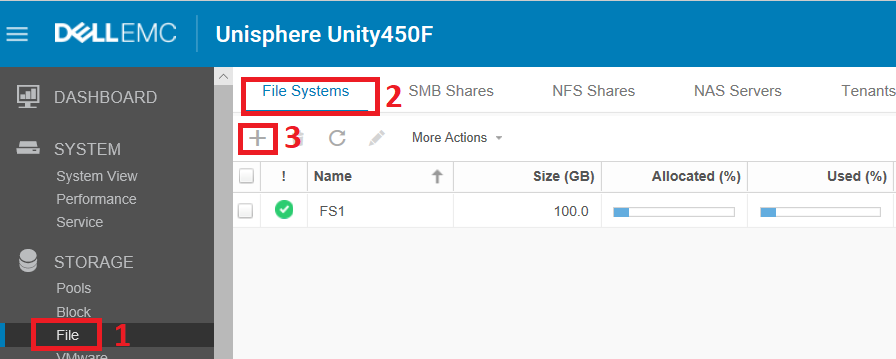
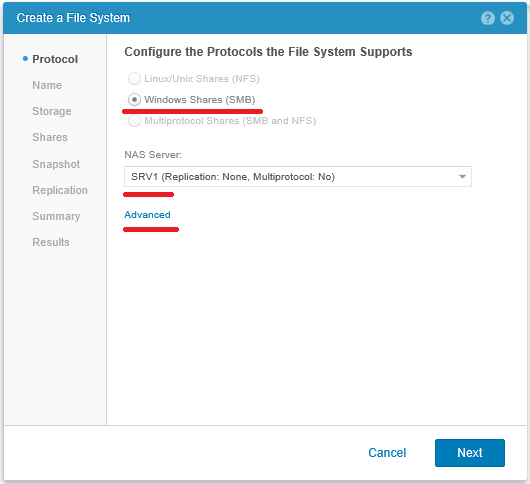
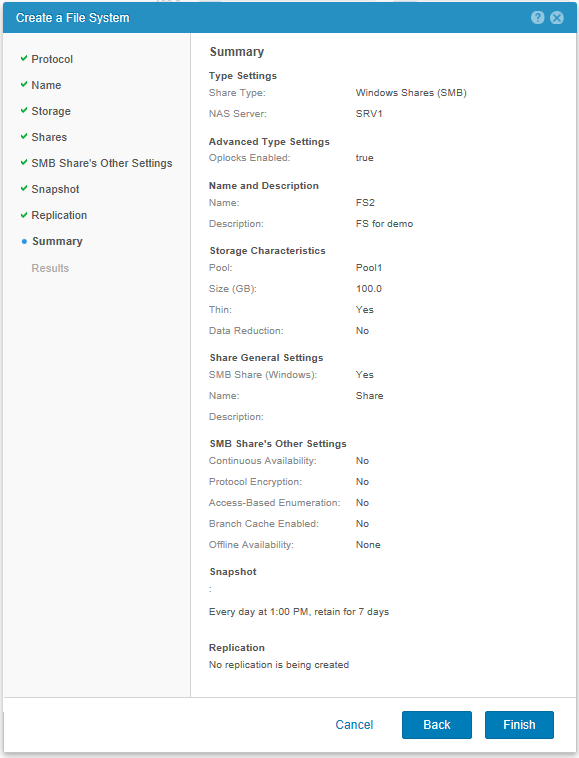
To create the FS, go to the management interface on the path Storage> File and then to the File Systems tab . Press " + " and get to the wizard to create a file system. We select NAS server in which the new file system will be mounted (if on Unity several file servers are created already). If the server is created with the support of several protocol options, then select the protocol by which the created FS will be shared. In this case, SMB will be selected immediately, since the SRV1 NAS server only supports this protocol. In Advanced settings, the inclusion of several features, described above, is hidden. You can change these settings even after creating the file system.

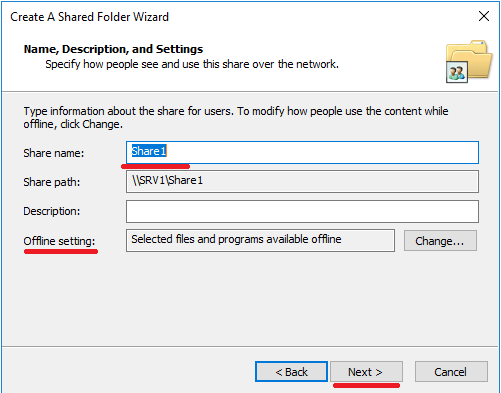
Going further on the wizard, we specify the name of the file system and a brief description of it. In the next step, you need to select the disk pool on which the FS will be created. It does not have to be the same disk pool on which we placed the NAS server configuration. Here we choose the size of the future FS. Moreover, since the storage system itself controls this file system, in the future we can change its size both upwards and downwards. Next, by default, the Thin checkbox is set , so that the FS is created in a thin format and grows as it is filled with data. And the Data reduction checkbox is not the default . A little more about Data reduction under the spoiler.

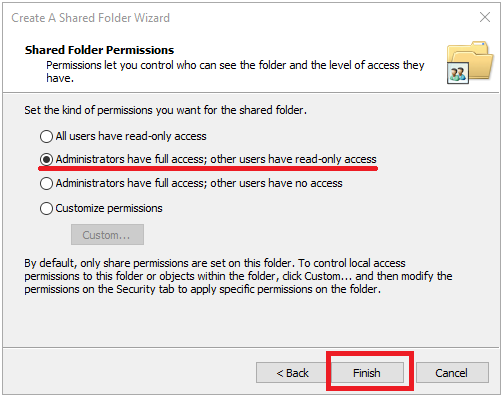
Next, without fail, set the SMB Share checkbox and specify the name for the first shared folder on this file system. If this first default ball is not created, then the access rights to the file system may not be completely correctly initialized. The created shared folder can then be deleted and re-created as we need from the management console on Windows. We do not make any additional settings for the created balls, since we will still re-create it in the future. Next, we can set up a schedule by which snapshots of the file system will be created. You can either choose one of the existing default schedules on Unity, or create your own by clicking New Schedule . Read more about SNAPSHOTS under the spoiler below.


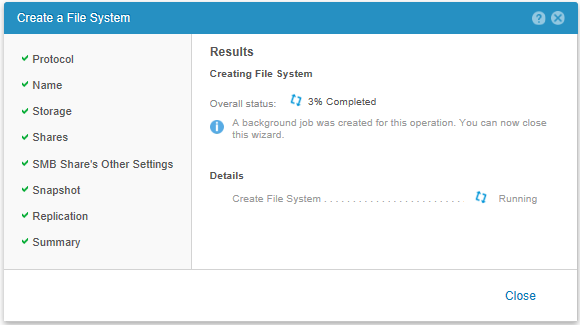
I will describe the file replication settings between Unity systems later. So just Next . Check the settings and run the creation of FS. Fans of video guides can watch this official video here:

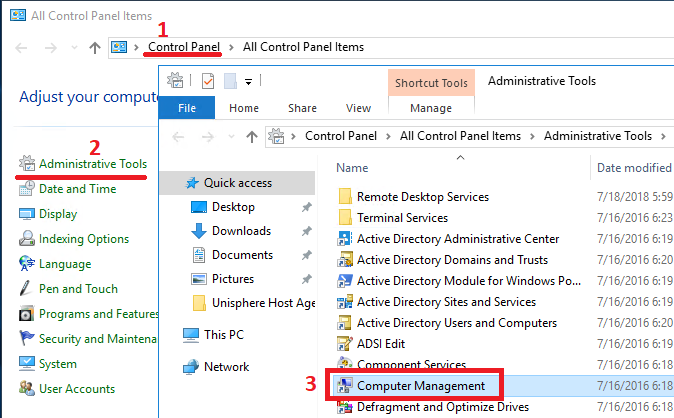
As I mentioned above, we can manage NAS servers created on the storage system using standard Windows snap-ins. For example, we can open the Computer Managment snap-in (in any of the convenient ways) and then Action> Connect to another computer ... Naturally, to connect and fully manage, we must have administrator rights on the NAS server. For the NAS server entered into AD, it is enough to launch the Computer Managment snap-in with domain administrator rights. The connection itself takes some time, which will be seen as soon as you try to expand the object tree in the remote server.
Once in Osnat, managing our NAS server, we can manage both the server itself and the file balls on it. In principle, control differs little from control, usually with a Windows machine. Naturally, most of the elements of the snap-in, not related to the file functionality, simply will not work. For example, Device Manager. What you can use this subsection System Tools . Namely, Shared Folders , Local Users and Groups and Event Viewer , which will need to be enabled separately. How to do this will describe a little later.
Since the shared folder that we created by default shares the root of the file system, this directory has a typical directory for Unix-based mount points. In which other there is no access. In order not to embarrass ordinary users, it is better to create separate directories on the file system and share them. Actually for this we remove the default ball from the snap. Right mouse button on the directory and Stop Sharing . And then create a new one. Further, passing through the Windows wizard, you need to click the Browse button in the Folder path ...

and we will see the root of our NAS server with all file systems and snapshots. By the way, from here you can share read-only snapshots as opposed to the Unity management interface. It is clear that it will be impossible to write in such balls. In our case, you need to get on the FS2 file system and click Make New Folder . Next, we select the created folder and move on to the wizard. Specify the name for the balls. Or leave as is. We specify whether users can cache the contents of the balls and get offline access to it. Set the default permissions on the ball. As a result, we get a clean and empty shared directory.

Then we can change permissions on this shared folder as on a normal Windows ball. In my opinion, the most convenient way is on the Share Permission tab to give full rights to the Everyone user and remove everyone else from here. And by the rights themselves, then steer on the Security tab . Here we can specify the user groups we need and their rights. We can remove the inheritance rights from the file system and redo everything the way we need. All changes to shared directories made in the Windows snap-in must be correctly displayed in the storage management interface in Storage> File> SMB Shares
. If for some reason this is not the case, you may need to restart the Unity Management service. This procedure does not affect user access to data stored on the storage system. Those. users will not notice anything. Just 7-10 minutes will not be available management interface.
Go to the System> Service section on the Service Tasks tab . In the Storage System section, select Restart Management Software and click Execute . As a result, everything should look like this in the storage management interface. Those. from Unisphere you can change the advanced settings of the file balls created in the Windows snap-in.
Domain group policies (GPOs) are applied to the NAS server created with connection to AD. The NAS server reads the policies from the domain and then updates them periodically. The frequency depends on the settings specified in the GPO on the domain itself. The list of supported policies is hidden under the spoiler below.
Another possibility to adjust the SMB NAS server parameters on the array is a remote connection to its registry. To do this, run regedit.exe (with AD administrative privileges) on Windows c. And connect to remote registry through the File> the Connect the Network Registry ... . After that, part of the parameters in the remote registry will be available for modification. And the other part can only be viewed, and it changes in another specialized MMC console. The result is the following picture:

In addition to standard MMC consoles, there are additional options for working with NAS servers on Unity. You can get their distribution kit on your own on the vendor’s service portal, or request from service partners involved in technical support of your array. The latest available version is available as a file 8.1.9.157_Unity_VNXFileCifsMgmt.exe. As the name implies, the same utility is also used to configure additional functionality of datamoovers and NAS servers on previous generations of VNX and VNXe arrays. This distribution can be deployed on any domain computer. In the screenshot below, you can see what functionality the installed equipment contains. You must run the mmc console under the domain administrator account via run , where the command is entered
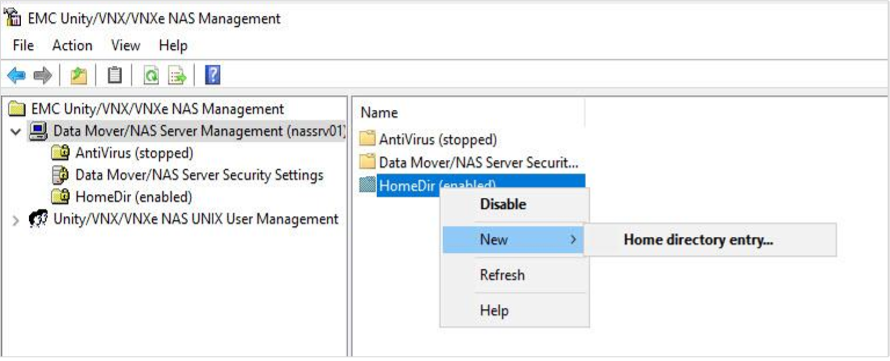
mmc / 32 . In the console, select the File> the Add / the Remove Snap-in ... . Here we have two new accessories. The first Data Mover / NAS Server Managment and the second Unity / VNX / VNXe NAS UNIX User Management . In our case, select the first one and click Add> . As a result, we will have another window where we need to select the NAS server that we will configure. Then we get access to the console, where we can manage and configure additional functionality of our NAS server. In particular, the home directory, the integration of shared directories with antivirus programs and configure a number of additional parameters related to security.


But first things first. Home directory is the functionality allowing to give all users the same link to the home network folder of the form \\ SRV1 \ home, but at the same time each user will get to his own directory with predefined rights. Moreover, if the personal directory does not exist and the user first enters the link indicated above, his personal directory can be created automatically. You can use this for example for portable profiles in AD. And just as personal network drives that can be created automatically, and in the script to specify the same path for all.
When creating a new home directory, regular expressions are allowed. For example, all users whose accounts begin with the letters a to k can be sent to one directory for one FS, and all others to another directory to another FS. The list of anti-virus servers with which you can integrate file balls on Unity: MMC console and its AntiVirus section allows you to connect the NAS server to the anti-virus server and adjust and set a number of work parameters for checking files on file balls.


The “Data Mover \ NAS Security Settings” section also allows you to make a number of security-related settings, in particular, enable Event Manager on a NAS server and view events in the Computer Management console connected to this server. True magazine size is limited to a maximum of 512 KB. Upon reaching which events begin to rotate. Direct access to the log file can be obtained with the administrator rights of the NAS server along the path:
\\ storage_server_netbios_name \ C $ \. Etc \ audit \ security.evt
You can watch a short video on how it works and how to configure LACP and FSN in Unity. It is pretty visual.
Ps Unfortunately, I did not have enough fuse to finish the article with one call, so it didn’t work out to bless all the functionality of the Unity file part in one article. Plus, while I was thinking about what to continue, I was “taken away” from the storage booth. So if the article will interest someone, then maybe I will describe the rest in the next section. I definitely didn’t touch the NFS ball configuration, Standalone SMB server with local accounts, creating a multi-protocol NAS server with access to the same data using different protocols, file replication, which is now both in asynchronous and synchronous versions and many more . Nevertheless, the article has been in drafts for almost a month now. So I spread it as it is, all of a sudden someone will come in handy and this will give me the motivation to continue and create the second part.
PsPs The Dell EMC has a virtual version of Unity VSA, which can be used with a shareware license for testing purposes. Unfortunately, only those who have an account on vendor portals can access to downloading it. An alternative way to get applines is to request through Dell EMC partners. At the same time, as for the file part, the system is quite fully functional; even replication works. The only significant architectural differences from the iron counterparts are one-controllability, the absence of FC ports and the limitation of the licensed volume under the “disk” pool of 4 TB with a free license.
Some theory
Unity systems (EMC 2 Unity in 2016 ) were originally released in Unified format. Those. these are systems that can provide access to data not only via block protocols, but also via file protocols. Supported file protocols are CIFS (SMB 1), SMB 2, SMB 3.0, SMB 3.02, SMB 3.1.1, NFS v3, NFS v4, NFS v4.1, Secure NFS, FTP, SFTP. At the same time, block and file access is supported on the same pair of controllers. Those. There are no separate physical controllers for organizing file access, as was the case on previous-generation VNX1 / VNX2 systems. Judging by the vendor's documentation, containerization is used to separate the functionality on the physical controller.
* All pictures in the article are clickable. In addition, the article has a certain amount of volume and not so spoilers.
Access to network folders is organized through the creation of virtual file servers (NAS servers) on storage controllers. Each file server has its own virtual Ethernet interface and network settings (ip / mask / default gateway / vlan). File systems created on disk pools are mounted in these NAS servers. The configuration of the NAS server itself is stored on the disk pool specified during creation. For a NAS server with SMB balls, you can join in MS AD and manage it remotely through native Windows snap-ins. Naturally, you can create single (standalone) servers that are not connected to MS AD, for example, for an NFS ball.
Creating NAS server
Go to the management interface (which is by the way written in HTML5) along the path Storage> File and select the NAS Servers tab . To create a new server, press the " + " and get to the wizard. Fill in the server name in the wizard. We select a disk pool on which the NAS server configuration will be stored. And we specify the physical controller (storage processor) on which the created server will work. What will happen to the NAS server if the selected SP fails or reboots will talk later.
We pass on the wizard further and fill in the network details for the new NAS server. First of all, we specify the network interface on the controller to which we will bind our server. Next, specify the desired IP address, network mask (fully or through the prefix), the network gateway and optionally vlan. If necessary, these settings can be changed later, on an already created server. In the next step, we are asked to choose with which file protocols our NAS server will work. And I would recommend to allocate separate servers for various access protocols. And only in the case of the actual need to use one server to work with multiple protocols. If you want to give access to the same data on SMB and NFS at the same time, then you need to select the type of access Multiprotocol
. For example, if the network has both clients on Linux and on Windows. If within the same server both SMB and NFS will be used, then you may have to work hard and set up the correct mapping (association) of Windows users to unix uid / gid. You can read more here Configuring multiprotocol file sharing .
In our case, we choose Windows Shares with the simultaneous introduction of the server into the Microsoft domain. If you look into Advanced , you can configure which OU (Organizational Unit) in our Active Directory will get our server. If there is no OU in AD, it will be created automatically. The default is " ou = Computers, ou = EMC NAS servers ".
Go ahead and configure the domain DNS server for the NAS server, if they do not coincide with those that were specified during the initial configuration of Unty. Otherwise, just click Next . Let's talk about setting up replication below separately, so again Next . We check the settings and complete the creation of the NAS server. In general, immediately after the creation of the server is completed, we can check its availability by pinging. Naturally, for this physical Ethernet-port on the storage, to which we tied a NAS server, must already be connected to the local network. Checking: In the domain in the Active Directory Users and Computers snap-in, we check that the specified OUs were created
and our server successfully performed the join to the domain. If something went wrong the first time, then you can always re-join in AD from the already created NAS server. One of the most common problems is incorrect storage time settings. Setting local time or connecting to NTP servers is performed during the installation and initial configuration of Unity. Changing the system clock during storage operation may require a simultaneous reboot of both physical controllers. That accordingly will lead to a suspension in service. If the local time in Unity differs by more than 5 minutes (default setting in MS AD) from the time on domain controllers, then the NAS server will not be able to log in correctly to AD and connect to it.
To retry connecting to AD, you can double-click on the NAS server to get into its settings. Go to the Sharing Protocols tab and in the SMB menu . Re-enter the login and password of the Active Directory administrator. After that click Apply .
Some more theory
In Unity, the vendor uses its own proprietary file system UFS64. The main characteristics of this file system are presented below. I can only add that the maximum file size that UFS64 supports is also 256TB. The SMB functionality on Unity supports a number of features specific to this protocol. They are presented in the table below. I hid the small descriptions of options from the table below under the spoiler.
Description of SMB features
SYNC WRITES ENABLED — это функционал который обязывает NAS сервер выполнять немедленную синхронную запись полученных данных, что может негативно сказываться на общей производительности SMB шары. Но позволяет обеспечить лучшую сохранность и целостность данных в случае хранения на файловой шаре баз данных в различных сценариях отказа. Например в таких как незапланированное отключение электроэнергии.
OPLOCKS ENABLED — функционал позволяющий клиенту получать файл с шары к себе в оперативную память и работать с ним локально (добавлять, изменять, удалять данные в файле). При этом изменения обратно в расшаренную папку клиент записывает не сразу после операции изменения файла, а только периодически, что существенно уменьшает сетевой трафик. Понятно что с критичными данными в таком режиме лучше не работать. Функциональность и методы работы с данными при включенном OPLOCKS сильно зависят от версии SMB протокола, которой пользуется клиент.
NOTIFY ON WRITE/ACCESS ENABLED — опция разрешает клиентам Windows регистрироваться на сервере через WIN32 API и получать информацию об изменениях файлов, содержимого директорий или переименования объектов в расшаренной папке. Что позволяет например автоматически обновлять содержимое шары в проводнике Windows без принудительного переопроса сервера.
CONTINUOUS AVAILABILITY — можно понять из названия, что включение функционала позволяет улучшить отказоустойчивость сессий открытых к SMB шаре. Работает этот функционал только для клиентов использующих SMB 3.0 и выше. Сервер для каждой сессии сохраняет определенные метаданные, что позволяет переоткрывать прерванные сессии без повторной авторизации на NAS сервере. Этот функционал очень полезен для работы например с Hyper-V или MS SQL. Если по какой-либо причине происходит кратковременный разрыв соединения, то клиент замечает его как небольшую задержку в передаче данных. Например ненадолго «встает на паузу» закачка большого файла, а затем автоматически продолжается с того же места, где произошел разрыв соединения. В случае Unity, так как NAS сервер живет на определенном физическом контроллере, то при перезагрузке этого контроллера или выходе его из строя, NAS сервер перезапустится на соседнем контроллере. Соответственно физически на какое-то время все SMB сессии будут прерваны. SMB3 скорее всего этого не заметят, в отличии от клиентов с более старой версией протокола.
PROTOCOL ENCRYPTION — фича SMB3 версии протокола, которая позволяет шифровать данные передаваемые между сервером и клиентом. При ее включении на шаре, все клиенты с более старой версией SMB протокола (по умолчанию) не смогут авторизоваться и получить доступ к данным на этой шаре. Для изменения этого поведения нужно исправлять параметры в удаленном реестре на NAS сервере.
ACCESS-BASED ENUMERATION — параметр файловой шары, который при включении скрывает от пользователя все файлы и директории на которые у пользователя нет явно выданных прав на чтение. При выключенном параметре пользователи видят все директории и файлы, в том числе те на которые у них нет прав на чтение, но по прежнему не могут открыть эти директории и файлы. Данный параметр ни как не влияет на пользователей имеющих привилегии администратора на NAS сервере.
BRANCHCACHE — параметр актуален для организаций имеющих удаленные офисы. Он позволяет кэшировать файл полученный с шары в центральном офисе локально. Для этого может использоваться либо часть оперативной памяти клиента, первым запросившего файл из центрального офиса, либо специально настроенный BranchCache сервер в удаленном офисе. Соответственно следующий клиент, запросивший тот же файл, с большой долей вероятности получит его локально с соседнего компьютера/сервера без необходимости скачивать его через WAN канал из центрального офиса. Данная фича наиболее полезна при работе с редко изменяемыми данными, что позволяет по долгу хранить их в локальном кэше в удаленном офисе. Функционал работает с использование сравнения hash-ей файла в центральном офисе и сохраненного в локальном кэше.
OFFLINE AVAILABILITY — при включении параметр позволяет клиентам кэшировать содержимое файловой шары локально. И работать с файлами, в том числе, в автономном режиме, не имея реального подключения к самой файловой шаре.
UMASK — работает с SMB шарами только при включенном на NAS сервере режиме Multiprotocol. Позволяет в unix-стиле определить с какими правами доступа по умолчанию будут создаваться файлы на файловой шаре.
Конец спойлера
Dell EMC Unity supports Microsoft Distributed File System (DFS). In this case, the NAS server on the storage system can be configured as standalone DFS root, or as a leaf node in the Active Directory DFS root structure. However, unfortunately, DFS-R (Replication) mode is not supported. If organization of data replication to a remote resource is required, then you will have to
use the built-in replication functionality between two Unity arrays. In this case, one of the arrays or both can be virtual.
Creation of file system and the first shared directory
To create the FS, go to the management interface on the path Storage> File and then to the File Systems tab . Press " + " and get to the wizard to create a file system. We select NAS server in which the new file system will be mounted (if on Unity several file servers are created already). If the server is created with the support of several protocol options, then select the protocol by which the created FS will be shared. In this case, SMB will be selected immediately, since the SRV1 NAS server only supports this protocol. In Advanced settings, the inclusion of several features, described above, is hidden. You can change these settings even after creating the file system.
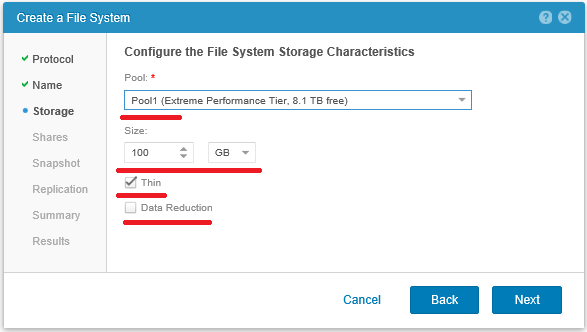
Going further on the wizard, we specify the name of the file system and a brief description of it. In the next step, you need to select the disk pool on which the FS will be created. It does not have to be the same disk pool on which we placed the NAS server configuration. Here we choose the size of the future FS. Moreover, since the storage system itself controls this file system, in the future we can change its size both upwards and downwards. Next, by default, the Thin checkbox is set , so that the FS is created in a thin format and grows as it is filled with data. And the Data reduction checkbox is not the default . A little more about Data reduction under the spoiler.
Short description Data reduction
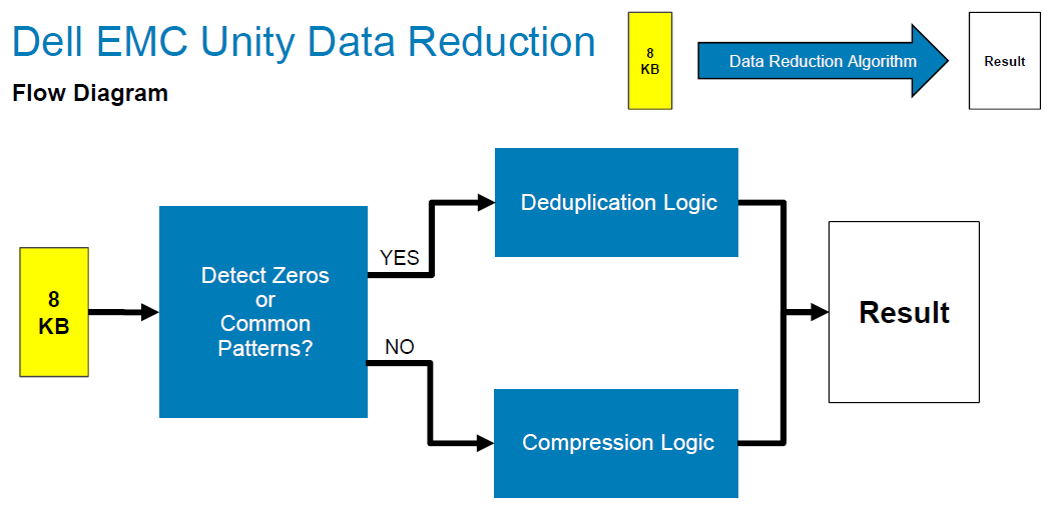
Data reduction — это механизм, который позволяет дедуплицировать и сжимать данные в оперативной памяти физических контроллеров Unity и записывать на дисковый пул уже уменьшенные в объеме данные. Что позволяет экономить дисковое пространство. Механизм, в том числе, позволяет определять блоки данных забитые нулями, что по большому счету является частным случаем дедупликации. Ниже несколько наглядных картинок о том как работает Data reduction.
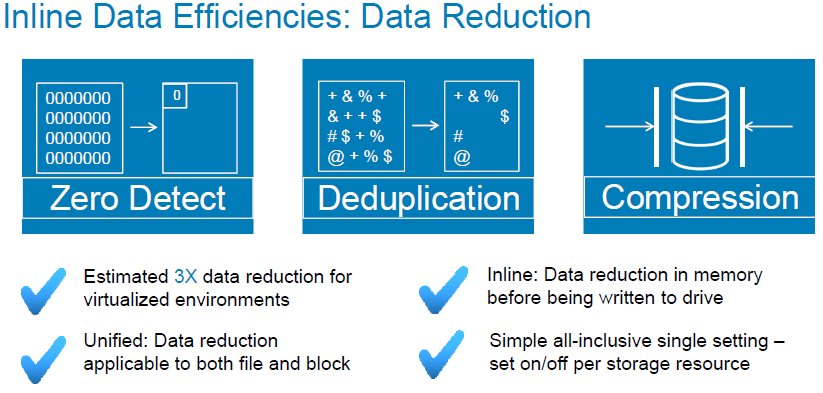
Механизм Data Reduction одинаково работает как для блочных томов, так и для файловых систем. Как и всегда есть ряд особенностей:
Описание получилось в итоге не совсем кратким :). Но все таки по размеру это не 30- страничный «DELL EMC UNITY: DATA REDUCTION Overview».
Конец спойлера
Механизм Data Reduction одинаково работает как для блочных томов, так и для файловых систем. Как и всегда есть ряд особенностей:
- Если включить чекбокс на уже созданном блочном томе или файловой системе, то записанные ранее данные останутся в неизменном виде. Уменьшаться в размере будут только новые операции записи. Аналогично, если выключить Data Reduction, то уже дедуплицированные и сжатые данные будут храниться в уменьшенном виде пока не будут удалены или перезаписаны.
- В случае если на СХД на LUN или FS c включенным Data reduction записывается новый уникальный 8KB блок, то он, в соответствии с блок схемой выше, будет проверяться на «сжимаемость». Если операция сжатия блока не принесет экономии дискового пространства, то блок будет записан в оригинальном размере.
- Перед тем как отдать клиенту запрошенные данные, прошедшие через Data Reduction, данные сначала восстанавливаются в оригинальное состояние в оперативной памяти контроллера Unity и только затем отдаются клиенту.
Описание получилось в итоге не совсем кратким :). Но все таки по размеру это не 30- страничный «DELL EMC UNITY: DATA REDUCTION Overview».
Конец спойлера
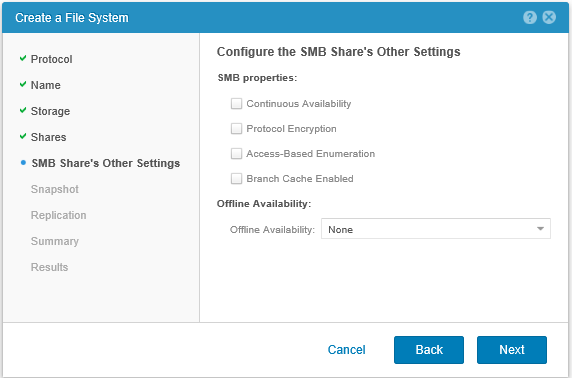
Next, without fail, set the SMB Share checkbox and specify the name for the first shared folder on this file system. If this first default ball is not created, then the access rights to the file system may not be completely correctly initialized. The created shared folder can then be deleted and re-created as we need from the management console on Windows. We do not make any additional settings for the created balls, since we will still re-create it in the future. Next, we can set up a schedule by which snapshots of the file system will be created. You can either choose one of the existing default schedules on Unity, or create your own by clicking New Schedule . Read more about SNAPSHOTS under the spoiler below.
Something interesting about File Snapshots
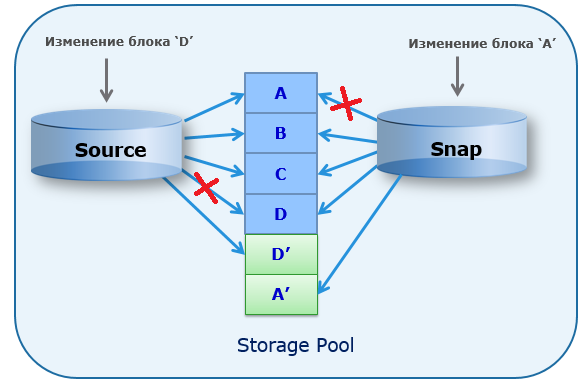
Unity поддерживает механизмы создания снэпшотов файловых систем, как по заранее заданному расписанию, так и в ручном режиме. Снэпшоты выполняются по технологии Redirect on Write (ROW). Т.е. после создания снэпшота и при необходимости перезаписать исходный блок данных, новый блок данных записывается в свободное место на дисковом пуле. А оригинальный блок остается на исходном месте и продолжает использоваться, если он ассоциирован хоть с оодним снэпшотом или оригинальным луном. Т.е. фактически для оригинального луна просто меняется ссылка в метаданных на расположение записанного блока. То же самое происходит для снэпшотов, используемых в режиме чтения записи. А файловые снэпшоты можно монтировать на NAS сервера, и отдавать к ним доступ как к самостоятельным расшаренным директориям. Схематично работа снэпшотинга выглядит следующим образом.
Так же поддерживается создание снэпшота снэпшота. Вплоть до 10 уровня вложенности.
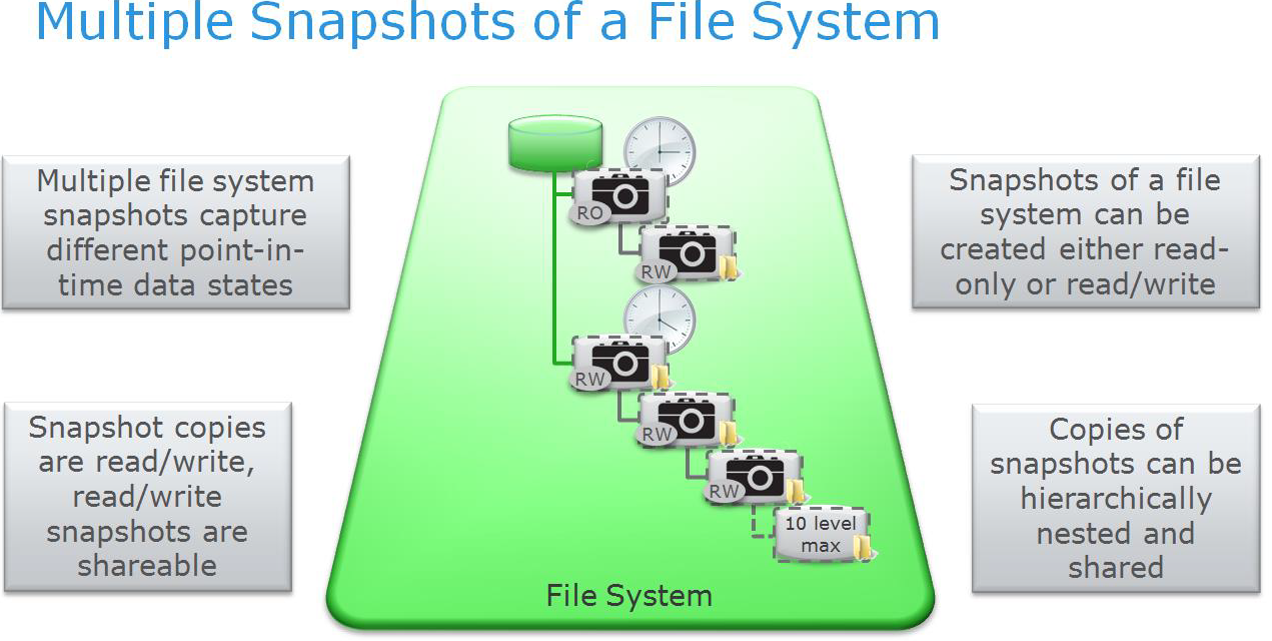
Для файловых систем поддерживается создание копий снэпшота и восстановление файловой системы из снэпшота. Т.е. состояние файловой системы можно вернуть на тут точку во времени, когда был создан снэпшот.
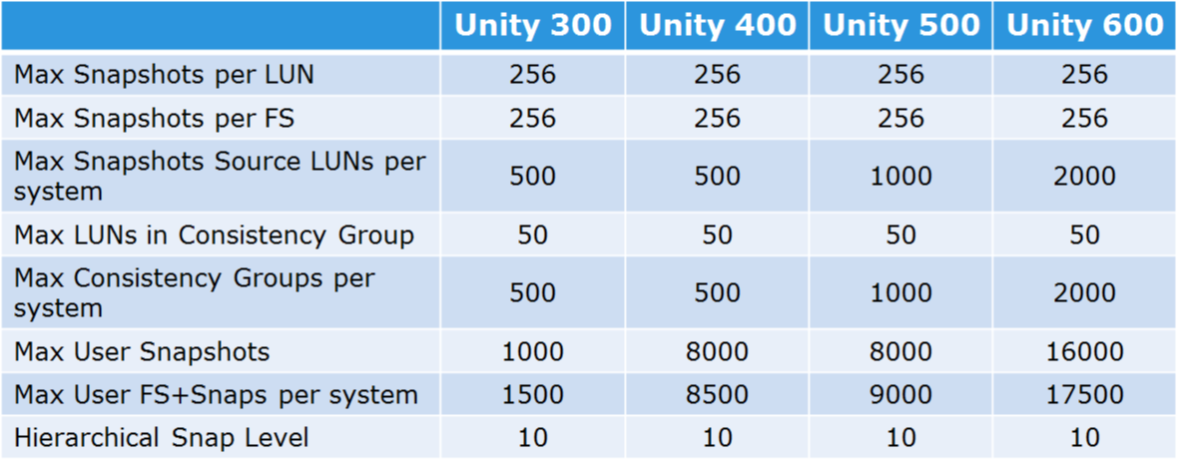
Общие количественные характеристики по снэпшотам для систем Unity приведены в таблице ниже.
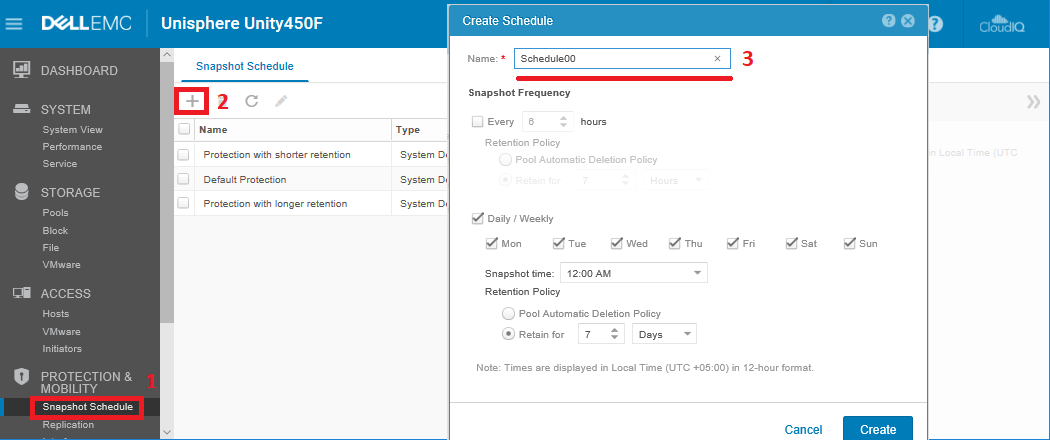
Заранее создать собственное расписание снэпшотинга в Unity можно в Protection & Mobility > Snapshots Schedule.
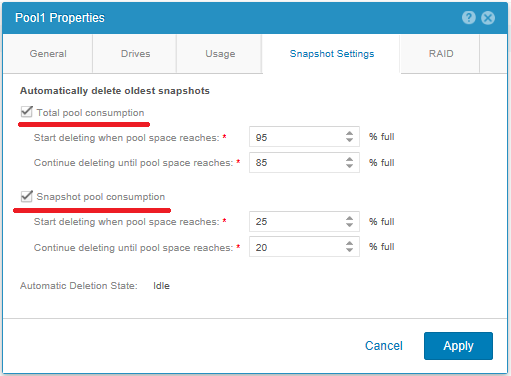
Обратите внимание на то, что для снэпшотов сразу указывается время их хранения в Retain for, по истечении этого времени снэпшот будет удален с дискового пула. Сделано это для того, что бы не переполнить дисковый пул содержимым уже не нужных снэпшотов. Если же выбрать Pool Automatic Deletion Policy, то будет применяться политика заданная в свойствах дискового пула. Она удаляет снэпшоты исходя либо из общей заполненности дискового пула данными, либо из процента дискового пространства занятого снэпшотами. По умолчанию применяются следующие значения:
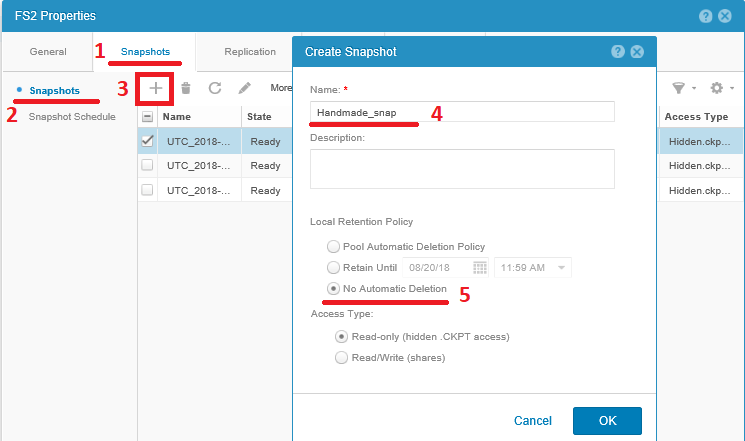
При создании снэпшота в ручном режиме можно указать, что его нельзя удалять автоматически по расписанию. Но в этом случае такие снэпшоты нужно не забывать удалить, когда они станут не нужны.
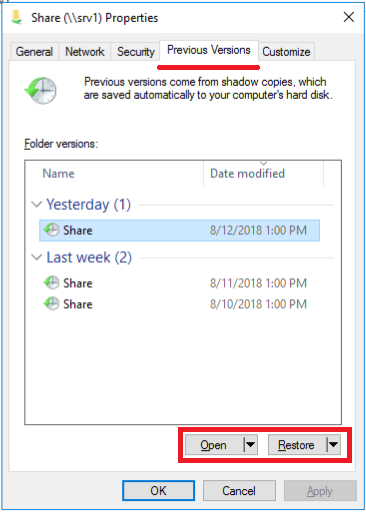
Так как файловой системой у нас полностью управляет массив, то создаваемые снэпшоты автоматически получаются консистентными. Снэпшоты файловых систем на Unity еще удобны тем, что для Windows клиентов они автоматом интегрируются с Windows Volume Shadow Copy Service (Windows VSS). Это означает, что во всех современных версиях Windows обычный пользователь может открыть свойства папки в расшаренной директории и, перейдя на вкладку Предыдущие версии (Previous Versions), получить доступ к содержимому снэпшотов. Т.е. обычный пользователь, не привлекая администраторов, может восстановить из снэпшота в том числе случайно удаленные файлы. Для созданной ранее шары на NAS сервере SRV1 это будет выглядеть следующим образом.
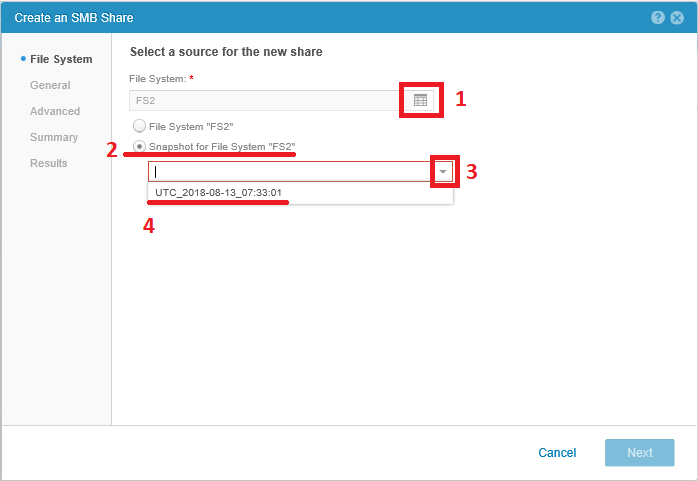
По расписанию снэпшоты создаются в режиме только чтения, для того что бы расшарить снэпшот как обычную директорию требуется создать его копию, которая будет иметь Acceess Type = Share.

Дальше нужно перейти в Storage > File на вкладку SMB Shares и начать создание новой расшаренной папки.

В открывшемся визарде выбираем файловую систему, для которой мы делали копию снэпшота и ставим чекбокс Snapshot for File System. В выпадающем списке выбираем снэпшот, к которому хотим предоставить общий доступ.
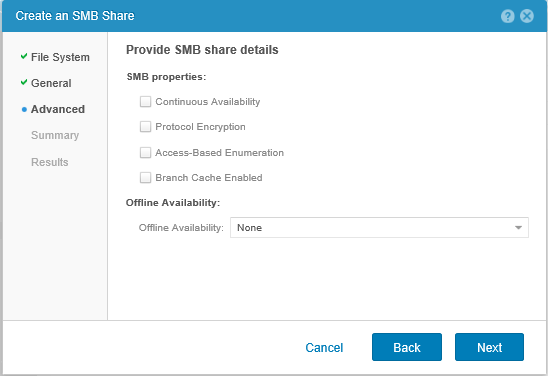
На следующем шаге указываем имя для шары.

Дальше визард ничем не отличается от визарда создания файловой системы, в разделе Advanced мы можем включить для шары дополнительные параметры.
И завершаем создание.

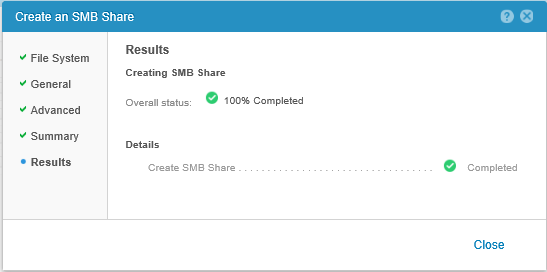
Получаем в итоге следующую картинку на Windows.

Конец спойлера
Так же поддерживается создание снэпшота снэпшота. Вплоть до 10 уровня вложенности.
Для файловых систем поддерживается создание копий снэпшота и восстановление файловой системы из снэпшота. Т.е. состояние файловой системы можно вернуть на тут точку во времени, когда был создан снэпшот.
Общие количественные характеристики по снэпшотам для систем Unity приведены в таблице ниже.
Заранее создать собственное расписание снэпшотинга в Unity можно в Protection & Mobility > Snapshots Schedule.
Обратите внимание на то, что для снэпшотов сразу указывается время их хранения в Retain for, по истечении этого времени снэпшот будет удален с дискового пула. Сделано это для того, что бы не переполнить дисковый пул содержимым уже не нужных снэпшотов. Если же выбрать Pool Automatic Deletion Policy, то будет применяться политика заданная в свойствах дискового пула. Она удаляет снэпшоты исходя либо из общей заполненности дискового пула данными, либо из процента дискового пространства занятого снэпшотами. По умолчанию применяются следующие значения:
При создании снэпшота в ручном режиме можно указать, что его нельзя удалять автоматически по расписанию. Но в этом случае такие снэпшоты нужно не забывать удалить, когда они станут не нужны.
Так как файловой системой у нас полностью управляет массив, то создаваемые снэпшоты автоматически получаются консистентными. Снэпшоты файловых систем на Unity еще удобны тем, что для Windows клиентов они автоматом интегрируются с Windows Volume Shadow Copy Service (Windows VSS). Это означает, что во всех современных версиях Windows обычный пользователь может открыть свойства папки в расшаренной директории и, перейдя на вкладку Предыдущие версии (Previous Versions), получить доступ к содержимому снэпшотов. Т.е. обычный пользователь, не привлекая администраторов, может восстановить из снэпшота в том числе случайно удаленные файлы. Для созданной ранее шары на NAS сервере SRV1 это будет выглядеть следующим образом.
По расписанию снэпшоты создаются в режиме только чтения, для того что бы расшарить снэпшот как обычную директорию требуется создать его копию, которая будет иметь Acceess Type = Share.
Дальше нужно перейти в Storage > File на вкладку SMB Shares и начать создание новой расшаренной папки.
В открывшемся визарде выбираем файловую систему, для которой мы делали копию снэпшота и ставим чекбокс Snapshot for File System. В выпадающем списке выбираем снэпшот, к которому хотим предоставить общий доступ.
На следующем шаге указываем имя для шары.
Дальше визард ничем не отличается от визарда создания файловой системы, в разделе Advanced мы можем включить для шары дополнительные параметры.
И завершаем создание.
Получаем в итоге следующую картинку на Windows.
Конец спойлера
I will describe the file replication settings between Unity systems later. So just Next . Check the settings and run the creation of FS. Fans of video guides can watch this official video here:
Manage NAS server from Windows snap-ins
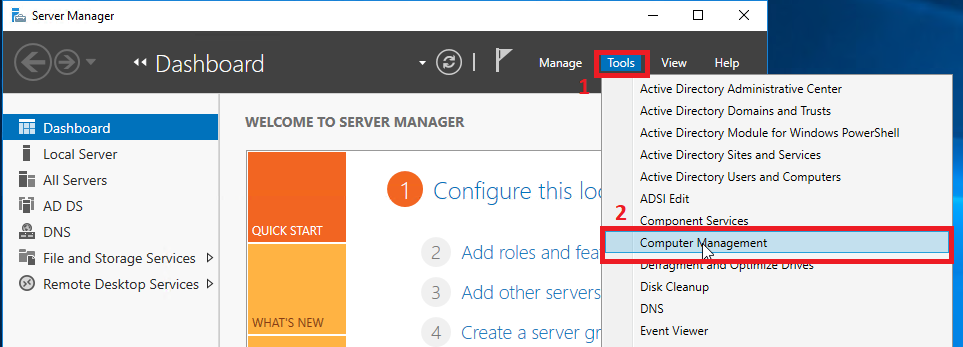
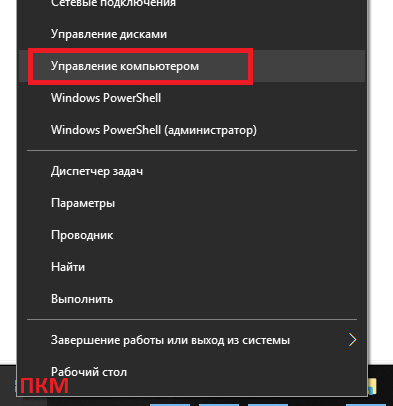
As I mentioned above, we can manage NAS servers created on the storage system using standard Windows snap-ins. For example, we can open the Computer Managment snap-in (in any of the convenient ways) and then Action> Connect to another computer ... Naturally, to connect and fully manage, we must have administrator rights on the NAS server. For the NAS server entered into AD, it is enough to launch the Computer Managment snap-in with domain administrator rights. The connection itself takes some time, which will be seen as soon as you try to expand the object tree in the remote server.
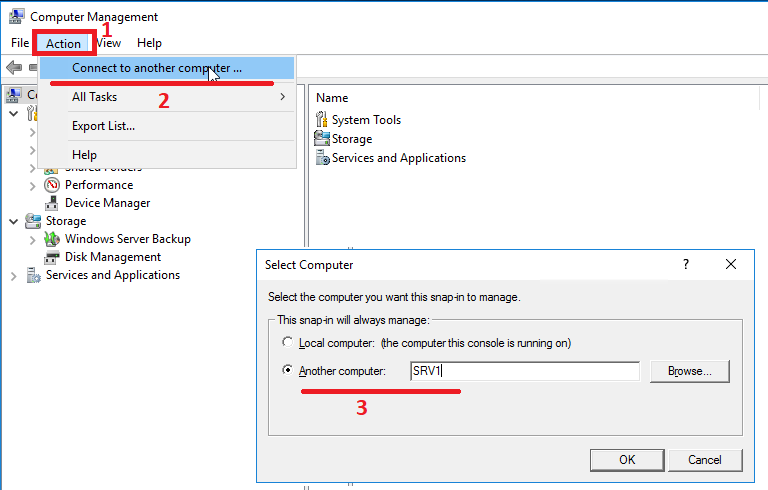
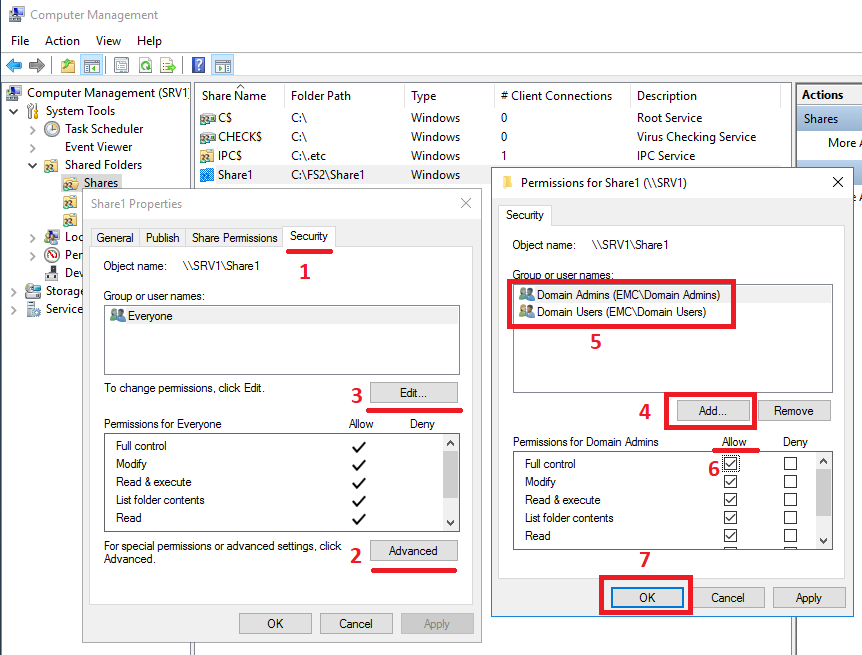
Once in Osnat, managing our NAS server, we can manage both the server itself and the file balls on it. In principle, control differs little from control, usually with a Windows machine. Naturally, most of the elements of the snap-in, not related to the file functionality, simply will not work. For example, Device Manager. What you can use this subsection System Tools . Namely, Shared Folders , Local Users and Groups and Event Viewer , which will need to be enabled separately. How to do this will describe a little later.
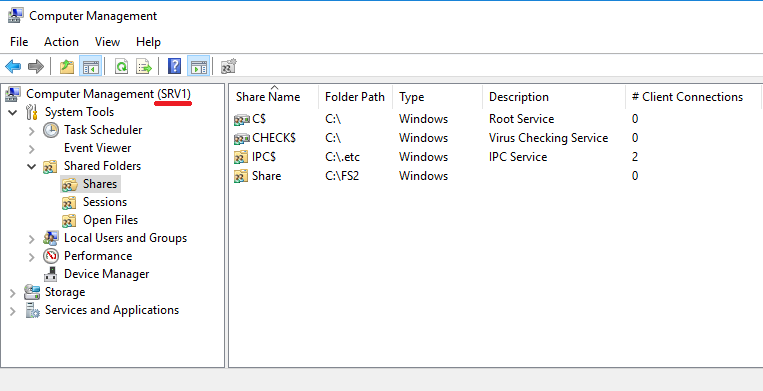
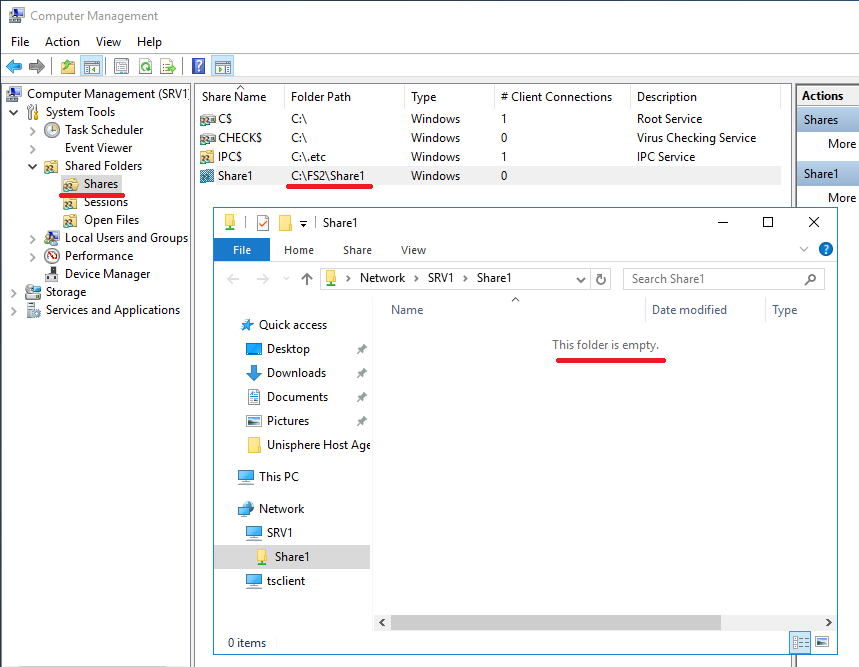
Since the shared folder that we created by default shares the root of the file system, this directory has a typical directory for Unix-based mount points. In which other there is no access. In order not to embarrass ordinary users, it is better to create separate directories on the file system and share them. Actually for this we remove the default ball from the snap. Right mouse button on the directory and Stop Sharing . And then create a new one. Further, passing through the Windows wizard, you need to click the Browse button in the Folder path ...
and we will see the root of our NAS server with all file systems and snapshots. By the way, from here you can share read-only snapshots as opposed to the Unity management interface. It is clear that it will be impossible to write in such balls. In our case, you need to get on the FS2 file system and click Make New Folder . Next, we select the created folder and move on to the wizard. Specify the name for the balls. Or leave as is. We specify whether users can cache the contents of the balls and get offline access to it. Set the default permissions on the ball. As a result, we get a clean and empty shared directory.
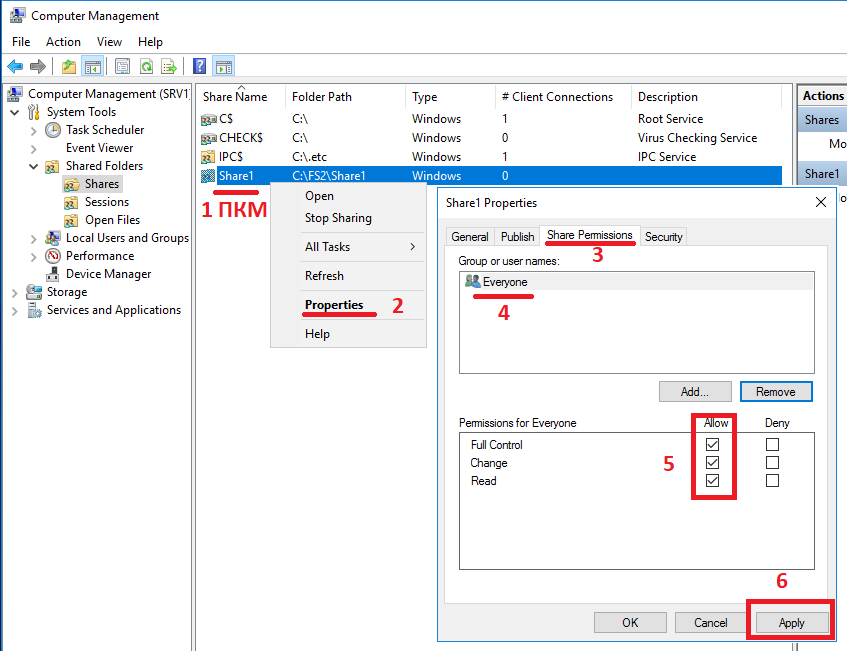
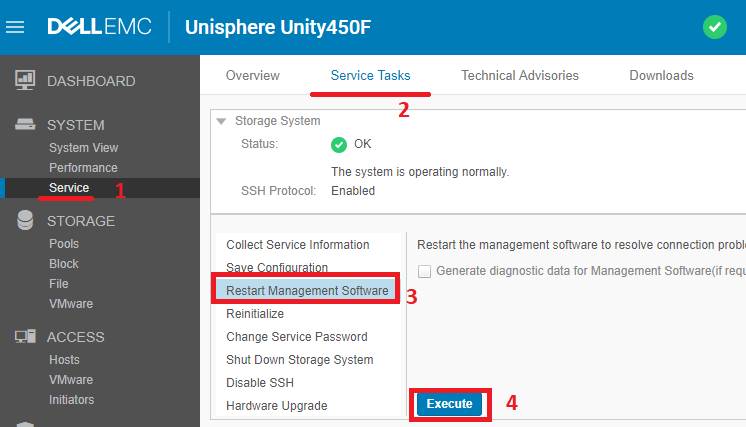
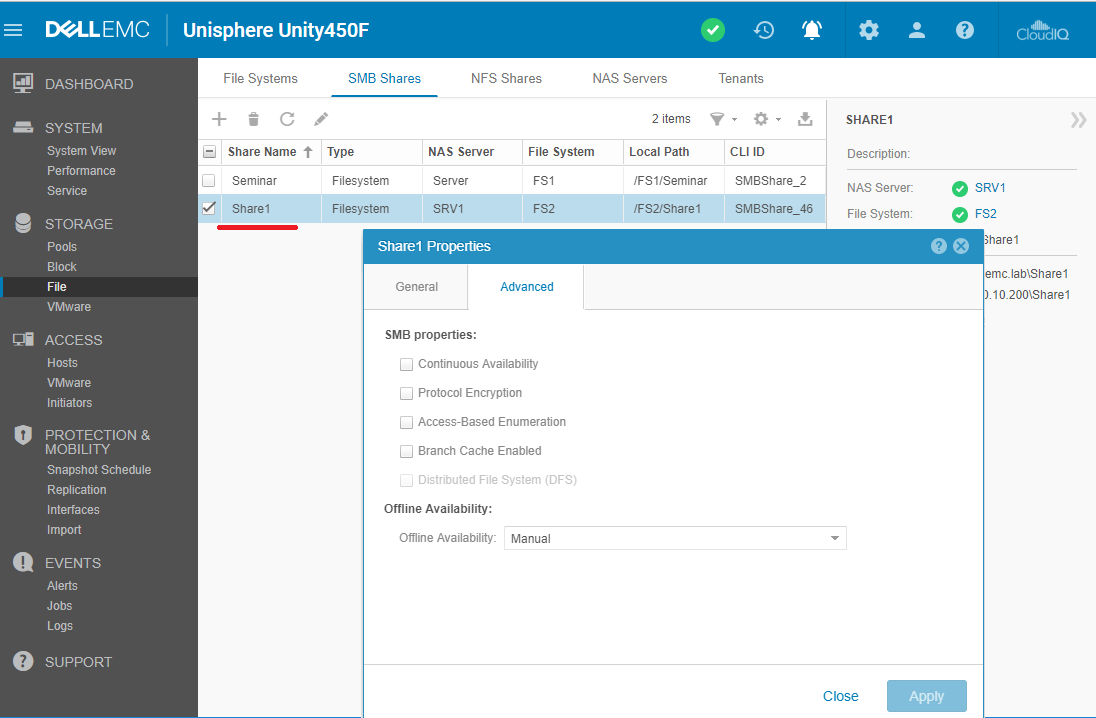
Then we can change permissions on this shared folder as on a normal Windows ball. In my opinion, the most convenient way is on the Share Permission tab to give full rights to the Everyone user and remove everyone else from here. And by the rights themselves, then steer on the Security tab . Here we can specify the user groups we need and their rights. We can remove the inheritance rights from the file system and redo everything the way we need. All changes to shared directories made in the Windows snap-in must be correctly displayed in the storage management interface in Storage> File> SMB Shares

. If for some reason this is not the case, you may need to restart the Unity Management service. This procedure does not affect user access to data stored on the storage system. Those. users will not notice anything. Just 7-10 minutes will not be available management interface.
Go to the System> Service section on the Service Tasks tab . In the Storage System section, select Restart Management Software and click Execute . As a result, everything should look like this in the storage management interface. Those. from Unisphere you can change the advanced settings of the file balls created in the Windows snap-in.
Domain group policies (GPOs) are applied to the NAS server created with connection to AD. The NAS server reads the policies from the domain and then updates them periodically. The frequency depends on the settings specified in the GPO on the domain itself. The list of supported policies is hidden under the spoiler below.
Supported GPO list
Kerberos
Audit policy
User right
Security options
Event logs
Group policy
Конец спойлера
- Maximum tolerance for computer clock synchronization (clock skew). Time synchronization is done per NAS server.
- Maximum lifetime for user ticket
Audit policy
- Audit account logon events
- Audit account management
- Audit directory service access
- Audit logon events
- Audit object access
- Audit policy change
- Audit privilege use
- Audit process tracking
- Audit system events
User right
- Access this computer from the network
- Back up files and directories
- Bypass traverse checking
- Deny access to this computer from the network
- Virus checking
- Generate security audits
- Manage auditing and security log
- Restore files and directories
- Take ownership of files or other objects
Security options
- Digitally sign client communication (always)
- Digitally sign client communication (when possible)
- Digitally sign server communication (always)
- Digitally sign server communication (when possible)
- LAN Manager Authentication Level
Event logs
- Maximum application log size
- Maximum security log size
- Maximum system log size
- Restrict guest access to application log
- Restrict guest access to security log
- Restrict guest access to system log
- Retain application log l Retain security log
- Retain system log l Retention method for application log
- Retention method for security log
- Retention method for system log
Group policy
- Disable background refresh of Group Policy
- Group Policy refresh interval for computer
Конец спойлера
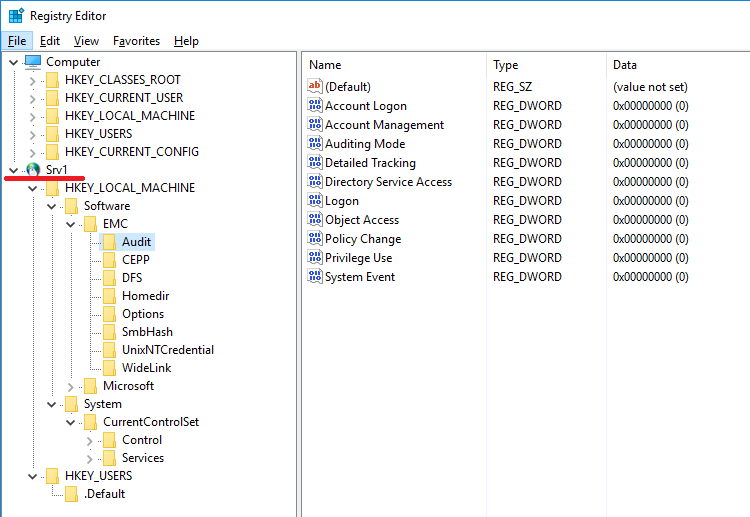
Another possibility to adjust the SMB NAS server parameters on the array is a remote connection to its registry. To do this, run regedit.exe (with AD administrative privileges) on Windows c. And connect to remote registry through the File> the Connect the Network Registry ... . After that, part of the parameters in the remote registry will be available for modification. And the other part can only be viewed, and it changes in another specialized MMC console. The result is the following picture:
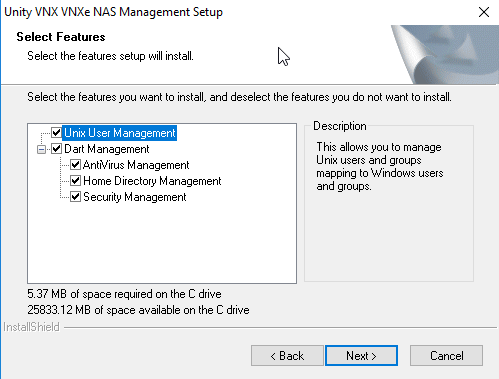
In addition to standard MMC consoles, there are additional options for working with NAS servers on Unity. You can get their distribution kit on your own on the vendor’s service portal, or request from service partners involved in technical support of your array. The latest available version is available as a file 8.1.9.157_Unity_VNXFileCifsMgmt.exe. As the name implies, the same utility is also used to configure additional functionality of datamoovers and NAS servers on previous generations of VNX and VNXe arrays. This distribution can be deployed on any domain computer. In the screenshot below, you can see what functionality the installed equipment contains. You must run the mmc console under the domain administrator account via run , where the command is entered
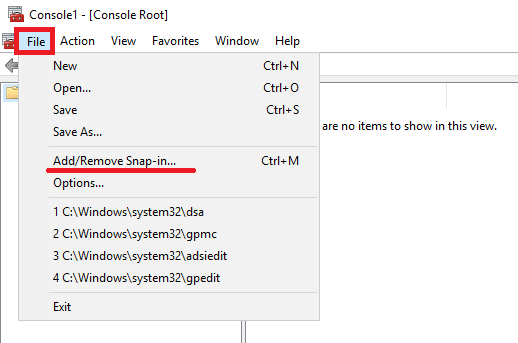
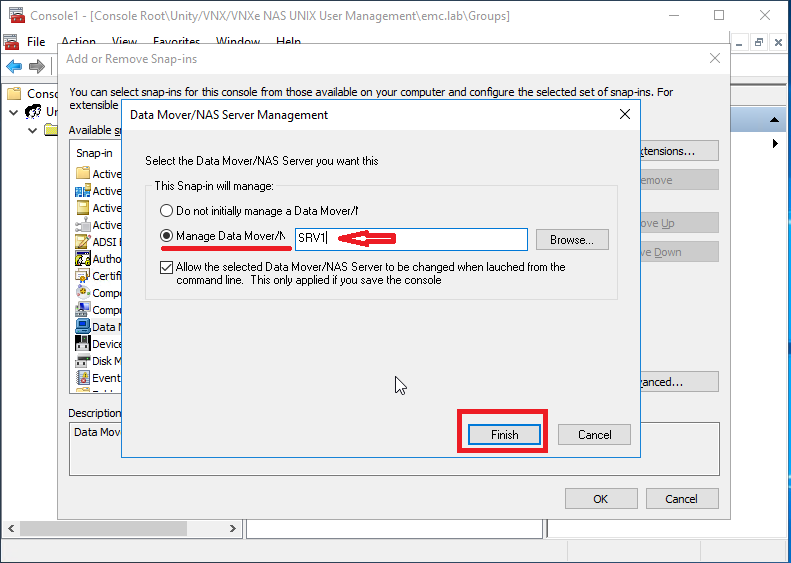
mmc / 32 . In the console, select the File> the Add / the Remove Snap-in ... . Here we have two new accessories. The first Data Mover / NAS Server Managment and the second Unity / VNX / VNXe NAS UNIX User Management . In our case, select the first one and click Add> . As a result, we will have another window where we need to select the NAS server that we will configure. Then we get access to the console, where we can manage and configure additional functionality of our NAS server. In particular, the home directory, the integration of shared directories with antivirus programs and configure a number of additional parameters related to security.
But first things first. Home directory is the functionality allowing to give all users the same link to the home network folder of the form \\ SRV1 \ home, but at the same time each user will get to his own directory with predefined rights. Moreover, if the personal directory does not exist and the user first enters the link indicated above, his personal directory can be created automatically. You can use this for example for portable profiles in AD. And just as personal network drives that can be created automatically, and in the script to specify the same path for all.
When creating a new home directory, regular expressions are allowed. For example, all users whose accounts begin with the letters a to k can be sent to one directory for one FS, and all others to another directory to another FS. The list of anti-virus servers with which you can integrate file balls on Unity: MMC console and its AntiVirus section allows you to connect the NAS server to the anti-virus server and adjust and set a number of work parameters for checking files on file balls.
The “Data Mover \ NAS Security Settings” section also allows you to make a number of security-related settings, in particular, enable Event Manager on a NAS server and view events in the Computer Management console connected to this server. True magazine size is limited to a maximum of 512 KB. Upon reaching which events begin to rotate. Direct access to the log file can be obtained with the administrator rights of the NAS server along the path:
\\ storage_server_netbios_name \ C $ \. Etc \ audit \ security.evt
Providing fault tolerance when connecting to the enterprise network
You can watch a short video on how it works and how to configure LACP and FSN in Unity. It is pretty visual.
Ps Unfortunately, I did not have enough fuse to finish the article with one call, so it didn’t work out to bless all the functionality of the Unity file part in one article. Plus, while I was thinking about what to continue, I was “taken away” from the storage booth. So if the article will interest someone, then maybe I will describe the rest in the next section. I definitely didn’t touch the NFS ball configuration, Standalone SMB server with local accounts, creating a multi-protocol NAS server with access to the same data using different protocols, file replication, which is now both in asynchronous and synchronous versions and many more . Nevertheless, the article has been in drafts for almost a month now. So I spread it as it is, all of a sudden someone will come in handy and this will give me the motivation to continue and create the second part.
PsPs The Dell EMC has a virtual version of Unity VSA, which can be used with a shareware license for testing purposes. Unfortunately, only those who have an account on vendor portals can access to downloading it. An alternative way to get applines is to request through Dell EMC partners. At the same time, as for the file part, the system is quite fully functional; even replication works. The only significant architectural differences from the iron counterparts are one-controllability, the absence of FC ports and the limitation of the licensed volume under the “disk” pool of 4 TB with a free license.