Just about the complicated. Part 3, we continue to create a wireless "smart home". Based on Z-Wave technology and MajorDoMo software
- Tutorial
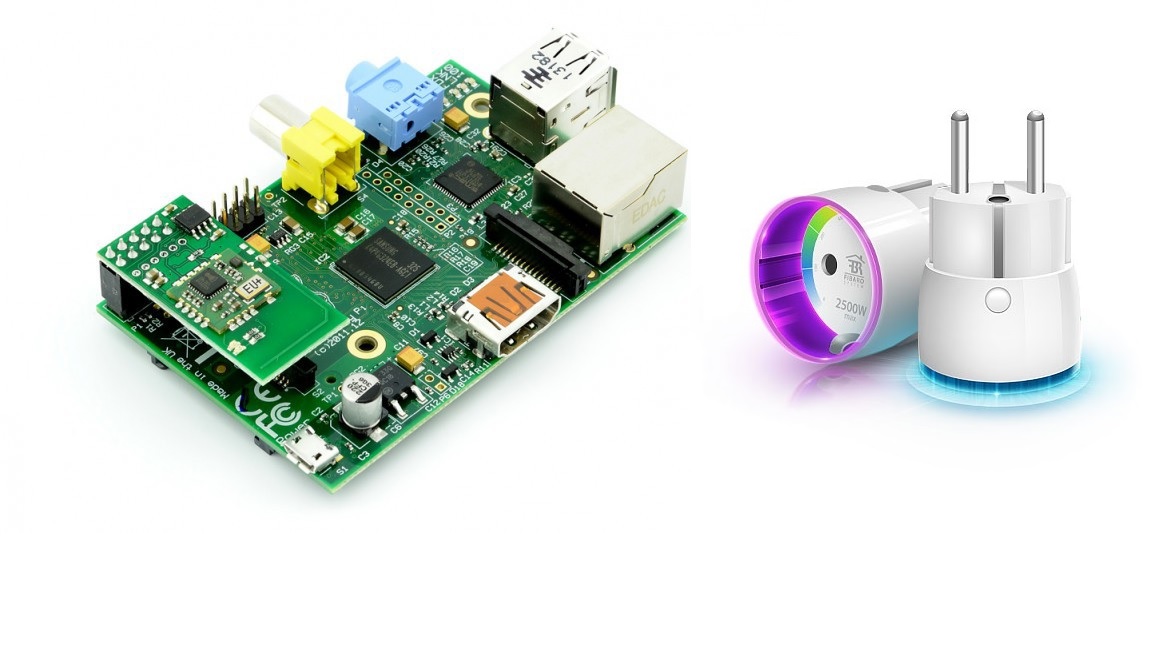
In this article, we continue the first steps in creating our wireless “Smart Home” based on technologies and open source protocol. On the example of connecting one device that uses Z-Wave technology: the FIBARO Wall Plug Z-Wave smart socket (FGWPF-102_ZW5).
The choice was made for the following reason: the device has several functions: it works as a relay and a switch, you can turn on / off both on demand and on schedule, a meter of power consumed at the moment, an electricity meter for a certain period of time.
In this part of the manual there will be quite a few pictures (screenshots) and although everything is relatively clear on an intuitive level, I will try to make the description accessible and understandable even for a user who is not very well versed in modern technologies and not an IT specialist.
The principle of this, made it work, rechecked, gave the task with a small instruction to his eldest son to repeat, he had some difficulties, explained, added information to the instruction and made a small explanation.
In previous parts:
→ Part One: A small step-by-step instruction on how to install the Smart Home operating system based on a Raspberry single board computer, Z-Way RaZberry module and MajorDoMo software
→ Part Two: continued: Z-Way RaZberry module and MajorDoMo software
In the past In the articles, we installed the Raspbian system with MajorDoMo on the Raspberry single board computer, installed the RaZbery module for the Z-Way technology. They registered everything in the “Smart Home” system. Requirements for hardware and software are indicated in both the first and second parts.
But after this article, I hope you can start at least a partial automation of your housing.
Connecting the first Z-Wave device to the controller
Now we will try to connect a new device, see the capabilities of standard software from the developer of the Z-Wave protocol. We will get remote access to the equipment and install the mobile application. Brief theoretical information will be in italics.
The FIBARO Wall Plug Z-Wave (FGWPF-102_ZW5) will be the first managed device. The choice was also made due to the compliance (certification) of this device with the Z-Wave + specification.
Compatibility condition is one of the main advantages of Z-Wave technology. Before going on sale, all devices are certified by Z-Wave at one of their three certification authorities, where they check the device for compatibility. More than 150 manufacturers worldwide have chosen Z-Wave as the main protocol for their products. And they are all compatible with each other within the same region (one frequency range).We go to our single-board computer Raspberry by typing its IP address in the address bar of the browser indicating the Z-Way port http://192.168.43.60:8083 .
Let me remind at the moment our username is admin, the password is the one that was set in the previous part.
As a primary controller, we have a single-board computer Raspberry with the RaZerry module installed.
At the entrance, in the device panel (home page) we have almost nothing, only service modules.

We enter the expert mode by typing, we see a brief information about the network, the type and number of the controller, the number of devices in the network. To select a language, use: Settings (gear icon) - Language.
Go to the tab Devices - Status:
http://192.168.43.60:8083/expert

From the list of devices, we have only one primary controller and little information about its state.
A little about the possibilities and terms of the network Z-Way:
The primary controller is the network coordinator. This is the only node capable of including new nodes in the network and excluding existing ones. It also stores information about the network topology and can update the lists of neighbors for all other (secondary) controllers and generate routes in all the child nodes. The primary controller can be only one in the network. Typically, the primary is the controller that started building the network. However, in the future, the primary controller may include a new controller in the network, transferring its role to it.More detailed information can be viewed by going to the Network tab and selecting Information about the controller.
Each Z-Wave network is identified by a unique Network ID (generated when a network is created by a random number generator with radio noise as a source of random numbers or assigned to Sigma Designs for old controllers). Network ID (also known as Home ID) is a common identifier for all nodes belonging to the same logical Z-Wave network. The Network ID is 4 bytes long (32 bits) and is assigned to each device through the primary controller when the device is connected to the network. Multiple Z-Wave networks with different Home IDs can coexist on the same territory. However, they will not see each other and interact with each other. and can include up to 232 nodes defined by a device ID (Node ID).
Nodes with different network IDs cannot communicate with each other.
Z-Wave uses a mesh network topology and you can create a network from one managed and one control device. (What we are doing at the moment). Additional devices can be added at any time, as well as several controllers.
Devices must be “plugged in” to the Z-Wave network before they can be managed.
Switching on is done by switching the controller to a special Enable mode (Inclusion mode; usually with a special button in the key or a combination of keys), and the device being switched on into the Learning mode (Learn mode; usually with a single or triple pressing the button). In this case, the controller and the included device must be in direct view. Many modern (protocol versions 4.5x or 6.x) devices that are constantly feeding (not sleeping) for the first 3-5 minutes after switching on the power supply network automatically switch to a special training mode (Network Wide Inclusion, NWI) if they are not yet included in the network . In this case, the condition of being in direct visibility is no longer required. This makes it quite easy to plug new devices into the network without running around the house.
Exclusion from the network is similar: the controller is switched to the Exclusion mode, and the child node is switched to the Training mode. After the exclusion, the Node ID and Home ID of the device will be reset to 0 (for NodeID controllers, it will be reset to 1, and HomeID to factory default). Most devices will reset all other user settings to their factory defaults.
It is worth noting that the device already registered in one network will not be included in another network. But any primary controller can be excluded from the network (even the device is not from its network).
This connection process is repeated for each device in the system. The controller remembers the signal strength of the device during the connection process, so the architecture assumes that the devices must be located in the final location before they are added to the system. However, Z-Wave involves reconfiguring the network — running this procedure on a controller allows you to redistribute routes and improve communication between devices located far from the controller.
Let's try to add our first device:
Go to network management: Network - Management

Complete with a smart socket was a small instruction in several languages, including Russian.
Quickly familiarizing with it we find out that the process of switching on Inclusion is achieved by quick triple pressing of a button on sockets. At first we start the Turn on mode on the controller: Turn on (anew) the device , then quickly press the socket button 3 times.
More detailed information about the device, its settings, and the functions of the FIBARO Z-Wave Wall Plug (FGWPF-102_ZW5) can be viewed
→ instruction in Russian
→instruction in English
FIBARO Wall Plug Z-Wave connection:
Our RaZberry controller supports several frequencies for different regions, see the region switching buttons at the bottom of the page (EU by default) and a small note:
Current frequency: EU May be unknown, not supported, or another region (EU / US / RU / ....)
Current frequency: EU Can be unknown, unsupported or any region (EU / US / RU /....)/
It worked for me by default at the European frequency. If your managed Z-wave device is not defined, you can try the frequency sweep.
After adding our device was determined:

Going to the device we can see its properties, version, etc.

We go to the main page of our Z-Wave house and see that new labels of our device have been added to the service ones. http://192.168.43.60:8083

Going to the Elements tab , in the settings (the gear icon in the upper right corner) each element can be removed from the main screen. As a result, I became this kind.

After this action, I want to make a small warning before trying to do anything else, especially on an intuitive level:
Back up the image of your bootable memory card , there are a lot of programs on the network, to learn how to use it will not be difficult.
It may happen like this:


Setting up remote access and the first steps in automation
Set up remote access, to manage our Z-Wave network from a mobile phone: Go to the additional Menu - Control - Remote Access , check the Enable remote access option and remember our ID.

On the smartphone (under my Android OS) we install the Z-Wave application, there are several applications, I installed the Z-Way (Z-Wave Europe Gmbh).
After installing and launching a mobile application, the program offers to login using a QR code, you can get it Menu - Manage - Devices on your phone’s tweet - add a new one.

But I did not succeed in this way. Therefore, I will describe an alternative option. On the phone in the window with the QR code, we press manually: the fields for filling appear, we enter our login (admin), password, and network ID number from the Remote access tab . There is a connection process, as a result we get to the main page of the application:

Labels of our devices (elements) are arranged in the same order as in the browser on the main page.
Now we can control the device remotely, watch its status.
But But management and control is not automation.
A little try and customize.
Go Menu - Applications - Local :

We can create your schedule, both in time and by day of the week.

There is also another interesting application If -> Then , with its help we can create algorithms for the operation of devices of our “Smart Home”.
This could be done, but using a little bit like using the Z-Wave device settings in the browser and the mobile application, for me personally I would like more from automation and the list of supported devices.
Therefore, in this part we will begin the small setup of MajorDoMo.
As in the previous part, we go into our system, this time without specifying the port. IP_OF_YOUR_RASPBERRY , go to Control Panel - Devices - Z-Wave .
At the moment, our Z-Way controller in the MajorDoMo system is not configured and we do not see its state (offline). You need to register it by specifying the API URL: and your login and password in the Z-Wave system.
From the API documentation, the controller’s URL itself has the format: http: // {username}: {password} @ {ip}: 8083 / {anyurl}

Password and login are provided by the MajorDoMo system, therefore we only write the address indicating the page. By the way, instead of IP, you can specify localhost: 8083 / ...