UITableView + sqlite3 for the smallest
Foreword
Greetings habrolyudi. The dream of my whole life has recently come true and I bought myself a Mac (13 'unibody). Late 2008, but for our village will do. Since then, he began to slowly delve into the development of applications for iOS (in particular for the iPhone).
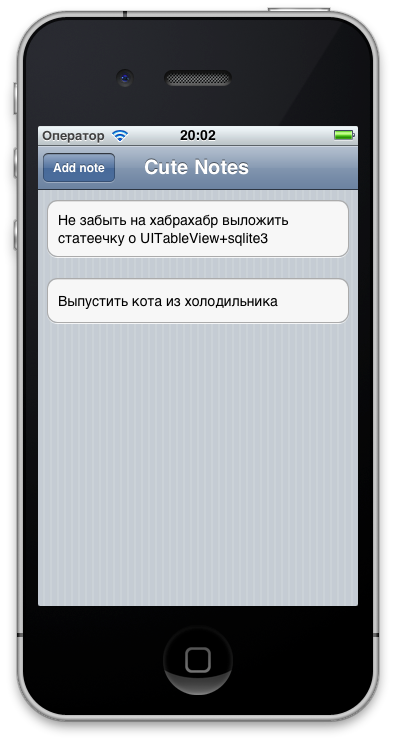
Now closer to the point. For starters, I decided to write a simple application that allows you to create and view notes. Here's how it looked in the end:


But even to write such a simple application, I had to bang my head against the wall, because there are few articles on the Internet for tractor drivers (which I essentially am). So I decided to make up for this shortcoming. If there will be admired reviews then I will continue this topic. And immediately I warn that I know the Russian language far from perfect. Well ok, let's go!
Setting up the environment and the project
The first thing to do is buy yourself a poppy. Of course, there is still an option to install a hackintosh for yourself and you should not discard it, it is a worthy alternative if there are no problems with hardware compatibility.
Next, download Xcode (the IDE in which we will create the application) from here: developer.apple.com/xcode (together with the IDE we get the compiler, debugger, profiler and iPhone simulator). In order to download it is necessary to register, I think it will not be difficult. Install and run.
At startup, Xcode will prompt us to create a new project, select “Create new Xcode project”:

Then we are offered several frameworks for a new application, we will go against many Internet recommendations and create a Single View Application (this application is the only one that we will see after launching the application):

Next, we indicate the name of our application (ActiveTable) and other nonsense (note that the Use Storyboards checkbox is checked; what it is you can see here habrahabr.ru/post/131128 ):

Next, select the folder to save the project (a subfolder will be created for the project), we can optionally create a regular support Git button (which pleases) and see the settings of our project (they are shown if you select the item with the project name in the panel on the left).
Overview of the project created by the wizard
The most interesting thing is here:

In the “Main Storyboard” dropbox, we can choose a storyboard that will be loaded when the application starts (for us a storyboard with the name “MainStoryboard” was automatically created and assigned to us), and under the dorpbox a list of supported orientations of our device (in the simulator “Simulator” iOS ”can be rotated by selecting“ Hardware-Turn Left ”or“ Hardware-Turn Right ”). On the left we see this:

Here we have the “Run” button to launch the application in the “iOS Simulator”, and below the project tree:
- AppDelegate.h / AppDelegate.m - a class for processing events of our application;
- MainStoryboard - file with our views and transitions;
- ViewController.h / ViewController.m is a class for managing our default view, which the project creation wizard created for us.
The remaining files and folders are not particularly interesting in the context of this article. But about the ViewController, I will say more. If you select MainStoryboard-ViewController in the project tree (left panel), select the “Show the Identity inspector” tab in the right panel, then we will see that the “View Class Control class” is selected as the control controller in “Custom Class-Class”, which is described in the files ViewController.h / ViewController.m:

Creating a database and connecting sqlite to the project
Well then, it's time to create a sqlite database. To do this, open our favorite terminal (oh yes, it drives me crazy. You see, mac os is like ubuntu, just not at all, but much better!), Go to the project folder and create a database there (immediately create a table and fill it her data):
$ cd ~/Documents/Projects/ActiveTable/ActiveTable
$ sqlite3 Base.db
sqlite> create table animals (id integer primary key, name text);
sqlite> insert into animals(name) values('Cat');
sqlite> insert into animals(name) values('Dog');
sqlite> insert into animals(name) values('Horse');
sqlite> .quit
The base is ready. Now you need to add the database file to the project. To do this, perform:
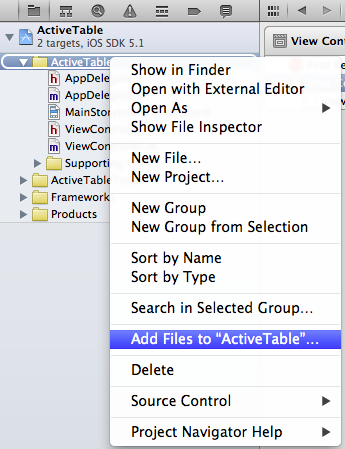
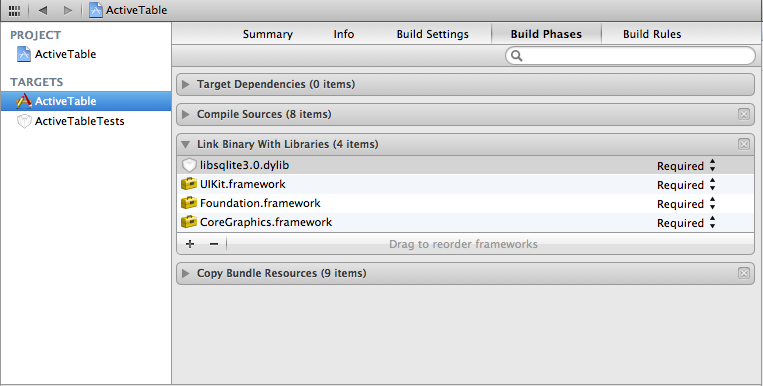
In the dialog, select the file Base.db. Now connect libsqlite3.0.dylib. To do this, go to the project settings (the root of the project tree on the left) -TARGETS-ActiveTable-Build Phases-Link Binary With Libraries, click on the plus sign and find libsqlite3.0.dylib.
Now attention, one more thing. Working with sqlite3 will be a nightmare if you do not write sensible wrapper. But fortunately there is a ready-made and very sympathetic FMDB library (https://github.com/ccgus/fmdb). There is also a good tutorial on using this miracle www.icodeblog.com/2011/11/04/simple-sqlite-database-interaction-using-fmdb . So we need to download this library. If Git is not worth it, then you need to download it from herecode.google.com/p/git-osx-installer . We clone ourselves FMDB (being in the project folder):
$ git clone https://github.com/ccgus/fmdbNext, add the fmdb folder to the project, just like Base.db. After that, you need to find and remove fmdb / src / main.m from the project tree (this is the file for building the FMDB library). Well, finally, we can podnakodit! :)
Controller refinement for TableView
First we need to create a TableView. To do this, go to MainStoryboard, find in the right panel at the bottom of the TableView spike

and drag it to our ViewController:

we have a TableView. Now we need to delegate the processing of events and receiving data to one of the controllers. To do this, we select our TableView, in the panel on the right go to the “Show the Connections inspector” tab and drag the marker near the “delegate” to the icon of our controller (the one that is the ViewController):

We also do it for “dataSource”. The connection is created, now TableView will know which controller to contact to obtain the data it needs.
In the ViewController (ViewController.h) class, we declare a field for storing table data:
@interface ViewController : UIViewController
{
    NSMutableArray *_items;
}
In the implementation of ViewController (ViewController.m) there are already two methods for processing events of entry and exit from the view, we add to them the loading and releasing of data:
- (void)viewDidLoad
{
    [super viewDidLoad];
    _items = [[NSMutableArray alloc] init];
	[self loadItems];
}
- (void)viewDidUnload
{
    [super viewDidUnload];
    [_items release];
}
As you can see from the example above, to load records, we create the loadItems method:
- (void)loadItems
{
    //определяем путь к файлу с базой
    NSString *path = [[[NSBundle mainBundle] resourcePath] stringByAppendingPathComponent:@"Base.db"];
    //создаем подключение к базе
    FMDatabase *database;
    database = [FMDatabase databaseWithPath:path];
    database.traceExecution = true; //выводит подробный лог запросов в консоль
    [database open];
    //выполняем выборку из таблицы animals
    FMResultSet *results = [database executeQuery:@"select * from animals"];
    while([results next]) {
        NSString *name = [results stringForColumn:@"name"];
        //atIndex - текущее кол-во элементов, чтобы новый элемент добавлялся в конец списка
        [_items insertObject:name atIndex:[_items count]];
    }
    //удаляем подключение к базе
    [database close];
}
The link to the tutorial on using FMDB is given above, I think everything is transparent here, the main thing is not to forget to enable the FMDB header (#import “fmdb / src / FMDatabase.h”).
Here we have the data, which means that we are slowly approaching the denouement! Next, there are three main methods that are necessary (except for numberOfSectionsInTableView, I bring it to complete the picture) in order for the data to appear in the TableView. The “numberOfSectionsInTableView” method returns the number of table sections. A table with sections looks something like this:

Since we have a table without sections, we simply return a unit:
- (NSInteger)numberOfSectionsInTableView:(UITableView *)tableView
{
    return 1;
}
But the “numberOfRowsInSection” method just returns the number of rows in the section. For a single-section table, this is simply the total number of rows:
- (NSInteger)tableView:(UITableView *)tableView numberOfRowsInSection:(NSInteger)section
{
    return [_items count];
}
Well, actually the method that returns the cell for rendering:
- (UITableViewCell *)tableView:(UITableView *)tableView cellForRowAtIndexPath:(NSIndexPath *)indexPath
{
    //для возврата ячейки мы используем один ее экземпляр, если он не создан, создадим
    //здесь "Cell" это придуманный нами для повторного использования идентификатор ячейки
    NSString *cellIdentifier = @"Cell";
    UITableViewCell *cell = [tableView dequeueReusableCellWithIdentifier:cellIdentifier];
    if (cell == nil)
    {
        //здесь можно не просто создать ячейку, можно добавить в нее даже картинки
        cell = [[[UITableViewCell alloc] initWithStyle:UITableViewCellStyleDefault reuseIdentifier:cellIdentifier] autorelease];
    }
    //в indexPath.row нам передают номер строчки для отображения
    NSString *item = [_items objectAtIndex:indexPath.row];
    //мы же в label выведем название животного
    cell.textLabel.text = item;
    return cell;
}
We launch and enjoy:

Conclusion
IOS development is a very interesting activity. The built-in components are very powerful and quite customizable. The IDE and its related tools are impressive. Well, really, you can display the table without any problems.
Ready project (File-Download): docs.google.com/open?id=0B-5edA19iu-TSXZ6QUpoVWtUN28 .
PS: do not judge strictly, this is my first attempt at writing! But all comments are welcome.