11 ways to (not) become a victim of hacking in Kubernetes
- Transfer
Note trans. : The original of this article was published on the official Kubernetes blog and was written by Andrew Martin, one of the founders of the young British company Control Plane, specializing in security for cloud native applications running in K8s.

Security in Kubernetes has come a long way since the project was launched, however, it still contains pitfalls. We offer a list of useful recommendations on how to protect the clusters and increase their stability in the event of hacking: let's start with the control plane, continue with workloads and network security, and finish with an assessment of future security.
The control plane is the Kubernetes brain. He has a general idea of each container and a pod running in a cluster, can plan new pods (in which containers with root access to their parent nodes can be located) and can read all secrets stored in the cluster. This is a very important component that needs real-time protection against accidental data leakage and malicious actions: both when it is accessed, and when nothing happens, and when data is transmitted over the network.
For each component that supports TLS, it must be enabled — to prevent traffic sniffing, server identity, and (in the case of Mutual TLS) client identity.
The following network diagram from Lucas Käldström demonstrates where TLS should ideally be used: between each component on the wizard, and between Kubelet and the API server. The classic “ Kubernetes The Hard Way ” by Kelsey Hightower and the safety documentation in etcd offer detailed instructions for achieving these goals.

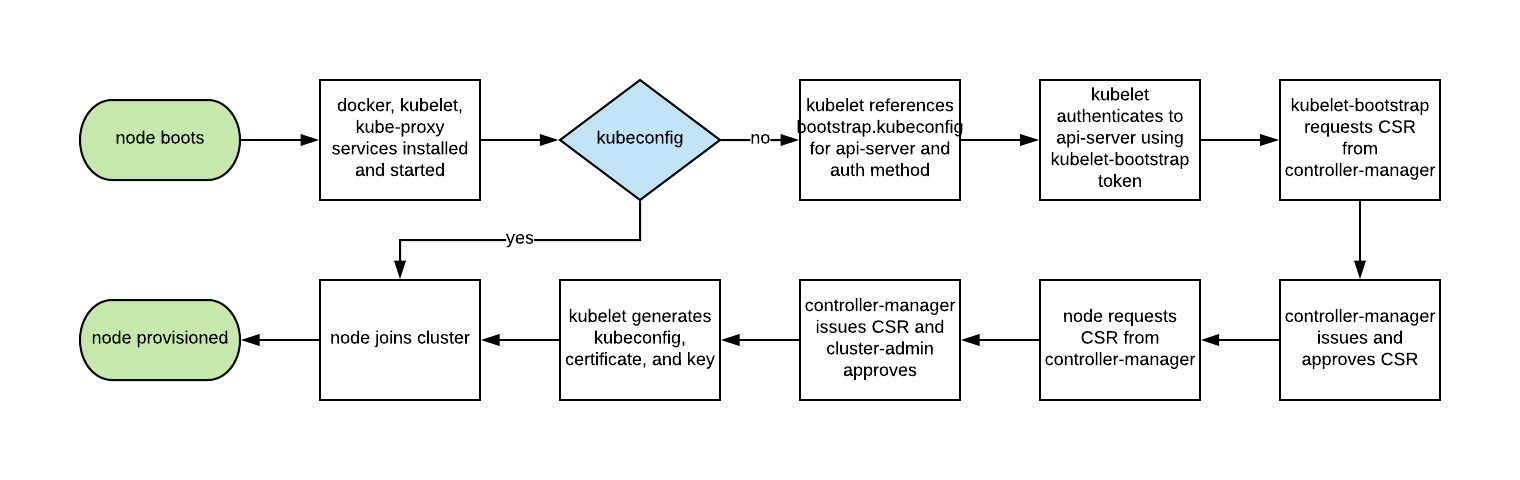
Historically, the automatic scaling of Kubernetes nodes was not easy, since each node required a TLS key to connect to the master, and storing secrets in basic images was a bad practice. Kubelet TLS bootstrapping provides the ability for a new Kubelet to create a certificate signing request so that certificates are generated at boot time:
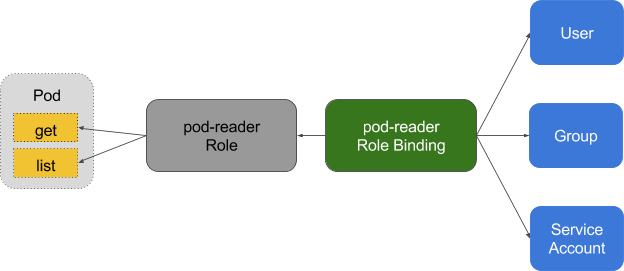
Role-based access control (RBAC) provides fine management of the policies by which users access resources such as namespaces.
The attribute-based access control system (ABAC, Attribute Based Access Control) in Kubernetes has been replaced by RBAC since K8s 1.6 release and should not be enabled on the server side of the API. Use RBAC instead:
There are many good examples of RBAC policies for various services in a cluster, as well as documentation . But you shouldn’t be limited to this: competent settings for RBAC policies can be obtained using audit2rbac from logs
Incorrect or over-authorizing RBAC policies are a security risk in the event of a compromise of the hearth. Supporting RBAC rules with minimal privileges, their ongoing audit and improvement should be part of the “technical duty hygiene” that teams apply in the development life cycle.
Audit logging (beta in Kubernetes 1.10) offers a custom logging API for workloads (for example, querying and responding to it) and at the metadata level. The logging level can be configured in accordance with the organization’s security policy — GKE applies reasonable defaults to those who are just starting to work with it.
For read requests, such as get , list and watch, in audit-logs only the requested object is saved, without a response object. For requests that affect sensitive data like Secret or ConfigMap , only metadata is exported. For all other requests, both objects are recorded in the audit logs: both the request and the response.
Do not forget: storing these logs inside the cluster is a security risk in the event of a compromise. These logs, like any other security-sensitive, should be placed outside the cluster in order to avoid negative consequences in case of vulnerability.
Centralizing authentication and authorization for the entire organization (ie, Single Sign On) helps in the process of accepting and leaving new employees, ensuring consistent access rights.
Integrating Kubernetes with third-party authentication providers (such as Google or GitHub) guarantees identity from a remote platform (with protection like two-factor authentication) and eliminates the need for administrators to reconfigure the API server in Kubernetes to add / remove users.
Dex - Provider OpenID Connect Identity (OIDC) and OAuth 2.0 with plug "connectors» ( connectors ) . Pusher went even further by providing customizable tools , in addition to which there aresome other helpers focused on other uses.
etcd stores information about the status of Kubernetes and secrets, is a critical component of K8s - it must be protected separately from the rest of the cluster.
Access to write to etcd at the API server is equivalent to granting root-rights to the entire cluster, and even read access can be easily used to escalate privileges.
The scheduler Kubernetes in etcd looks for definitions of hearths that do not have a node. Then he sends all the found pods to the available Kubelet for planning. Validation of these pods is made API server before recording them in etcd, so attackers, directly in writing etcd, can bypass many security mechanisms - eg
etcd must be configured with both TLS certificates ( client andpeer ) and deployed to selected nodes. To reduce the risk of theft and the use of private keys from work nodes, you can also restrict the cluster server's API firewall.
Regular rotation of security keys and certificates is the best practice in security, which allows you to limit the "radius of destruction" when a key is compromised.
Kubernetes will automatically rotate some certificates (in particular, Kubelet’s client and server certificates) by creating new CSRs after the expiration of the current ones.
However, the symmetric keys used by the API server to encrypt etcd values are not automatically rotated — this must be done manually . This operation requires master level access, so managed services (like GKE and AKS) hide the problem from the user.
With minimal security at the control plane, the cluster can already function safely. However, as for a ship with potentially dangerous cargo, the containers of such a vessel must protect the cargo in case of an unforeseen accident or leakage. The same is true for workloads in Kubernetes ( Pods , Deployments , Jobs , Sets , etc.) - they can be trusted at the time of deployment, but if they are accessible from the outside, there is always the risk that they will be used later by [attackers]. This risk can be reduced by running workloads with minimal privileges and their safe configuration.
The Linux kernel has many overlapping security extensions (capabilities, SELinux, AppArmor, seccomp-bpf) that can be configured to provide minimal privileges to applications.
Utilities like bane will help generate profiles for AppArmor, and docker-slim profiles will help seccomp, but be careful: a comprehensive test suite that checks all application code is required to identify all the side effects of using these policies.
PodSecurityPoliciesRegulate the use of these security extensions as well as other Kubernetes security directives. They are responsible for the minimum requirements that must conform to in order to get to the API server, including security profiles, privilege flag, sharing of the host network, processes or namespaces for IPC.
These directives are important because they help prevent containerized processes from escaping their isolated boundaries. Example PodSecurityPolicy by Tim Allclair is very versatile - it can be taken as a basis and readjust for your case.
If PodSecurityPolicies restrict access to the API server, then static analysis can also be used in the design process to model the organization's regulatory requirements and risk appetite.
Sensitive information should not be stored in YAML resources like pods ( Pods , Deployments , Sets , etc.), and sensitive ConfigMaps and Secrets must be encrypted with utilities like Vault (with an operator from CoreOS), git-crypt , sealed secrets or KMS cloud provider .
Static analysis of the YAML configuration can be used as a basis for security during startup. kubesec generates risk assessments for resources:
And kubetest is a framework for unit testing of Kubernetes configurations:
These utilities implement the “ shift left ” approach (i.e., move checks and verification to the early stages of the development cycle). Security testing at the design stage provides users with quick code and configuration feedback, which can be further rejected by manual or automated verification, and can also facilitate the introduction of additional security practices.
Containers that run as root are often much more privileged than their workloads require, and in the case of compromise they help attackers to achieve greater opportunities.
Containers still rely on the traditional UNIX security model (called the DAC, discretionary access control ) - everything is a file, and rights are granted to users and groups.
Namespaces for users do not work in Kubernetes. This means that the table of user IDs in the container is mapped to the table of users of the host, and starting the process with root rights inside the container will start it with root rights on the host. Although mechanisms are added to all of this to prevent the container from going out of limits, launching as root within the container is not recommended.
Many container images use the root user to run PID 1: if this process is compromised, the attacker gets root in the container and with any configuration error, the operation becomes much easier.
Bitnami did a great job of translating their container images to regular (non-root) users (besides, this is the default OpenShift requirement), which can simplify your migration to non-root images.
This fragment of PodSecurityPolicy prevents processes with root rights in the container from starting and escalating to root:
Containers that do not use root cannot occupy privileged ports, i.e. up to 1024 (the corresponding capability in the Linux kernel is for this -
The need to run workloads without using root will persist until the namespace for users is running or the runtime for launching containers without root is included in the executable media for containers.
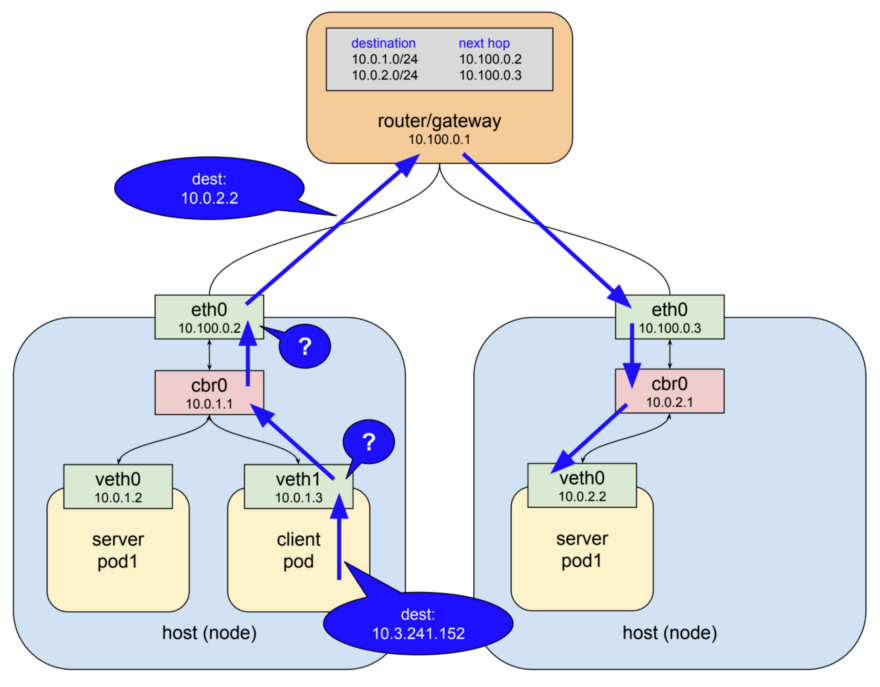
By default, the network in Kubernetes allows all traffic between the hooks. This setting can be limited by network policy - NetworkPolicy .
Traditional services are limited to firewalls that use static IP addresses and port ranges for each service. Since these IP addresses change very rarely, they have historically been used as a form of identification. Containers rarely have static IP - their nature implies the ability to quickly fall and re-create, for them, instead of static IP-addresses, service discovery is used. These features greatly complicate the configuration and testing of firewalls.
Since Kubernetes stores all system state data in etcd, it is possible to configure a dynamic firewall - if there is the necessary support in the CNI network plugin. Calico, Cilium, kube-router, Romana and Weave Net - all these plugins support network policies.
It is important to note that policies work on the principle of fail-closed, that is, the absence
The following is an example of NetworkPolicy , which prohibits everything from egress except UDP 53 (DNS), which also prevents incoming connections to the application. NetworkPolicies policies are stateful , so the application will still receive responses to outgoing connections.
Kubernetes network policies cannot be applied to DNS names. The reason is that DNS supports round-robin on multiple IP addresses and dynamic responses that depend on the addressing IP, so network policies apply only to fixed IP addresses or
The best practice is to start with a ban on all traffic for the namespace and add the routes required by the application to pass acceptance testing step by step. The process can be tricky, so ControlPlane developed netassert , a utility for testing network security in DevSecOps scripts with a highly parallelized nmap:
The metadata API from the cloud provider is a constant source of potential escalation (demonstrated by Shopify’s recent bug bounty ), so special tests that confirm the blocking of the API in the container network will help protect against configuration errors.
Web servers are a springboard for attacking the networks to which they are attached. Scanning files installed in images helps to ensure that there are no known vulnerabilities that an attacker could use to gain remote access to the container. Intrusion Detection Systems (IDS) capture these events if they occur.
Kubernetes allows submissions to the cluster through a set of supervisory checks (in the admission controller ), applied not only to submissions, but also to other resources like Deployments . In them, each of them can be validated for admission or its contents can be changed, in addition to which webhooks on the backend side are now also supported.

These webhooks can be used by container imaging tools to validate images before they are deployed to a cluster. Images that fail validation will not receive controller approval.
Scanning container images for known vulnerabilities helps reduce the time it takes for an attacker to take advantage of an open CVE. To prevent rolling out images with critical vulnerabilities in the deployment pipeline, you can use free utilities like Clair from CoreOS and Micro Scanner from Aqua.
Tools such as Grafeas allow you to store image metadata for constant compliance and vulnerability checks using a unique container signature (or a special content-addressablehash). Scanning an image of a container using this hash is equivalent to scanning images deployed in production, and can be done continuously without the need to have access to production environments.
Unknown 0day vulnerabilities will always exist, so Kubernetes should deploy an intrusion detection system like Twistlock , Aqua or Sysdig Secure . IDS detects unusual behavior in a container and stops or kills it. Falco by Sysdig is an open source rules engine and a starting point for this ecosystem.
The next stage of security in the “evolution of cloud native” seems to be the service mesh, although its adoption will not happen right away: this migration requires shifting the complexity of applications into the mesh infrastructure, and organizations will have to realize this best practice.

Service mesh is a network of permanent encrypted connections made between “side-connected” (similar to “sidecar”) , high-performance proxy servers like Envoy and Linkerd. It brings traffic management, monitoring and policies - all without changes in microservices.
The transfer of security and network-related code from microservices to a shared and tested set of libraries was already possible with Linkerd , and the emergence of Istio from Google, IBM and Lyft brought an alternative to this space. With the addition of SPIFFE for the cryptographic identity of each hearth and many other features, Istio can simplify the deployment of next-generation network security.
In zero trust networks, there may be no need for a traditional firewall or Kubernetes network policies, since each interaction takes place using mTLS (mutual TLS), which not only guarantees the security of the interaction, but also confirms the identity of both services .
This transition from traditional networking approaches to the security principles of the Cloud Native world will not be easy for those with traditional security thinking. As an introduction to this new world, we highly recommend the book “Zero Trust Networking” by Evan Gilman from SPIFFE. Istio 0.8 LTS
is currently available ., and the project is rapidly approaching its release 1.0. The project is versioned in terms of stability in the same way as the Kubernetes model: a stable core with separate APIs, for which their alpha or beta status is indicated using namespaces. Expect to see an increase in the spread of Istio in the coming months.
Cloud Native applications have a more detailed set of lightweight security primitives to protect workloads and infrastructure. The power and flexibility of such tools is both a blessing and a curse: not having enough automation [to use them], it was even easier to put out unsafe applications that allow you to go beyond the container or their insulating model.
Utilities for protection available more than ever, but to reduce the opportunities for attack and the potential of incorrect configurations, you must use them with caution.
If security slows down the organization’s speed in delivering change, it will never be high priority. Using the principles of Continuous Delivery in relation to the software supply chain allows an organization to achieve regulatory compliance, continuous auditing and enhanced management without affecting business performance.
Rapidly progressive security improvements are the easiest way with a comprehensive test suite. It is achieved with Continuous Security - an alternative to predetermined time test with constant validation in the pipeline, ensuring that the attack area is known, the risk is always clear and manageable.
Read also in our blog:
Security in Kubernetes has come a long way since the project was launched, however, it still contains pitfalls. We offer a list of useful recommendations on how to protect the clusters and increase their stability in the event of hacking: let's start with the control plane, continue with workloads and network security, and finish with an assessment of future security.
Part 1: Control Plane
The control plane is the Kubernetes brain. He has a general idea of each container and a pod running in a cluster, can plan new pods (in which containers with root access to their parent nodes can be located) and can read all secrets stored in the cluster. This is a very important component that needs real-time protection against accidental data leakage and malicious actions: both when it is accessed, and when nothing happens, and when data is transmitted over the network.
1. Ubiquitous TLS
For each component that supports TLS, it must be enabled — to prevent traffic sniffing, server identity, and (in the case of Mutual TLS) client identity.
"Please note that some components and installation methods can activate local ports for HTTP, so administrators need to familiarize themselves with the settings of each component in order to identify possible paths for unsafe traffic."
Kubernetes documentation
The following network diagram from Lucas Käldström demonstrates where TLS should ideally be used: between each component on the wizard, and between Kubelet and the API server. The classic “ Kubernetes The Hard Way ” by Kelsey Hightower and the safety documentation in etcd offer detailed instructions for achieving these goals.
Historically, the automatic scaling of Kubernetes nodes was not easy, since each node required a TLS key to connect to the master, and storing secrets in basic images was a bad practice. Kubelet TLS bootstrapping provides the ability for a new Kubelet to create a certificate signing request so that certificates are generated at boot time:
2. Minimum privileges in RBAC, disabling ABAC, monitoring logs
Role-based access control (RBAC) provides fine management of the policies by which users access resources such as namespaces.
The attribute-based access control system (ABAC, Attribute Based Access Control) in Kubernetes has been replaced by RBAC since K8s 1.6 release and should not be enabled on the server side of the API. Use RBAC instead:
--authorization-mode=RBAC(or this flag for GKE:) --no-enable-legacy-authorization. There are many good examples of RBAC policies for various services in a cluster, as well as documentation . But you shouldn’t be limited to this: competent settings for RBAC policies can be obtained using audit2rbac from logs
audit.Incorrect or over-authorizing RBAC policies are a security risk in the event of a compromise of the hearth. Supporting RBAC rules with minimal privileges, their ongoing audit and improvement should be part of the “technical duty hygiene” that teams apply in the development life cycle.
Audit logging (beta in Kubernetes 1.10) offers a custom logging API for workloads (for example, querying and responding to it) and at the metadata level. The logging level can be configured in accordance with the organization’s security policy — GKE applies reasonable defaults to those who are just starting to work with it.
For read requests, such as get , list and watch, in audit-logs only the requested object is saved, without a response object. For requests that affect sensitive data like Secret or ConfigMap , only metadata is exported. For all other requests, both objects are recorded in the audit logs: both the request and the response.
Do not forget: storing these logs inside the cluster is a security risk in the event of a compromise. These logs, like any other security-sensitive, should be placed outside the cluster in order to avoid negative consequences in case of vulnerability.
3. Use third-party authentication for API Server
Centralizing authentication and authorization for the entire organization (ie, Single Sign On) helps in the process of accepting and leaving new employees, ensuring consistent access rights.
Integrating Kubernetes with third-party authentication providers (such as Google or GitHub) guarantees identity from a remote platform (with protection like two-factor authentication) and eliminates the need for administrators to reconfigure the API server in Kubernetes to add / remove users.
Dex - Provider OpenID Connect Identity (OIDC) and OAuth 2.0 with plug "connectors» ( connectors ) . Pusher went even further by providing customizable tools , in addition to which there aresome other helpers focused on other uses.
4. Separate and place your cluster etcd behind the firewall
etcd stores information about the status of Kubernetes and secrets, is a critical component of K8s - it must be protected separately from the rest of the cluster.
Access to write to etcd at the API server is equivalent to granting root-rights to the entire cluster, and even read access can be easily used to escalate privileges.
The scheduler Kubernetes in etcd looks for definitions of hearths that do not have a node. Then he sends all the found pods to the available Kubelet for planning. Validation of these pods is made API server before recording them in etcd, so attackers, directly in writing etcd, can bypass many security mechanisms - eg
PodSecurityPolicies. etcd must be configured with both TLS certificates ( client andpeer ) and deployed to selected nodes. To reduce the risk of theft and the use of private keys from work nodes, you can also restrict the cluster server's API firewall.
5. Rotation of encryption keys
Regular rotation of security keys and certificates is the best practice in security, which allows you to limit the "radius of destruction" when a key is compromised.
Kubernetes will automatically rotate some certificates (in particular, Kubelet’s client and server certificates) by creating new CSRs after the expiration of the current ones.
However, the symmetric keys used by the API server to encrypt etcd values are not automatically rotated — this must be done manually . This operation requires master level access, so managed services (like GKE and AKS) hide the problem from the user.
Part 2: Workloads
With minimal security at the control plane, the cluster can already function safely. However, as for a ship with potentially dangerous cargo, the containers of such a vessel must protect the cargo in case of an unforeseen accident or leakage. The same is true for workloads in Kubernetes ( Pods , Deployments , Jobs , Sets , etc.) - they can be trusted at the time of deployment, but if they are accessible from the outside, there is always the risk that they will be used later by [attackers]. This risk can be reduced by running workloads with minimal privileges and their safe configuration.
6. Use security features in Linux and PodSecurityPolicies
The Linux kernel has many overlapping security extensions (capabilities, SELinux, AppArmor, seccomp-bpf) that can be configured to provide minimal privileges to applications.
Utilities like bane will help generate profiles for AppArmor, and docker-slim profiles will help seccomp, but be careful: a comprehensive test suite that checks all application code is required to identify all the side effects of using these policies.
PodSecurityPoliciesRegulate the use of these security extensions as well as other Kubernetes security directives. They are responsible for the minimum requirements that must conform to in order to get to the API server, including security profiles, privilege flag, sharing of the host network, processes or namespaces for IPC.
These directives are important because they help prevent containerized processes from escaping their isolated boundaries. Example PodSecurityPolicy by Tim Allclair is very versatile - it can be taken as a basis and readjust for your case.
7. Perform a static YAML analysis.
If PodSecurityPolicies restrict access to the API server, then static analysis can also be used in the design process to model the organization's regulatory requirements and risk appetite.
Sensitive information should not be stored in YAML resources like pods ( Pods , Deployments , Sets , etc.), and sensitive ConfigMaps and Secrets must be encrypted with utilities like Vault (with an operator from CoreOS), git-crypt , sealed secrets or KMS cloud provider .
Static analysis of the YAML configuration can be used as a basis for security during startup. kubesec generates risk assessments for resources:
{
  "score": -30,
  "scoring": {
    "critical": [{
      "selector": "containers[] .securityContext .privileged == true",
      "reason": "Privileged containers can allow almost completely unrestricted host access"
    }],
    "advise": [{
      "selector": "containers[] .securityContext .runAsNonRoot == true",
      "reason": "Force the running image to run as a non-root user to ensure least privilege"
    }, {
      "selector": "containers[] .securityContext .capabilities .drop",
      "reason": "Reducing kernel capabilities available to a container limits its attack surface",
      "href": "https://kubernetes.io/docs/tasks/configure-pod-container/security-context/"
    }]
  }
}
And kubetest is a framework for unit testing of Kubernetes configurations:
#// vim: set ft=python:
def test_for_team_label():
    if spec["kind"] == "Deployment":
        labels = spec["spec"]["template"]["metadata"]["labels"]
        assert_contains(labels, "team", "should indicate which team owns the deployment")
test_for_team_label()
These utilities implement the “ shift left ” approach (i.e., move checks and verification to the early stages of the development cycle). Security testing at the design stage provides users with quick code and configuration feedback, which can be further rejected by manual or automated verification, and can also facilitate the introduction of additional security practices.
8. Run non-root containers
Containers that run as root are often much more privileged than their workloads require, and in the case of compromise they help attackers to achieve greater opportunities.
Containers still rely on the traditional UNIX security model (called the DAC, discretionary access control ) - everything is a file, and rights are granted to users and groups.
Namespaces for users do not work in Kubernetes. This means that the table of user IDs in the container is mapped to the table of users of the host, and starting the process with root rights inside the container will start it with root rights on the host. Although mechanisms are added to all of this to prevent the container from going out of limits, launching as root within the container is not recommended.
Many container images use the root user to run PID 1: if this process is compromised, the attacker gets root in the container and with any configuration error, the operation becomes much easier.
Bitnami did a great job of translating their container images to regular (non-root) users (besides, this is the default OpenShift requirement), which can simplify your migration to non-root images.
This fragment of PodSecurityPolicy prevents processes with root rights in the container from starting and escalating to root:
# Required to prevent escalations to root.
allowPrivilegeEscalation: false
runAsUser:
  # Require the container to run without root privileges.
  rule: 'MustRunAsNonRoot'
Containers that do not use root cannot occupy privileged ports, i.e. up to 1024 (the corresponding capability in the Linux kernel is for this -
CAP_NET_BIND_SERVICE), but using Services helps to bypass this limitation. Here is an example for the MyApp application, which occupies port 8443 in a container, but Service makes it available on port 443, proxying requests to targetPort:kind: Service
apiVersion: v1
metadata:
name: my-service
spec:
selector:
app: MyApp
ports:
- protocol: TCP
port: 443
targetPort: 8443The need to run workloads without using root will persist until the namespace for users is running or the runtime for launching containers without root is included in the executable media for containers.
9. Use network policies
By default, the network in Kubernetes allows all traffic between the hooks. This setting can be limited by network policy - NetworkPolicy .
Traditional services are limited to firewalls that use static IP addresses and port ranges for each service. Since these IP addresses change very rarely, they have historically been used as a form of identification. Containers rarely have static IP - their nature implies the ability to quickly fall and re-create, for them, instead of static IP-addresses, service discovery is used. These features greatly complicate the configuration and testing of firewalls.
Since Kubernetes stores all system state data in etcd, it is possible to configure a dynamic firewall - if there is the necessary support in the CNI network plugin. Calico, Cilium, kube-router, Romana and Weave Net - all these plugins support network policies.
It is important to note that policies work on the principle of fail-closed, that is, the absence
podSelectorhere is equated to all possible values (wildcard) by default:apiVersion: networking.k8s.io/v1
kind: NetworkPolicy
metadata:
name: default-deny
spec:
podSelector:The following is an example of NetworkPolicy , which prohibits everything from egress except UDP 53 (DNS), which also prevents incoming connections to the application. NetworkPolicies policies are stateful , so the application will still receive responses to outgoing connections.
apiVersion: networking.k8s.io/v1
kind: NetworkPolicy
metadata:
  name: myapp-deny-external-egress
spec:
  podSelector:
    matchLabels:
      app: myapp
  policyTypes:
  - Egress
  egress:
  - ports:
    - port: 53
      protocol: UDP
  - to:
    - namespaceSelector: {}
Kubernetes network policies cannot be applied to DNS names. The reason is that DNS supports round-robin on multiple IP addresses and dynamic responses that depend on the addressing IP, so network policies apply only to fixed IP addresses or
podSelector'Kubernetes' for dynamic IP addresses. The best practice is to start with a ban on all traffic for the namespace and add the routes required by the application to pass acceptance testing step by step. The process can be tricky, so ControlPlane developed netassert , a utility for testing network security in DevSecOps scripts with a highly parallelized nmap:
k8s: # used for Kubernetes pods
  deployment: # only deployments currently supported
    test-frontend: # pod name, defaults to `default` namespace
      test-microservice: 80  # `test-microservice` is the DNS name of the target service
      test-database: -80     # `test-frontend` should not be able to access test-database’s port 80
      169.254.169.254: -80, -443           # AWS metadata API
      metadata.google.internal: -80, -443  # GCP metadata API
    new-namespace:test-microservice:  # `new-namespace` is the namespace name
      test-database.new-namespace: 80 # longer DNS names can be used for other namespaces
      test-frontend.default: 80
      169.254.169.254: -80, -443           # AWS metadata API
      metadata.google.internal: -80, -443  # GCP metadata API
The metadata API from the cloud provider is a constant source of potential escalation (demonstrated by Shopify’s recent bug bounty ), so special tests that confirm the blocking of the API in the container network will help protect against configuration errors.
10. Scan the images and run IDS
Web servers are a springboard for attacking the networks to which they are attached. Scanning files installed in images helps to ensure that there are no known vulnerabilities that an attacker could use to gain remote access to the container. Intrusion Detection Systems (IDS) capture these events if they occur.
Kubernetes allows submissions to the cluster through a set of supervisory checks (in the admission controller ), applied not only to submissions, but also to other resources like Deployments . In them, each of them can be validated for admission or its contents can be changed, in addition to which webhooks on the backend side are now also supported.
These webhooks can be used by container imaging tools to validate images before they are deployed to a cluster. Images that fail validation will not receive controller approval.
Scanning container images for known vulnerabilities helps reduce the time it takes for an attacker to take advantage of an open CVE. To prevent rolling out images with critical vulnerabilities in the deployment pipeline, you can use free utilities like Clair from CoreOS and Micro Scanner from Aqua.
Tools such as Grafeas allow you to store image metadata for constant compliance and vulnerability checks using a unique container signature (or a special content-addressablehash). Scanning an image of a container using this hash is equivalent to scanning images deployed in production, and can be done continuously without the need to have access to production environments.
Unknown 0day vulnerabilities will always exist, so Kubernetes should deploy an intrusion detection system like Twistlock , Aqua or Sysdig Secure . IDS detects unusual behavior in a container and stops or kills it. Falco by Sysdig is an open source rules engine and a starting point for this ecosystem.
Part 3: The Future
The next stage of security in the “evolution of cloud native” seems to be the service mesh, although its adoption will not happen right away: this migration requires shifting the complexity of applications into the mesh infrastructure, and organizations will have to realize this best practice.
11. Run the service mesh
Service mesh is a network of permanent encrypted connections made between “side-connected” (similar to “sidecar”) , high-performance proxy servers like Envoy and Linkerd. It brings traffic management, monitoring and policies - all without changes in microservices.
The transfer of security and network-related code from microservices to a shared and tested set of libraries was already possible with Linkerd , and the emergence of Istio from Google, IBM and Lyft brought an alternative to this space. With the addition of SPIFFE for the cryptographic identity of each hearth and many other features, Istio can simplify the deployment of next-generation network security.
In zero trust networks, there may be no need for a traditional firewall or Kubernetes network policies, since each interaction takes place using mTLS (mutual TLS), which not only guarantees the security of the interaction, but also confirms the identity of both services .
This transition from traditional networking approaches to the security principles of the Cloud Native world will not be easy for those with traditional security thinking. As an introduction to this new world, we highly recommend the book “Zero Trust Networking” by Evan Gilman from SPIFFE. Istio 0.8 LTS
is currently available ., and the project is rapidly approaching its release 1.0. The project is versioned in terms of stability in the same way as the Kubernetes model: a stable core with separate APIs, for which their alpha or beta status is indicated using namespaces. Expect to see an increase in the spread of Istio in the coming months.
Conclusion
Cloud Native applications have a more detailed set of lightweight security primitives to protect workloads and infrastructure. The power and flexibility of such tools is both a blessing and a curse: not having enough automation [to use them], it was even easier to put out unsafe applications that allow you to go beyond the container or their insulating model.
Utilities for protection available more than ever, but to reduce the opportunities for attack and the potential of incorrect configurations, you must use them with caution.
If security slows down the organization’s speed in delivering change, it will never be high priority. Using the principles of Continuous Delivery in relation to the software supply chain allows an organization to achieve regulatory compliance, continuous auditing and enhanced management without affecting business performance.
Rapidly progressive security improvements are the easiest way with a comprehensive test suite. It is achieved with Continuous Security - an alternative to predetermined time test with constant validation in the pipeline, ensuring that the attack area is known, the risk is always clear and manageable.
PS from translator
Read also in our blog:
- “ OPA and SPIFFE - two new projects at CNCF for the security of cloud applications ”;
- " Vulnerable Docker VM - a virtual puzzle for Docker and pentesting ";
- “ What is a service mesh and why do I need it [for a cloud microservice application]? ";
- " Conduit - lightweight service mesh for Kubernetes ";
- “ An Illustrated Network Guide for Kubernetes ”;
- " Infrastructure with Kubernetes as an affordable service ."