QEMU on FreeBSD-9.0-RELEASE-amd64
Task: Run, configure n (in the example we will start 3) qemu machines with ubuntu-12.04.1-server-amd64-1pc OS. and FreeBSD-9.0-RELEASE-amd64. The amd64 version is recommended by the ubuntu developers.
1. Installation (Do not forget to update the ports comrades BSD'delniki)
main [16: 54: emulators / qemu] # cd / usr / ports / emulators / qemu
main [16: 55: emulators / qemu] # make install clean
So:
main [17: 25: emulators / qemu-devel] # pkg_info | grep "qemu"
kqemu-kmod-devel-1.4.0.p1_5 Kernel Accelerator for QEMU CPU Emulator (development versi
qemu-0.11.1_11 QEMU CPU Emulator
main [17: 25: emulators / qemu-devel] #
Accelerator and processor emulator installed.
main [17: 40: / usr / QEMU] #mkdir —p / usr / QEMU / UbuEx1
Download the boot disk image ubuntu-12.04.1-server-amd64.iso from the official site. We load kernel modules and add them to loader.conf (we create if necessary)
main [17: 53: / usr / QEMU] # touch /boot/loader.conf
main [17: 53: / usr / QEMU] # echo 'kqemu_load = & aquo; YES »'>> /boot/loader.conf
main [ 17: 53: / usr / QEMU] # echo 'aio_load = & aquo; YES »'>> /boot/loader.conf
kqemu.ko - Acceleration module.
aio.ko - Asynchronous I / O module.
Or you can add the aio module to the kernel, just to emulate the network we need a tap device, and therefore the following modules need to be loaded into the kernel:
options VFS_AIO
device tap
options IPFILTER
options IPFILTER_LOG
main [17: 53: / usr / QEMU] # cd / usr / src
main [17: 53: / usr / QEMU] # make buildkernel KERNCONF = <kernel_name>
...
main [17:53 : / usr / QEMU] # make installkernel KERNCONF = <kernel_name>
...
main [17: 53: / usr / QEMU] # shutdown —r now
If you do not load the aio.ko module, then QEMU will fall with a cry:
Bad system call: 12 (core dumped)
In the event that you plan to establish networking between the host FreeBSD and guest systems, you must also download the following modules:
main [18: 14: ~] # kldload if_bridge
main [18: 14: ~] # kldload if_tap
After a reboot, we will see our modules as being submerged in the kernel:
main [18:22:~]# kldstat
Id Refs Address Size Name
1 28 0xffffffff80200000 1203808 kernel
2 1 0xffffffff81404000 2bdd0 kqemu.ko
3 1 0xffffffff81612000 42a7 linprocfs.ko
4 1 0xffffffff81617000 1e00b linux.ko
5 1 0xffffffff81636000 1582 fdescfs.ko
6 1 0xffffffff81638000 64b00 radeon.ko
7 1 0xffffffff8169d000 13a2b drm.ko
8 1 0xffffffff816b1000 2655 if_tap.ko
9 1 0xffffffff816b4000 55fe if_bridge.ko
10 1 0xffffffff816ba000 353d bridgestp.ko
bridgestp.ko - loaded automatically.
Next, make sure that your main IDE-master bus supports the DMA tenology (now it is supported by most architectures)
Since the irreplaceable kernel modules are already loaded, we will continue to prepare the host OS for the upcoming network configuration in the guest OS. After loading the if_tap.ko module, among the system variables will appear those that regulate the operation of tap * interfaces. We are interested in two -
main [19: 26: ~] # sysctl -a | grep "net.link.tap"
net.link.tap.debug: 0
net.link.tap.devfs_cloning: 1
net.link.tap.up_on_open: 0
net.link.tap.user_open: 0
net.link.tap.up_on_open - puts the interface to the up position when / dev / tap is open. net.link.tap.user_open - allows users to open / dev / tap. To limit the use of devices, / dev / tap * will change its owner and access rights to it. This can be done by setting the devfs rules in the /etc/devfs.rules file, by default it is not in FreeBSD 9.0, so we create it.
main [20: 12: ~] # touch /etc/devfs.rules
main [20: 18: ~] # echo "[sysqemu = 11]" >> /etc/devfs.rules
main [20: 17: ~] # echo "add path 'tap *' mode 0660 group qemu" >> /etc/devfs.rules
Now let's change the variables:
main [20: 20: ~] # sysctl net.link.tap.user_open = 1
net.link.tap.user_open: 0 -> 1
main [20: 21: ~] # echo net.link.tap.up_on_open = 1
net.link.tap.up_on_open = 1
Now prepare the network. I need all the machines to be able to connect externally via IP and they have access to the local network of virtual machines. So you need to create a bridge interface by combining 3 tap interfaces into it.
main [20: 54: ~] # ifconfig bridge0 create
main [20: 54: ~] # ifconfig bridge0 addm bfe0 addm tap0 addm tap1 addm tap2 up
main [20: 58: ~] # ifconfig bridge0
bridge0: flags = 8843metric 0 mtu 1500
ether 02: a5: 80: 8e: f1: 00
id 00: 00: 00: 00: 00: 00 priority 32768 hellotime 2 fwddelay 15
maxage 20 holdcnt 6 proto rstp maxaddr 100 timeout 1200
root id 00:00: 00: 00: 00: 00 priority 32768 ifcost 0 port 0
member: tap2 flags = 143
ifmaxaddr 0 port 14 priority 128 path cost 2,000,000
member: tap1 flags = 143
ifmaxaddr 0 port 12 priority 128 path cost 2,000,000
member: tap0 flags = 143
ifmaxaddr 0 port 11 priority 128 path cost 2,000,000
member: bfe0 flags = 143
ifmaxaddr 0 port 7 priority 128 path cost 200000
Where bfe0 is my physical interface.
The next step is to create a disk image, which in the future we will connect to our virtual machine. Qemu supports several image formats, which are described in detail on the man pages. I will focus on the native qemu and the most suitable qcow2 format for the project. Its peculiarity lies in the fact that once having created with predefined settings, in the future, if you want to use an image with the same settings, we point to the original image, and the disk of the new machine will exactly coincide with it, however, all changes made to the new image will not recorded in templated. This process in qemu is called cow “Copy On Write”. This format also supports encryption, snapshots, beer with girls and zlib compression.
In order to make changes to the base image, you must use the
commit [-f fmt] filename command
main [23: 20: QEMU / UbuEx1] # qemu-img create -f qcow2 ubuntu_tamplate.qcow2 7G
main [23: 22: QEMU / UbuEx1] # ls -al
total 200
drwxr-xr-x 2 root wheel 512 Sep 22 23 : 22.
drwxr-xr-x 5 root wheel 512 Sep 21 17: 40 ...
-rw-r - r-- 1 root wheel 262144 Sep 22 23:22 ubuntu_tamplate.qcow2
This completes the creation of the environment. Let's start the emulator and install the ubuntu-12.04.1-server OS.
Consider the command syntax. Without further ado, I will analyze the most often necessary options.
General format:
main [13: 57: QEMU / UbuEx1] # qemu [options] [disk_image]
To emulate architectures that are different from X86_32, we use the commands:
qemu-system-mips qemu-system-ppcemb
qemu-system-mips64 qemu-system-sh4
qemu-system-arm qemu-system-mips64el qemu-system-sh4eb
qemu-system-cris qemu -system-mipsel qemu-system-sparc
qemu-system-m68k qemu-system-ppc qemu-system-sparc64
qemu-system-microblaze qemu-system-ppc64 qemu-system-x86_64
Multiprocessing support, n = {1..255}, for Sparc32 or Linux architecture n = {1..4}.
Support for the NUMA system, uneven access to memory where the memory is shared between processors, which gives a gain in performance.

-fdb file
Use image file or real device / dev / fd0 - floppy host as a floppy drive of the QEMU machine.
-hdb file
-hdc file
-hdd file
Use the file as a hard disk of a QEMU machine. In x86 architecture notation -a -b floppy, -c first hdd, -d cdrom
Using an image file as a CDROM of a QEMU machine. You cannot use the -hdc and -cdrom options at the same time. You can also use the cdrom of the host / dev / cdrom.
Device definition. Images can be connected as devices, media devices, the ability to create snapshots of these devices, device types is determined.
For example:
connecting cdrom
qemu -drive file = file, index = 2, media = cdrom
to the ide bus
qemu -drive file = file, if = ide, index = 1, media = cdrom
without specifying the file option we connect the empty
qemu -drive device if = ide, index = 1, media = cdrom drive
connection
qemu -drive file = file, index = 0, media = disk
qemu -drive file = file, index = 1, media = disk
qemu -drive file = file, index = 2, media = disk
qemu -drive file = file, index = 3, media = disk
connect floppy drive
qemu -drive file = file, index = 0, if = floppy
qemu -drive file = file, index = 1, if = floppy
SCSI connection with unit ID = 6 bus = 0
qemu -drive file = file, if = scsi, bus = 0, unit = 6
The ide interface is used by default, index is incremented .
qemu -drive file = a -drive file = b is equivalent to qemu -hda a -hdb b
-sd file
-pflash file
Different types of flash memory.
An option that determines the boot order. Drives = ab (flopy) c (hdd) d (cdrom) n (network). -boot order = ac - boot first with floppy, then with hdd
-boot once = d - boot with cdrom then reboot
Writing shots to temporary files instead of a raw image.
Set RAM value. In GB or Mb.
Language table:
ar de-ch es fo fr-ca hu ja mk no pt-br sv
da en-gb et fr fr-ch is lt nl pl ru th
de en-us fi fr-be hr it lv nl-be pt sl tr
defaults to "en-us".
USB driver connection.
13. -usbdevice devname
Get the USB device. Types of devices can be a mouse, tablet, disk, etc.
-uuid uuid
The name of the guest system. Guest ID
Type of VGA card for emulation.
сirrus - supported by the Windows OS family starting from Windows 95
std - used for high resolution. Cirrus and std will do in most cases.
vmware
none
Creating a network interface in the guest system. Example from man:
qemu linux.img -net nic, vlan = 0 -net tap, vlan = 0, ifname = tap0 \
-net nic, vlan = 1 -net tap, vlan = 1, ifname = tap1
We see the creation of several interfaces vlan of different types, with different names. -net nic creates a pci card with vlan interface. -net tap will connect the host tap device to the vlan0 and vlan1 interfaces.
Logging in /tmp/qemu.log
kqemu.ko
The QEMU emulator still has a lot of logging options, such as redirecting physical devices of a host and others, a description of all its delicious properties is beyond the scope of this article.
So, it's time to start the VM of the reference machine.
Due to some instability of the kqemu.ko module in FreeBSD, before starting the VM, we unload this module from memory at the stage of installing the guest OS.
main [14: 41: dassi / QEMU] # kldunload kqemu.k
main [0: 08: dassi / QEMU] # qemu-system-x86_64 -net nic, model = e1000 -net tap, name = tap0, script = no -cdrom ubuntu-12.04.1-server-amd64.iso -hda tamplates /Ubuntu_T/ubuntu_tamplate.qcow2 -boot order = dc m 256 -localtime
VNC server running on `127.0.0.1:5901 '
Warning: no scancode found for keysym 0
Warning: no scancode found for keysym 0

The next step is to configure the local area network between the host and guest OS. To get started, how does it work. We need to create a physical interface for the guest OS, which through the virtual switch will be connected to the host OS. Such a switch in qemu notation is called vlan.

1. In user mode, the guest machine uses the built-in host exchange system.
main [19: 45: dassi / QEMU] # qemu-system-x86_64 -net nic, vlan = 0 -net user, vlan0 -hda tamplates / FreeBSD_T / freebsd_tamplate.qcow -boot c -m 256 -localtime
After starting in the guest OS, you need to configure the network using the built-in dhcp server.
We will get the address from the range 10.0.2.0/8.
main [19: 45: dassi / QEMU] # qemu-system-x86_64 -net nic, vlan = 0 -net tap, vla0, script = no, downscript = no -hda tamplates / FreeBSD_T / freebsd_tamplate.qcow -boot c -m 256 -localtime
At startup, it is recommended that you configure the / usr / local / etc / qemu-ifup and / usr / local / etc / qemu-ifdown files, these are network configuration scripts on startup / shutdown.

This is achieved by creating a bridge-type connection in the host machine and placing its physical interface and virtual tun * \ tap * there. Such a connection is created by means of the host OS or by editing the start scripts of the qemu network system. In general, the setup repeats step 2.
I want to note that the qemu system provides the ability to combine virtual machines into a network through a host OS socket, bind vlan * to a port, dump network traffic of a specific vlan, as well as the -net none option is used if the network there is no need for an interface - to cancel the default values -net nic -net user.
main [21: 38: dassi / QEMU] # ifconfig bridge0 create
main [21: 38: dassi / QEMU] # ifconfig tap0 10.100.0.1/24
main [21: 38: dassi / QEMU] # ifconfig tap1 10.101.0.1/24
main [21: 38: dassi / QEMU] # ifconfig tap2 10.102.0.1/24
main [22: 14: dassi / QEMU] # ifconfig bridge0 addm tap0 addm tap1 addm tap2 addm bfe0
main [22: 14: dassi / QEMU] # ifconfig bridge0
bridge0: flags = 8802metric 0 mtu 1500
ether 02: a5: 80: 8e: f1: 00
id 00: 00: 00: 00: 00: 00 priority 32768 hellotime 2 fwddelay 15
maxage 20 holdcnt 6 proto rstp maxaddr 100 timeout 1200
root id 00:00: 00: 00: 00: 00 priority 0 ifcost 0 port 0
member: bfe0 flags = 143
ifmaxaddr 0 port 7 priority 128 path cost 55
member: tap2 flags = 143
ifmaxaddr 0 port 14 priority 128 path cost 2000000
member: tap1 flags=143
ifmaxaddr 0 port 12 priority 128 path cost 2000000
member: tap0 flags=143
ifmaxaddr 0 port 11 priority 128 path cost 2000000
(На этом этапе настройка хоста завешена, как вы замеили — пара tap интерфейс хоста + вируальный интерфейс гостевой ОС будет нахоится в одной подсети с маской 24. bfe0 — мой физический интерфейс смотрящий во внутреннюю дмашнюю сеть )
Теперь достаточно запустить наши машины и средствами готевых ОС назначить виртуаьным инерфейсам соответствующие адреса 10.0.100.2, 10.0.101.2 и 10.0.102.2 соответственно. Отлично, теперь наши машины видят внутреннюю сеть и видны из нее.
ИТОГ: Имеем 3 машины с ОС Ubuntu-1шт и FreBSD-2шт запущенные, сабильно работающие «видящие» ЛВС и «видимые» из нее. Задание выполнено.
man frebsd;
http://wiki.freebsd.org/qemu;
http://www.lissyara.su/articles/freebsd/programms/qemu_lan/.
1. Installation (Do not forget to update the ports comrades BSD'delniki)
main [16: 54: emulators / qemu] # cd / usr / ports / emulators / qemu
main [16: 55: emulators / qemu] # make install clean
So:
main [17: 25: emulators / qemu-devel] # pkg_info | grep "qemu"
kqemu-kmod-devel-1.4.0.p1_5 Kernel Accelerator for QEMU CPU Emulator (development versi
qemu-0.11.1_11 QEMU CPU Emulator
main [17: 25: emulators / qemu-devel] #
Accelerator and processor emulator installed.
2. Creating a workspace and setting up the environment
main [17: 40: / usr / QEMU] #mkdir —p / usr / QEMU / UbuEx1
Download the boot disk image ubuntu-12.04.1-server-amd64.iso from the official site. We load kernel modules and add them to loader.conf (we create if necessary)
main [17: 53: / usr / QEMU] # touch /boot/loader.conf
main [17: 53: / usr / QEMU] # echo 'kqemu_load = & aquo; YES »'>> /boot/loader.conf
main [ 17: 53: / usr / QEMU] # echo 'aio_load = & aquo; YES »'>> /boot/loader.conf
kqemu.ko - Acceleration module.
aio.ko - Asynchronous I / O module.
Or you can add the aio module to the kernel, just to emulate the network we need a tap device, and therefore the following modules need to be loaded into the kernel:
options VFS_AIO
device tap
options IPFILTER
options IPFILTER_LOG
main [17: 53: / usr / QEMU] # cd / usr / src
main [17: 53: / usr / QEMU] # make buildkernel KERNCONF = <kernel_name>
...
main [17:53 : / usr / QEMU] # make installkernel KERNCONF = <kernel_name>
...
main [17: 53: / usr / QEMU] # shutdown —r now
If you do not load the aio.ko module, then QEMU will fall with a cry:
Bad system call: 12 (core dumped)
In the event that you plan to establish networking between the host FreeBSD and guest systems, you must also download the following modules:
main [18: 14: ~] # kldload if_bridge
main [18: 14: ~] # kldload if_tap
After a reboot, we will see our modules as being submerged in the kernel:
main [18:22:~]# kldstat
Id Refs Address Size Name
1 28 0xffffffff80200000 1203808 kernel
2 1 0xffffffff81404000 2bdd0 kqemu.ko
3 1 0xffffffff81612000 42a7 linprocfs.ko
4 1 0xffffffff81617000 1e00b linux.ko
5 1 0xffffffff81636000 1582 fdescfs.ko
6 1 0xffffffff81638000 64b00 radeon.ko
7 1 0xffffffff8169d000 13a2b drm.ko
8 1 0xffffffff816b1000 2655 if_tap.ko
9 1 0xffffffff816b4000 55fe if_bridge.ko
10 1 0xffffffff816ba000 353d bridgestp.ko
bridgestp.ko - loaded automatically.
Next, make sure that your main IDE-master bus supports the DMA tenology (now it is supported by most architectures)
Since the irreplaceable kernel modules are already loaded, we will continue to prepare the host OS for the upcoming network configuration in the guest OS. After loading the if_tap.ko module, among the system variables will appear those that regulate the operation of tap * interfaces. We are interested in two -
main [19: 26: ~] # sysctl -a | grep "net.link.tap"
net.link.tap.debug: 0
net.link.tap.devfs_cloning: 1
net.link.tap.up_on_open: 0
net.link.tap.user_open: 0
net.link.tap.up_on_open - puts the interface to the up position when / dev / tap is open. net.link.tap.user_open - allows users to open / dev / tap. To limit the use of devices, / dev / tap * will change its owner and access rights to it. This can be done by setting the devfs rules in the /etc/devfs.rules file, by default it is not in FreeBSD 9.0, so we create it.
main [20: 12: ~] # touch /etc/devfs.rules
main [20: 18: ~] # echo "[sysqemu = 11]" >> /etc/devfs.rules
main [20: 17: ~] # echo "add path 'tap *' mode 0660 group qemu" >> /etc/devfs.rules
Now let's change the variables:
main [20: 20: ~] # sysctl net.link.tap.user_open = 1
net.link.tap.user_open: 0 -> 1
main [20: 21: ~] # echo net.link.tap.up_on_open = 1
net.link.tap.up_on_open = 1
Now prepare the network. I need all the machines to be able to connect externally via IP and they have access to the local network of virtual machines. So you need to create a bridge interface by combining 3 tap interfaces into it.
main [20: 54: ~] # ifconfig bridge0 create
main [20: 54: ~] # ifconfig bridge0 addm bfe0 addm tap0 addm tap1 addm tap2 up
main [20: 58: ~] # ifconfig bridge0
bridge0: flags = 8843
ether 02: a5: 80: 8e: f1: 00
id 00: 00: 00: 00: 00: 00 priority 32768 hellotime 2 fwddelay 15
maxage 20 holdcnt 6 proto rstp maxaddr 100 timeout 1200
root id 00:00: 00: 00: 00: 00 priority 32768 ifcost 0 port 0
member: tap2 flags = 143
ifmaxaddr 0 port 14 priority 128 path cost 2,000,000
member: tap1 flags = 143
ifmaxaddr 0 port 12 priority 128 path cost 2,000,000
member: tap0 flags = 143
ifmaxaddr 0 port 11 priority 128 path cost 2,000,000
member: bfe0 flags = 143
ifmaxaddr 0 port 7 priority 128 path cost 200000
Where bfe0 is my physical interface.
The next step is to create a disk image, which in the future we will connect to our virtual machine. Qemu supports several image formats, which are described in detail on the man pages. I will focus on the native qemu and the most suitable qcow2 format for the project. Its peculiarity lies in the fact that once having created with predefined settings, in the future, if you want to use an image with the same settings, we point to the original image, and the disk of the new machine will exactly coincide with it, however, all changes made to the new image will not recorded in templated. This process in qemu is called cow “Copy On Write”. This format also supports encryption, snapshots, beer with girls and zlib compression.
In order to make changes to the base image, you must use the
commit [-f fmt] filename command
main [23: 20: QEMU / UbuEx1] # qemu-img create -f qcow2 ubuntu_tamplate.qcow2 7G
main [23: 22: QEMU / UbuEx1] # ls -al
total 200
drwxr-xr-x 2 root wheel 512 Sep 22 23 : 22.
drwxr-xr-x 5 root wheel 512 Sep 21 17: 40 ...
-rw-r - r-- 1 root wheel 262144 Sep 22 23:22 ubuntu_tamplate.qcow2
This completes the creation of the environment. Let's start the emulator and install the ubuntu-12.04.1-server OS.
3. Starting and installing the OS
Consider the command syntax. Without further ado, I will analyze the most often necessary options.
General format:
main [13: 57: QEMU / UbuEx1] # qemu [options] [disk_image]
To emulate architectures that are different from X86_32, we use the commands:
qemu-system-mips qemu-system-ppcemb
qemu-system-mips64 qemu-system-sh4
qemu-system-arm qemu-system-mips64el qemu-system-sh4eb
qemu-system-cris qemu -system-mipsel qemu-system-sparc
qemu-system-m68k qemu-system-ppc qemu-system-sparc64
qemu-system-microblaze qemu-system-ppc64 qemu-system-x86_64
The most common options are:
1. -smp n
Multiprocessing support, n = {1..255}, for Sparc32 or Linux architecture n = {1..4}.
2. -numa opts
Support for the NUMA system, uneven access to memory where the memory is shared between processors, which gives a gain in performance.
3. -fda file
-fdb file
Use image file or real device / dev / fd0 - floppy host as a floppy drive of the QEMU machine.
4. -hda file
-hdb file
-hdc file
-hdd file
Use the file as a hard disk of a QEMU machine. In x86 architecture notation -a -b floppy, -c first hdd, -d cdrom
5. -cdrom file
Using an image file as a CDROM of a QEMU machine. You cannot use the -hdc and -cdrom options at the same time. You can also use the cdrom of the host / dev / cdrom.
6. -drive option [, option [, option [, ...]]]
Device definition. Images can be connected as devices, media devices, the ability to create snapshots of these devices, device types is determined.
For example:
connecting cdrom
qemu -drive file = file, index = 2, media = cdrom
to the ide bus
qemu -drive file = file, if = ide, index = 1, media = cdrom
without specifying the file option we connect the empty
qemu -drive device if = ide, index = 1, media = cdrom drive
connection
qemu -drive file = file, index = 0, media = disk
qemu -drive file = file, index = 1, media = disk
qemu -drive file = file, index = 2, media = disk
qemu -drive file = file, index = 3, media = disk
connect floppy drive
qemu -drive file = file, index = 0, if = floppy
qemu -drive file = file, index = 1, if = floppy
SCSI connection with unit ID = 6 bus = 0
qemu -drive file = file, if = scsi, bus = 0, unit = 6
The ide interface is used by default, index is incremented .
qemu -drive file = a -drive file = b is equivalent to qemu -hda a -hdb b
7. -mtdblock file
-sd file
-pflash file
Different types of flash memory.
8. -boot [order = drives] [, once = drives] [, menu = on | off]
An option that determines the boot order. Drives = ab (flopy) c (hdd) d (cdrom) n (network). -boot order = ac - boot first with floppy, then with hdd
-boot once = d - boot with cdrom then reboot
9. -snapshot
Writing shots to temporary files instead of a raw image.
10. -m megs
Set RAM value. In GB or Mb.
11. -k language
Language table:
ar de-ch es fo fr-ca hu ja mk no pt-br sv
da en-gb et fr fr-ch is lt nl pl ru th
de en-us fi fr-be hr it lv nl-be pt sl tr
defaults to "en-us".
12. -usb
USB driver connection.
13. -usbdevice devname
Get the USB device. Types of devices can be a mouse, tablet, disk, etc.
14. -name name
-uuid uuid
The name of the guest system. Guest ID
15. -vga type
Type of VGA card for emulation.
сirrus - supported by the Windows OS family starting from Windows 95
std - used for high resolution. Cirrus and std will do in most cases.
vmware
none
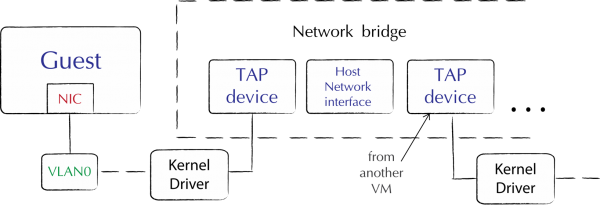
16. -net tap [, vlan = n] [, name = name] [, fd = h] [, ifname = name] [, script = file] [, downscript = dfile]
Creating a network interface in the guest system. Example from man:
qemu linux.img -net nic, vlan = 0 -net tap, vlan = 0, ifname = tap0 \
-net nic, vlan = 1 -net tap, vlan = 1, ifname = tap1
We see the creation of several interfaces vlan of different types, with different names. -net nic creates a pci card with vlan interface. -net tap will connect the host tap device to the vlan0 and vlan1 interfaces.
17. -d
Logging in /tmp/qemu.log
kqemu.ko
The QEMU emulator still has a lot of logging options, such as redirecting physical devices of a host and others, a description of all its delicious properties is beyond the scope of this article.
So, it's time to start the VM of the reference machine.
Due to some instability of the kqemu.ko module in FreeBSD, before starting the VM, we unload this module from memory at the stage of installing the guest OS.
main [14: 41: dassi / QEMU] # kldunload kqemu.k
main [0: 08: dassi / QEMU] # qemu-system-x86_64 -net nic, model = e1000 -net tap, name = tap0, script = no -cdrom ubuntu-12.04.1-server-amd64.iso -hda tamplates /Ubuntu_T/ubuntu_tamplate.qcow2 -boot order = dc m 256 -localtime
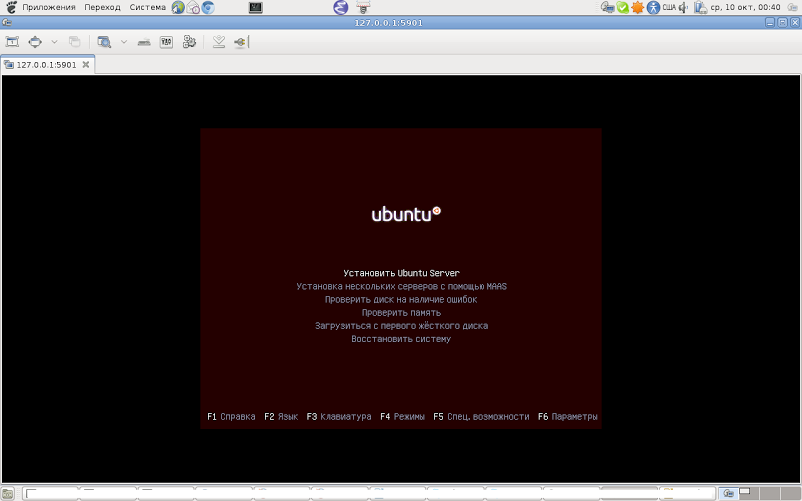
VNC server running on `127.0.0.1:5901 '
Warning: no scancode found for keysym 0
Warning: no scancode found for keysym 0
Now connect to the VNC server and start the installation.
The next step is to configure the local area network between the host and guest OS. To get started, how does it work. We need to create a physical interface for the guest OS, which through the virtual switch will be connected to the host OS. Such a switch in qemu notation is called vlan.
There are several options for connecting the guest and host OS in the LAN:
1. In user mode, the guest machine uses the built-in host exchange system.
main [19: 45: dassi / QEMU] # qemu-system-x86_64 -net nic, vlan = 0 -net user, vlan0 -hda tamplates / FreeBSD_T / freebsd_tamplate.qcow -boot c -m 256 -localtime
After starting in the guest OS, you need to configure the network using the built-in dhcp server.
We will get the address from the range 10.0.2.0/8.
2. Linking the host interface tun * \ tap * with the guest interface.
main [19: 45: dassi / QEMU] # qemu-system-x86_64 -net nic, vlan = 0 -net tap, vla0, script = no, downscript = no -hda tamplates / FreeBSD_T / freebsd_tamplate.qcow -boot c -m 256 -localtime
At startup, it is recommended that you configure the / usr / local / etc / qemu-ifup and / usr / local / etc / qemu-ifdown files, these are network configuration scripts on startup / shutdown.
3. The third method is used if you need access to guest machines from outside.
This is achieved by creating a bridge-type connection in the host machine and placing its physical interface and virtual tun * \ tap * there. Such a connection is created by means of the host OS or by editing the start scripts of the qemu network system. In general, the setup repeats step 2.
I want to note that the qemu system provides the ability to combine virtual machines into a network through a host OS socket, bind vlan * to a port, dump network traffic of a specific vlan, as well as the -net none option is used if the network there is no need for an interface - to cancel the default values -net nic -net user.
So, here is the sequence of steps for organizing the upcoming network diagram
main [21: 38: dassi / QEMU] # ifconfig bridge0 create
main [21: 38: dassi / QEMU] # ifconfig tap0 10.100.0.1/24
main [21: 38: dassi / QEMU] # ifconfig tap1 10.101.0.1/24
main [21: 38: dassi / QEMU] # ifconfig tap2 10.102.0.1/24
main [22: 14: dassi / QEMU] # ifconfig bridge0 addm tap0 addm tap1 addm tap2 addm bfe0
main [22: 14: dassi / QEMU] # ifconfig bridge0
bridge0: flags = 8802
ether 02: a5: 80: 8e: f1: 00
id 00: 00: 00: 00: 00: 00 priority 32768 hellotime 2 fwddelay 15
maxage 20 holdcnt 6 proto rstp maxaddr 100 timeout 1200
root id 00:00: 00: 00: 00: 00 priority 0 ifcost 0 port 0
member: bfe0 flags = 143
ifmaxaddr 0 port 7 priority 128 path cost 55
member: tap2 flags = 143
ifmaxaddr 0 port 14 priority 128 path cost 2000000
member: tap1 flags=143
ifmaxaddr 0 port 12 priority 128 path cost 2000000
member: tap0 flags=143
ifmaxaddr 0 port 11 priority 128 path cost 2000000
(На этом этапе настройка хоста завешена, как вы замеили — пара tap интерфейс хоста + вируальный интерфейс гостевой ОС будет нахоится в одной подсети с маской 24. bfe0 — мой физический интерфейс смотрящий во внутреннюю дмашнюю сеть )
Теперь достаточно запустить наши машины и средствами готевых ОС назначить виртуаьным инерфейсам соответствующие адреса 10.0.100.2, 10.0.101.2 и 10.0.102.2 соответственно. Отлично, теперь наши машины видят внутреннюю сеть и видны из нее.
ИТОГ: Имеем 3 машины с ОС Ubuntu-1шт и FreBSD-2шт запущенные, сабильно работающие «видящие» ЛВС и «видимые» из нее. Задание выполнено.
Используемые ресурсы
man frebsd;
http://wiki.freebsd.org/qemu;
http://www.lissyara.su/articles/freebsd/programms/qemu_lan/.