Mouse click repair Logitech MX Revolution
It’s clear that we’ll repair not a click, but the Logitech MX Revolution mouse button, or rather the mikrik that lies beneath it. The essence of the problem - the click began to fail. Instead of a single click, when pressed, the button worked like a double, or stuck, as if the long-pressed button had remained pressed.
The mouse is good, very comfortable and expensive enough to just throw it away and buy a new one. Therefore, at first there were experiments with reinstalling SetPoint of different versions based on the results of which it became finally clear that the problem was purely mechanical. Googling also confirmed the unfortunate fact of the weakness of the mice in the Logitech mice. Although, it is worth noting that another instance of the previous top mouse from Logitech has already been living in extremely aggressive use for about 5 years and there are no problems with mikrik.
Disassemble the mouse

To do this, unscrew the 4 bolts on her belly, which are hidden under the blotches. Try to peel off the blotches carefully. The adhesive layer stubbornly remains on the belly. And do not bend them, if then there are creases on the blotches, then aligning them will be problematic. After unscrewing the bolts, the top cover is easily removed, but connected to the bottom with a loop. A long cable does not interfere with the repair of Mikrik, but if desired, it can be disconnected.
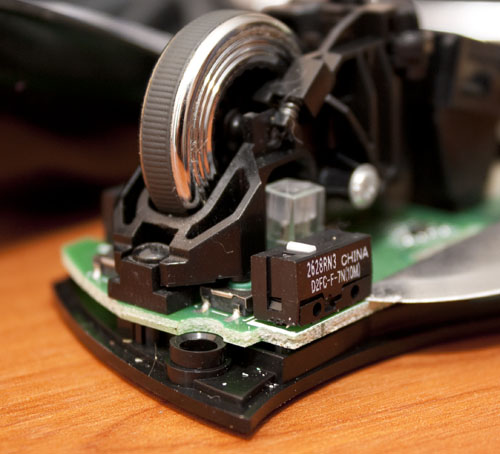
The ill-fated mikrik in front of us
Model D2FC-F-7N. By the way, googling on this number gave some very interesting links. They will be at the end of the article. Offhand to find these mikriki in the network in Moscow stores failed. On ebee they are at a price of $ 3 per pair. Also, such mikriks were used by Logitech mice, respectively, if you have a dead mouse lying around somewhere, then you can remove the mikrik from the old mouse and solder it to a new one.
I decided to make out mikrik

This is not difficult to do. We pry the cover with a thin screwdriver or knife first from one side, then from the other, remove the cover. When we remove the lid, a button falls out of it. Try not to lose her. The back button is inserted with the long end into the lid.

The essence of the sticky button problem is that the tongue here gets tired of this plastic. The plate must be removed, the tab slightly bent and the plate inserted back.
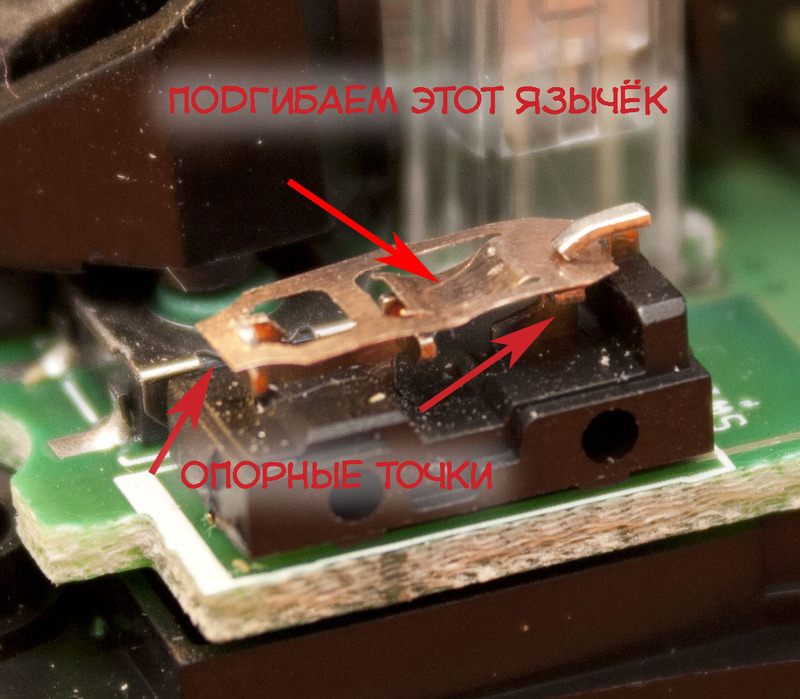
The most difficult part in all repairs is to put the record back. It is small, easily bent, it must be inserted so that there is tension, so that the right end of the plate is firmly pressed to the upper contact on the right.
It took me about five minutes to disassemble the mouse, and for the first time in half an hour to install the plate. Then I parsed the mouse twice more so that the click was more intelligible. But in the end, the mouse works. As a bonus, the click has become quieter.
In conclusion, some useful links that helped me a lot.
I highly recommend looking at the links before starting repairs, especially in terms of bending the tongue.
Detailed pictures of disassembling Logitech MX Revolution , repairing a mikrik from another mouse , more about mikrik .