Restore defocused and blurry images. Improve quality
I present to your attention the final article from the trilogy “Restoring Defocused and Blurred Images”. The first two aroused considerable interest - the area is really interesting. In this part, I will consider a family of methods that give the best quality compared to the standard Wiener filter - these are methods based on Total Variaton prior.
Also, by tradition, I posted a new version of SmartDeblur (along with open-source sources) in which I implemented this method. The final quality was at the level of commercial counterparts such as Topaz InFocus. Here is an example of processing a real image with very large blur:
I will not describe the basic theory of deconvolution here; it was described in great detail in previous articles. For those who have not read them or have forgotten, I recommend that you first familiarize yourself with them in order to understand the terminology and classical approaches:
Part 1. Theory ;
Part 2. Practice .
Before proceeding to the description of Total Variation (hereinafter referred to as TV prior), it is necessary to understand what are the disadvantages of algorithms such as the classical Wiener filter? The most basic ones are the effect of the type of ringing (periodic halo at the edges of objects) even with a small level of noise, blurring of borders and small details, as well as poor noise reduction in terms of human perception. All this greatly interferes with the practical application of the Wiener filter, limiting its application to the tasks of technical image restoration, for example, for reading inscriptions of interest.
Therefore, in recent years, a large number of a variety of methods have been developed, the purpose of which is to improve visual quality. It should be noted that the number of parts in this case, as a rule, does not increase.
The main quality of Total Variation prior from the point of view of the result is the preservation of sharp edges and smoothing of artifacts of deconvolution. It is written as follows:
Unfortunately, the calculation of this functional cannot be done in a simple way, since it requires the use of very complex optimization techniques.
As an alternative, you can use a smoothed functional instead of an absolute value:

When epsilon tends to zero, the result tends to the initial determination of Total Variation, but the optimization process becomes more complex. Conversely, with a sufficiently large epsilon, the optimization result will resemble a Wiener filter with blurring edges. Unfortunately, the above formula has a non-quadratic form; therefore, it cannot be simply calculated in the Fourier frequency space, as was the case with the Wiener and Tikhonov filters. Therefore, one of the step-by-step optimization methods is needed to find an approximate solution - for example, the classical gradient descent method:

Where tau is calculated using the following formula:
And the gradient of the smoothed functional is defined as: The
number of iterations should be quite large - several hundred.
This is the most basic approach in the implementation of TV prior, which is called “forehead”. Nevertheless, even it gives very good results. On the basis of it, many studies have appeared in scientific publications that are still trying to improve the quality and also reduce the calculation time.
The described formulas, in principle, are simple, although very cumbersome to implement. The main problem is to achieve high performance, because the number of iterations is very large and each iteration contains many complex actions. Namely, a few convolutions of the entire image, calculation of the full gradient and divergence.
I have to say right away that I have not been able to achieve a good speed of work yet, on an image of several megapixels the final calculation time is 2-3 minutes. But Preview is fast - on the order of 0.2 seconds.
The assembly for Windows can be downloaded at:
github.com/downloads/Y-Vladimir/SmartDeblur/SmartDeblur-1.27-win.zip
Sources (under the GPL v3 license) are available at: github.com/Y-Vladimir/SmartDeblur
The main changes compared to the previous version, which was described in the second part:
C ++ language using Qt.
Well and now the most important thing is what quality can be expected when processing blurry images. We will compare with the top commercial counterpart Topaz InFocus. Other analogues (such as FocusMagic) have not been supported for a long time or give absolutely unacceptable processing results. So let's go.
First, let's take an advertising example from the Topaz InFocus website: www.topazlabs.com/infocus/_images/licenseplate_compare.jpg
Here is the result from Topaz InFocus:

Here is the result of SmartDeblur with the following parameters:
Type: Motion Blur, Length: 10.1, Angle: -45 Smooth: 60%

As you can see, the results are very similar. And it's not so obvious which is better. Topaz InFocus, apparently, also uses an algorithm similar to TV prior plus post-processing in the form of edge sharpening. It should be noted that the given initial blurred image, with a very high probability, is synthetic. Those. an undistorted image is taken and a Motion Blur filter is applied. This can be seen by the almost perfect recovery, as well as by the suspiciously whole distortion parameters - an angle of 45 degrees and a length of 10 pixels.
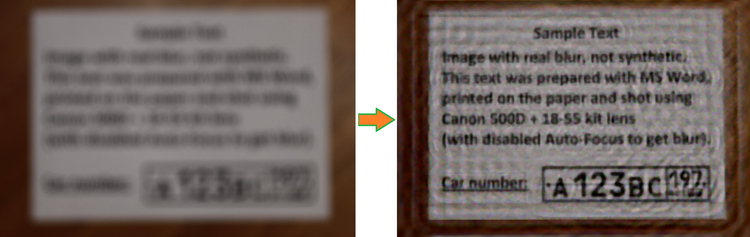
Now let's take the real image that I took a picture of yesterday on my Canon 500D with manual focusing:

Topaz InFocus result with the following parameters:
Type: Out-of-Focus, Radius: 5.5, Suppress Artifacts: 0.34

SmartDeblur result with the following parameters:
Type: Out of Focus, Radius: 5.9, Smooth: 60%

There is a draw, you can say. The parameters in each program were selected so as to ensure the best quality.
Another real example I shot:
The result of SmartDeblur with the following parameters:
Type: Motion Blur, Length: 6.6, Angle: -37, Smooth: 53%

The third final article has come to an end. It turned out not very big, but, I hope, it will be useful. As you can see, the resulting processing quality is already quite acceptable for real use. The main problem that remains is in places where there are bright objects, after processing a noticeable ringing effect is obtained. I think this is due to the fact that in bright areas the linearity of displaying the brightness of pixels is violated, which gives an incorrect interpretation of its real brightness. Perhaps you need a logarithmic brightness preprocessing, or something else.
Let me remind you once again:
Assembly for Windows can be downloaded at:
github.com/downloads/Y-Vladimir/SmartDeblur/SmartDeblur-1.27-win.zip
Sources (under the GPL v3 license) are available at: github.com/Y-Vladimir/ Smartdeblur
And as usual - I will be very glad to comments and suggestions on SmartDeblur!
Who will try the program - note that the Smooth quality parameter in the preview mode and in the High-Quality mode behaves very differently. Therefore, the final result of the smoothing slider can be evaluated only after the High-Quality rendering is completed.
PS A huge request to all who write to me in the mail. After the publication of the two previous articles, I received (and continues to receive) a large number of letters asking me to restore the car numbers on frames from CCTV cameras, when the entire number occupies an area of several pixels.
I do not do that!SmartDeblur does not know how to do this either. This is a task of a completely different kind, namely Super-Resolution, when a high-resolution image with new details that were not on the source data is obtained from several low-resolution images. Maybe someday I’ll do it, but certainly not in the near future.
UPDATE Continuation Link:
Blind Deconvolution - Automatically restore blurry images
Also, by tradition, I posted a new version of SmartDeblur (along with open-source sources) in which I implemented this method. The final quality was at the level of commercial counterparts such as Topaz InFocus. Here is an example of processing a real image with very large blur:
Introduction
I will not describe the basic theory of deconvolution here; it was described in great detail in previous articles. For those who have not read them or have forgotten, I recommend that you first familiarize yourself with them in order to understand the terminology and classical approaches:
Part 1. Theory ;
Part 2. Practice .
Before proceeding to the description of Total Variation (hereinafter referred to as TV prior), it is necessary to understand what are the disadvantages of algorithms such as the classical Wiener filter? The most basic ones are the effect of the type of ringing (periodic halo at the edges of objects) even with a small level of noise, blurring of borders and small details, as well as poor noise reduction in terms of human perception. All this greatly interferes with the practical application of the Wiener filter, limiting its application to the tasks of technical image restoration, for example, for reading inscriptions of interest.
Therefore, in recent years, a large number of a variety of methods have been developed, the purpose of which is to improve visual quality. It should be noted that the number of parts in this case, as a rule, does not increase.
Description of TV prior
The main quality of Total Variation prior from the point of view of the result is the preservation of sharp edges and smoothing of artifacts of deconvolution. It is written as follows:
Unfortunately, the calculation of this functional cannot be done in a simple way, since it requires the use of very complex optimization techniques.
As an alternative, you can use a smoothed functional instead of an absolute value:
When epsilon tends to zero, the result tends to the initial determination of Total Variation, but the optimization process becomes more complex. Conversely, with a sufficiently large epsilon, the optimization result will resemble a Wiener filter with blurring edges. Unfortunately, the above formula has a non-quadratic form; therefore, it cannot be simply calculated in the Fourier frequency space, as was the case with the Wiener and Tikhonov filters. Therefore, one of the step-by-step optimization methods is needed to find an approximate solution - for example, the classical gradient descent method:
Where tau is calculated using the following formula:
And the gradient of the smoothed functional is defined as: The
number of iterations should be quite large - several hundred.
This is the most basic approach in the implementation of TV prior, which is called “forehead”. Nevertheless, even it gives very good results. On the basis of it, many studies have appeared in scientific publications that are still trying to improve the quality and also reduce the calculation time.
Practical implementation
The described formulas, in principle, are simple, although very cumbersome to implement. The main problem is to achieve high performance, because the number of iterations is very large and each iteration contains many complex actions. Namely, a few convolutions of the entire image, calculation of the full gradient and divergence.
I have to say right away that I have not been able to achieve a good speed of work yet, on an image of several megapixels the final calculation time is 2-3 minutes. But Preview is fast - on the order of 0.2 seconds.
The assembly for Windows can be downloaded at:
github.com/downloads/Y-Vladimir/SmartDeblur/SmartDeblur-1.27-win.zip
Sources (under the GPL v3 license) are available at: github.com/Y-Vladimir/SmartDeblur
The main changes compared to the previous version, which was described in the second part:
- Two deconvolution methods are added: TV prior and Tikhonov filtering
- Added support for restoring Gaussian blur
- Improved speed (about 2.5 times)
- Reduced memory consumption (about 1.5 times)
- The maximum size of the processed image by default is 3000 (but can be changed in the settings)
- Added settings section
- Added Updates Checker
- Drag & Drop Support
- Added Help Screen with sample image and setup tips
- Fixed bug with ripples in preview mode
C ++ language using Qt.
Comparison
Well and now the most important thing is what quality can be expected when processing blurry images. We will compare with the top commercial counterpart Topaz InFocus. Other analogues (such as FocusMagic) have not been supported for a long time or give absolutely unacceptable processing results. So let's go.
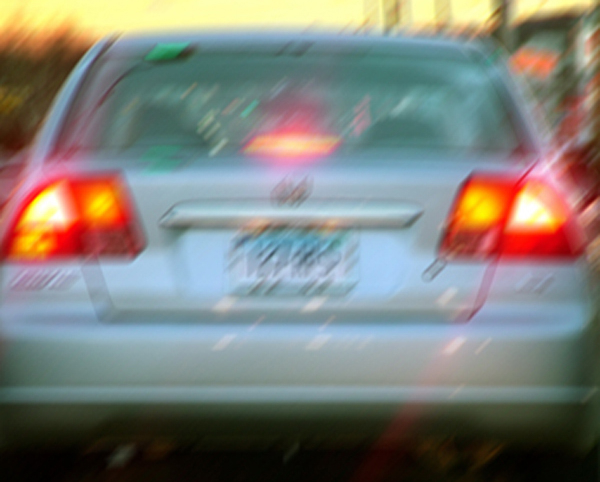
First, let's take an advertising example from the Topaz InFocus website: www.topazlabs.com/infocus/_images/licenseplate_compare.jpg
Here is the result from Topaz InFocus:
Here is the result of SmartDeblur with the following parameters:
Type: Motion Blur, Length: 10.1, Angle: -45 Smooth: 60%
As you can see, the results are very similar. And it's not so obvious which is better. Topaz InFocus, apparently, also uses an algorithm similar to TV prior plus post-processing in the form of edge sharpening. It should be noted that the given initial blurred image, with a very high probability, is synthetic. Those. an undistorted image is taken and a Motion Blur filter is applied. This can be seen by the almost perfect recovery, as well as by the suspiciously whole distortion parameters - an angle of 45 degrees and a length of 10 pixels.
Now let's take the real image that I took a picture of yesterday on my Canon 500D with manual focusing:
Topaz InFocus result with the following parameters:
Type: Out-of-Focus, Radius: 5.5, Suppress Artifacts: 0.34
SmartDeblur result with the following parameters:
Type: Out of Focus, Radius: 5.9, Smooth: 60%
There is a draw, you can say. The parameters in each program were selected so as to ensure the best quality.
Another real example I shot:
The result of SmartDeblur with the following parameters:
Type: Motion Blur, Length: 6.6, Angle: -37, Smooth: 53%
conclusions
The third final article has come to an end. It turned out not very big, but, I hope, it will be useful. As you can see, the resulting processing quality is already quite acceptable for real use. The main problem that remains is in places where there are bright objects, after processing a noticeable ringing effect is obtained. I think this is due to the fact that in bright areas the linearity of displaying the brightness of pixels is violated, which gives an incorrect interpretation of its real brightness. Perhaps you need a logarithmic brightness preprocessing, or something else.
Let me remind you once again:
Assembly for Windows can be downloaded at:
github.com/downloads/Y-Vladimir/SmartDeblur/SmartDeblur-1.27-win.zip
Sources (under the GPL v3 license) are available at: github.com/Y-Vladimir/ Smartdeblur
And as usual - I will be very glad to comments and suggestions on SmartDeblur!
Who will try the program - note that the Smooth quality parameter in the preview mode and in the High-Quality mode behaves very differently. Therefore, the final result of the smoothing slider can be evaluated only after the High-Quality rendering is completed.
PS A huge request to all who write to me in the mail. After the publication of the two previous articles, I received (and continues to receive) a large number of letters asking me to restore the car numbers on frames from CCTV cameras, when the entire number occupies an area of several pixels.
I do not do that!SmartDeblur does not know how to do this either. This is a task of a completely different kind, namely Super-Resolution, when a high-resolution image with new details that were not on the source data is obtained from several low-resolution images. Maybe someday I’ll do it, but certainly not in the near future.
UPDATE Continuation Link:
Blind Deconvolution - Automatically restore blurry images
-Vladimir Yuzhikov (Vladimir Yuzhikov)