Installation, system configuration and management for cameras
So, let's start, we will use:
Aipishniki, which will be used in our how-to:
192.168.110.151 - the address of our DVR;
192.168.107.103 - address of the ip camera.
1) Detailed installation instructions for Ubuntu 12.04 server. Step-by-step screenshots are attached.
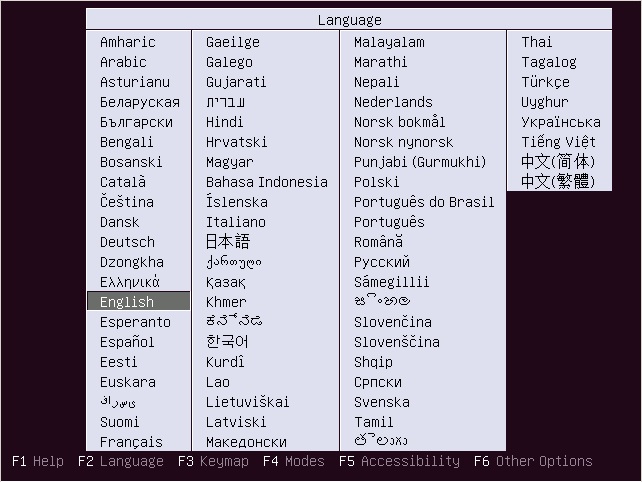
To install Ubuntu 12.04 Server, download the iso image on the page, burn it to a CD and boot from it. The first window, select the installation language, in our case I choose Russian:
Start the installation Ubuntu 12.04:

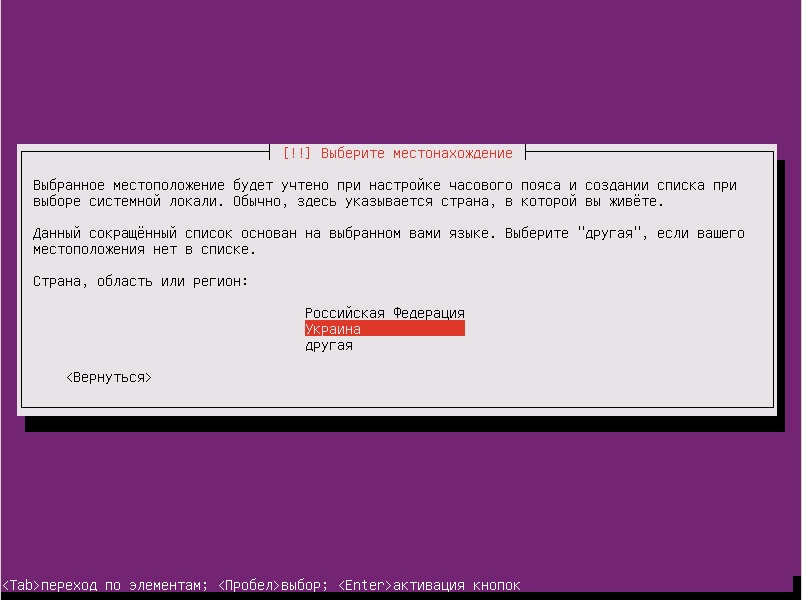
Select the country:
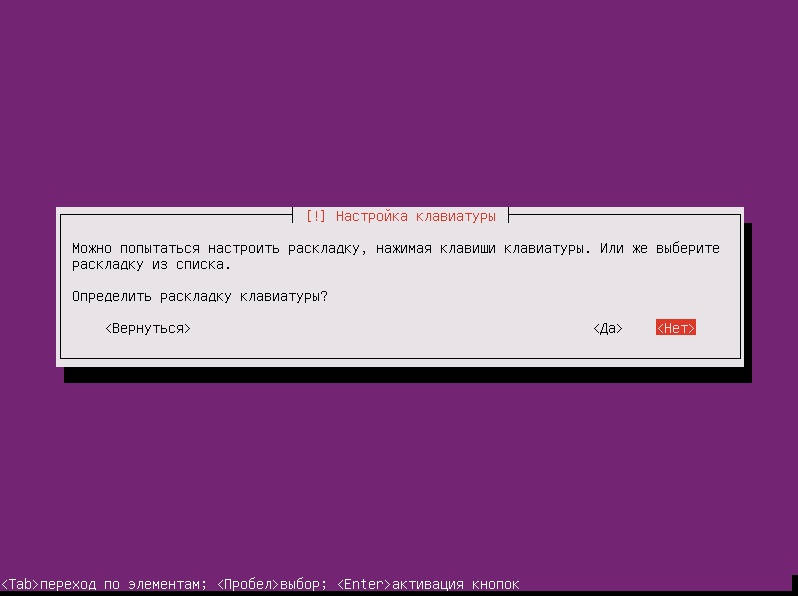
Do not agree with the automatic keyboard detection:
Select the layout language:

Choose the keyboard switching method, I prefer Ctrl + Shift, in your case it may be different :

The network will be set up via dhcp:

It does not suit us, therefore, we press the “Return” button.

We choose “Manually configure the network”

Next, in the proposed, windows, we write the settings of our network, gateway and dns. The next window will offer to write the name of the computer in my case, this is a tester. We write the user name:

Enter the password, first writing it in a notebook:

Next is the automatic setting of the time zone and asks if this is the correct time zone:

Today I will

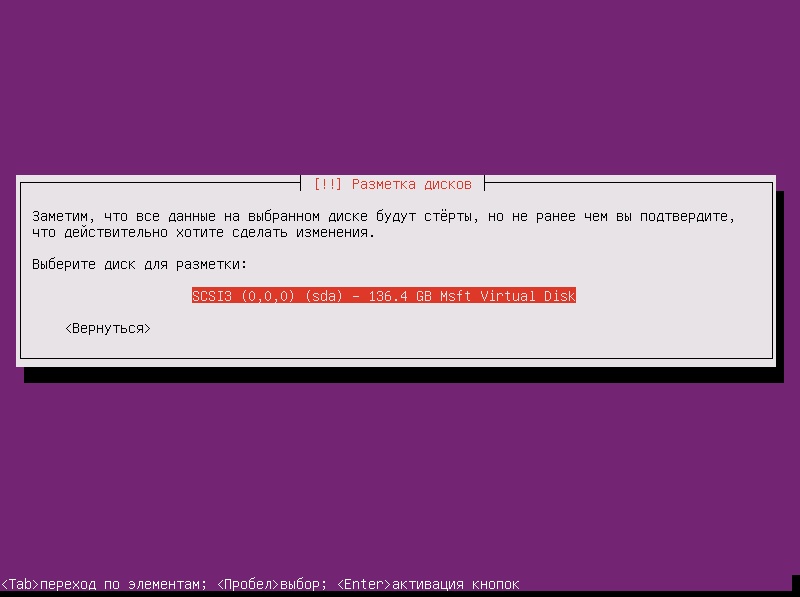
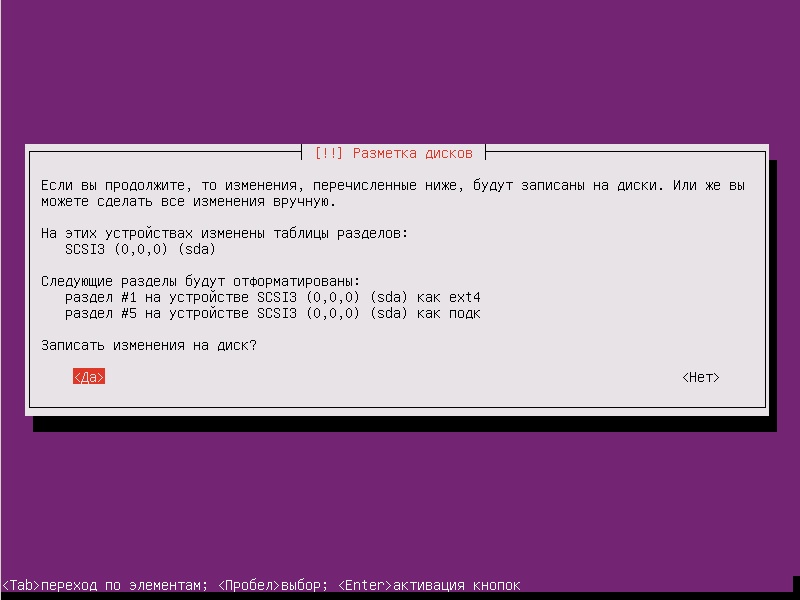
select the automatic disk partitioning: Select the disk:
and record the changes:
Then the installation process will follow Ubuntu 12.04 Server:
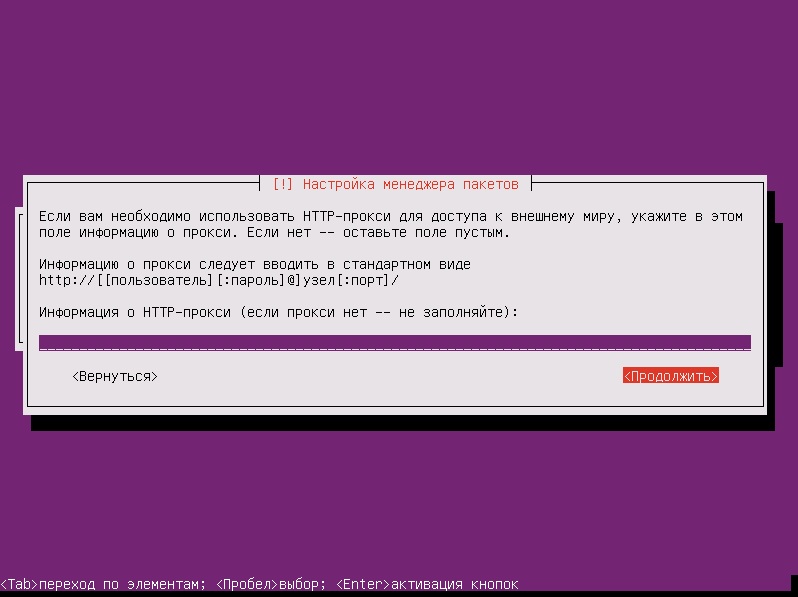
During the installation process, if you are using a proxy, you must specify the address of the proxy server:
Disable updates, because they can cause system instability:

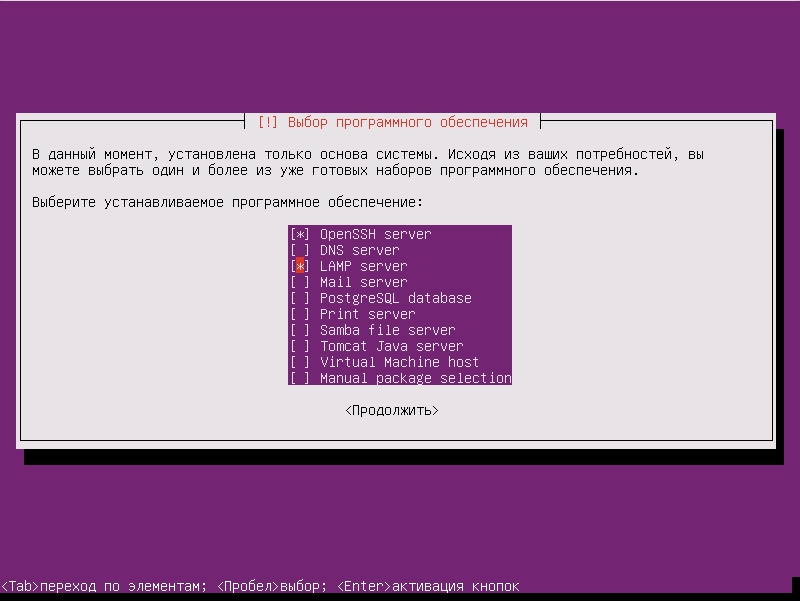
Well, we have almost completed the installation of Ubuntu 12.04 Server and have reached the stage of choosing the purpose of our system. The choice of items in this step depends on what role your new Ubuntu server will play - it can be both a database server and a mail server, etc. In our case, it is necessary to choose the lamp and openssh server.
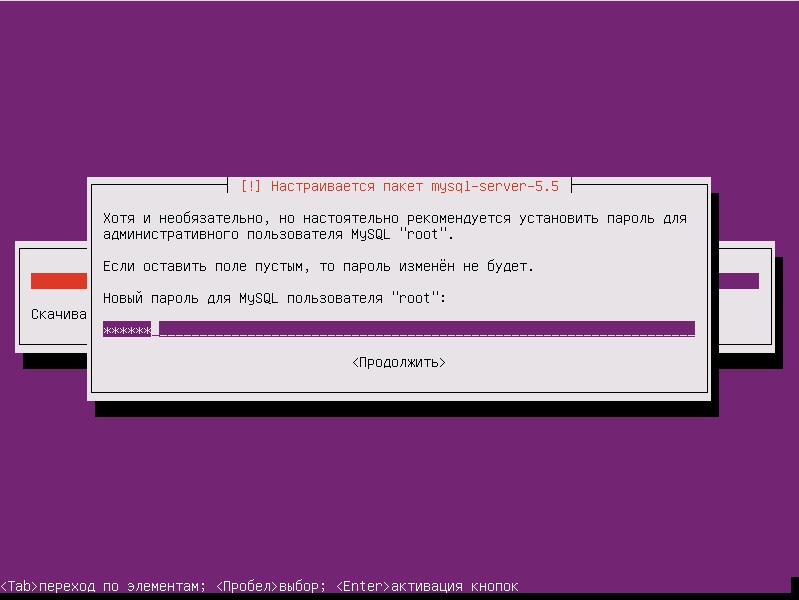
Enter the root password for mysql:
At the last stage, the installer will offer to install the system bootloader in the master boot record:

A few seconds and you can remove the disk from Ubuntu 12.04 Server from the drive and click on "Continue":

When the server is successfully overloaded, you can log in using your username and password.
2) Installing and configuring the Zoneminder
Zoneminder 1.25.0 dvr on Ubuntu 12.04
For successful work, we need to install the OpenSSH Server, and LAMP Server, which we did in the previous paragraph.
1. Login as root:
2. Install updates and reboot:
3. We need: Static aypishnik
4. There we write:
5. Save the document.
6. Reboot:
7. Proceed directly to installing the zoneminder:
8. Edit the Zoneminder script itself, since it does not start automatically at boot:
We paste in the document before the line “zmfix -a”, just like this - sleep 15.
9. Save the document.
10. Making a symbolic reference:
11. Restarting the web server:
12. Add a user from whom the video will be manipulated:
13. Install cambozola to support video playback:
14. Add certificates for the web server:
15. Activate them:
16. Activate the default ssl-virtual host:
17. Restart the web server:
18. For the successful use of https we do the following:
19. Paste these two lines:
20. Save the document.
21. Giving rights to it:
22. We edit the sysctl.conf file in order to let the kernel know how much memory we will use under the zoneminder (otherwise the black screen will be the case):
23. Insert into the bottom of the document the following two lines:
24. Pass these values to the kernel:
25. Rebooting:
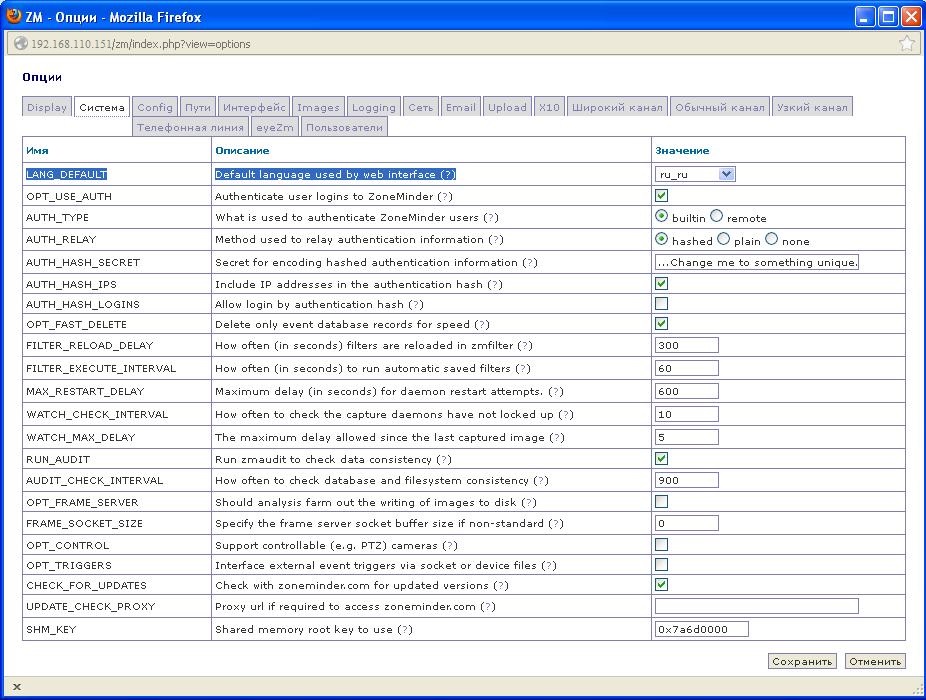
26. Go to Zoneminder:
27. In the console, click the “Options” button.
LANG_DEFAULT Default language used by web interface, set the value to “ru_ru”.
Ability to see the Russian interface.
28. Click Add Monitor.
29. And fill two columns with options.
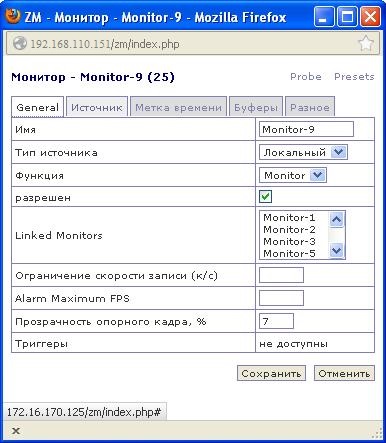

30. When viewing the monitor, we will most likely see a black screen, after playing around with the options, it is possible to see the image, but with great interference.
31. How to solve this problem, I will tell in the next item to configure the cameras.
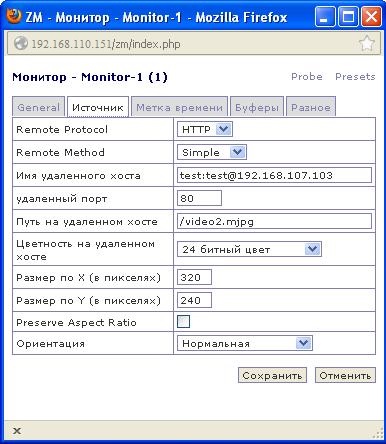
32. Everything is a bit simpler with ip camera, go to the management console of our ip camera, we need three parameters: 1) username and password to access the camera via http, 2) path to the camera, 3) its resolution.
33. Go to the camera control console through a browser:
192.168.107.103
34. Add a new user (for example, test with a password test):

35. We look at the resolution:

Yeah, we have 320x240.
36. We now look at the path to the camera>
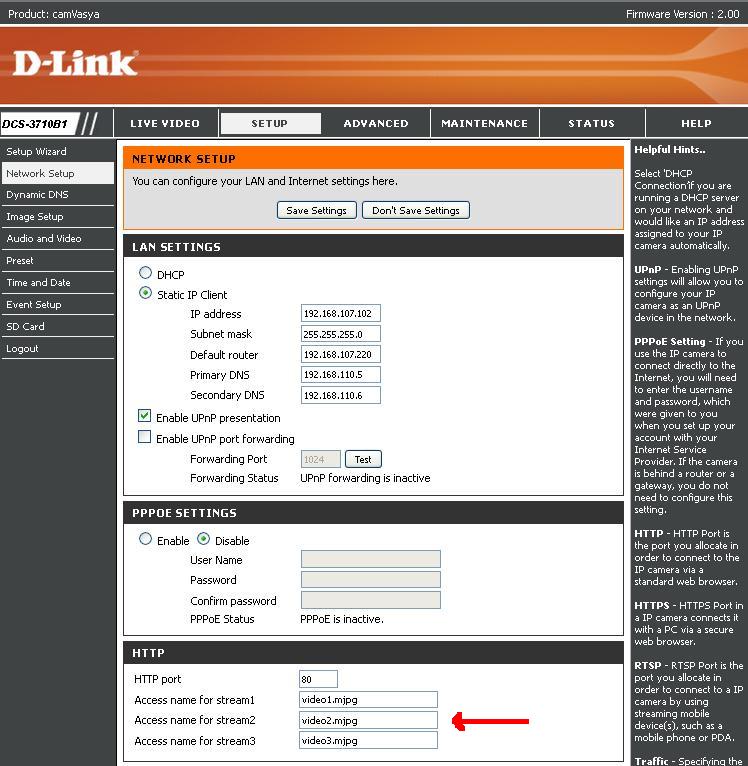
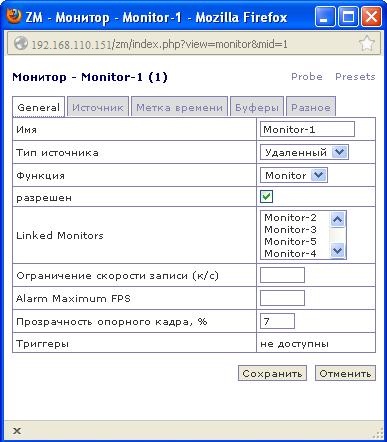
37. Click on Zoneminder, “Add Monitor”. We enter the following options on the “General” and “Source” tabs:
3) Setting up analog cameras on the PCI bridge video capture card: Hint Corp HiNT HB4 PCI-PCI Bridge (PCI6150).
1. Install the following packages:
2. We look, whether our video devices were defined at all:
Must get a conclusion
So our analog video output devices are defined in the system.
3. We look at the information about our device (all analog video devices are stored in the form / dev / video):
We get this conclusion:
That was the reason why our device was not correctly displayed in Zoneminder. This is not good, because The driver parameters of our device are not transferred to the kernel, we look further.
4. We need to unload the module:
5. What we get a non-affirmative answer:
I spent a lot of time on rebuilding the kernel and other nonsense, the answer was simple. Our analog device was used, and it was used by the DVR, so that we do so.
6. Stop the zoneminder:
7. We try to unload the module:
8. As we see the command, it swallowed normally, so we try to transfer the parameters to the kernel manually:
9. We look at the information about our device (all analog video devices are stored in the form / dev / video):
And now we get the following conclusion:
Which means that everything turned out great and the drivers applied.
10. We give just in case the rights to the cameras:
11. Start Zoneminder:
12. Go to Zoneminder:
192.168.110.151/zm We
check our analog camera and we can make sure that everything is fine with the image and we can safely watch it in our DVR. Further, this whole thing is necessary for us automatically, that would rise in the kernel, without manual launch.
13. Create a bttv.conf file:
14. Insert into it the following content:
15. Reboot:
16. We admire the result:

4) Possible problems that will have to be encountered while performing my HOW-TO.
1. Russian font in the console:
• in any text editor with root privileges, add the line FRAMEBUFFER = Y to the /etc/initramfs-tools/initramfs.conf file. This can also be done by running the following commands:
• Update ramdisk image of the kernel initialization period (initrd):
• Field of these manipulations settings made by the command:
• finally start working: Russian fonts will show everything from the very beginning - i.e. even a request for checking disks (arising during the kernel initialization process) will be displayed in Cyrillic, rather than squares.
2. Ubuntu does not see the monitor.
Not all types of monitors see Ubuntu after installation, most often you will see “Non-optimal mode 1024x768. The optimal mode is 1240 x 860 ”:
• Go to / etc / default / grub
• Remove comments from the line
• Update the bootloader
• reboot the system
- System: Ubuntu Server 12.04;
- DVR: Zoneminder;
- Cameras: analog and ip dish;
- Video capture card: PCI bridge: Hint Corp HiNT HB4 PCI-PCI Bridge (PCI6150)
- The main requirement: to raise the video surveillance server for production
Aipishniki, which will be used in our how-to:
192.168.110.151 - the address of our DVR;
192.168.107.103 - address of the ip camera.
1) Detailed installation instructions for Ubuntu 12.04 server. Step-by-step screenshots are attached.
To install Ubuntu 12.04 Server, download the iso image on the page, burn it to a CD and boot from it. The first window, select the installation language, in our case I choose Russian:
Start the installation Ubuntu 12.04:
Select the country:
Do not agree with the automatic keyboard detection:
Select the layout language:
Choose the keyboard switching method, I prefer Ctrl + Shift, in your case it may be different :
The network will be set up via dhcp:
It does not suit us, therefore, we press the “Return” button.
We choose “Manually configure the network”
Next, in the proposed, windows, we write the settings of our network, gateway and dns. The next window will offer to write the name of the computer in my case, this is a tester. We write the user name:
Enter the password, first writing it in a notebook:
Next is the automatic setting of the time zone and asks if this is the correct time zone:
Today I will
select the automatic disk partitioning: Select the disk:
and record the changes:
Then the installation process will follow Ubuntu 12.04 Server:
During the installation process, if you are using a proxy, you must specify the address of the proxy server:
Disable updates, because they can cause system instability:
Well, we have almost completed the installation of Ubuntu 12.04 Server and have reached the stage of choosing the purpose of our system. The choice of items in this step depends on what role your new Ubuntu server will play - it can be both a database server and a mail server, etc. In our case, it is necessary to choose the lamp and openssh server.
Enter the root password for mysql:
At the last stage, the installer will offer to install the system bootloader in the master boot record:
A few seconds and you can remove the disk from Ubuntu 12.04 Server from the drive and click on "Continue":
When the server is successfully overloaded, you can log in using your username and password.
2) Installing and configuring the Zoneminder
Zoneminder 1.25.0 dvr on Ubuntu 12.04
For successful work, we need to install the OpenSSH Server, and LAMP Server, which we did in the previous paragraph.
1. Login as root:
#sudo su2. Install updates and reboot:
$apt-get update
$apt-getupgrade
$apt-get dist-upgrade
$reboot
3. We need: Static aypishnik
$nano /etc/network/interfaces4. There we write:
autoeth0ifaceeth0inetstaticaddress 192.168.110.151netmask 255.255.255.0gateway 192.168.110.220dns-nameservers 192.168.110.5 192.168.110.65. Save the document.
6. Reboot:
$reboot7. Proceed directly to installing the zoneminder:
#sudo su
$apt-get install zoneminder
8. Edit the Zoneminder script itself, since it does not start automatically at boot:
$nano /etc/init.d/zoneminderWe paste in the document before the line “zmfix -a”, just like this - sleep 15.
9. Save the document.
10. Making a symbolic reference:
$ln -s /etc/zm/apache.conf /etc/apache2/conf.d/zoneminder.conf11. Restarting the web server:
$/etc/init.d/apache2 force-reload12. Add a user from whom the video will be manipulated:
$adduser www-data video13. Install cambozola to support video playback:
$cd /usr/src && wget http://www.charliemouse.com:8080/code/cambozola/cambozola-latest.tar.gz
$tar -xzvf cambozola-latest.tar.gz
$cp cambozola-0.92/dist/cambozola.jar /usr/share/zoneminder
14. Add certificates for the web server:
$make-ssl-cert generate-default-snakeoil --force-overwrite15. Activate them:
$a2enmod ssl16. Activate the default ssl-virtual host:
$a2ensite default-ssl17. Restart the web server:
$service apache2 restart18. For the successful use of https we do the following:
$nano /etc/cron.daily/ntpdate19. Paste these two lines:
#!/bin/sh
ntpdate ntp.ubuntu.com
20. Save the document.
21. Giving rights to it:
$chmod 755 /etc/cron.daily/ntpdate22. We edit the sysctl.conf file in order to let the kernel know how much memory we will use under the zoneminder (otherwise the black screen will be the case):
$nano /etc/sysctl.conf 23. Insert into the bottom of the document the following two lines:
kernel.shmall = 134217728
kernel.shmmax = 134217728
24. Pass these values to the kernel:
$echo 134217728 >/proc/sys/kernel/shmall
$echo 134217728 >/proc/sys/kernel/shmmax
25. Rebooting:
$reboot26. Go to Zoneminder:
http://192.168.110.151/zm27. In the console, click the “Options” button.
LANG_DEFAULT Default language used by web interface, set the value to “ru_ru”.
Ability to see the Russian interface.
28. Click Add Monitor.
29. And fill two columns with options.
30. When viewing the monitor, we will most likely see a black screen, after playing around with the options, it is possible to see the image, but with great interference.
31. How to solve this problem, I will tell in the next item to configure the cameras.
32. Everything is a bit simpler with ip camera, go to the management console of our ip camera, we need three parameters: 1) username and password to access the camera via http, 2) path to the camera, 3) its resolution.
33. Go to the camera control console through a browser:
192.168.107.103
34. Add a new user (for example, test with a password test):
35. We look at the resolution:
Yeah, we have 320x240.
36. We now look at the path to the camera>
37. Click on Zoneminder, “Add Monitor”. We enter the following options on the “General” and “Source” tabs:
3) Setting up analog cameras on the PCI bridge video capture card: Hint Corp HiNT HB4 PCI-PCI Bridge (PCI6150).
1. Install the following packages:
$apt-get install v4l-conf libv4l-0 v4l2ucp v4l-conf v4l-utils2. We look, whether our video devices were defined at all:
$ls -l /dev/video* Must get a conclusion
crw-rw---- 1 root video 81, 0 Мар 19 17:28 /dev/video0
crw-rw---- 1 root video 81, 1 Мар 19 17:28 /dev/video1
crw-rw---- 1 root video 81, 2 Мар 19 17:28 /dev/video2
crw-rw---- 1 root video 81, 3 Мар 19 17:28 /dev/video3
crw-rw---- 1 root video 81, 4 Мар 19 17:28 /dev/video4
crw-rw---- 1 root video 81, 5 Мар 19 17:28 /dev/video5
crw-rw---- 1 root video 81, 6 Мар 20 08:18 /dev/video6
crw-rw---- 1 root video 81, 7 Мар 19 17:28 /dev/video7
So our analog video output devices are defined in the system.
3. We look at the information about our device (all analog video devices are stored in the form / dev / video):
$v4l-info /dev/video0 | head -n 9 | grep"^card"We get this conclusion:
card : "BT878 video ( *** UNKNOWN/GENER"That was the reason why our device was not correctly displayed in Zoneminder. This is not good, because The driver parameters of our device are not transferred to the kernel, we look further.
4. We need to unload the module:
$rmmod bttv5. What we get a non-affirmative answer:
Error: Module bttv isinuseI spent a lot of time on rebuilding the kernel and other nonsense, the answer was simple. Our analog device was used, and it was used by the DVR, so that we do so.
6. Stop the zoneminder:
$/etc/init.d/zoneminder /stop7. We try to unload the module:
$rmmod bttv8. As we see the command, it swallowed normally, so we try to transfer the parameters to the kernel manually:
modprobe -v bttv card=0x69,0x69,0x69,0x69,0x69,0x69,0x69,0x69,0x69 tuner=-1,-1,-1,-1,-1,-1,-1,-1,-1 autoload=09. We look at the information about our device (all analog video devices are stored in the form / dev / video):
$v4l-info /dev/video0 | head -n 9 | grep"^card"And now we get the following conclusion:
card: “BT878 video (ProVideo PV143)”Which means that everything turned out great and the drivers applied.
10. We give just in case the rights to the cameras:
$chmod a+rwx /dev/video*11. Start Zoneminder:
$/etc/init.dzoneminder start12. Go to Zoneminder:
192.168.110.151/zm We
check our analog camera and we can make sure that everything is fine with the image and we can safely watch it in our DVR. Further, this whole thing is necessary for us automatically, that would rise in the kernel, without manual launch.
13. Create a bttv.conf file:
$nano /et c/modprobe.d/bttv.conf14. Insert into it the following content:
aliaschar-major-81-0 bttv
aliaschar-major-81-1 bttv
aliaschar-major-81-2 bttv
aliaschar-major-81-3 bttv
aliaschar-major-81-4 bttv
aliaschar-major-81-5 bttv
aliaschar-major-81-6 bttv
aliaschar-major-81-7 bttv
aliaschar-major-81-8 bttv
options bttv card=0x69 tuner=-1 autoload=0 i2c_scan=0 i2c_hw=-1options bttv card=0x69,0x69,0x69,0x69,0x69,0x69,0x69,0x69 tuner=-1,-1,-1,-1,-1,-1,-1,-1 autoload=0
15. Reboot:
$reboot16. We admire the result:
4) Possible problems that will have to be encountered while performing my HOW-TO.
1. Russian font in the console:
• in any text editor with root privileges, add the line FRAMEBUFFER = Y to the /etc/initramfs-tools/initramfs.conf file. This can also be done by running the following commands:
$sudo -i
$echo 'FRAMEBUFFER=Y'>> /etc/initramfs-tools/initramfs.conf
$exit
• Update ramdisk image of the kernel initialization period (initrd):
$update-initramfs –u• Field of these manipulations settings made by the command:
sudo dpkg-reconfigure console-setup• finally start working: Russian fonts will show everything from the very beginning - i.e. even a request for checking disks (arising during the kernel initialization process) will be displayed in Cyrillic, rather than squares.
2. Ubuntu does not see the monitor.
Not all types of monitors see Ubuntu after installation, most often you will see “Non-optimal mode 1024x768. The optimal mode is 1240 x 860 ”:
• Go to / etc / default / grub
• Remove comments from the line
GRUB_GFXMODE=640x480• Update the bootloader
$update-grub• reboot the system
$reboot3) Sources used to implement this project
Ubuntu
1. www.ithowto.ru/666-ustanovka-ubuntu-12-04-server.html
2. softnastroy.com/content/instrukciya-po-ustanovke-ubuntu-1204-lts-server-c-podrobnymi-skrinshotami.html
3. help.ubuntu.ru/wiki/russian_font_in_console
Проблемы с камерами
4. avreg.net/howto_linux-capture-cards.html
5. www.lecam.ru/articles/avreg
6. devhead.ru/read/organizaciya-videonablyudeniya-zoneminder-ubuntu
7. www.linuxtv.org/wiki/index.php/Bttv_devices_%28bt848,_bt878%29#Driver
8. www.zoneminder.com/wiki/index.php/Ubuntu_9.04_%28Jaunty%29_desktop_with_graphical_interface
9. forum.ubuntu.ru/index.php?topic=30146.0
10. unixforum.org/index.php?showtopic=117969
Zoneminder
11. www.zoneminder.com/wiki/index.php/Ubuntu_Server_12.04_64-bit_with_Zoneminder_1.25.0_the_easy_way
12. blog.sighworld.com/page/3