Once again about Linux screencasts
More recently, there was a pomeo article on this topic. It’s not that I have some kind of alternative view of this, or that my version is essentially different. I just know that some problems in Linux are not solved by just one manual. Therefore, repeating myself somewhat, I will describe how I do it.
Some time ago, I decided to take up the series of articles “Networks for the smallest” and was seriously puzzled by the issue of recording screencasts. Readers are very requested to accompany the article with video materials.
There were two difficulties when working in Linux:
1) A program for recording video from a screen,
2) A program for processing video.
The first thing that came to mind was not to seek adventures on your head and do it in Windows. But, firstly, this is a whole series of not very pleasant actions, and, secondly, IT blood blew up - we need to figure it out.
Linux has a great recordMyDesktop app - simple and yet versatile. This is the first that I tried and it completely satisfied me.
In Ubuntu, it is put in one command: There is also a gtk-recordMyDesktop graphical shell for it, but I preferred a different path. I created two buttons on the quick launch panel: I assigned the following command to the first button: It will start recording and will only capture the rectangle specified by the coordinates. That is, the upper left point here: 0; 25, and the length and width are: 1250x750. It will save the final file to the directory

sdsm / video / desktop.ogv
After clicking on this button, recordMyDesktop will helpfully show the frame in which it will record:

There is really one unpleasant thing: with this frame length: 1250 - it cuts the window a bit, and if you increase it by one pixel, for some reason he jumps a lot more and grabs part of my panel on the left. I had to come to terms with this.
On the second button we hang up the command to stop recording. Perhaps I did not do it very carefully, if anyone knows labor, tell
me : But it works and it suits me perfectly. After stopping, processing of this video starts, which will affect the operation of your processor.
If you start and stop RecordMyDesktop from the console or graphical shell, you will see the video calculation process:
hang up the command to stop recording. Perhaps I did not do it very carefully, if anyone knows labor, tell
me : But it works and it suits me perfectly. After stopping, processing of this video starts, which will affect the operation of your processor.
If you start and stop RecordMyDesktop from the console or graphical shell, you will see the video calculation process:


In my case, with the buttons we act blindly, focusing on the processor image and the noise of coolers. Once the load has dropped, you can go check the result. If you press the buttonagain, the processing will be interrupted. That is, if you started to record and something went wrong, just double-click the button and that's it.
The final file is obtained in the ogv format - to whom it seems, but it will do for me.
Now for the sound. The built-in speaker and sound card leave much to be desired or even even the presence of articulate sounds as a result. An example .
So I found a good microphone:

The quality has become much better, but the voice is very quiet. Having played around with the sound parameters, I realized that with software amplification we get wild noises, but you can achieve some more or less sane result. An example .
But that is not what we need. I did not want to buy an external sound card, but an old eeepc901 was lying idle in the nightstand - ideal. The lack of a hard drive and a weak quiet cooler did their job: the result is completely nothing. Example
I have already been advised that in order to get rid of the noise of hard drives, batteries, coolers and other things, I should use a mixer with a microphone input - they say that the sound quality will rise by an order of magnitude.
I record using the program Audacity, where then I process the sound.
When I delete any treatment of wheezing, wheezing, and other respiratory others Nia . Then, if necessary, I do signal amplification, normalization and noise removal:

Noise removal - killer feature. Select the area where you have only noise and create a model:
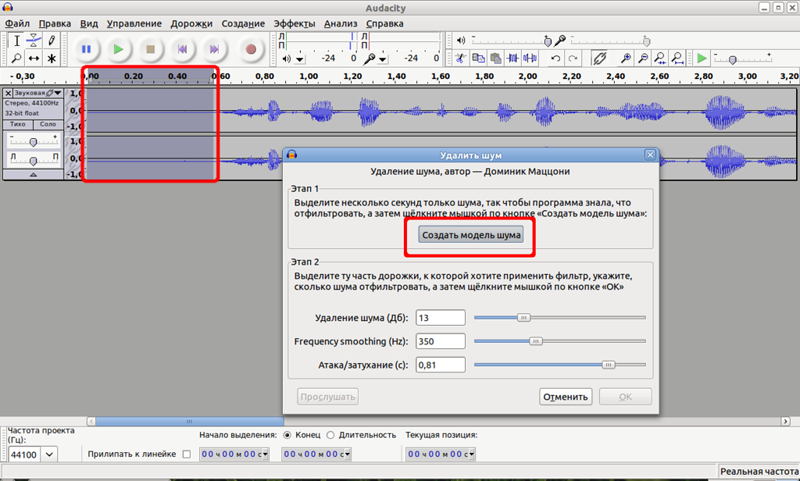
Next, select the entire track (or deselect) and open “Noise Removal” and Ok again. Audacity will clean your entire file from the template.
And the output can be very tolerable file. An example .
One of the most difficult parts is to combine all this into one final video file. I broke a lot of copies in search of a working variant. I tried to do this in the console via ffmpeg - either the sound goes bad or the video quality - I did not have the patience to figure it out.
KinoIt has a very modest functionality and also spoils the quality.
Avidemux is generally buggy when trying to open this video. Either he didn’t like ogv, or the size of the picture.
Pitivi pleased, but the functionality is not enough.
So I stayed at Kdenlive . With him, too, everything is not so simple, if you write, for example, the final file in avi, then for some reason it spoiled my sound, other codecs, like mp3, did not allow me to put it. Again, due to my incredible laziness, I decided to write in m2t - the size was a little larger than necessary, but in all other parameters the result was suitable. Youtube is also happy to accept them.

What Kdenlive especially suited me for is the fact that you can create many tracks and easily work with pictures. In my videos, I use a series of photos to create a video sequence, and this opportunity is just what I need.

Processing even a 15-minute video takes a very long time. For example, a 30-minute video in two passes, I counted about 2 hours. But this is not the fault of the program, but of my rather old machine.
One of the significant shortcomings of kdenlive is that it is an epileptic, bastard. And I didn’t catch the trigger of his fall. But to his credit, he restores the last (or almost the last) state before the crash.
In addition, in the article that was in front of me, the author uses OpenShot , which is very similar to kdenlive, but with more glamor. In addition, I have already set myselfCinelerra . to prepare the next video, but there are problems with the encoding. Judging by the reviews, a very powerful and high-quality program.
The last videos I got for 30-40 minutes almost. I prepared them in parts and in the end, merging the 5-minute part with the 30-minute part, not to die waiting, I did it on Youtube - they have a simple but good video editor .
It contains the most necessary functions for me to “crop” and “glue”. In general, from my pieces of video, I collected the final version there and Google servers calculated the result.
Profit .
PS I apologize for the number of heterogeneous players - I'm testing audio hosting.
Some time ago, I decided to take up the series of articles “Networks for the smallest” and was seriously puzzled by the issue of recording screencasts. Readers are very requested to accompany the article with video materials.
There were two difficulties when working in Linux:
1) A program for recording video from a screen,
2) A program for processing video.
The first thing that came to mind was not to seek adventures on your head and do it in Windows. But, firstly, this is a whole series of not very pleasant actions, and, secondly, IT blood blew up - we need to figure it out.
Linux has a great recordMyDesktop app - simple and yet versatile. This is the first that I tried and it completely satisfied me.
In Ubuntu, it is put in one command: There is also a gtk-recordMyDesktop graphical shell for it, but I preferred a different path. I created two buttons on the quick launch panel: I assigned the following command to the first button: It will start recording and will only capture the rectangle specified by the coordinates. That is, the upper left point here: 0; 25, and the length and width are: 1250x750. It will save the final file to the directory
#apt-get install recordmydesktop
recordmydesktop -y 25 --height 750 --width 1250 -o sdsm/video/desktop.ogv
sdsm / video / desktop.ogv
After clicking on this button, recordMyDesktop will helpfully show the frame in which it will record:
There is really one unpleasant thing: with this frame length: 1250 - it cuts the window a bit, and if you increase it by one pixel, for some reason he jumps a lot more and grabs part of my panel on the left. I had to come to terms with this.
On the second button we
hang up the command to stop recording. Perhaps I did not do it very carefully, if anyone knows labor, tell
me : But it works and it suits me perfectly. After stopping, processing of this video starts, which will affect the operation of your processor.
If you start and stop RecordMyDesktop from the console or graphical shell, you will see the video calculation process:pkill recordmydesktop
In my case, with the buttons we act blindly, focusing on the processor image and the noise of coolers. Once the load has dropped, you can go check the result. If you press the button
again, the processing will be interrupted. That is, if you started to record and something went wrong, just double-click the button and that's it. The final file is obtained in the ogv format - to whom it seems, but it will do for me.
Now for the sound. The built-in speaker and sound card leave much to be desired or even even the presence of articulate sounds as a result. An example .
So I found a good microphone:
The quality has become much better, but the voice is very quiet. Having played around with the sound parameters, I realized that with software amplification we get wild noises, but you can achieve some more or less sane result. An example .
But that is not what we need. I did not want to buy an external sound card, but an old eeepc901 was lying idle in the nightstand - ideal. The lack of a hard drive and a weak quiet cooler did their job: the result is completely nothing. Example
I have already been advised that in order to get rid of the noise of hard drives, batteries, coolers and other things, I should use a mixer with a microphone input - they say that the sound quality will rise by an order of magnitude.
I record using the program Audacity, where then I process the sound.
When I delete any treatment of wheezing, wheezing, and other respiratory others Nia . Then, if necessary, I do signal amplification, normalization and noise removal:
Noise removal - killer feature. Select the area where you have only noise and create a model:
Next, select the entire track (or deselect) and open “Noise Removal” and Ok again. Audacity will clean your entire file from the template.
And the output can be very tolerable file. An example .
One of the most difficult parts is to combine all this into one final video file. I broke a lot of copies in search of a working variant. I tried to do this in the console via ffmpeg - either the sound goes bad or the video quality - I did not have the patience to figure it out.
KinoIt has a very modest functionality and also spoils the quality.
Avidemux is generally buggy when trying to open this video. Either he didn’t like ogv, or the size of the picture.
Pitivi pleased, but the functionality is not enough.
So I stayed at Kdenlive . With him, too, everything is not so simple, if you write, for example, the final file in avi, then for some reason it spoiled my sound, other codecs, like mp3, did not allow me to put it. Again, due to my incredible laziness, I decided to write in m2t - the size was a little larger than necessary, but in all other parameters the result was suitable. Youtube is also happy to accept them.
What Kdenlive especially suited me for is the fact that you can create many tracks and easily work with pictures. In my videos, I use a series of photos to create a video sequence, and this opportunity is just what I need.
Processing even a 15-minute video takes a very long time. For example, a 30-minute video in two passes, I counted about 2 hours. But this is not the fault of the program, but of my rather old machine.
One of the significant shortcomings of kdenlive is that it is an epileptic, bastard. And I didn’t catch the trigger of his fall. But to his credit, he restores the last (or almost the last) state before the crash.
In addition, in the article that was in front of me, the author uses OpenShot , which is very similar to kdenlive, but with more glamor. In addition, I have already set myselfCinelerra . to prepare the next video, but there are problems with the encoding. Judging by the reviews, a very powerful and high-quality program.
The last videos I got for 30-40 minutes almost. I prepared them in parts and in the end, merging the 5-minute part with the 30-minute part, not to die waiting, I did it on Youtube - they have a simple but good video editor .
It contains the most necessary functions for me to “crop” and “glue”. In general, from my pieces of video, I collected the final version there and Google servers calculated the result.
Profit .
PS I apologize for the number of heterogeneous players - I'm testing audio hosting.