Stupid Weatherbox on E-Ink
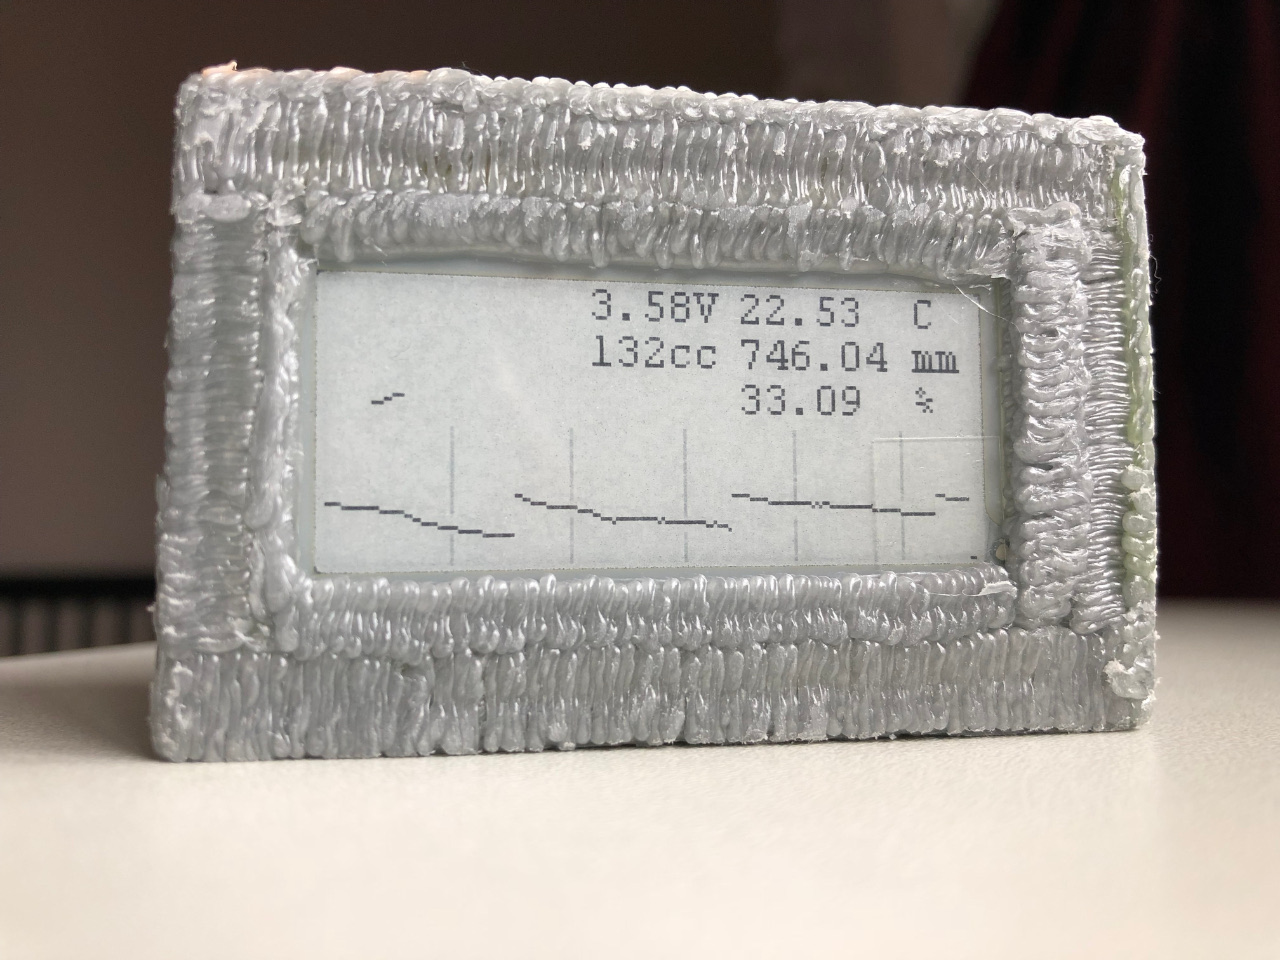
Already a year and a half ago, I bought a pair of E-Ink screens with eBay based on the SSD1606 driver, just for the weather station. And 4 months ago, before the new year, he appeared.
I will say right away that there is no clock in it, since there are literally everywhere at home! But he can show the following:
- current temperature Celsius;
- current humidity in percent;
- current pressure in mm Hg;
- pressure history for the last 15 hours as a graph;
- battery voltage.
Actually that's all. The necessary minimum and ultimate simplicity!
Even there is no such GUI
Principle of operation
The controller should at the touch of a button to display current information. Most of the time the controller sleeps, as does the display, which is in deep sleep.
The controller periodically wakes up on watchDog and takes pressure measurements every 5 minutes to plot the pressure change.
With the schedule it came out very interesting, since the pressure can change very quickly and strongly (the weather in the northern city is generally unpredictable), then at some point a graph may increase in scale. To do this, once a couple of hours, the average measurement point is recalibrated (the pressure can go both up and down). However, due to this, the visual difference of the previous values simplifies the reading of the graph (example on KPDV).
Iron
The main brain is the ATMega328P microcontroller, the BME280 is used as an all-
This is almost the same screen as waveShare epaper 2.7 “, only older (they have very similar datasheets).
All this works on the battery from a
Energy Optimization
Good and healthy sleep is our everything! Therefore, you need to sleep to the maximum!
Since there was no software for working with the screen, only a basic code sample with comments in the language of the Middle Kingdom and datasheet (the screen just appeared a year and a half ago), I had to do most of the work myself, since there was already experience with different screens.
The DeepSleep mode was found in the datasheet, the screen consumes nothing but 1.6mA in it!
The barometer has a metering mode on demand (aka standby), in it the sensor consumes a minimum of energy, while providing sufficient accuracy for a simple indication of changes (the datasheet indicates that it is just for weather stations). The inclusion of this mode gave a consumption of 6.2 μA. Next, on the module, the LDO controller from the LM6206N3 (and maybe the XC6206, both are masked as 662k) on the MCP1700 was soldered.
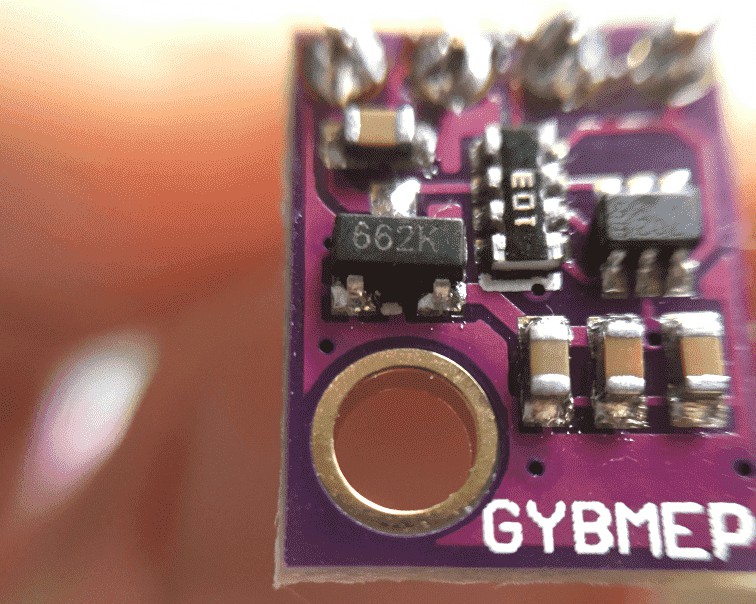
This gave a gain of even 2 µA.
Since you need to achieve minimal power consumption, the LowPower library was used. It has a convenient work with watchDog, on the basis of which the dream is made. However, by itself, it consumes about 4µA. I see a solution to this problem using an external timer based on Texas Instruments TPL5010 or equivalent.
To reduce power consumption, it was also necessary to flash the tool with other FUSE bits and a bootloader, which was successfully done with USBasp, and was added to the boards.txt file
The following text:
## Arduino Pro or Pro Mini (1.8V, 1 MHz Int.) w/ ATmega328p

## internal osc div8, also now watchdog, no LED on boot

## bootloader size: 402 bytes

## http://homes-smart.ru/index.php/oborudovanie/arduino/avr-zagruzchik

## http://homes-smart.ru/fusecalc/?prog=avrstudio&part=ATmega328P

## http://www.engbedded.com/fusecalc

## -------------------------------------------------

pro.menu.cpu.1MHzIntatmega328=ATmega328 (1.8V, 1 MHz Int., BOD off)


pro.menu.cpu.1MHzIntatmega328.upload.maximum_size=32256

pro.menu.cpu.1MHzIntatmega328.upload.maximum_data_size=2048

pro.menu.cpu.1MHzIntatmega328.upload.speed=9600


pro.menu.cpu.1MHzIntatmega328.bootloader.low_fuses=0x62

pro.menu.cpu.1MHzIntatmega328.bootloader.high_fuses=0xD6

pro.menu.cpu.1MHzIntatmega328.bootloader.extended_fuses=0x07

pro.menu.cpu.1MHzIntatmega328.bootloader.file=atmega/a328p_1MHz_62_d6_5.hex


pro.menu.cpu.1MHzIntatmega328.build.mcu=atmega328p

pro.menu.cpu.1MHzIntatmega328.build.f_cpu=1000000L
Also put in the “bootloaders / atmega /” folder the bootloader compiled from optiboot:
a328p_1MHz_62_d6_5.hex
:107E0000F894112484B714BE81FFDDD082E0809302

:107E1000C00088E18093C10086E08093C2008CE0BE

:107E20008093C4008EE0B9D0CC24DD2488248394D0

:107E3000B5E0AB2EA1E19A2EF3E0BF2EA2D08134A3

:107E400061F49FD0082FAFD0023811F0013811F43F

:107E500084E001C083E08DD089C0823411F484E1D4

:107E600003C0853419F485E0A6D080C0853579F447

:107E700088D0E82EFF2485D0082F10E0102F00278F

:107E80000E291F29000F111F8ED068016FC0863583

:107E900021F484E090D080E0DECF843609F040C049

:107EA00070D06FD0082F6DD080E0C81680E7D8065C

:107EB00018F4F601B7BEE895C0E0D1E062D089932E

:107EC0000C17E1F7F0E0CF16F0E7DF0618F0F60147

:107ED000B7BEE89568D007B600FCFDCFA601A0E0CC

:107EE000B1E02C9130E011968C91119790E0982F91

:107EF0008827822B932B1296FA010C0187BEE895F6

:107F000011244E5F5F4FF1E0A038BF0751F7F60133

:107F1000A7BEE89507B600FCFDCF97BEE89526C042

:107F20008437B1F42ED02DD0F82E2BD03CD0F601D2

:107F3000EF2C8F010F5F1F4F84911BD0EA94F80143

:107F4000C1F70894C11CD11CFA94CF0CD11C0EC0EF

:107F5000853739F428D08EE10CD085E90AD08FE03E

:107F60007ACF813511F488E018D01DD080E101D09E

:107F700065CF982F8091C00085FFFCCF9093C600FD

:107F800008958091C00087FFFCCF8091C00084FDE0

:107F900001C0A8958091C6000895E0E6F0E098E160

:107FA000908380830895EDDF803219F088E0F5DF5B

:107FB000FFCF84E1DECF1F93182FE3DF1150E9F7E5

:107FC000F2DF1F91089580E0E8DFEE27FF27099494

:0400000300007E007B

:00000001FF
Actually, as you most likely guessed, all this was done on the basis of the Arduino, namely pro mini at 8 MHz 3.3V. The mic5203 LDO controller (too voracious at low currents) was dropped from this board and the LED resistor was sealed off to indicate power.
As a result, it was possible to achieve energy consumption of 10 µAh in sleep mode, which gives about 462.96 days of work. From this number it is safe to deduct a third, thereby obtaining about 10 months, which so far corresponds to reality.
I tested the version on ionistors, with a final capacity of 3 mAh, it works no more than 6 days (high self-discharge). The calculation of the capacity of the ionistor was made according to the formula C * V / 3.6 = X mAh. I think that the version with the solar battery and MSP430 will be generally eternal.
Ads:
#include <SPI.h>

#include <Wire.h>

#include <ssd1606.h>

#include <Adafruit_BME280.h>

//#include <BME280_2.h> // local optimisation

#include <LowPower.h>


#include <avr/sleep.h>

#include <avr/power.h>


#define TIME_X_POS 0

#define TIME_Y_POS 12


#define DATE_X_POS 2

#define DATE_Y_POS 9


#define WEECK_X_POS 65

#define WEECK_Y_POS 9


// ====================================== //

#define TEMP_X_POS 105

#define TEMP_Y_POS 15


#define PRESURE_X_POS 105

#define PRESURE_Y_POS 12


#define HUMIDITY_X_POS 105

#define HUMIDITY_Y_POS 9

// ====================================== //


#define BATT_X_POS 65

#define BATT_Y_POS 15


#define ONE_PASCAL 133.322


// ==== for presure history in graph ==== //

#define MAX_MESURES 171

#define BAR_GRAPH_X_POS 0

#define BAR_GRAPH_Y_POS 0

#define PRESURE_PRECISION_RANGE 4.0 // -/+ 4 mm

#define PRESURE_GRAPH_MIN 30 // vertical line graph for every N minutes

#define PRESURE_PRECISION_VAL 10 // max val 100

#define PRESURE_CONST_VALUE 700.0 // const val what unneed in graph calculations

#define PRESURE_ERROR -1000 // calibrated value

// ====================================== //


#define VCC_CALIBRATED_VAL 0.027085714285714 // == 3.792 V / 140 (real / mesured)

//#define VCC_CALIBRATED_VAL 0.024975369458128 // == 5.070 V / 203 (real / mesured)

#define VCC_MIN_VALUE 2.95 // min value to refresh screen

#define CALIBRATE_VCC 1 // need for battery mesure calibration


// 37 ~296 sec or 5 min * MAX_MESURES = 14,33(3) hours for full screen

#define SLEEP_SIZE 37


#ifdef BME280_ADDRESS

#undef BME280_ADDRESS

#define BME280_ADDRESS 0x76

#endif


#define ISR_PIN 3 // other mega328-based 2, 3

#define POWER_OFF_PIN 4 // also DONEPIN


#define E_CS 6 // CS ~ D6

#define E_DC 5 // D/C ~ D5

#define E_BSY 7 // BUSY ~ D7

#define E_RST 2 // RST ~ D2

#define E_BS 8 // BS ~ D8


/*

MOSI ~ D11

MISO ~ D12

CLK ~ D13

*/

EPD_SSD1606 Eink(E_CS, E_DC, E_BSY, E_RST);

Adafruit_BME280 bme;


volatile bool adcDone;

bool updateSreen = true;

bool normalWakeup = false;


float battVal =0;

uint8_t battValcV =0;


uint8_t timeToSleep = 0;


float presure =0;

float temperature =0;

float humidity =0;

float presure_mmHg =0;


unsigned long presureMin =0;

unsigned long presureMax =0;


uint8_t currentMesure = MAX_MESURES;

uint8_t presureValHistoryArr[MAX_MESURES] = {0};


typedef struct {

 uint8_t *pData;

 uint8_t pos;

 uint8_t size;

 unsigned long valMax;

 unsigned long valMin;

} history_t;
Initialization:
void setup()

{

 saveExtraPower();

 Eink.begin();


initBME();


// https://www.arduino.cc/en/Reference/attachInterrupt

 pinMode(ISR_PIN, INPUT_PULLUP);

 attachInterrupt(digitalPinToInterrupt(ISR_PIN), ISRwakeupPin, RISING);


//drawDefaultGUI();

 drawDefaultScreen();


// tiiiiny fix....

 checkBME280();

 updatePresureHistory();

}


void saveExtraPower(void)

{

 power_timer1_disable();

 power_timer2_disable();


// Disable digital input buffers:

 DIDR0 = 0x3F; // on ADC0-ADC5 pins

 DIDR1 = (1 << AIN1D) | (1 << AIN0D); // on AIN1/0

}


void initBME(void)

{

 bme.begin(BME280_ADDRESS); // I2C addr


LowPower.powerDown(SLEEP_250MS, ADC_OFF, BOD_OFF); // wait for chip to wake up.

 while(bme.isReadingCalibration()) { // if chip is still reading calibration, delay

 LowPower.powerDown(SLEEP_120MS, ADC_OFF, BOD_OFF);

 }

 bme.readCoefficients();


bme.setSampling(Adafruit_BME280::MODE_FORCED,

 Adafruit_BME280::SAMPLING_X1, // temperature

 Adafruit_BME280::SAMPLING_X1, // pressure

 Adafruit_BME280::SAMPLING_X1, // humidity

 Adafruit_BME280::FILTER_OFF);

}
Main code:
void loop()

{

 for(;;) { // i hate func jumps when it's unneed!

 checkVCC();

 if(normalWakeup) {

 checkBME280();

 updatePresureHistory();

 } else {

 normalWakeup = true;

 }


 updateEinkData();

 enterSleep();

 }

}


// func to exec in pin ISR

void ISRwakeupPin(void)

{

 // Keep this as short as possible. Possibly avoid using function calls

 normalWakeup = false;

 updateSreen = true;

 timeToSleep = 1;

}


ISR(ADC_vect)

{

 adcDone = true;

}


void debounceFix(void)

{

 normalWakeup = true;

 updateSreen = false;

}


//https://github.com/jcw/jeelib/blob/master/examples/Ports/bandgap/bandgap.ino

uint8_t vccRead(void)

{

 uint8_t count = 4;

 set_sleep_mode(SLEEP_MODE_ADC);

 ADMUX = bit(REFS0) | 14; // use VCC and internal bandgap

 bitSet(ADCSRA, ADIE);

 do {

 adcDone = false;

 while(!adcDone) sleep_mode();

 } while (--count);

 bitClear(ADCSRA, ADIE);

 // convert ADC readings to fit in one byte, i.e. 20 mV steps:

 // 1.0V = 0, 1.8V = 40, 3.3V = 115, 5.0V = 200, 6.0V = 250

 return (55U * 1023U) / (ADC + 1) - 50;

}


unsigned long getHiPrecision(double number)

{

 // what if presure will be more 800 or less 700? ...

 number -= PRESURE_CONST_VALUE; // remove constant value

 number *= PRESURE_PRECISION_VAL; // increase precision by PRESURE_PRECISION_VAL

 return (unsigned long)number; // Extract the integer part of the number

}


void checkVCC(void)

{

 // reconstruct human readable value

 battValcV = vccRead();

 battVal = battValcV * VCC_CALIBRATED_VAL;


if(battVal <= VCC_MIN_VALUE) { // not enought power to drive E-Ink or work propetly

 detachInterrupt(digitalPinToInterrupt(ISR_PIN));

 // to prevent full discharge: just sleep

 bme.setSampling(Adafruit_BME280::MODE_SLEEP);

 LowPower.powerDown(SLEEP_2S, ADC_OFF, BOD_OFF);

 Eink.sleep(true);

 LowPower.powerDown(SLEEP_FOREVER, ADC_OFF, BOD_OFF);

 }

}


void checkBME280(void)

{

 bme.takeForcedMeasurement(); // wakeup, make new mesure and sleep

 temperature = bme.readTemperature();

 humidity = bme.readHumidity();

 presure = bme.readPressure();

}


void updatePresureHistory(void)

{

 // convert Pa to mmHg; 1 mmHg == 133.322 Pa

 presure_mmHg = (presure + PRESURE_ERROR)/ONE_PASCAL;


// === calc presure history in graph === //

 if((++currentMesure) >= (MAX_MESURES/3)) { // each 4,75 hours

 currentMesure =0;

 presureMin = getHiPrecision(presure_mmHg - PRESURE_PRECISION_RANGE);

 presureMax = getHiPrecision(presure_mmHg + PRESURE_PRECISION_RANGE);

 }


// 36 == 4 pixels in sector * 9 sectors

 presureValHistoryArr[MAX_MESURES-1] = map(getHiPrecision(presure_mmHg), presureMin, presureMax, 0, 35);


 for(uint8_t i=0; i < MAX_MESURES; i++) {

 presureValHistoryArr[i] = presureValHistoryArr[i+1];

 }

}


void updateEinkData(void)

{

 if(updateSreen) {

 updateSreen = false;

 Eink.sleep(false);


// bar history

 Eink.fillRect(BAR_GRAPH_X_POS, BAR_GRAPH_Y_POS, MAX_MESURES, 9, COLOR_WHITE);


for(uint8_t i=1; i <= (MAX_MESURES/PRESURE_GRAPH_MIN); i++) {

 Eink.drawVLine(BAR_GRAPH_X_POS+i*PRESURE_GRAPH_MIN, BAR_GRAPH_Y_POS, 35, COLOR_DARKGREY);

 }


for(uint8_t i=0; i <= MAX_MESURES; i++) {

 Eink.drawPixel(i, BAR_GRAPH_Y_POS+presureValHistoryArr[i], COLOR_BLACK);

 }


#if CALIBRATE_VCC

 Eink.setCursor(BATT_X_POS, BATT_Y_POS);

 Eink.print(battVal);


Eink.setCursor(BATT_X_POS, BATT_Y_POS-3);

 Eink.print(battValcV);

#endif


Eink.setCursor(TEMP_X_POS, TEMP_Y_POS);

 Eink.print(temperature);


Eink.setCursor(PRESURE_X_POS, PRESURE_Y_POS);

 Eink.print(presure_mmHg);


Eink.setCursor(HUMIDITY_X_POS, HUMIDITY_Y_POS);

 Eink.print(humidity);


updateEinkSreen();

 Eink.sleep(true);

 }

}


void updateEinkSreen(void)

{

 Eink.display(); // update Eink RAM to screen

 LowPower.idle(SLEEP_15MS, ADC_OFF, TIMER2_OFF, TIMER1_OFF, TIMER0_OFF, SPI_OFF, USART0_OFF, TWI_OFF);


Eink.closeChargePump();

 // as Eink display acts not like in DS, then just sleep for 2 seconds

 LowPower.powerDown(SLEEP_2S, ADC_OFF, BOD_OFF);

}


void effectiveIdle(void)

{

 LowPower.idle(SLEEP_30MS, ADC_OFF, TIMER2_OFF, TIMER1_OFF, TIMER0_OFF, SPI_OFF, USART0_OFF, TWI_OFF);

}


void drawDefaultScreen(void)

{

 Eink.fillScreen(COLOR_WHITE);


Eink.printAt(TEMP_X_POS, TEMP_Y_POS, F("00.00 C"));

 Eink.printAt(PRESURE_X_POS, PRESURE_Y_POS, F("000.00 mm"));

 Eink.printAt(HUMIDITY_X_POS, HUMIDITY_Y_POS, F("00.00 %"));


#if CALIBRATE_VCC

 Eink.printAt(BATT_X_POS, BATT_Y_POS, F("0.00V"));

 // just show speed in some kart racing game in mushr... kingdom \(^_^ )/

 Eink.printAt(BATT_X_POS, BATT_Y_POS-3, F("000cc"));

#endif

}


void drawDefaultGUI(void)

{

 Eink.drawHLine(0, 60, 171, COLOR_BLACK); // split 2 areas


// draw window

 Eink.drawRect(0, 0, 171, 71, COLOR_BLACK);


// frame for text

 Eink.drawRect(BATT_X_POS, BATT_Y_POS, 102, 32, COLOR_BLACK);

}


void snooze(void)

{

 do {

 LowPower.powerDown(SLEEP_8S, ADC_OFF, BOD_OFF);

 } while(--timeToSleep);

}


void disablePower(void)

{

 digitalWrite(POWER_OFF_PIN, HIGH);

 delay(1);

 digitalWrite(POWER_OFF_PIN, LOW);

 LowPower.powerDown(SLEEP_FOREVER, ADC_OFF, BOD_OFF);

}


void enterSleep(void)

{

 // wakeup after ISR signal;

 timeToSleep = SLEEP_SIZE;

 debounceFix();

 snooze();

}
Housing
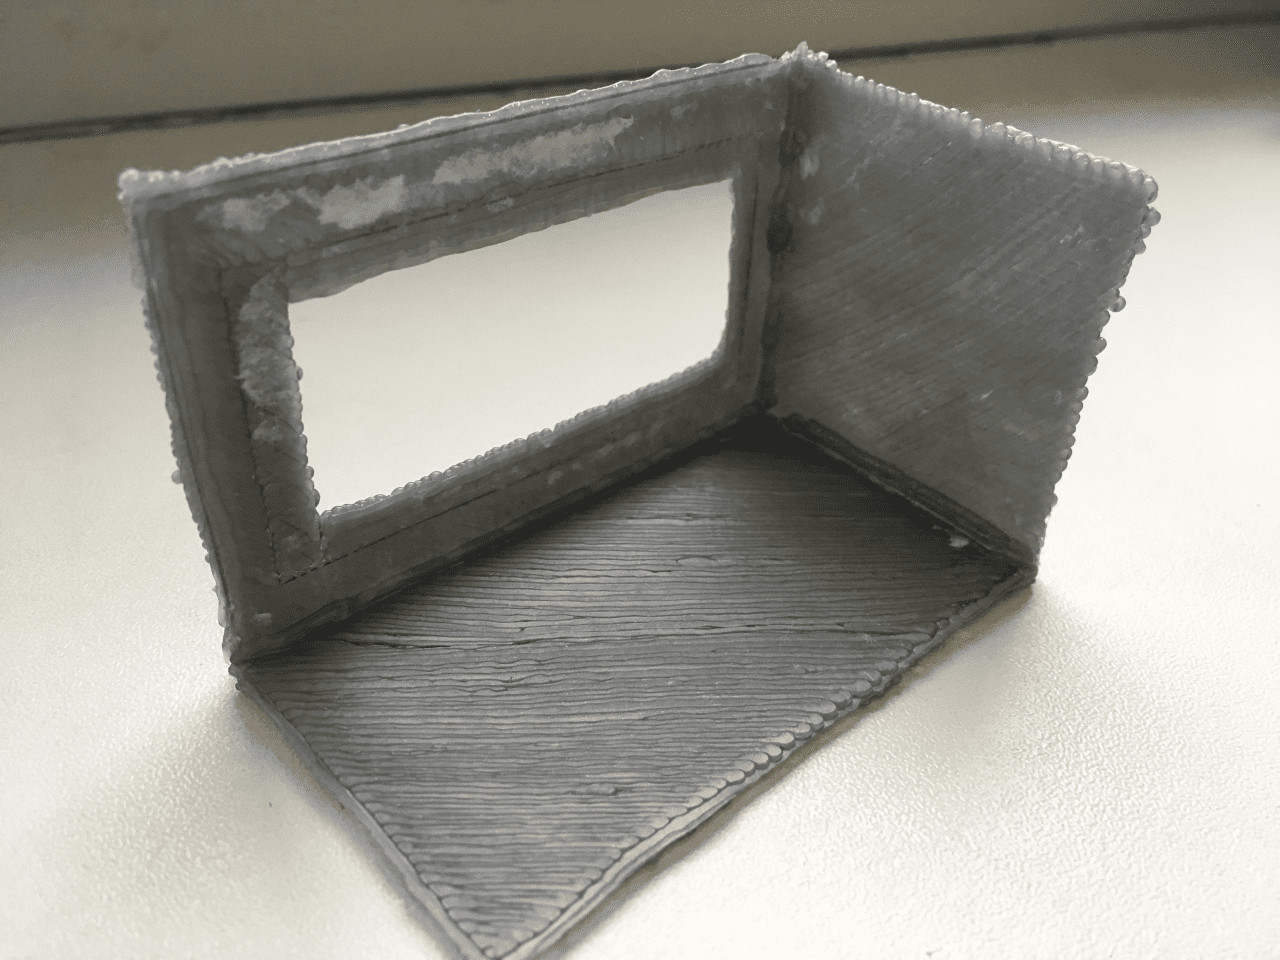
Since I do not have a 3D printer, but I have a MyRiwell RP800A 3D pen. It turned out that it was not so easy for her to make planar and even structures. All PLA was painted with plastic, which was at that time, so the case came out multi-colored, which in other matters gives a certain charm (then I will redo it under the tree, when plastic with wood chips arrives).
The first parts were drawn directly on paper, after which they came off. It left traces on the plastic. Moreover, the details were crooked and needed to be straightened somehow!

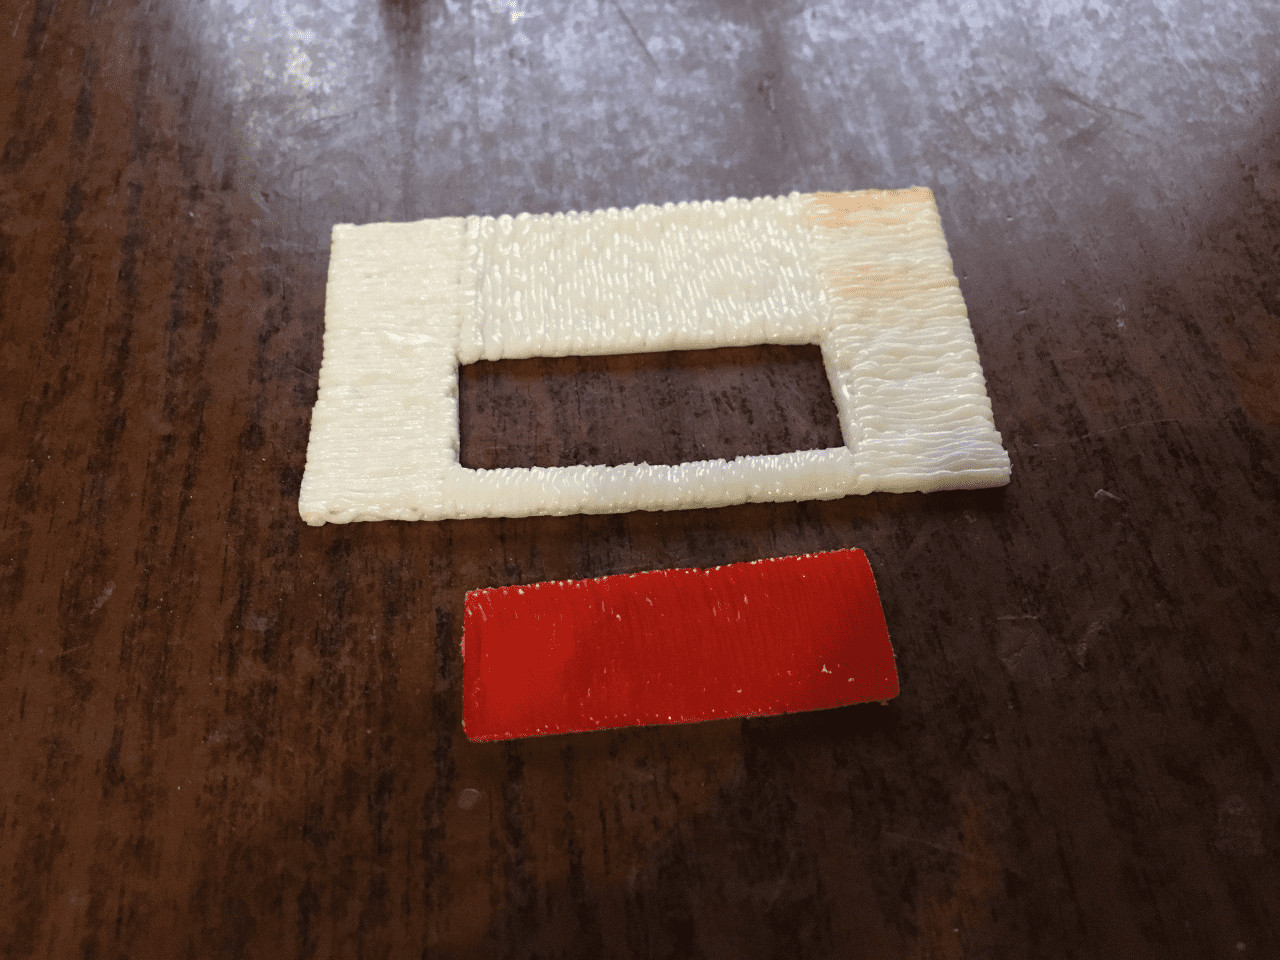
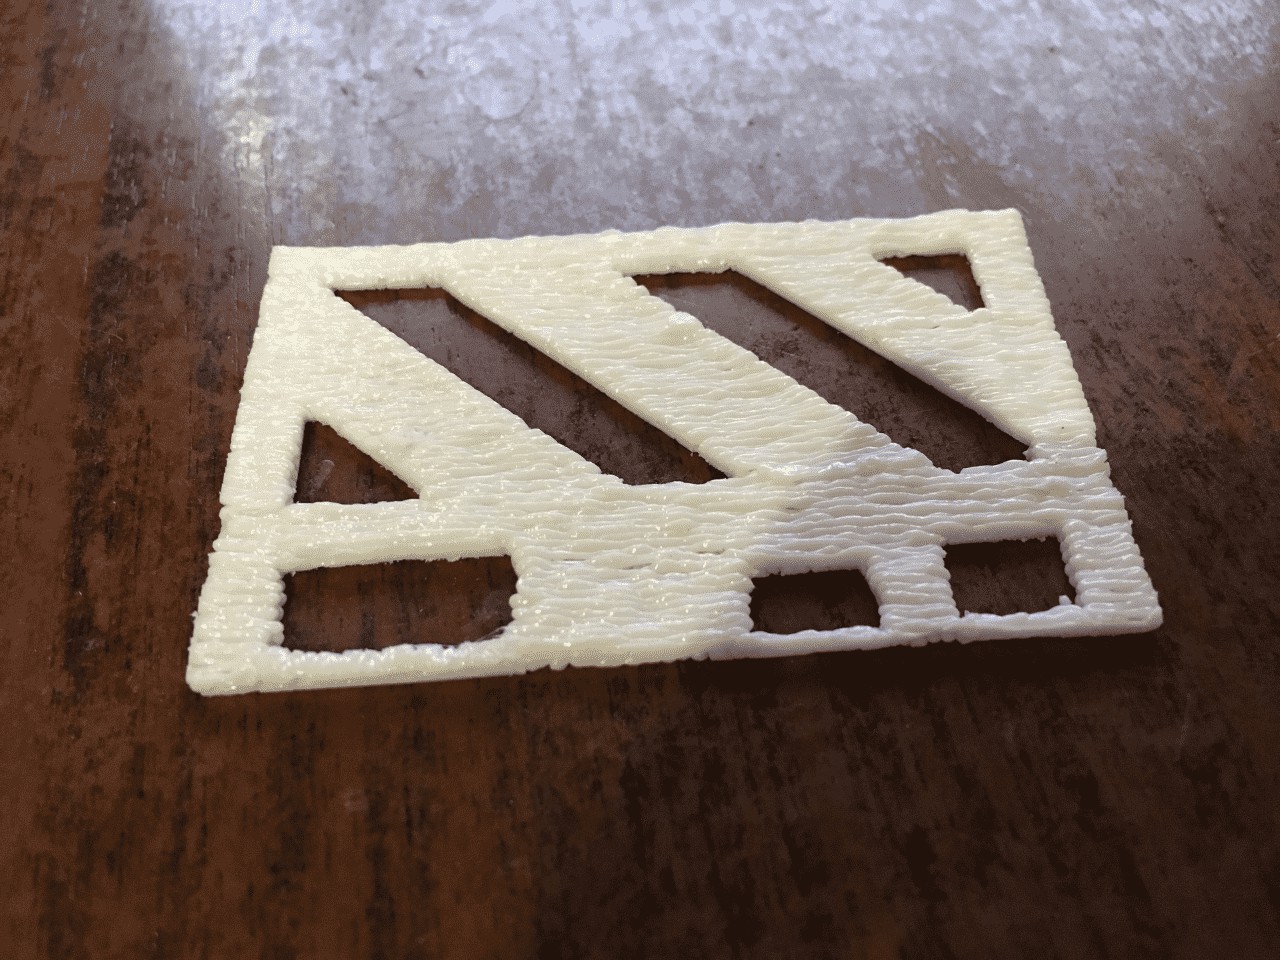
The solution turned out to be trivially simple - to draw on the glass, and under it put "drawings" of the necessary elements of the body.
And that's what happened: the
screen refresh button just had to be red on a white background!
The back wall is made with the simplest pattern, thereby creating air vents.
The button was attached to the horizontal strut inside (in yellow) with the handle that was also made.

The button itself is taken from the old computer case (it has a pleasant sound).
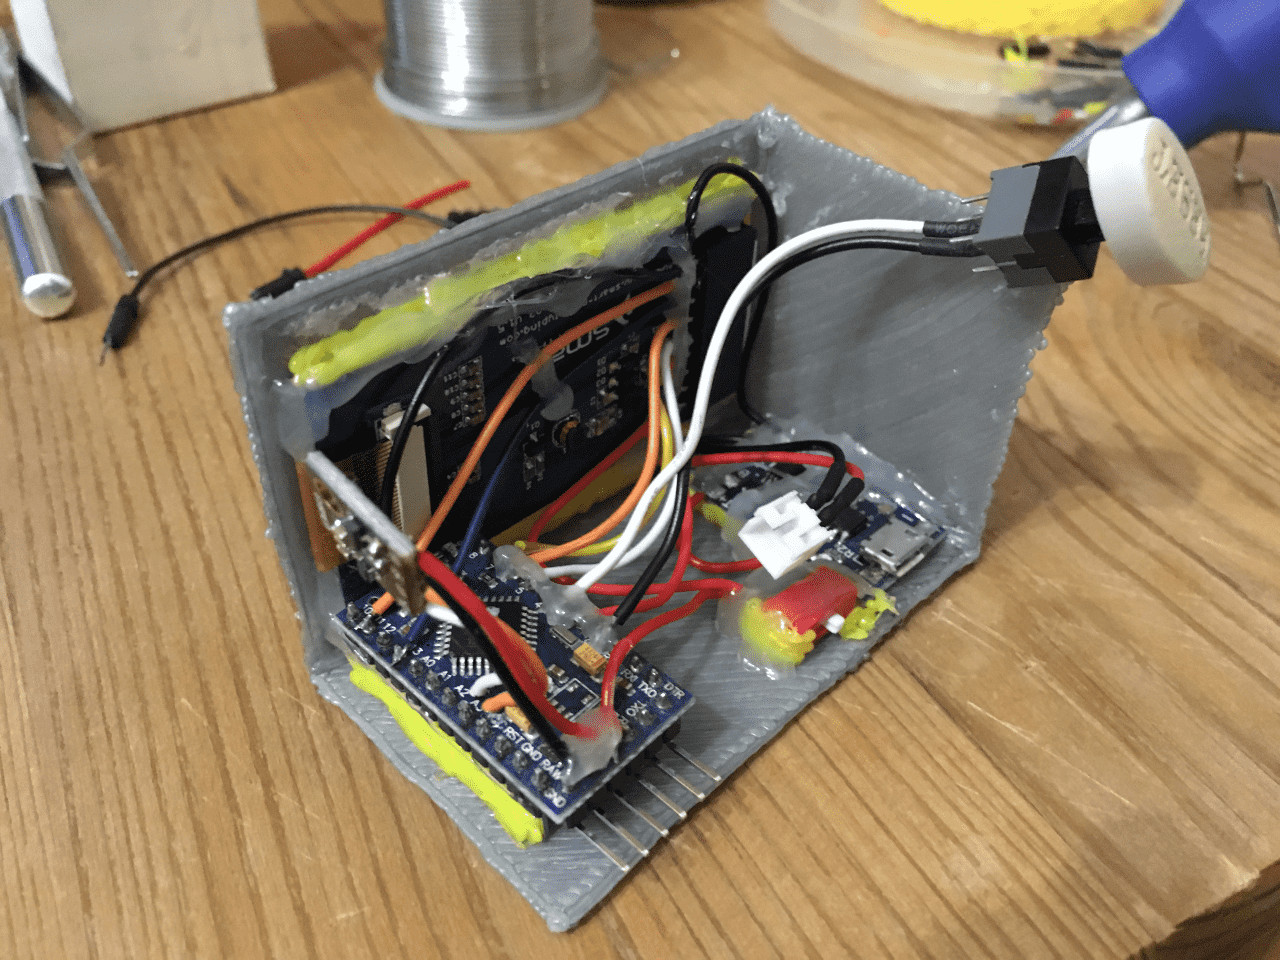
Inside, everything is fixed with hot melt and plastic, so that it’s not easy to disassemble.
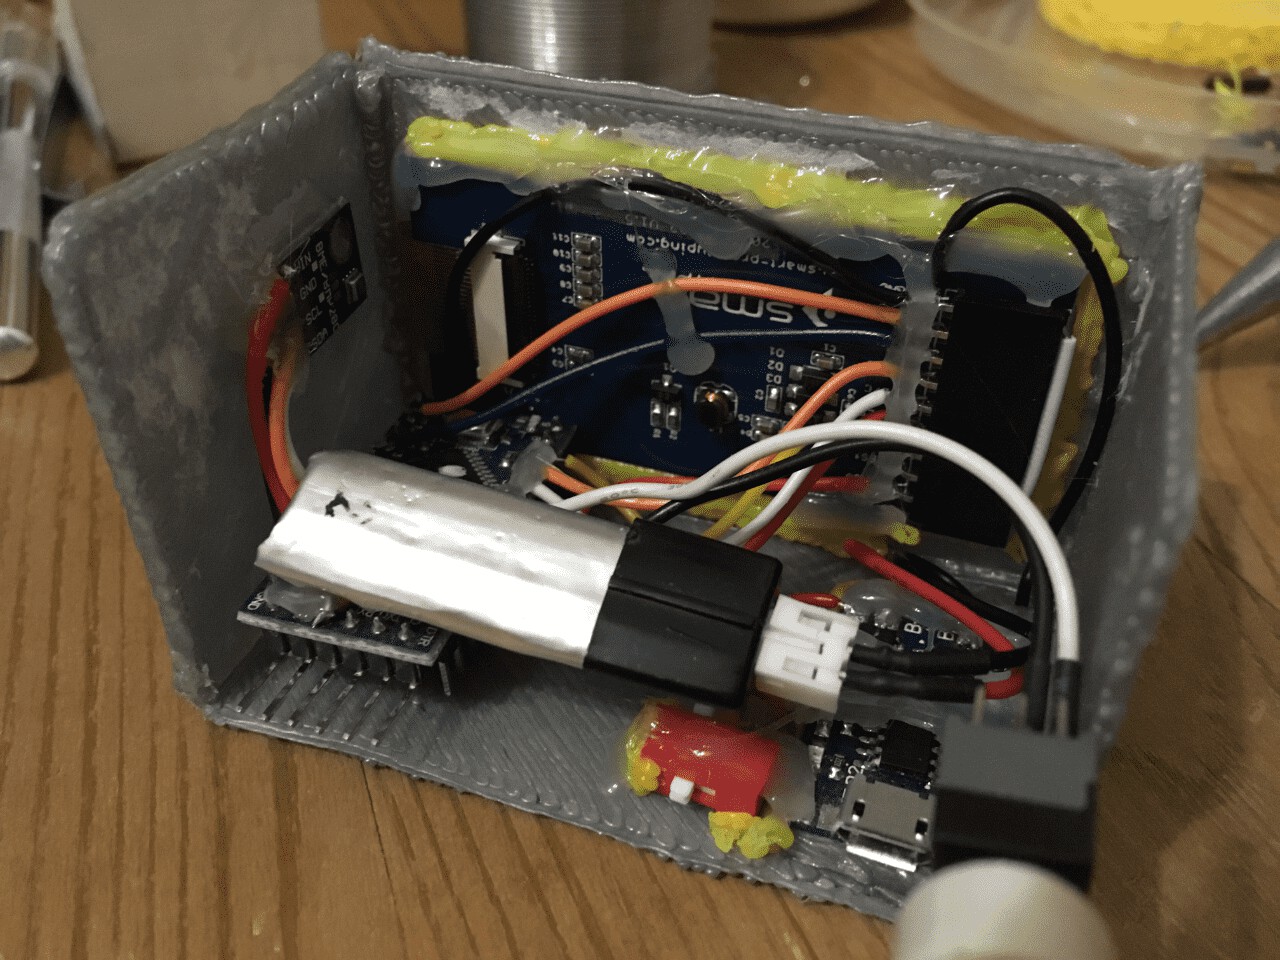
Of course, left the connector for charging and firmware upgrades. The case, unfortunately, had to be made monolithic for greater strength.
Conclusion
4 months have passed, and after not fully charging (up to 4V) the voltage on the battery is only up to 3.58V, which guarantees a long service life until the next charge.
People are very accustomed to this thing in the case of headaches or if you need to know the exact weather forecast for the next hour or two, they immediately go to her and see what happened with the pressure. At KPDV, for example, one can see a strong drop in pressure, as a result it began to snow heavily with the wind.
Links to repositories:
→ library for the screen
→ library for lowPower
→ library for BME280
Updated:
In connection with the increased interest in the body posted more images. Screen Smart-Prototyping second revision. Analog to him on Ali here .
Click me:


PS KPDV was done in the evening, as a result, very, very much snow fell in St. Petersburg tonight.
PPS Blue tape did not add to the survey for known reasons.
Only registered users can participate in the survey. Sign in , please.









