Cooking Fugu Fish at Home or OpenBSD on a Home Server

Of course, this will not be about preparing a well-known Japanese delicacy. And she will go about setting up several services, which I have determined for
myself as necessary, on the home server. Which operating system will be OpenBSD.
Many will exclaim, but why do you need this little-known OS, because there is Linux, FreeBSD. Yes, indeed, I could configure everything I needed on other
unix like, but it would not bring me as much pleasure as I experienced while studying and tuning OpenBSD. And then, I am always attracted to complex
and non-standard solutions.
Finish with the introduction and return to the subject line.
I hasten to introduce you to the menu, dear reader.
Today's menu:
1. Initial setup.
2. DNS (redirecting requests to the provider).
3. Soft RAID 1 (archive of family photos, music, travel videos and other important information).
4. rtorrent + rutorrent (different torrents are needed, different torrents are important).
5. NFS server (network folder for access from LAN computers).
6. VPN tunnel with work. FreeBSD (mpd5) OpenBSD (ppp) (I like, you know, sometimes working from home).
7. NUT + UPS Ippon Back power pro 400 (we are not afraid of an unexpected blackout).
8. Firewall (great PF packet filter).
And so, let's get started.
1. Initial setup.
I will describe the configuration based on the fact that the system is already installed.
I will dwell only on the configuration of network interfaces. There are two of them in my system: re0, rl0.
# cat /etc/hostname.re0
inet 192.168.254.1 255.255.255.0
inet alias 192.168.254.10 255.255.255.255
#зачем мне алиас будет понятно позже
# cat /etc/hostname.rl0
inet 10.110.1.103  255.255.255.224
To install the software, I use both packages and ports, so the first thing to do is download the ports tree
# cd /tmp
# ftp http://ftp://ftp.openbsd.org/pub/OpenBSD/4.7/ports.tar.gz
# cd /usr
# tar -zxvf /tmp/ports.tar.gz
In order to be able to update the ports tree, install cvsup:
# cd /usr/ports
# make search key=cvsup
Port:   cvsup-16.1hp2-no_x11
Path:   net/cvsup,-main,no_x11
Info:   network file distribution system
Maint:  The OpenBSD ports mailing-list
Index:  net devel
L-deps:
B-deps: :lang/ezm3
R-deps:
Archs:  i386
# cd net/cvsup
# make show=FLAVORS
no_x11
# env FLAVOR="no_x11" make install
we will clear working directories of ports
# make clean
# make clean=depends
In order not to delay, we will immediately configure the cvsup config for updating ports
#cat /etc/cvsup-file-ports
*default release=cvs
*default delete use-rel-suffix
*default umask=002
*default host=obsd.cec.mtu.edu
*default base=/usr
*default prefix=/usr
*default tag=OPENBSD_4_7
OpenBSD-ports
Lists of available anonymous cvs servers can be viewed here.
To update, just use the command
# cvsup -g -L 2 /etc/cvsup-file-portsOn this with the ports, for now, let's finish.
Let's move on to the packages, in this step I will install everything that I need from the packages
#export PKG_PATH=http://ftp.gamma.ru/pub/OpenBSD/`uname -r`/packages/`machine -a`/
#pkg_add libxml mod_scgi nut p5-XML-Parser php5-core php5-extensions\
php5-xmlrpc pptp screen xmlrpc-c bash
* It may well turn out that the list is incomplete, since the server is configured for a long time, I could miss something
2. DNS (redirecting requests to the provider).
Make changes to /etc/rc.conf.local to run named
named_flags=""
named_user=named
named_chroot=/var/named
For forwarding of requests by provider DNS, it is enough to enter the following lines in
/var/named/etc/named.conf (in options)
        forwarders {
        10.5.0.2;};
and /etc/resolv.conf will contain
namesrver 127.0.0.13. Soft RAID 1 (archive of family photos, music, travel videos and other important information).
To organize a soft raid in OpenBSD, do the following.
(The array will be assembled from two Western Digital 500GB HDDs)
# dmesg |grep WD
wd2 at pciide0 channel 1 drive 0: WDC WD5000AAKS-00UU3A0
wd3 at pciide0 channel 1 drive 1: WDC WD5000AAKS-00UU3A0
Further, everything is strictly according to man softraid, initialize the disks (overwrite the MBR bootcode and MBR partition table)
# fdisk -iy wd2
# fdisk -iy wd3
create RAID partitions on disks
# printf "a\n\n\n\nRAID\nw\nq\n\n" | disklabel -E wd2
# printf "a\n\n\n\nRAID\nw\nq\n\n" | disklabel -E wd3
we collect an array
# bioctl -c 1 -l /dev/wd2a,/dev/wd3a softraid0it’s good practice to clean the beginning / title of a disc before using it
# dd if=/dev/zero of=/dev/rsd0c bs=1m count=1initialize and format the array
# fdisk -iy sd0
# printf "a\n\n\n\n4.2BSD\nw\nq\n\n" | disklabel -E sd0
# newfs /dev/rsd0a
An attentive reader will notice that when I cleaned the beginning of a newly created array, I used the name rsd0, while when creating a partition on the disk I specified
sd0. To understand the differences, we turn to the wonderful book Absolute OpenBSD: UNIX for the Practical Paranoid by Michael Lucas.
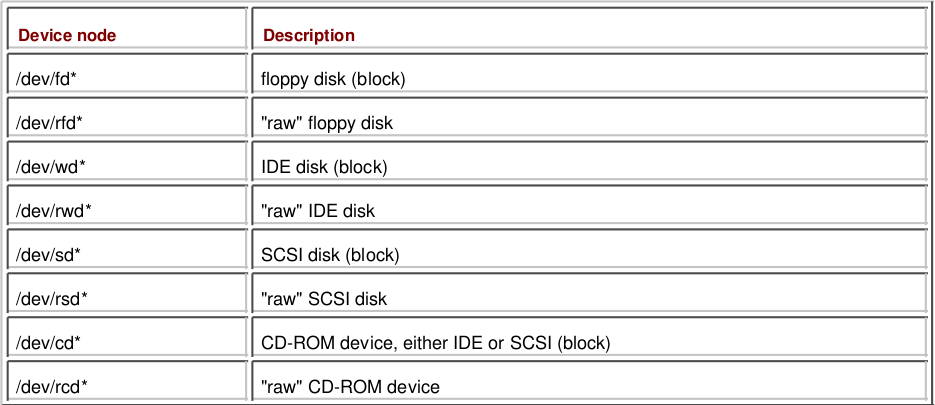
As you can see, the table shows two types of devices - “raw” devices and block devices. There are programs that are written to work with raw
devices, and they cannot work with block devices and, accordingly, vice versa.
When writing / reading to / from block devices, data is buffered, and upon reaching a certain limit (buffer size), a disk is accessed.
When writing / reading to / from raw devices, data is transferred to the device immediately.
M. Lucas gives the following example to facilitate understanding of these mechanisms.
Imagine that you have a bottle in front of you that you need to fill with tablets. You take the tablet with your right hand and shift it to the left, and
so on until the left hand is full, then pour all the tablets from the left hand into the bottle - this will work with block devices. Your left hand
played the role of a buffer. Now put each tablet in a bottle one at a time - this is working with raw devices.
* I really hope that my clumsy translation of explanations will be understandable.
The final step is to mount the array and fix / etc / fstab to automatically mount it at boot time.
#mkdir /raid
#mount /deb/sd0a /raid
#cat /etc/fstab
---skip---
/dev/sd0a /raid ffs rw,nodev,nosuid 1 2
---skip---
4. rtorrent + rutorrent + apache2 (different torrents are needed, different torrents are important).
Even when preparing the first dish (aka initial setup), we installed the necessary components for the work of the torrent rocking chair, except for herself.
We will install it from the ports.
In order for rtorrent to work in conjunction with rutorrent, you need to build it with the configure script option --with-xmlrpc-c, for this we’ll go to the
port directory
# cd /usr/ports/net/rtorrent/and fix the CONFIGURE_ARGS parameter in the Makefile
CONFIGURE_ARGS= ${CONFIGURE_SHARED} --disable-debug --with-xmlrpc-c* A small hint, a wonderful Flavors mechanism, there is nothing more than the configure script options, which is not hard to guess by looking at the Makefile
www / php5 / extensions, for example.
I consider the rtorrent config to be excessive, I’ll just say that the torrents are added to a separate disk mounted to / data, which is exported via
NFS. Folder Rights
# ls -la /data/
total 16
drwxr-xr-x   4 root  wheel   512 Dec 11 18:41 .
drwxr-xr-x  16 root  wheel   512 Dec 20 13:13 ..
drwxr-xr-x  12 p2p   p2p    1024 Dec 20 20:19 torrents
Create a user from whom rtorrent will work
# adduser
Use option ``-silent'' if you don't want to see all warnings and questions.
Reading /etc/shells
Check /etc/master.passwd
Check /etc/group
Ok, let's go.
Don't worry about mistakes. There will be a chance later to correct any input.
Enter username []: p2p
---skip---
rtorrent auto start, add to /etc/rc.local
if [ -x /etc/rtorrent.sh ]; then
echo -n ' rtorrent';       /etc/rtorrent.sh
fi
rtorrent.sh
# cat /etc/rtorrent.sh
su p2p  -c '/usr/local/bin/screen -m -d -S rtorrent /usr/local/bin/rtorrent'
Next on the list is rutorrent
# cd /var/www/
# mkdir sites/
# cd sites/
# wget http://rutorrent.googlecode.com/files/rutorrent-3.2.tar.gz
# tar xzvf rutorrent-3.2.tar.gz
# chown -R www:www rutorrent
# chmod -R 777 rutorrent/share/
Now let's get down to configuring apache2, it is already present on the system. Automatic start at system startup with the necessary parameters is solved as follows
#cat /etc/rc.conf.local
httpd_flags="-u"
* I added the -u flag in order to disable Apache chrooting.
For rutorrent I made a separate alias (which is mentioned in the first paragraph) and VirtualHost
# cat /var/www/conf/Includes/rutorrent.home.local.conf
DocumentRoot /var/www/sites/rutorrent
ServerName rutorrent.home.local
ServerAlias www.rutorrent.home.local
ErrorLog "|/usr/local/sbin/rotatelogs2 /var/log/httpd/http.rutorrent.home.local-error_log.%Y-%m-%d-%H_%M_%S 86400"
CustomLog "|/usr/local/sbin/rotatelogs2 /var/log/httpd/http.rutorrent.home.local-access_log.%Y-%m-%d-%H_%M_%S 86400" common
VirtualHost !!! - тэг, при правильном его написании не отображается
AllowOverride AuthConfig
DirectoryIndex index.html
Order Deny,Allow
Deny from all
Allow from 192.168.0.0/16
Directory !!! - тэг, при правильном его написании не отображается
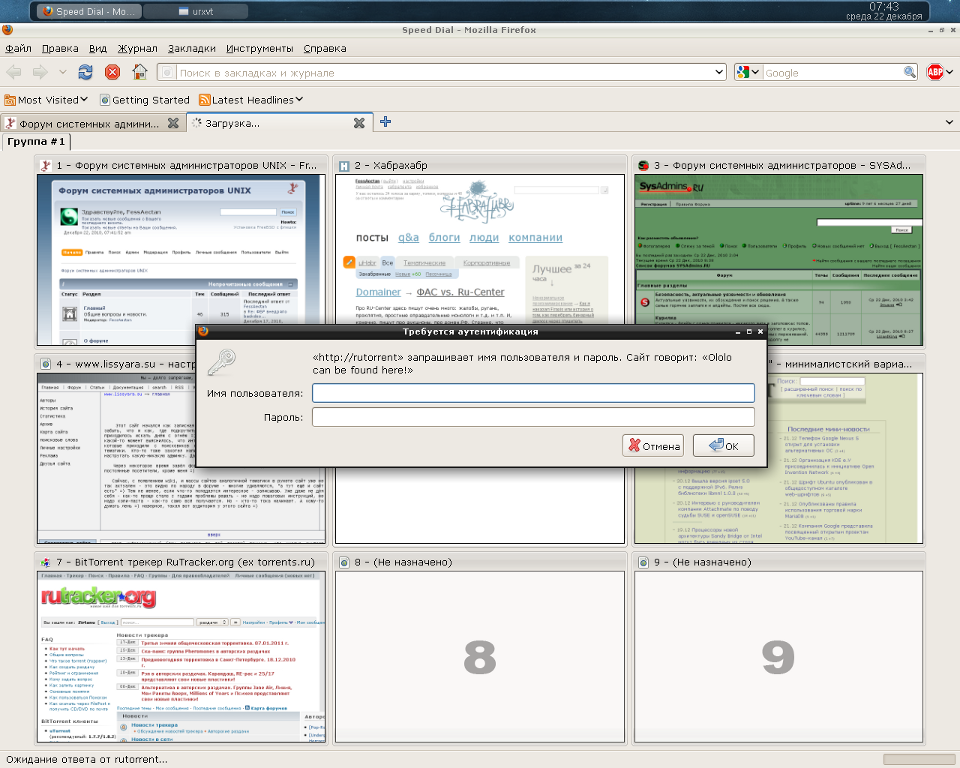
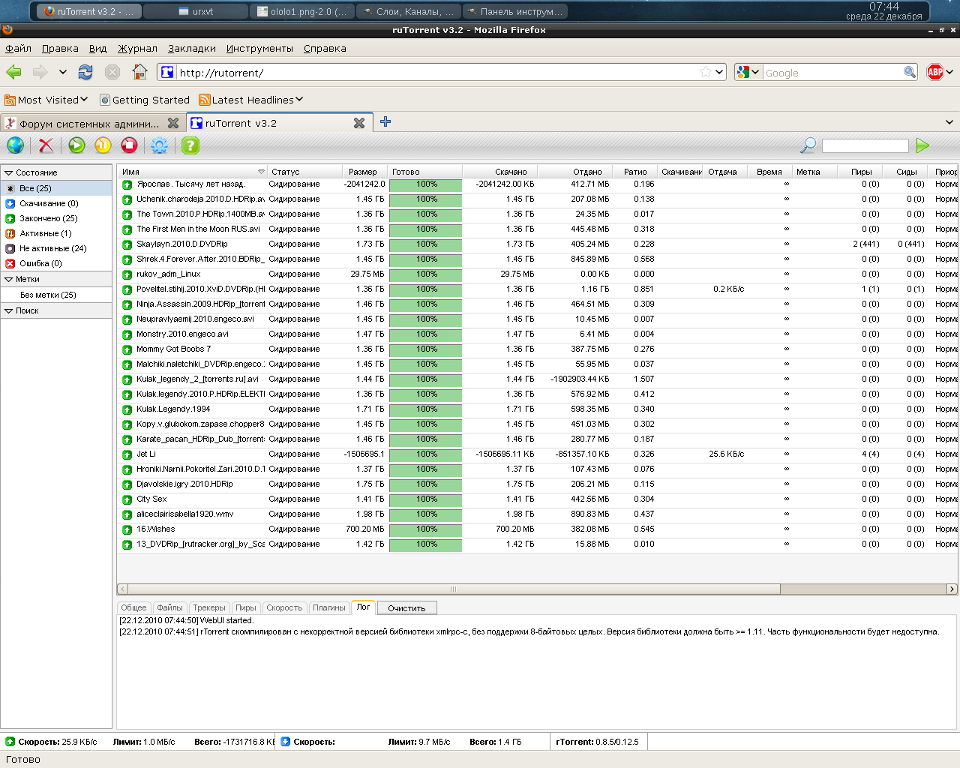
SCGIMount /RPC2 127.0.0.1:5000 The final piece of this dish will be setting up password access to the rutorrent web interface.
In the rutorrent folder, create a .htaccess file
# cat /var/www/sites/rutorrent/.htaccess
AuthName "Ololo can be found here!"
AuthType Basic
AuthUserFile /home/onotole/.htpasswd
and password file at the specified path
#htpasswd -c /home/onotole/.htpasswd adminWe start apache and check the fruits of our labors
#apachectl startA couple of screenshots =)
5. NFS server (network folder for access from LAN computers).
Folders Available to Clients for NFS Mounting
# sed '/ *#/d; /^$/d'  /etc/exports
/data -alldirs -mapall=nobody  -network=192.168.254 -mask=255.255.255.0
/raid -alldirs -mapall=nobody  -network=192.168.254 -mask=255.255.255.0
Access rights
#chmod 777 /raid Starting nfsd at system startup
# grep nfs /etc/rc.conf.local
nfs_server=YES
I have FreeBSD installed on the desktop, editing the / etc / fstab mount folders
#grep gateway /etc/fstab
gateway:/data      /home/onotole/data nfs ro 0 0
gateway:/raid                /home/onotole/share nfs rw 0 0
#mount ~/data
#mount ~/share
6. VPN tunnel with work. FreeBSD (mpd5) OpenBSD (ppp) (I like, you know, sometimes working from home).
I need access to the local network at work all the time, so I organized a VPN tunnel between the server at work and the home server.
The mpd5 config looks like this
startup:
   set user onotole ololo admin
      set console self 127.0.0.1 5005
   set console open
          set web self 192.168.0.1 5006
   set web open
default:
   load pptp_vpn
pptp_vpn:
	create bundle static pptp1
	set ipcp ranges 10.255.255.1/32 10.255.255.2/32
	set iface route 192.168.254.0/24
	set iface enable proxy-arp
	set iface enable on-demand
	set bundle enable compression
	set bundle enable crypt-reqd
	set ccp yes mppc
	set mppc yes compress
	set mppc yes e128
	set mppc yes stateless
	create link static lpptp1 pptp
	set link action bundle pptp1
	set link no pap
	set link yes chap
	set auth authname "ololo"
	set auth password "123"
	set link mtu 1460
	set link keep-alive 0 0
	set link max-redial -1
	set pptp self 1.2.3.4
	set pptp peer 0.0.0.0/0
	set link enable incoming
In OpenBSD, do the following:
change the parameter net.inet.gre.allow
# sysctl -w net.inet.gre.allow=1
net.inet.gre.allow: 0 -> 1
also change the value of the parameter in /etc/sysctl.conf
# grep gre /etc/sysctl.conf
net.inet.gre.allow=1
ppp daemon, main config
# sed '/ *#/d; /^$/d'  /etc/ppp/ppp.conf
default:
    set log Phase Chat LCP IPCP CCP tun command
    disable ipv6cp
vpn:
    set device "!/usr/local/sbin/pptp --nolaunchpppd work-onotole.com"
    set timeout 0
    set lqrperiod 600
    set redial 30
    set authname ololo
    set authkey 123
    set dial
    set login
    set mppe 128 stateless
    accept chap
    enable mssfixup
    disable acfcomp protocomp
    deny acfcom
#
when raising the link (add routes and distort pf.conf)
# cat /etc/ppp/ppp.linkup
vpn:
    add work-onotole.com 10.110.1.97
    add 192.168.0.0 255.255.255.0 10.255.255.1
     ! sh -c "/sbin/pfctl -f /etc/pf.conf"
when falling (delete routes and distort pf.conf)
# cat /etc/ppp/ppp.linkdown
vpn:
    delete 192.168.0.0/24
    delete  work-onotole.com
    ! sh -c "/sbin/pfctl -f /etc/pf.conf"
Raise the link at system startup
# cat /etc/hostname.tun0
!/usr/sbin/ppp -ddial vpn >/dev/null 2>&1
7. NUT + UPS Ippon Back power pro 400 (we are not afraid of an unexpected blackout).
We create configs for demons.
ups.conf
# cat /etc/nut/ups.conf
[myups]
    driver = megatec
    port = /dev/tty00 #ибп подключен к com1
    desc = "Server"
upsd.users
# cat /etc/nut/upsd.users
[admin]
    password = ups123
    allowfrom = localhost
    actions = SET
    instcmds = ALL
[monuser]
    password = mon123
    allowfrom = localhost
    upsmon master
upsd.conf
# cat /etc/nut/upsd.conf
LISTEN 127.0.0.1 3493
upsmon.conf
# cat /etc/nut/upsmon.conf
MONITOR myups@localhost 1 monuser mon123 master
MINSUPPLIES 1 #сколько у нас батарей в ибп
SHUTDOWNCMD "/sbin/shutdown -h now" #комманда выключения
POLLFREQALERT 5 #частота опроса ибп при работе от батареи
DEADTIME 15 #интервал в секундах, перед тем как ибп будет объявлен мертвым
POWERDOWNFLAG /etc/killpower #флаг для форсирования завершения работы
FINALDELAY 60 #процент батареи, при котором происходит завершение работы системы
Set the correct rights to tty00 and load the driver
# chown _ups:wheel /dev/tty00
# chmod 600 /dev/tty00
# /usr/local/bin/upsdrvctl start
Run the demons
# /usr/local/sbin/upsd
# /usr/local/sbin/upsmon
Checking the status of the UPS
# upsc  myups@localhost
battery.charge: 97.5
battery.voltage: 13.60
battery.voltage.nominal: 12.0
driver.name: megatec
driver.parameter.pollinterval: 2
driver.parameter.port: /dev/tty00
driver.version: 2.4.1
driver.version.internal: 1.6
input.frequency: 50.1
input.frequency.nominal: 50.0
input.voltage: 221.5
input.voltage.fault: 221.5
input.voltage.maximum: 245.0
input.voltage.minimum: 206.8
input.voltage.nominal: 220.0
output.voltage: 221.5
ups.beeper.status: enabled
ups.delay.shutdown: 0
ups.delay.start: 2
ups.load: 19.0
ups.mfr: unknown
ups.model: unknown
ups.serial: unknown
ups.status: OL #ибп работает от сети, так же могут быть  OB - от батареи и  LB - батарея севшая
ups.temperature: 25.0
ups.type: standby
Add to autorun
In /etc/rc.local prescribe autorun nut
if [ -x /usr/local/bin/upsdrvctl ]; then
    echo -n ' nut'
    chown _ups:wheel /dev/tty00
    chmod 600 /dev/tty00
    /usr/local/bin/upsdrvctl start > /dev/null 2>&1
    /usr/local/sbin/upsd > /dev/null 2>&1
    /usr/local/sbin/upsmon > /dev/null 2>&1
fi
Turn off the power after the data on the disks are synchronized, add the following to rc.shutdown
if [ -f /etc/killpower ]; then
    /usr/local/bin/upsdrvctl shutdown
    sleep 60
fi
8. Firewall (great PF packet filter).
Turn on packet forwarding
#sysctl -w net.inet.ip.forwarding=1 make the appropriate changes in /etc/sysctl.conf
#grep ip.forwarding /etc/sysctl.conf
net.inet.ip.forwarding=1        # 1=Permit forwarding (routing) of IPv4 packets
PF config is more than simple
# sed '/ *#/d; /^$/d'  /etc/pf.conf
ext_if="rl0"
int_if="re0"
vpn_if="tun0"
set block-policy return
set skip on lo0
match in all scrub (no-df)
block all
pass on $int_if
pass on $vpn_if
pass out on  $ext_if
#натим все из локалки
pass out on $ext_if from $int_if:network to any nat-to ($ext_if)
#прокидываем порты 3333(tcp,udp) для dc++
pass in on $ext_if proto {tcp,udp} from any port 3333 rdr-to 192.168.254.2 synproxy state
All! OpenBSD is equipped =)

This is how I got my home server.
I really like working with OpenBSD, it will run into its compromise, simplicity and reliability. By the way, I really appreciated the value of the man command
only now and thanks to this OS. The system documentation is beyond praise. To the developers, a deep bow and deepest gratitude.
In preparation, I used the following sources:
1. man)
2. http://openbsd.org/faq/index.html
3. http://unixadmins.su/index.php/topic,196.0.html
4. www.openbsd .ru / docs / steps / nut.html
5. mpd.sourceforge.net/doc5/mpd.html
6. Absolute OpenBSD: Unix for the practical paranoid
Special thanks to Michael Lucas for his undoubtedly masterpieces!