Practical guidelines for developing large-scale React applications. Planning, Actions, Data Sources, and APIs
- Transfer
Today we bring to your attention the first part of the translation of the material, which is devoted to the development of large-scale React-applications. When creating a one-page application using React, it’s very easy to mess up its code base. This complicates the debugging of the application, makes it difficult to update or extend the project code.

There are many good libraries in the React ecosystem that can be used to manage certain aspects of an application. We will dwell on some of them in some detail. In addition, some practical recommendations will be given here. If the project should scale well, it will be useful to follow these recommendations from the very beginning of work on it. In this part of the translation, we’ll talk about planning, actions, data sources, and the API. The first step in developing large-scale React applications, which we will look at, is planning.
Part 1: Practical guidelines for developing large-scale React applications. Planning, Actions, Data Sources, and APIs
Part 2:Practical guidelines for developing large-scale React applications. Part 2: state management, routing
Most often, developers skip this stage of work on the application. This is due to the fact that during the planning process no work is done on writing code. But the importance of this step cannot be underestimated. You will soon learn why this is so.
Software development requires the coordination of many processes. At the same time, everything is very easily able to get out of control. Obstacles and uncertainties encountered in the development process may jeopardize the timing of the project.
Helping to meet deadlines is where the project planning phase can help you. At this stage, “lay on the shelves” all the features that the application should have. It is much easier to predict how long it will take to create small separate modules, the list of which lies with the programmers, than to try, in mind, to estimate the terms of development of the entire project.
If several programmers take part in a large project (as it usually happens), then the presence of a pre-developed plan, a certain document, will greatly facilitate their interaction with each other. In fact, various tasks formulated in this document can be assigned to individual developers. Its presence will help team members to be aware of what their colleagues are doing.
And finally, thanks to this document you can very clearly see how the work on the project is progressing. Programmers often move from working on one part of the application to another, and return to what they did before, much later than they would like.
Consider the application planning process.
It is necessary to determine the appearance and functionality of each page of the application. One of the best approaches here is to draw each page. You can do this either using the mockup tool , or manually, on paper. This will give you a good understanding of what information should be present on each page. Here's what a page layout might look like.
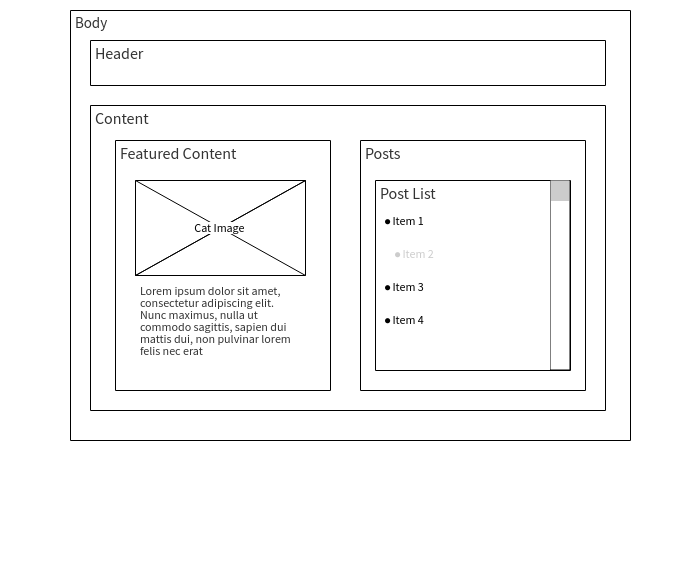
Page layout (taken from here )
In the above layout, you can easily identify the parent container entities and their children. Later, the parent containers will become pages of the application, and smaller elements will fall into the
After you have decided on the components of the application, think about what actions will be performed in each of them. Later, from these components, these actions will be sent.
Consider an online store on the home page of which displays a list of recommended products. Each of the elements of this list will be presented in the project as a separate component. Let the name of this component be
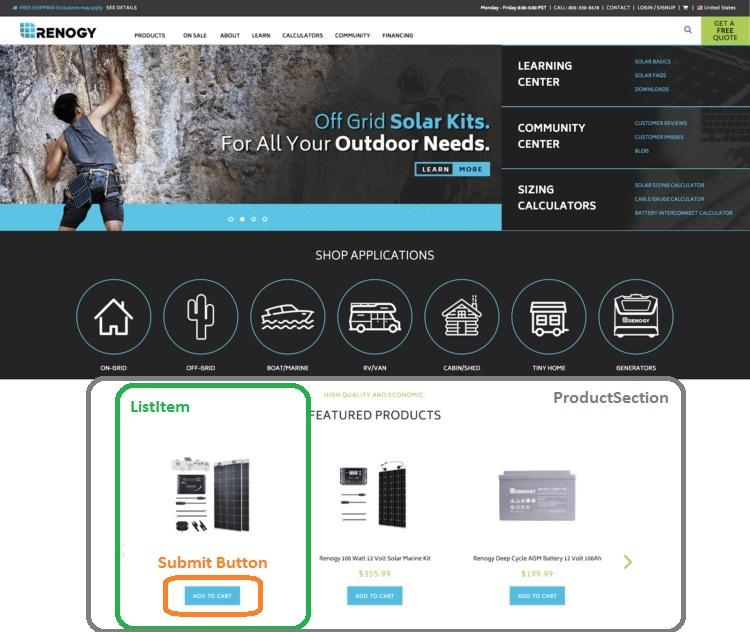
An example of the home page of an online store (taken from here )
In this application, the action that is performed by the component from the section
There is some data associated with each component of the application. If the same data is used by several application components, then they will be part of a centralized state tree. The state tree is managed using Redux .
This data is used by many components. As a result, when data is changed by one component, it is reflected in other components.
Create a list of similar data for your application. It will become a model diagram. Based on this list, it will be possible to create reducers.
Let us return to the above example with an online store. The recommended products and new products section uses the same data type used to represent individual products (something like
After documenting the action plan, it's time to consider some of the details necessary to set up the application layer responsible for working with the data.
As your application grows, it often happens that an excessive number of methods are associated with the Redux repository. It happens that the directory structure worsens, departing from the real needs of the application. All this becomes difficult to maintain, adding new features to the application becomes more complicated.
Let's talk about how you can adjust some things in order to keep Redux repository code clean in the long run. Many problems can be avoided if, from the very beginning, modules are made to be suitable for reuse. It’s worth it to do just that, even though at first it may seem like an excess, unnecessarily complicating the project.
During the initial setup of the repository, the format of the data that comes from the API greatly affects the structure of the repository. Often, data must be converted before it can be transferred to reducers.
Recently, much has been said about what is needed and what does not need to be done when designing an API. Factors such as the backend framework and application size have an additional impact on how the APIs are designed.
It is recommended, as in the development of server applications, to store auxiliary functions in a separate folder. These may be, for example, functions for formatting and mapping data. Make sure that these functions do not have side effects (see this article on pure functions).
In this code example, the function
Here you can go even further by mapping data to a previously described object whose structure corresponds to the needs of your front-end application. However, you can validate some keys.
Now let's talk about those parts of the applications that are responsible for making calls to the API .
What we will talk about in this section will be directly used by Redux to modify the state of the application. Depending on the size of the application (and, in addition, on the time that the programmer has), you can approach the design of the data warehouse using one of the following two approaches:
With this approach, while setting mechanisms querying the repository
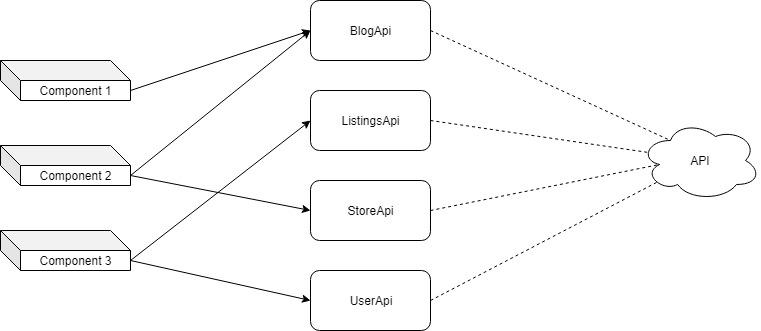
Components interact with the API without using an agent.
The previous diagram shows that each component sends actions that invoke methods of different data stores. Here's how, with this approach, the method
This approach saves time ... And at first it also allows you to make changes to the code without worrying about side effects. But because of this, the project will have a large amount of redundant code. In addition, performing operations on groups of objects will require a lot of time.
With this approach, in the long run, the project is easier to maintain, it is easier to make changes. The code base does not become polluted over time, as the developer is spared the problem of executing parallel queries using axios.
Components interact with the API using an agent.
However, with this approach, some time is required for the initial system configuration. She is less flexible. This is both good and bad, as it does not allow the developer to do something unusual.
The code for the base method is shown here
When working with Redux, special attention is paid to the use of predefined actions. This makes data changes occurring in the application predictable.
Defining a whole bunch of constants in a large application may seem like an impossible task. However, the implementation of this task is greatly simplified thanks to the planning phase that we reviewed earlier.
The code snippet above shows a simple way to use data source methods
In addition, note that this code is stored in the folder in which the project action files are stored. Similarly, you can create JavaScript files that declare actions and handlers for other application models.
Today we talked about the role of the planning phase in the development of large-scale projects. We also discussed here the features of the organization of the application with data sources. The next part in this article will focus on managing the state of an application and developing a scalable user interface.
Dear readers! Where do you start developing React applications?

There are many good libraries in the React ecosystem that can be used to manage certain aspects of an application. We will dwell on some of them in some detail. In addition, some practical recommendations will be given here. If the project should scale well, it will be useful to follow these recommendations from the very beginning of work on it. In this part of the translation, we’ll talk about planning, actions, data sources, and the API. The first step in developing large-scale React applications, which we will look at, is planning.
Part 1: Practical guidelines for developing large-scale React applications. Planning, Actions, Data Sources, and APIs
Part 2:Practical guidelines for developing large-scale React applications. Part 2: state management, routing
Planning
Most often, developers skip this stage of work on the application. This is due to the fact that during the planning process no work is done on writing code. But the importance of this step cannot be underestimated. You will soon learn why this is so.
▍Why do you plan when developing applications?
Software development requires the coordination of many processes. At the same time, everything is very easily able to get out of control. Obstacles and uncertainties encountered in the development process may jeopardize the timing of the project.
Helping to meet deadlines is where the project planning phase can help you. At this stage, “lay on the shelves” all the features that the application should have. It is much easier to predict how long it will take to create small separate modules, the list of which lies with the programmers, than to try, in mind, to estimate the terms of development of the entire project.
If several programmers take part in a large project (as it usually happens), then the presence of a pre-developed plan, a certain document, will greatly facilitate their interaction with each other. In fact, various tasks formulated in this document can be assigned to individual developers. Its presence will help team members to be aware of what their colleagues are doing.
And finally, thanks to this document you can very clearly see how the work on the project is progressing. Programmers often move from working on one part of the application to another, and return to what they did before, much later than they would like.
Consider the application planning process.
▍Step 1: pages and components
It is necessary to determine the appearance and functionality of each page of the application. One of the best approaches here is to draw each page. You can do this either using the mockup tool , or manually, on paper. This will give you a good understanding of what information should be present on each page. Here's what a page layout might look like.
Page layout (taken from here )
In the above layout, you can easily identify the parent container entities and their children. Later, the parent containers will become pages of the application, and smaller elements will fall into the
componentsproject folder . After you have finished drawing layouts - write on each of them the names of pages and components.▍Step 2: actions and events
After you have decided on the components of the application, think about what actions will be performed in each of them. Later, from these components, these actions will be sent.
Consider an online store on the home page of which displays a list of recommended products. Each of the elements of this list will be presented in the project as a separate component. Let the name of this component be
ListItem.An example of the home page of an online store (taken from here )
In this application, the action that is performed by the component from the section
Productis called getItems. Among some of the other actions that may be included in this page can be getUserDetails, getSearchResultsand so on.▍Step 3: data and models
There is some data associated with each component of the application. If the same data is used by several application components, then they will be part of a centralized state tree. The state tree is managed using Redux .
This data is used by many components. As a result, when data is changed by one component, it is reflected in other components.
Create a list of similar data for your application. It will become a model diagram. Based on this list, it will be possible to create reducers.
products: {
  productId: {productId, productName, category, image, price},
  productId: {productId, productName, category, image, price},
  productId: {productId, productName, category, image, price},
}
Let us return to the above example with an online store. The recommended products and new products section uses the same data type used to represent individual products (something like
product). This type will serve as the basis for creating one of the application reducers. After documenting the action plan, it's time to consider some of the details necessary to set up the application layer responsible for working with the data.
Actions, Data Sources, and APIs
As your application grows, it often happens that an excessive number of methods are associated with the Redux repository. It happens that the directory structure worsens, departing from the real needs of the application. All this becomes difficult to maintain, adding new features to the application becomes more complicated.
Let's talk about how you can adjust some things in order to keep Redux repository code clean in the long run. Many problems can be avoided if, from the very beginning, modules are made to be suitable for reuse. It’s worth it to do just that, even though at first it may seem like an excess, unnecessarily complicating the project.
▍ API Design and Client Applications
During the initial setup of the repository, the format of the data that comes from the API greatly affects the structure of the repository. Often, data must be converted before it can be transferred to reducers.
Recently, much has been said about what is needed and what does not need to be done when designing an API. Factors such as the backend framework and application size have an additional impact on how the APIs are designed.
It is recommended, as in the development of server applications, to store auxiliary functions in a separate folder. These may be, for example, functions for formatting and mapping data. Make sure that these functions do not have side effects (see this article on pure functions).
export function formatTweet (tweet, author, authedUser, parentTweet) {
  const { id, likes, replies, text, timestamp } = tweet
  const { name, avatarURL } = author
  return {
    name,
    id,
    timestamp,
    text,
    avatar: avatarURL,
    likes: likes.length,
    replies: replies.length,
    hasLiked: likes.includes(authedUser),
    parent: !parentTweet ? null : {
      author: parentTweet.author,
      id: parentTweet.id,
}
In this code example, the function
formatTweetadds a new key ( parent) to the tweet object of the front-end application. This function returns data based on the parameters passed to it, without affecting data outside it. Here you can go even further by mapping data to a previously described object whose structure corresponds to the needs of your front-end application. However, you can validate some keys.
Now let's talk about those parts of the applications that are responsible for making calls to the API .
▍ Organization of work with data sources
What we will talk about in this section will be directly used by Redux to modify the state of the application. Depending on the size of the application (and, in addition, on the time that the programmer has), you can approach the design of the data warehouse using one of the following two approaches:
- Without the use of an agent (courier).
- Using agent.
▍ Designing a repository without using an agent
With this approach, while setting mechanisms querying the repository
GET, POSTand PUTeach model is created separately.Components interact with the API without using an agent.
The previous diagram shows that each component sends actions that invoke methods of different data stores. Here's how, with this approach, the method
updateBlogfrom the file will look BlogApi:function updateBlog(blog){
let blog_object = new BlogModel(blog)
axios.put('/blog', { ...blog_object })
.then(function (response) {
console.log(response);
})
.catch(function (error) {
console.log(error);
});
}This approach saves time ... And at first it also allows you to make changes to the code without worrying about side effects. But because of this, the project will have a large amount of redundant code. In addition, performing operations on groups of objects will require a lot of time.
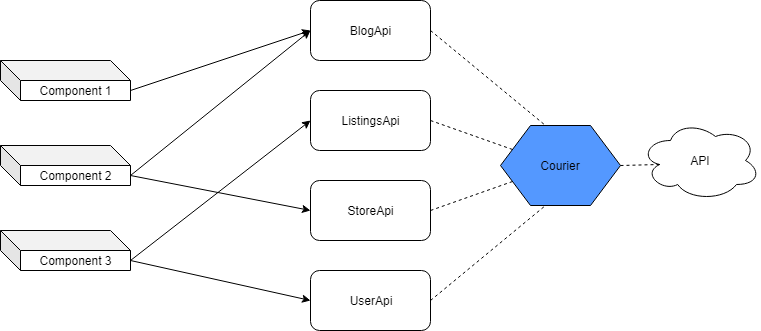
▍ Designing a repository using an agent
With this approach, in the long run, the project is easier to maintain, it is easier to make changes. The code base does not become polluted over time, as the developer is spared the problem of executing parallel queries using axios.
Components interact with the API using an agent.
However, with this approach, some time is required for the initial system configuration. She is less flexible. This is both good and bad, as it does not allow the developer to do something unusual.
export default function courier(query, payload) {
   let path = `${SITE_URL}`;
   path += `/${query.model}`;
   if (query.id) path += `/${query.id}`;
   if (query.url) path += `/${query.url}`;
   if (query.var) path += `?${QueryString.stringify(query.var)}`;
   return axios({ url: path, ...payload })
     .then(response => response)
     .catch(error => ({ error }));
}
The code for the base method is shown here
courier. All API handlers can call it, passing it the following data:- Request object containing URL-related information. For example, the model name, query string, and so on.
- The payload containing the request headers and its body.
▍ API calls and application internal actions
When working with Redux, special attention is paid to the use of predefined actions. This makes data changes occurring in the application predictable.
Defining a whole bunch of constants in a large application may seem like an impossible task. However, the implementation of this task is greatly simplified thanks to the planning phase that we reviewed earlier.
export const BOOK_ACTIONS = {
   GET:'GET_BOOK',
   LIST:'GET_BOOKS',
   POST:'POST_BOOK',
   UPDATE:'UPDATE_BOOK',
   DELETE:'DELETE_BOOK',
}
export function createBook(book) {
   return {
      type: BOOK_ACTIONS.POST,
book
}
export function handleCreateBook (book) {
   return (dispatch) => {
      return createBookAPI(book)
         .then(() => {
            dispatch(createBook(book))
         })
         .catch((e) => {
            console.warn('error in creating book', e);
            alert('Error Creating book')
         })
}
export default {
   handleCreateBook,
}
The code snippet above shows a simple way to use data source methods
createBookApiwith Redux actions. The method createBookcan easily be passed to the Redux method dispatch. In addition, note that this code is stored in the folder in which the project action files are stored. Similarly, you can create JavaScript files that declare actions and handlers for other application models.
Summary
Today we talked about the role of the planning phase in the development of large-scale projects. We also discussed here the features of the organization of the application with data sources. The next part in this article will focus on managing the state of an application and developing a scalable user interface.
Dear readers! Where do you start developing React applications?