Big brother is watching ... himself or a map with the history of movements in HomeAssistant
Introduction
For my home automation, I have been using HomeAssistant for a long time. Once a friend asked me, they say, why does HomeAssistant have the ability to indicate only the current position of the tracker on the map, but it is not possible to display the entire route? Since then, this idea has captured me. And once I realized that I really want to have this function right now. Everyone who is interested in what came of this, welcome to the cat…
Intelligence service
Actually, to display the route you need to have a set of points with coordinates, so the first step was to find out where the HomeAssistant stores the necessary data (if at all) and how to get it out of there. A short study of the primary source immediately led to the solution: you need the included recorder module to record the status of the required sensors in the database at various points in time, as well as the history module, which allows you to get data from the database in a beautiful way. The history module has a well-documented REST API . Exactly what is needed!
Next, you need to somehow display the received data on the map. There are many different services that allow you to display the history of movements. I probably tried far from all of them, but I will allow myself a few words about the ones I checked:
A. yandex and google. Actually for my needs there is everything and even more, but due to the paid services and strong restrictions of the free versions, they did not suit me right away. Yandex, for example, allows free use only for open projects (that is, anyone should be able to open your resource at any time and take advantage of its capabilities), not to mention other restrictions on the number of requests. Only the lazy did not write about changes in Google’s policies regarding api. At the moment, as I understand it, each request to maps api or directions api is paid, the more requests - the cheaper. However, each user with a bank card connected to his account is given a free limit of $ 200 per month. Everything on top is immediately paid from your card. Linking a card to an account is not our way.
Correct if I made a mistake somewhere about google and / or yandex.
B . OpenRouteService Bundleand OpenRouteService maps. In principle, the capabilities are not much different from google or yandex (in any case, I did not notice). Completely free (there are restrictions on the number of requests per day and per minute, if exceeded, it is advised to contact support ... there is no description of any paid tariffs at all). However, the use of the OpenRouteService maps resource turned out to be inconvenient (long loading of the application and the annoying wide menu on the left, which opens by default and is not disabled by the API, moreover, the service does not open correctly from mobile devices). In fairness, OpenRouteService maps can be put on your server and it is quite possible that there you can configure everything for yourself.
In . Mapbbcode . I came across Habréfor an interesting implementation of cards in a simple format. In principle, the project is absolutely suitable for my task, however, from this article I learned about Leaflet and decided to turn to the source. She eventually stopped ...
D . Leaflet. Very good open-source js library for maps, easy to learn and well-documented. From the chips: allows you to use tiles from many services (openstreetmaps, yandex, google, mapbox, microsoft, etc., etc.). Additionally, I used the leaflet.polylineDecorator plugin to indicate the direction of movement on the map.
It is worth mentioning that the last two resources under consideration do not support “routes”, that is, they do not know how to connect points along existing roads and / or sidewalks, but simply connect the points with a straight line. For me personally, this is not a problem, but a conscious step. If you need navigation on the roads, then you need to look in the direction of paid google, yandex or free openrouteservice.
Implementation
The request to the history module via the REST-API is quite simple (hereinafter the code will be in the HomeAssistant language, i.e. python) and allows you to get the answer in the form of easy-to-understand JSON:
response = requests.get(self._haddr + '/api/history/period/' + dayBegin + '?filter_entity_id=' + self._myid, headers={'Authorization': 'Bearer ' + self._token, 'content-type': 'application/json'})
data = response.json()[0]
here self._haddr is the address of your HA same as specified in the frontend settings, self._myid is the device id of device_tracker, whose route we will build, dayBegin is the beginning of the period for displaying the route, I selected the beginning of the current day by default, self._token is a long-life token for accessing the api, which can be obtained in the HomeAssistant interface.
When the object whose history we are trying to display on the map is stationary for a long time or moves extremely slowly, we will get a bunch of points that are closely located and clog the map. To correct the situation, let the resulting coordinate array pass through the filter: if the distance between the previous point and the next is less than 100 meters, then do not display the point on the map. To calculate the distances between two adjacent points, we use a simplified formula withequiangular approximation . The approximation is applicable when the distance between neighboring points does not exceed several km:
    def getDistance(self, latA, lonA, latB, lonB):
        dst = 0
        latRadA = math.radians(latA)
        lonRadA = math.radians(lonA)
        latRadB = math.radians(latB)
        lonRadB = math.radians(lonB)
        x = latRadB - latRadA
        y = (lonRadB-lonRadA)*math.cos((latRadB+latRadA)*0.5)
        dst = 6371*math.sqrt(x*x+y*y)
        return dst
Here dst is the distance in km.
Describe Leaflet API here does not see the point. For this - on the official website. The module works as follows: Every n seconds (I have set it to 300) a request is made to today's history of the object of interest to me. The resulting array of coordinates is run through the distance filter, reducing the number of points. Further, in the folder with the HomeAssistant configuration in the www folder, 2 files are formed: index.html and route.html. The route.html file contains all the logic for creating a map. And the index.html file is a life hack to prevent page caching. By default, HomeAssistant caches everything that is possible, and only resetting the cache helped to update the data on the map, which, of course, is unacceptable. In the index.html file, the contents of route.html are called, however with a dynamically generated random parameter, which allows you to always request the current version of route.html from the server:
src = 'route.html?datetime=' + (new Date()).getTime() + Math.floor(Math.random() * 1000000)A bit about security
HomeAssistant is designed so that all files inside the www directory are public, that is, any file inside the www directory can be opened in any browser without any authorization, knowing the direct link. In the case of my module, this link is this: your_address_homeassistant / local / route / index.html . If this is not critical for you, then you can skip this section. I went a little further and screwed the authorization to the page with routes. For this, I used nginx (you can choose another web server with reverse proxy support) as a proxy server. The HomeAssistant website has official instructions for setting up this configuration. After setting up the proxy and checking operation, you need to add authorization to the necessary pages in the nginx configuration:
location /local/route/route.html {
        proxy_pass http://localhost:8123/local/route/route.html;
        proxy_set_header Host $host;
        proxy_redirect http:// https://;
        proxy_http_version 1.1;
        proxy_set_header X-Forwarded-For $proxy_add_x_forwarded_for;
        proxy_set_header Upgrade $http_upgrade;
        proxy_set_header Connection $connection_upgrade;
        auth_basic "Unauthorized";
        auth_basic_user_file /etc/nginx/.htpasswd;
    }
Then create the file "/etc/nginx/.htpasswd" and execute the following commands in the console:
sh -c "echo -n 'admin:' >> /etc/nginx/.htpasswd"
sh -c "openssl passwd -apr1 >> /etc/nginx/.htpasswd"
admin - replace with the desired login.
After that, restart nginx and check: when trying to open a page with a route, the browser should request a username and password. I note that this is a separate authorization that has nothing to do with the authorization of HomeAssistant itself.
Conclusion
Perhaps all that can be said about this module.
Who are interested, here is a link to the module. Place the file along the path: config_folder_homeassistant / custom_components / route / sensor.py, do not forget about the rights.
If it does not exist, then create the config_folder_homeassistant / www folder and give it the appropriate rights.
In the configuration file configuration.yaml, write the following lines:
sensor:
  - platform: route
    name: route
    entityid: your_device_tracker_entity_id
    haddr: your_address_homeassistant
    token: your_long_life_token
here your_device_tracker_entity_id is the ID of your device device_tracker, your_address_homeassistant is the external address of your HomeAssistant, your_long_life_token is the access token previously received in the HomeAssistant frontend to use the REST API.
After that, restart HomeAssistant and enjoy. The map will be available through a direct link: your_address_homeassistant / local / route / index.html . If you wish, you can add it to the HA menu using panel_iframe or to any HA window via the lovelace card “iframe”.
That's all, thanks for your attention.
UPD:
Added a link to GitHub. Modified some places (removed from the configuration haddr, automatically get config_dir, added the ability to set my time zone)
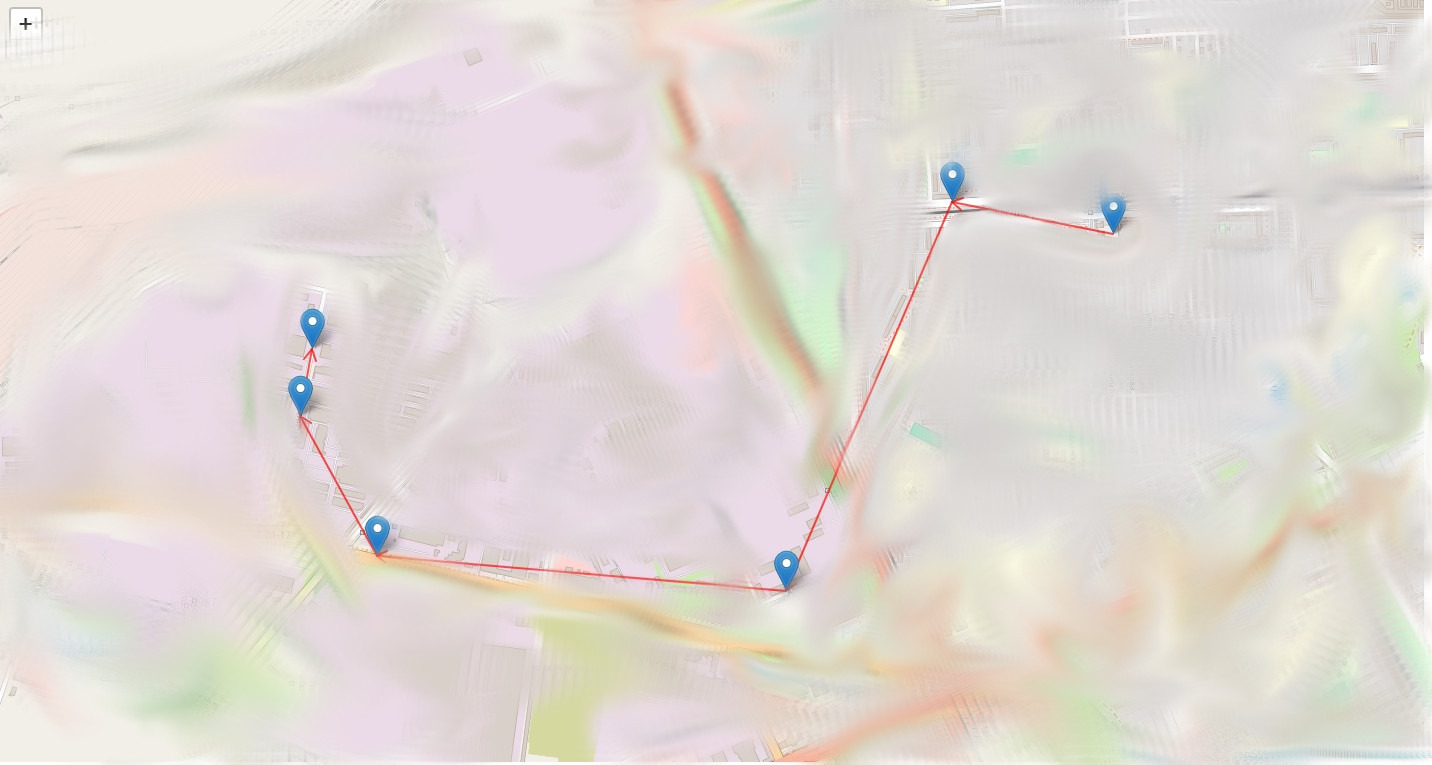
And how does it all look? Caution, Bluer!