Menu bar app for macOS
- Transfer
- Tutorial
Applications located on the menu bar have long been known to macOS users. Some of these applications have a “normal” part, others are located only in the menu bar.
In this guide, you will write an application that displays several quotes from famous people in a pop-up window. In the process of creating this application, you will learn:
Launch Xcode. Next, on the File / New / Project ... menu, select the macOS / Application / Cocoa App template and click Next .
On the next screen, enter Quotes as the Product Name , select your Organization Name and Organization Identifier . Then make sure that Swift is selected as the application language and the Use Storyboards checkbox is checked . Uncheck the Create Document-Based Application , Use Core Data , Include Unit tests and Include UI Tests checkboxes .
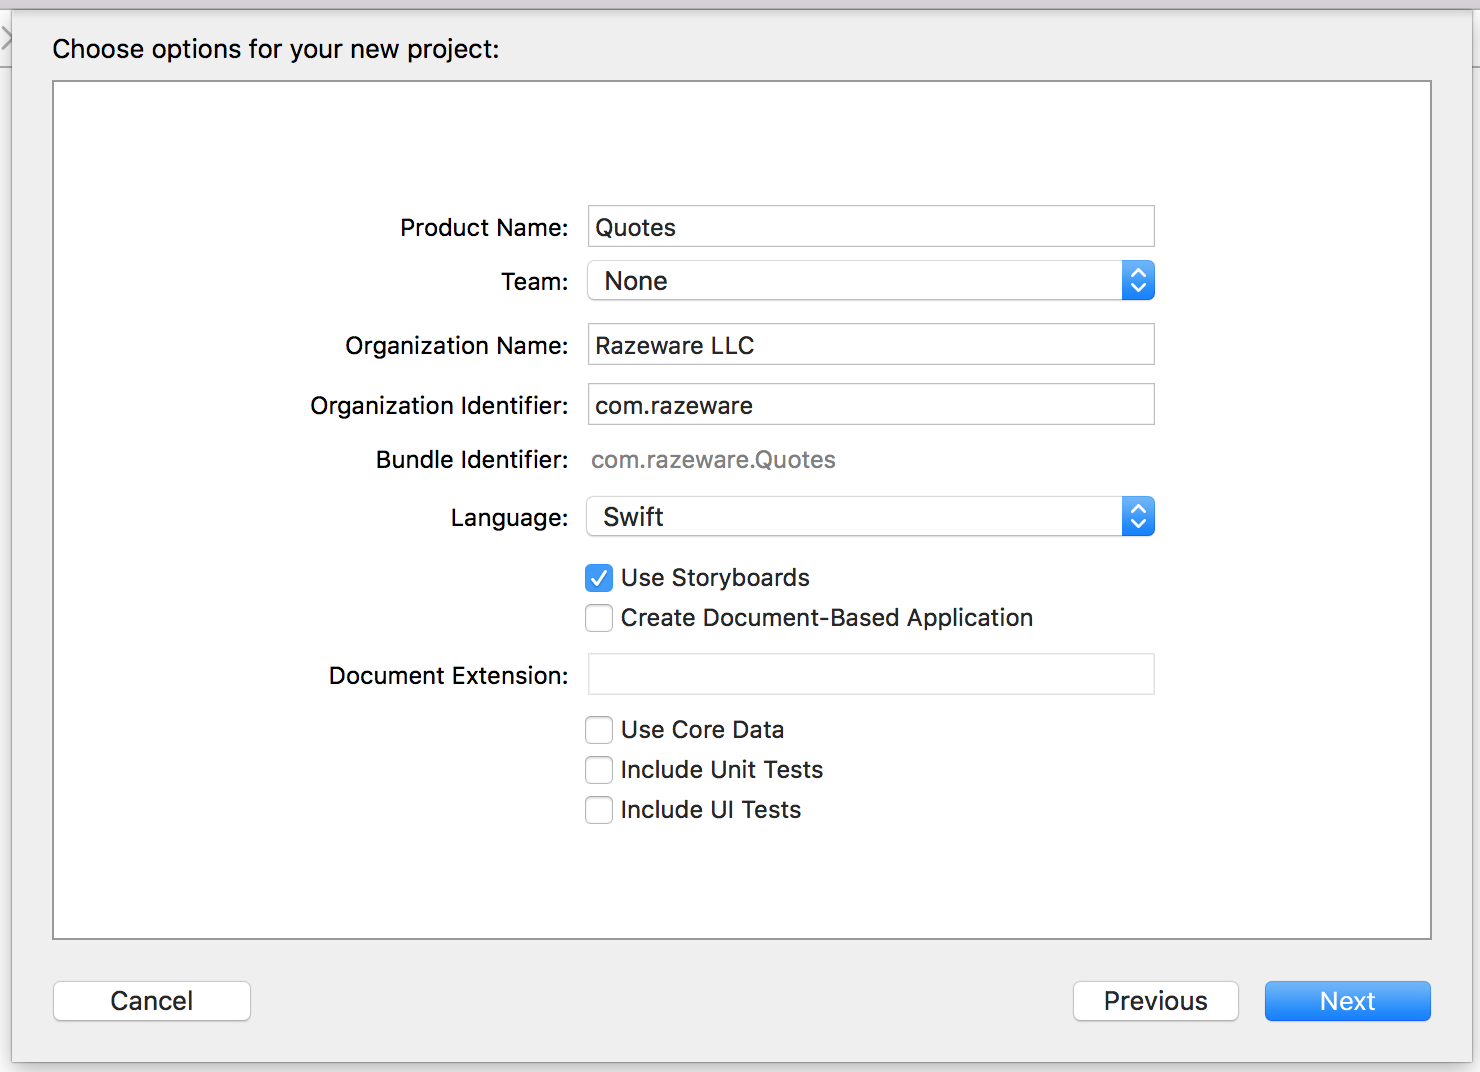
Finally, click Next again., specify the location to save the project and click Create .
Once the new project is created, open AppDelegate.swift and add the following property to the class:
Here we create in the menu bar Status Item (application icon) a fixed length that will be visible to users.
Then we need to assign our picture to this new item in the menu bar so that we can distinguish our new application.
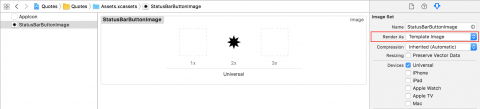
In the project navigator, go to Assets.xcassets, upload a picture and drag it into the asset catalog.
Select a picture and open the attribute inspector. Change the Render As option to Template Image . If you use your own picture, make sure the image is black and white and configure it as a Template image so that the icon looks great on both the dark and the light menu bar.
Go back to AppDelegate.swift , and add the following code to applicationDidFinishLaunching (_ :)
Here we assign the application icon that we just added to the application icon and assign action when we click on it.
Add the following method to the class:
This method simply prints the quote to the console.
Pay attention to the objc method directive . This allows you to use this method as a response to a button click.
Build and run the application, and you will see the new application in the menu bar. Hurrah!
Each time you click on the icon in the menu bar, the famous saying of Mark Twain is displayed in the Xcode console.
There are a couple of little things that we need to do before dealing directly with the functionality:
To remove the dock icon, open Info.plist . Add a new Application is agent (UIElement) key and set its value to YES .

Now is the time to deal with the main application window.
Build and run the application. Now the application does not have both the main window and the unnecessary icon in the dock. Excellent!
A single click response is clearly not enough for a serious application. The easiest way to add functionality is to add a menu. Add this function at the end of AppDelegate .
And then add this call at the end of applicationDidFinishLaunching (_ :)
We create NSMenu , add 3 instances of NSMenuItem to it, and set this menu as the application icon menu.
A few important points:
Launch the application and you will see a menu by clicking on the application icon.

Try clicking on the menu - selecting Print Quote displays the quote in the Xcode console, and Quit Quotes terminates the application.
You saw how easy it is to add a menu from the code, but displaying a quote in the Xcode console is clearly not what users expect from the application. Now we will add a simple view controller to display quotes in the right way.
Go to the File / New / File ... menu, select the macOS / Source / Cocoa Class template and click Next .
Finally, click Next again , select a location to save the file, and click Create .
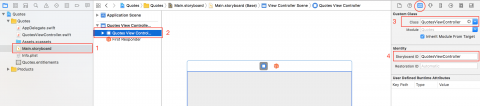
Now open Main.storyboard . Expand View Controller Scene and select View Controller instance . First select the Identity Inspector and change the class to QuotesViewController , then set the Storyboard ID to QuotesViewController Now add the following code to the end of the QuotesViewController.swift file :
What's going on here:
You create this method, so now everyone who uses the QuotesViewController does not need to know how it is created. It just works.
Note the fatalError inside the guard statement . It can be nice to use it or assertionFailure so that if something in the development goes wrong, you yourself, and the other members of the development team, are in the know.
Now back to AppDelegate.swift . Add a new property.
Then replace a pplicationDidFinishLaunching (_ :) with the following code:
You have changed the click action to call the togglePopover (_ :) method , which we will write a little later. Also, instead of configuring and adding a menu, we configured a pop-up window that will show something from QuotesViewController .
Add the following three methods to AppDelegate :
showPopover () shows a popup. You just indicate where it comes from, macOS positions it and draws an arrow, as if it appears from the menu bar.
closePopover () just closes the popup, and togglePopover () is a method that either shows or hides the popup, depending on its state.
Launch the application and click on its icon.
Everything is fine, but where is the content?
First you need a model for storing quotes and attributes. Go to the File / New / File ... menu and select macOS / Source / Swift File template , then Next . Name the file Quote and click Create .
Open the Quote.swift file and add the following code to it:
Here we define a simple quotation structure and a static property that returns all quotes. Since we made Quote compliant with the CustomStringConvertible protocol , we can easily get conveniently formatted text.
There is progress, but we still need controls to display all this.
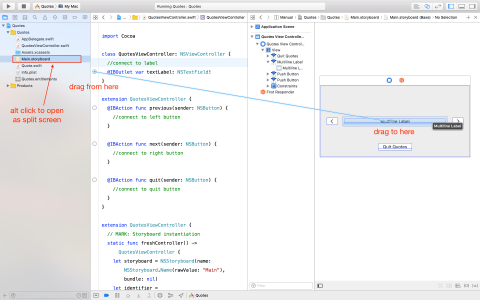
Open Main.storyboard and pull out 3 buttons ( Push Button ) and label ( Multiline Label) on the view controller.
Arrange the buttons and the label so that they look something like this:
Attach the left button to the left edge with a gap of 20 and center vertically.
Attach the right button to the right edge with a gap of 20 and center vertically.
Attach the bottom button to the bottom edge with a gap of 20 and center horizontally.
Attach the left and right edges of the mark to the buttons with a gap of 20, center vertically. You will see several layout errors, as there is not enough information for auto layout to figure it out. Set at the tag

Horizontal Content Hugging Priority at 249 to allow the label to resize. Now do the following:
Now open QuotesViewController.swift and add the following code to the implementation of the QuotesViewController class :
Add this extension to the class implementation. Now in QuotesViewController.swift there are two class extensions.
We just added outlet for the label that we will use to display quotes, and 3 stub methods that we will connect with the buttons.
Note: Xcode has placed circles to the left of your code - next to the IBAction and IBOutlet keywords .

We will use them to connect the code to the UI.
While holding down the alt key, click on Main.storyboard in the project navigator . Thus, the storyboard opens in the Assistant Editor on the right, and the code on the left.
Drag the circle to the left of textLabel onto the label in the interface builder . In the same way, combine the previous , next, and quit methods with the left, right, and bottom buttons, respectively.
Launch your application.
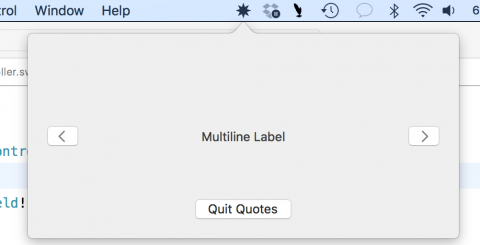
We used the default popup size. If you want a larger or smaller popup, just resize it in the storyboard .
If you have not hidden the Assistant Editor , click Cmd-Return or V iew> Standard Editor> Show Standard Editor
Open QuotesViewController.swift and add the following properties to the class implementation:
The quotes property contains all quotes, and currentQuoteIndex is the index of the quote that is currently being displayed. In currentQuoteIndex there is also a property observer, to update the contents of the new quote marks when changing the index.
Now add the following methods:
When the view loads, we set the quote index to 0, which in turn leads to an update to the interface. updateQuote () simply updates the text label to display a quote. corresponding currentQuoteIndex .
Finally, update these methods with the following code:
The next () and previous () methods cycle through all citations. quit closes the application.
Launch the app:
There is one more thing that users expect from our application - hide the pop-up window when the user clicks somewhere outside of it. To do this, we need a mechanism called macOS global event monitor .
Create a new Swift file, call it EventMonitor , and replace its contents with the following code:
When initializing an instance of this class, we pass it an event mask that we will listen to (such as keystrokes, mouse wheel scrolls, etc.) and an event handler.
When we are ready to start listening, start () calls addGlobalMonitorForEventsMatchingMask (_: handler :) , which returns the object we are saving. As soon as the event contained in the mask happens, the system calls your handler.
To stop monitoring events, removeMonitor () is called in stop () and we delete the object by setting it to nil.
All that remains for us is to call start () and stop () at the right time . The class also callsstop () in the initializer to clean up after itself.
Open AppDelegate.swift one last time and add a new property:
Then add this code to configure the event monitor at the end of applicationDidFinishLaunching (_ :)
This will inform your application when you click the left or right button. Please note: the handler will not be called in response to mouse clicks inside your application. This is why the popup will not close while you click inside it.
We use a weak reference to self to avoid the danger of a cycle of strong links between AppDelegate and EventMonitor .
Add the following code at the end of the showPopover (_ :) method :
Here we start monitoring events when a pop-up window appears.
Now add the code at the end of the closePopover (_ :) method :
Here we end monitoring when the popup closes.
The application is ready!
Here you will find the full code for this project.
You have learned how to set the menu and pop-up in the application located on the menu bar. Why not experiment with multiple tags or formatted text to get a better look for the quotes? Or connect a backend to receive quotes from the Internet? Or do you want to use the keyboard to navigate between quotes?
A good place to research is the official documentation: NSMenu , NSPopover and NSStatusItem .
In this guide, you will write an application that displays several quotes from famous people in a pop-up window. In the process of creating this application, you will learn:
- assign application icon in menu bar
- make the application hosted only on the menu bar
- add custom menu
- show a pop-up window at the user's request and hide it when necessary, using Event Monitoring
Note: this guide assumes that you are familiar with Swift and macOS.
Getting started
Launch Xcode. Next, on the File / New / Project ... menu, select the macOS / Application / Cocoa App template and click Next .
On the next screen, enter Quotes as the Product Name , select your Organization Name and Organization Identifier . Then make sure that Swift is selected as the application language and the Use Storyboards checkbox is checked . Uncheck the Create Document-Based Application , Use Core Data , Include Unit tests and Include UI Tests checkboxes .
Finally, click Next again., specify the location to save the project and click Create .
Once the new project is created, open AppDelegate.swift and add the following property to the class:
let statusItem = NSStatusBar.system.statusItem(withLength:NSStatusItem.squareLength)Here we create in the menu bar Status Item (application icon) a fixed length that will be visible to users.
Then we need to assign our picture to this new item in the menu bar so that we can distinguish our new application.
In the project navigator, go to Assets.xcassets, upload a picture and drag it into the asset catalog.
Select a picture and open the attribute inspector. Change the Render As option to Template Image . If you use your own picture, make sure the image is black and white and configure it as a Template image so that the icon looks great on both the dark and the light menu bar.

Go back to AppDelegate.swift , and add the following code to applicationDidFinishLaunching (_ :)
if let button = statusItem.button {
  button.image = NSImage(named:NSImage.Name("StatusBarButtonImage"))
  button.action = #selector(printQuote(_:))
}
Here we assign the application icon that we just added to the application icon and assign action when we click on it.
Add the following method to the class:
@objc func printQuote(_ sender: Any?) {
  let quoteText = "Never put off until tomorrow what you can do the day after tomorrow."
  let quoteAuthor = "Mark Twain"
  print("\(quoteText) — \(quoteAuthor)")
}
This method simply prints the quote to the console.
Pay attention to the objc method directive . This allows you to use this method as a response to a button click.
Build and run the application, and you will see the new application in the menu bar. Hurrah!
Each time you click on the icon in the menu bar, the famous saying of Mark Twain is displayed in the Xcode console.
We hide the main window and the icon in the dock
There are a couple of little things that we need to do before dealing directly with the functionality:
- delete dock icon
- remove unnecessary application main window
To remove the dock icon, open Info.plist . Add a new Application is agent (UIElement) key and set its value to YES .
Now is the time to deal with the main application window.
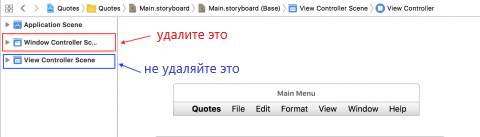
- open Main.storyboard
- select Window Controller scene and delete it
- View Controller scene leave, we will use it soon
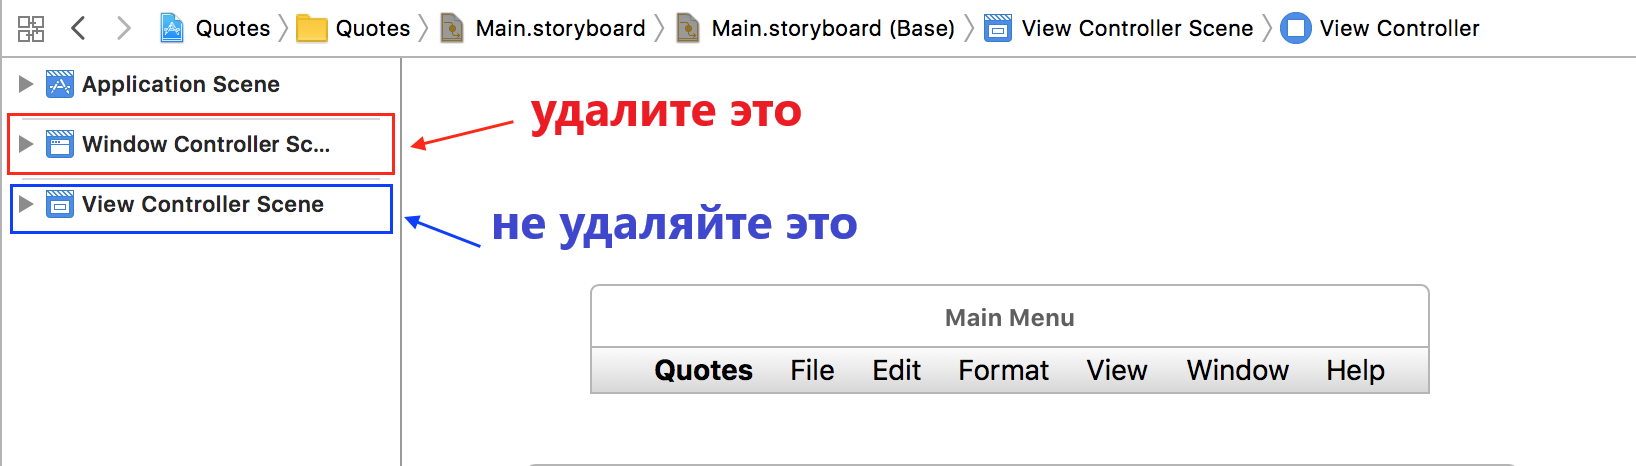
Build and run the application. Now the application does not have both the main window and the unnecessary icon in the dock. Excellent!
Add menu to Status Item
A single click response is clearly not enough for a serious application. The easiest way to add functionality is to add a menu. Add this function at the end of AppDelegate .
func constructMenu() {
  let menu = NSMenu()
  menu.addItem(NSMenuItem(title: "Print Quote", action: #selector(AppDelegate.printQuote(_:)), keyEquivalent: "P"))
  menu.addItem(NSMenuItem.separator())
  menu.addItem(NSMenuItem(title: "Quit Quotes", action: #selector(NSApplication.terminate(_:)), keyEquivalent: "q"))
  statusItem.menu = menu
}
And then add this call at the end of applicationDidFinishLaunching (_ :)
constructMenu()We create NSMenu , add 3 instances of NSMenuItem to it, and set this menu as the application icon menu.
A few important points:
- The title of the menu item is the text that appears in the menu. A good place to localize the application (if necessary).
- action , like the action of a button or other control, is a method that is called when the user clicks on a menu item
- keyEquivalent is a keyboard shortcut that you can use to select a menu item. Lowercase characters use Cmd as a modifier, and lowercase characters use Cmd + Shift . This only works if the application is at the very top and is active. In our case, it is necessary that the menu or some other window is visible, since our application does not have an icon in the dock
- separatorItem is an inactive menu item in the form of a gray line between other elements. Use it to group
- printQuote is the method that you already defined in AppDelegate , and terminate is the method defined by NSApplication .
Launch the application and you will see a menu by clicking on the application icon.
Try clicking on the menu - selecting Print Quote displays the quote in the Xcode console, and Quit Quotes terminates the application.
Add a popup
You saw how easy it is to add a menu from the code, but displaying a quote in the Xcode console is clearly not what users expect from the application. Now we will add a simple view controller to display quotes in the right way.
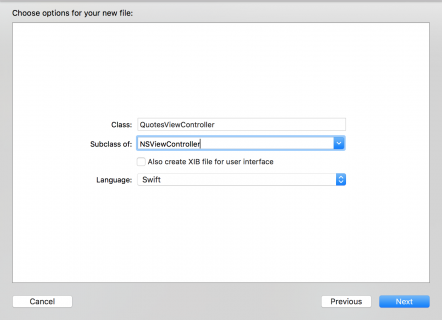
Go to the File / New / File ... menu, select the macOS / Source / Cocoa Class template and click Next .
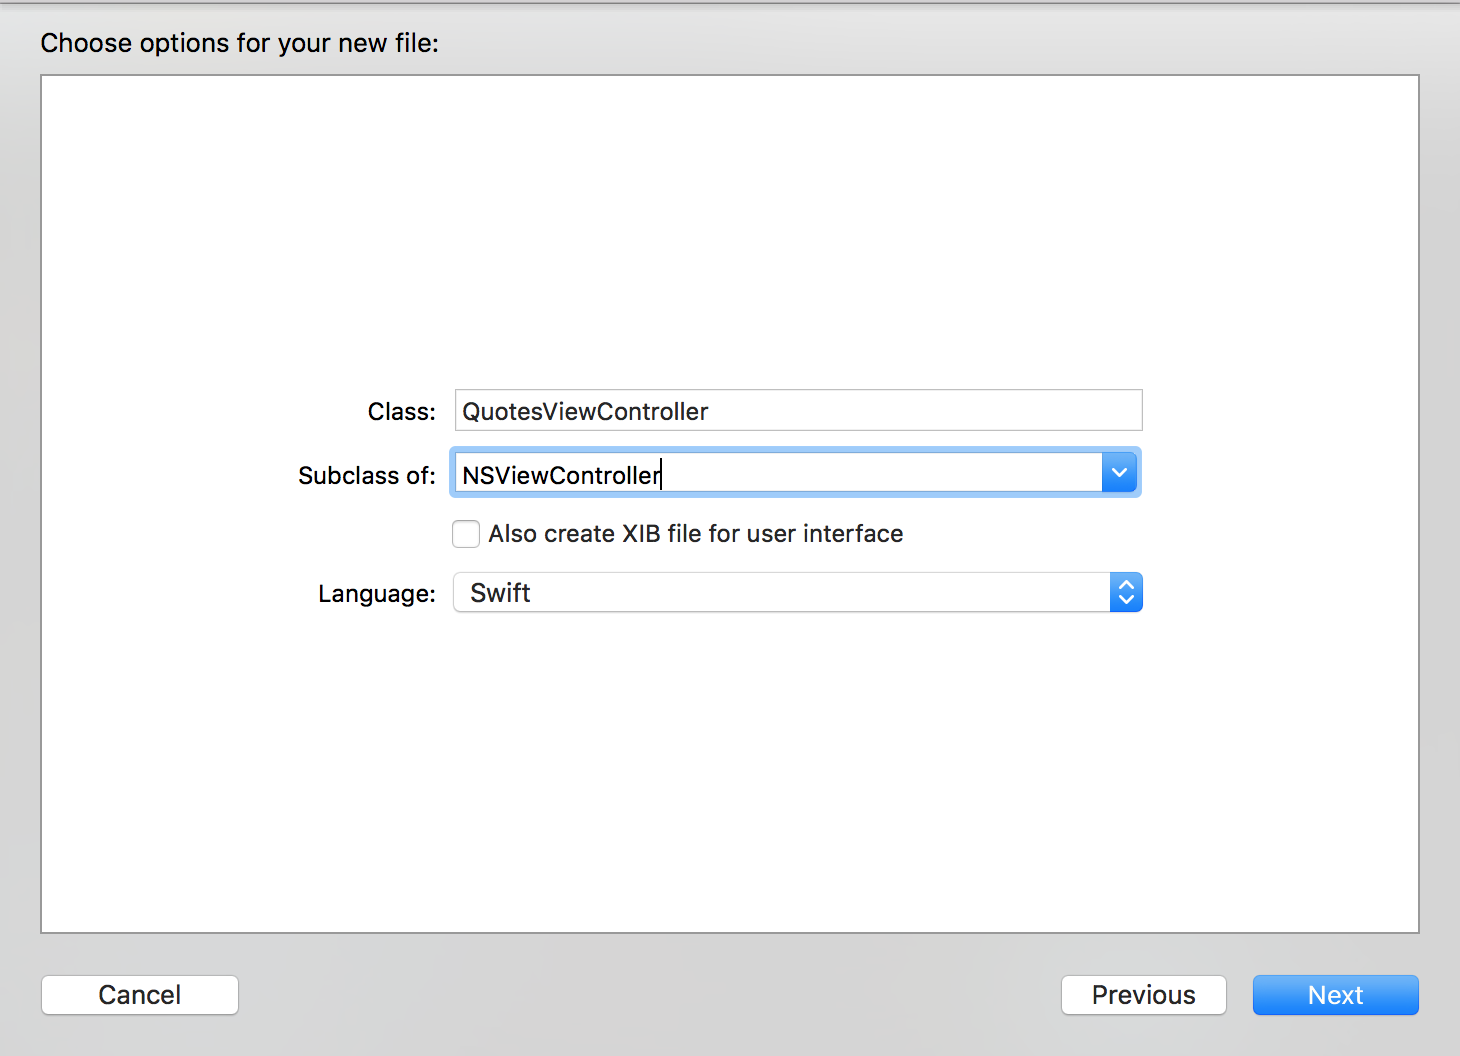
- name the class QuotesViewController
- make an inheritor of NSViewController
- make sure the checkbox Also create XIB file for user interface is not checked
- set the language to Swift
Finally, click Next again , select a location to save the file, and click Create .
Now open Main.storyboard . Expand View Controller Scene and select View Controller instance . First select the Identity Inspector and change the class to QuotesViewController , then set the Storyboard ID to QuotesViewController Now add the following code to the end of the QuotesViewController.swift file :

extension QuotesViewController {
    // MARK: Storyboard instantiation
    static func freshController() -> QuotesViewController {
        //1.
        let storyboard = NSStoryboard(name: NSStoryboard.Name("Main"), bundle: nil)
        //2.
        let identifier = NSStoryboard.SceneIdentifier("QuotesViewController")
        //3.
        guard let viewcontroller = storyboard.instantiateController(withIdentifier: identifier) as? QuotesViewController else {
            fatalError("Why cant i find QuotesViewController? - Check Main.storyboard")
        }
        return viewcontroller
    }
}
What's going on here:
- we get a link to Main.storyboard .
- create a Scene identifier that matches the one we just installed just above.
- create an instance of QuotesViewController and return it.
You create this method, so now everyone who uses the QuotesViewController does not need to know how it is created. It just works.
Note the fatalError inside the guard statement . It can be nice to use it or assertionFailure so that if something in the development goes wrong, you yourself, and the other members of the development team, are in the know.
Now back to AppDelegate.swift . Add a new property.
let popover = NSPopover()Then replace a pplicationDidFinishLaunching (_ :) with the following code:
func applicationDidFinishLaunching(_ aNotification: Notification) {
  if let button = statusItem.button {
    button.image = NSImage(named:NSImage.Name("StatusBarButtonImage"))
    button.action = #selector(togglePopover(_:))
  }
  popover.contentViewController = QuotesViewController.freshController()
}
You have changed the click action to call the togglePopover (_ :) method , which we will write a little later. Also, instead of configuring and adding a menu, we configured a pop-up window that will show something from QuotesViewController .
Add the following three methods to AppDelegate :
@objc func togglePopover(_ sender: Any?) {
  if popover.isShown {
    closePopover(sender: sender)
  } else {
    showPopover(sender: sender)
  }
}
func showPopover(sender: Any?) {
  if let button = statusItem.button {
    popover.show(relativeTo: button.bounds, of: button, preferredEdge: NSRectEdge.minY)
  }
}
func closePopover(sender: Any?) {
  popover.performClose(sender)
}
showPopover () shows a popup. You just indicate where it comes from, macOS positions it and draws an arrow, as if it appears from the menu bar.
closePopover () just closes the popup, and togglePopover () is a method that either shows or hides the popup, depending on its state.
Launch the application and click on its icon.
Everything is fine, but where is the content?
We implement Quote View Controller
First you need a model for storing quotes and attributes. Go to the File / New / File ... menu and select macOS / Source / Swift File template , then Next . Name the file Quote and click Create .
Open the Quote.swift file and add the following code to it:
struct Quote {
  let text: String
  let author: String
  static let all: [Quote] =  [
    Quote(text: "Never put off until tomorrow what you can do the day after tomorrow.", author: "Mark Twain"),
    Quote(text: "Efficiency is doing better what is already being done.", author: "Peter Drucker"),
    Quote(text: "To infinity and beyond!", author: "Buzz Lightyear"),
    Quote(text: "May the Force be with you.", author: "Han Solo"),
    Quote(text: "Simplicity is the ultimate sophistication", author: "Leonardo da Vinci"),
    Quote(text: "It’s not just what it looks like and feels like. Design is how it works.", author: "Steve Jobs")
  ]
}
extension Quote: CustomStringConvertible {
  var description: String {
    return "\"\(text)\" — \(author)"
  }
}
Here we define a simple quotation structure and a static property that returns all quotes. Since we made Quote compliant with the CustomStringConvertible protocol , we can easily get conveniently formatted text.
There is progress, but we still need controls to display all this.
Add interface elements
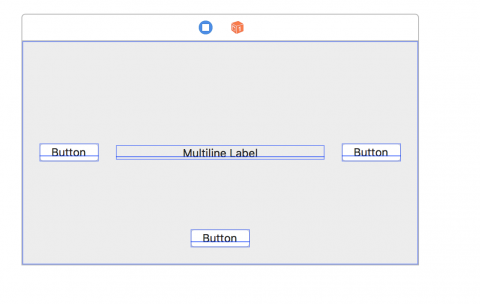
Open Main.storyboard and pull out 3 buttons ( Push Button ) and label ( Multiline Label) on the view controller.
Arrange the buttons and the label so that they look something like this:
Attach the left button to the left edge with a gap of 20 and center vertically.
Attach the right button to the right edge with a gap of 20 and center vertically.
Attach the bottom button to the bottom edge with a gap of 20 and center horizontally.
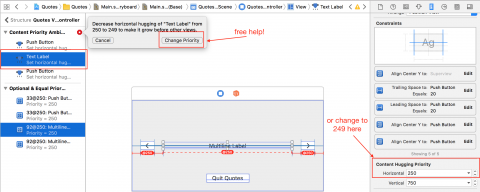
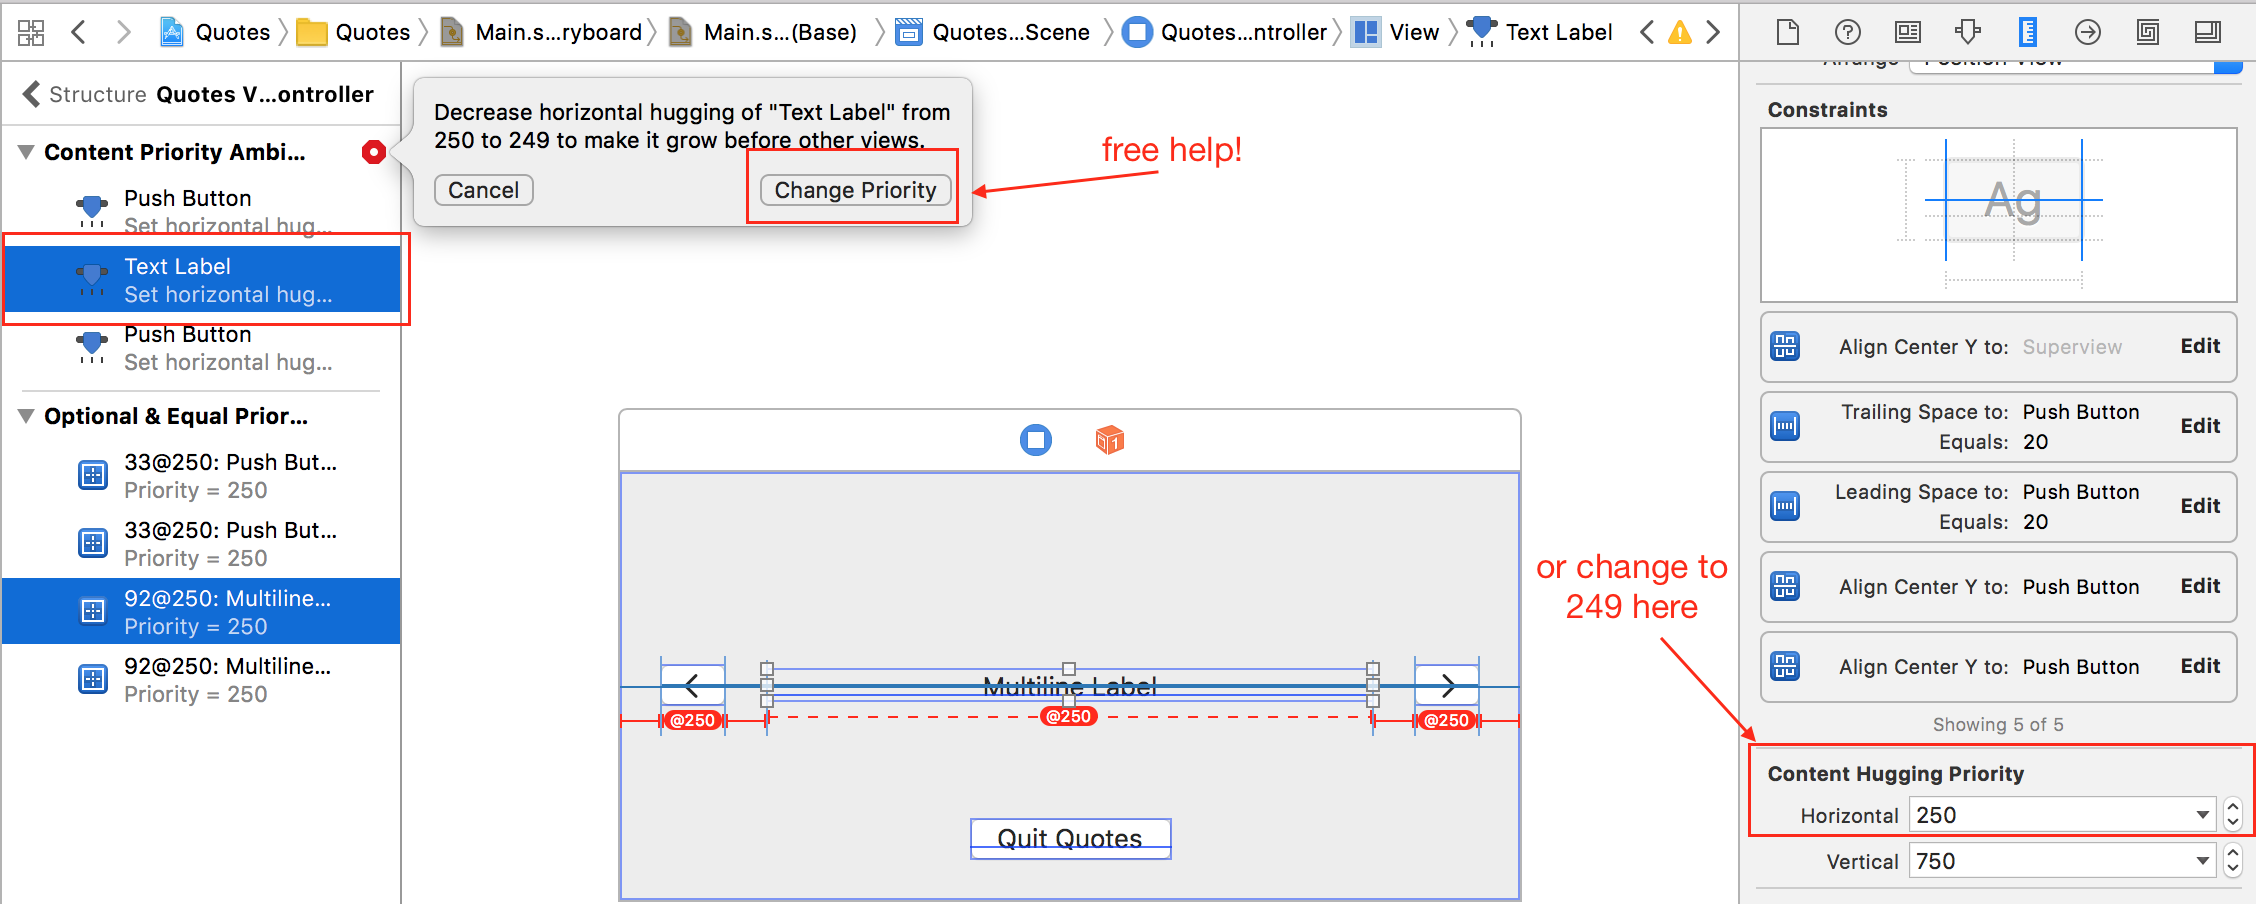
Attach the left and right edges of the mark to the buttons with a gap of 20, center vertically. You will see several layout errors, as there is not enough information for auto layout to figure it out. Set at the tag
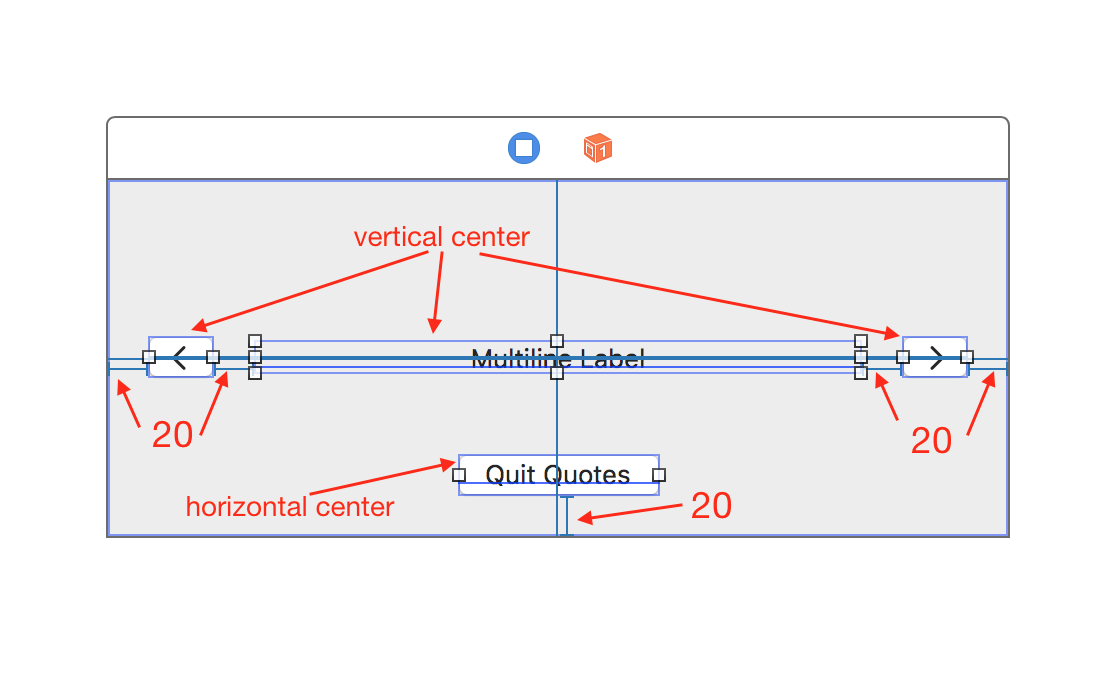
Horizontal Content Hugging Priority at 249 to allow the label to resize. Now do the following:
- set the left button image to NSGoLeftTemplate and clear the title
- set the right button image to NSGoRightTemplate and clear the title
- set the title of the button below to Quit Quotes .
- set the text alignment of the label to center.
- check that the Line Break at the label is set to Word Wrap .
Now open QuotesViewController.swift and add the following code to the implementation of the QuotesViewController class :
@IBOutlet var textLabel: NSTextField!Add this extension to the class implementation. Now in QuotesViewController.swift there are two class extensions.
// MARK: Actions
extension QuotesViewController {
  @IBAction func previous(_ sender: NSButton) {
  }
  @IBAction func next(_ sender: NSButton) {
  }
  @IBAction func quit(_ sender: NSButton) {
  }
}
We just added outlet for the label that we will use to display quotes, and 3 stub methods that we will connect with the buttons.
Connecting the code with Interface Builder
Note: Xcode has placed circles to the left of your code - next to the IBAction and IBOutlet keywords .
We will use them to connect the code to the UI.
While holding down the alt key, click on Main.storyboard in the project navigator . Thus, the storyboard opens in the Assistant Editor on the right, and the code on the left.
Drag the circle to the left of textLabel onto the label in the interface builder . In the same way, combine the previous , next, and quit methods with the left, right, and bottom buttons, respectively.

Launch your application.
We used the default popup size. If you want a larger or smaller popup, just resize it in the storyboard .
Writing a code for the buttons
If you have not hidden the Assistant Editor , click Cmd-Return or V iew> Standard Editor> Show Standard Editor
Open QuotesViewController.swift and add the following properties to the class implementation:
let quotes = Quote.all
var currentQuoteIndex: Int = 0 {
  didSet {
    updateQuote()
  }
}
The quotes property contains all quotes, and currentQuoteIndex is the index of the quote that is currently being displayed. In currentQuoteIndex there is also a property observer, to update the contents of the new quote marks when changing the index.
Now add the following methods:
override func viewDidLoad() {
super.viewDidLoad()
currentQuoteIndex = 0
}
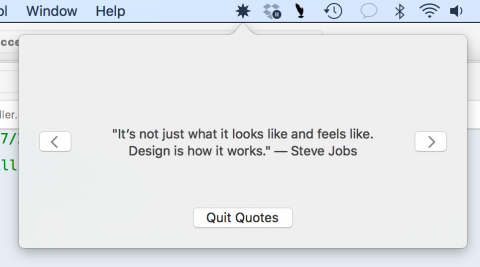
func updateQuote() {
textLabel.stringValue = String(describing: quotes[currentQuoteIndex])
}When the view loads, we set the quote index to 0, which in turn leads to an update to the interface. updateQuote () simply updates the text label to display a quote. corresponding currentQuoteIndex .
Finally, update these methods with the following code:
@IBAction func previous(_ sender: NSButton) {
  currentQuoteIndex = (currentQuoteIndex - 1 + quotes.count) % quotes.count
}
@IBAction func next(_ sender: NSButton) {
  currentQuoteIndex = (currentQuoteIndex + 1) % quotes.count
}
@IBAction func quit(_ sender: NSButton) {
  NSApplication.shared.terminate(sender)
}
The next () and previous () methods cycle through all citations. quit closes the application.
Launch the app:
Event monitoring
There is one more thing that users expect from our application - hide the pop-up window when the user clicks somewhere outside of it. To do this, we need a mechanism called macOS global event monitor .
Create a new Swift file, call it EventMonitor , and replace its contents with the following code:
import Cocoa
public class EventMonitor {
  private var monitor: Any?
  private let mask: NSEvent.EventTypeMask
  private let handler: (NSEvent?) -> Void
  public init(mask: NSEvent.EventTypeMask, handler: @escaping (NSEvent?) -> Void) {
    self.mask = mask
    self.handler = handler
  }
  deinit {
    stop()
  }
  public func start() {
    monitor = NSEvent.addGlobalMonitorForEvents(matching: mask, handler: handler)
  }
  public func stop() {
    if monitor != nil {
      NSEvent.removeMonitor(monitor!)
      monitor = nil
    }
  }
}
When initializing an instance of this class, we pass it an event mask that we will listen to (such as keystrokes, mouse wheel scrolls, etc.) and an event handler.
When we are ready to start listening, start () calls addGlobalMonitorForEventsMatchingMask (_: handler :) , which returns the object we are saving. As soon as the event contained in the mask happens, the system calls your handler.
To stop monitoring events, removeMonitor () is called in stop () and we delete the object by setting it to nil.
All that remains for us is to call start () and stop () at the right time . The class also callsstop () in the initializer to clean up after itself.
Connecting Event Monitor
Open AppDelegate.swift one last time and add a new property:
var eventMonitor: EventMonitor?Then add this code to configure the event monitor at the end of applicationDidFinishLaunching (_ :)
eventMonitor = EventMonitor(mask: [.leftMouseDown, .rightMouseDown]) { [weak self] event in
  if let strongSelf = self, strongSelf.popover.isShown {
    strongSelf.closePopover(sender: event)
  }
}
This will inform your application when you click the left or right button. Please note: the handler will not be called in response to mouse clicks inside your application. This is why the popup will not close while you click inside it.
We use a weak reference to self to avoid the danger of a cycle of strong links between AppDelegate and EventMonitor .
Add the following code at the end of the showPopover (_ :) method :
eventMonitor?.start()
Here we start monitoring events when a pop-up window appears.
Now add the code at the end of the closePopover (_ :) method :
eventMonitor?.stop()
Here we end monitoring when the popup closes.
The application is ready!
Conclusion
Here you will find the full code for this project.
You have learned how to set the menu and pop-up in the application located on the menu bar. Why not experiment with multiple tags or formatted text to get a better look for the quotes? Or connect a backend to receive quotes from the Internet? Or do you want to use the keyboard to navigate between quotes?
A good place to research is the official documentation: NSMenu , NSPopover and NSStatusItem .