Sonoff Basic firmware via Raspberry Pi
This manual is not intended to be new. The above is quite google (though in English), but for a long time I was looking for where to start and decided to help those who embark on the path of communication with Sonoff.
There are a lot of reviews of Sonoff Basic on the Internet, including in Russian, there are also articles on how to connect it to the local Smart Home systems after reflashing it.
So, if you do not have USB-UART (not yet come from China), and the Sonoff unit is already there and there is a Raspberry Pi, then this article is for you.
Here, if you have already tried to find information on how to flash this Chinese unit, then you realized that you cannot do without a soldering iron. First things first, you have to solder the comb to be able to connect our unit to the Raspberry Pi.
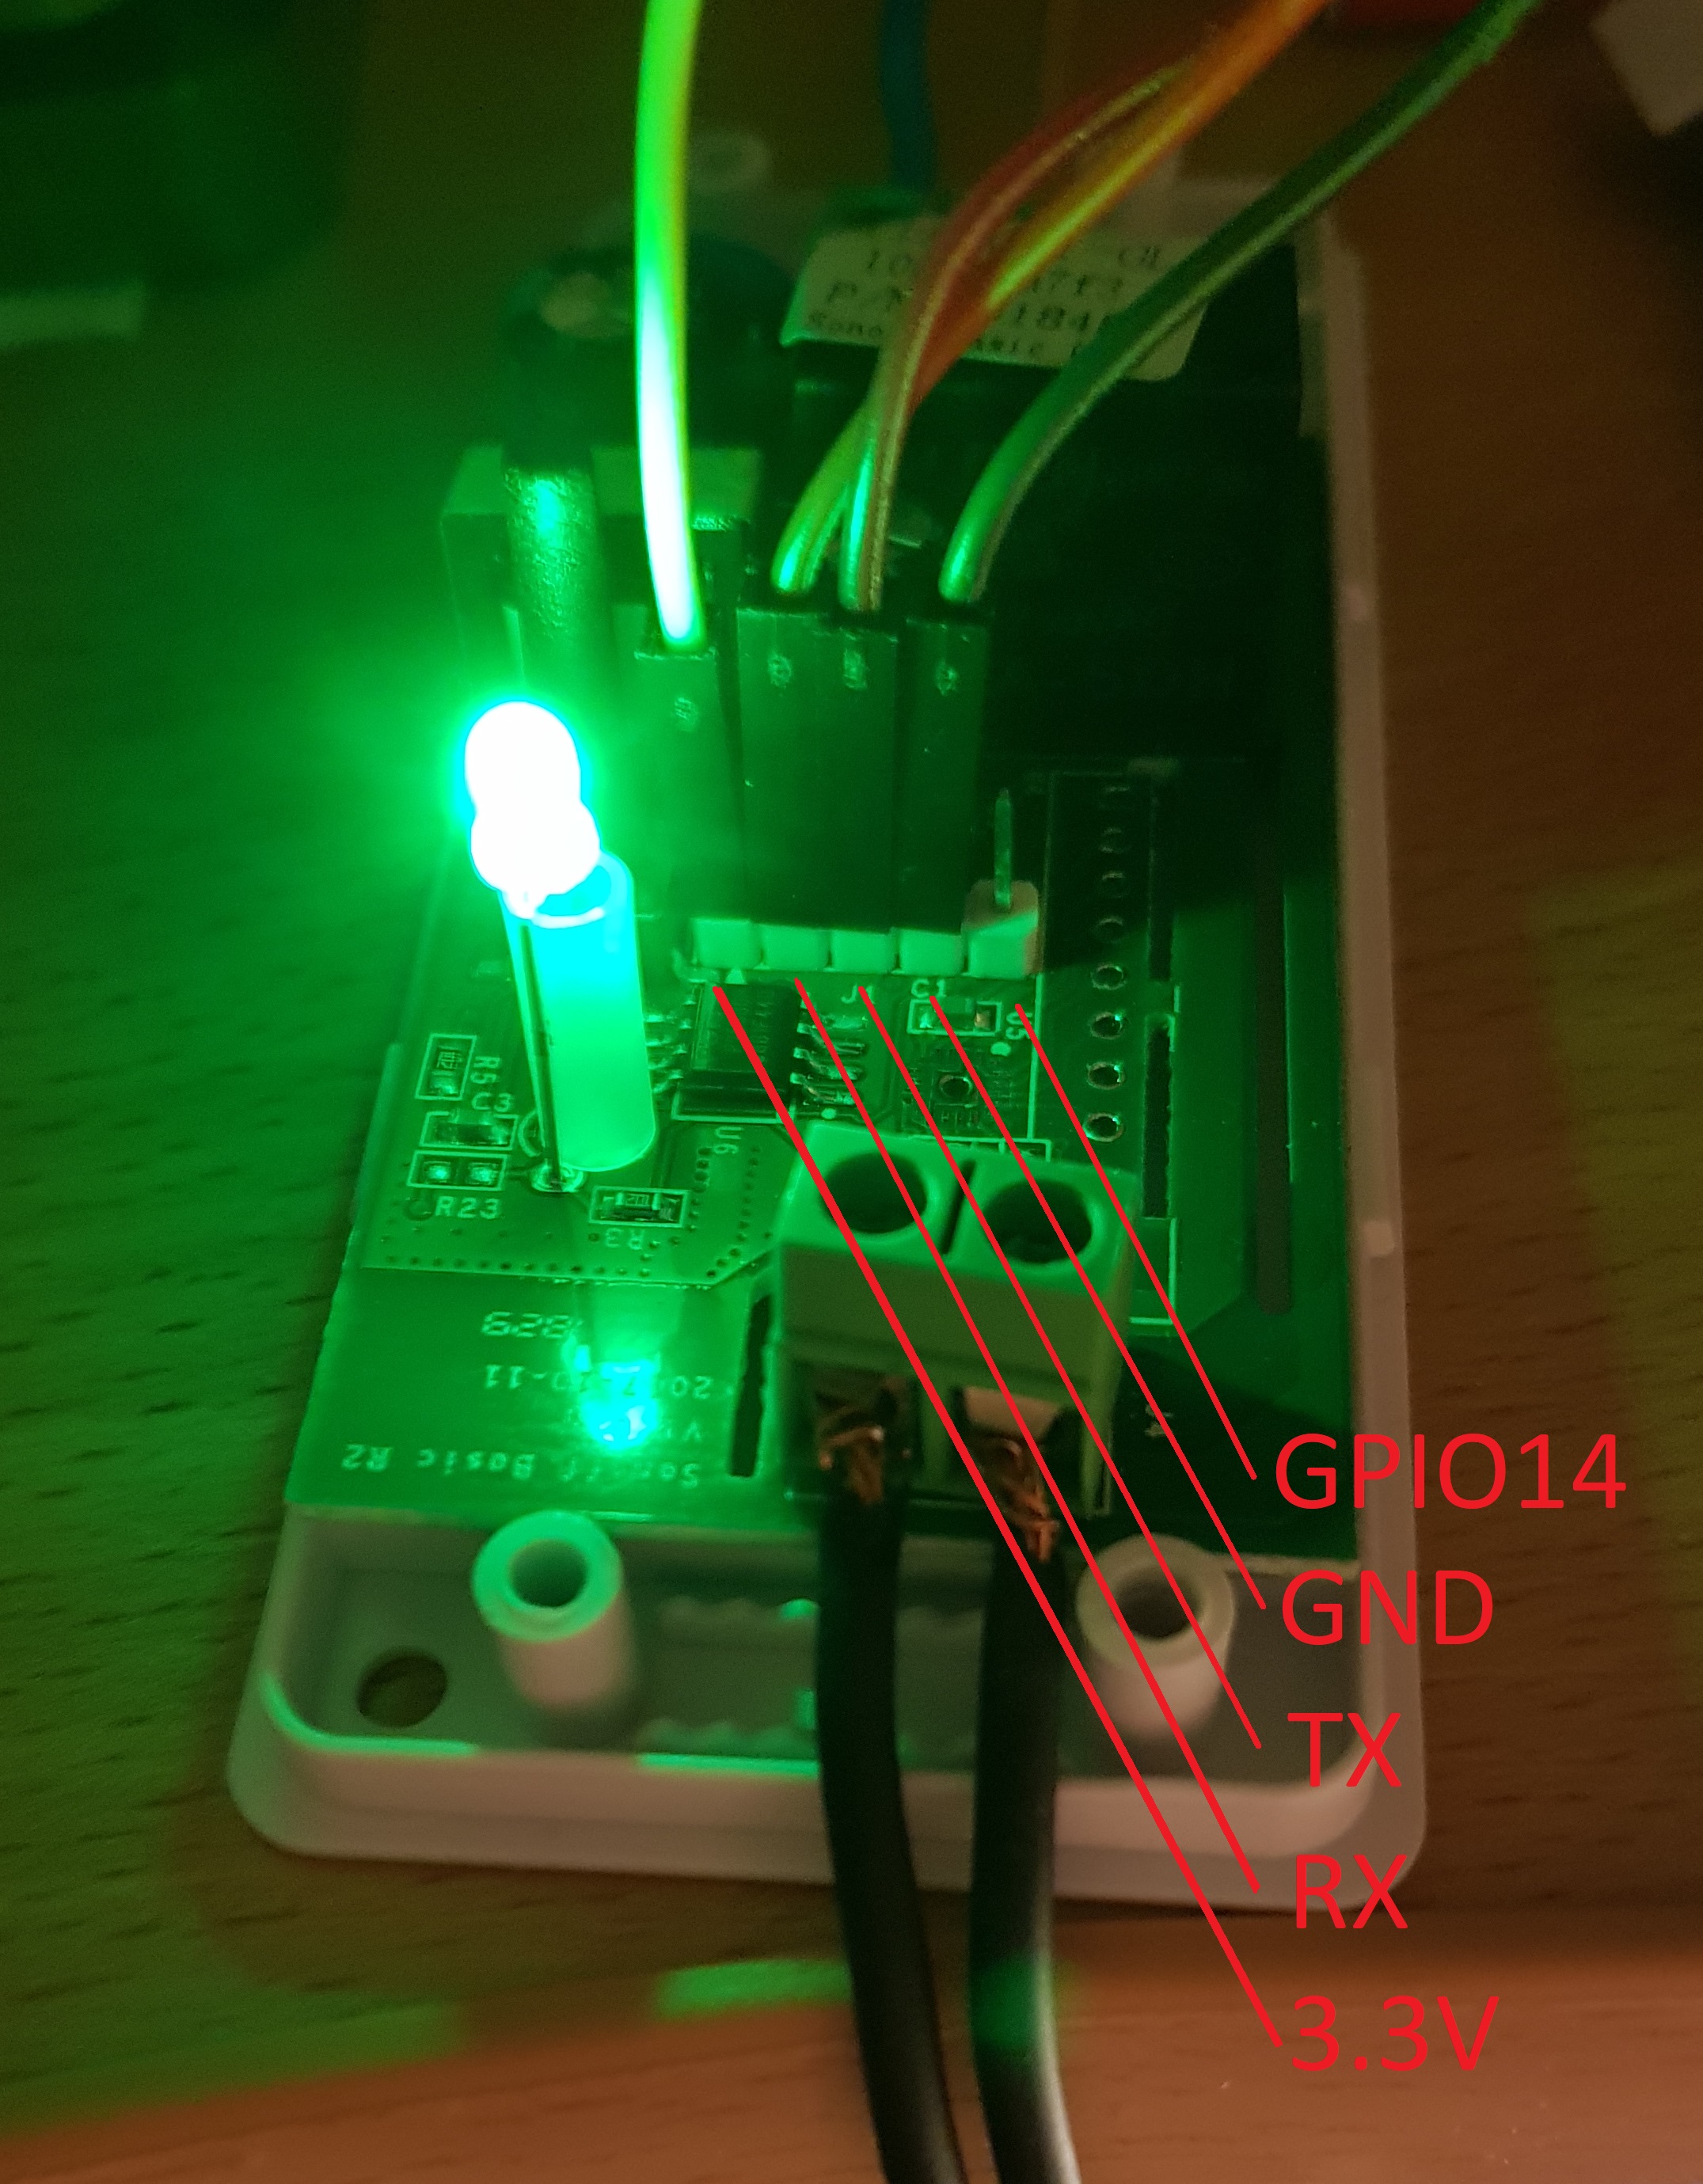
Next, we connect Sonoff Basic (after disconnecting it from 220V) to the Raspberry Pi, as it is shown in the picture (I took the picture, as well as the information here , and I give here, accordingly, a brief translation).

The first thing to do is to see if you have a ttyS0 port.
If it is not there, but there is ttyAMA0 (as in the above article), then this does not mean that everything is fine with you (I remind you that we are talking about Raspberry Pi 3 b +), because ttyAMA0 - responsible for bluetooth. This means that we need to go into the settings:
and in “Interfacing Options” turn on “Serial”, then reboot.
Next, prepare the Raspberry:
And edit cmdline.txt, namely delete “console = serial0,115200”:
In addition, it is advised to attribute “enable_uart = 1” right below (of course, without quotes), to be honest, I don’t know what will happen if this is not done.
Next, install pip (if necessary) and esptool.py:
Reboot Raspberry.
Download the firmware (I used ESPEasy build 120 as a stable release, but in general everything is true for other firmware as well):
After making sure that you are in the folder in which you would like to download and then unzip your firmware.
And should get a list of files:
Next, disconnect Sonoff from 3.3V, hold the button on the board (there is only one button - do not mix it up), connect to 3.3V.
We make a backup of the firmware (and suddenly we want to return later, and the firmware is unique for each block).
Disconnect Sonoff from 3.3V, hold the button on the board, connect to 3.3V. We erase the memory:
Disconnect Sonoff from 3.3V, hold the button on the board, connect to 3.3V. Firmware (we take the firmware to 1MB, unless of course you re-soldered the memory of your block):
Well, actually, and that’s all, you had to flash your device.
When the module starts up for the first time, the wifi network “ESP_0” and the network password “configesp” will appear. You need to connect to it, after which you will be automatically redirected to the settings page, where you need to enter information about your existing wifi network, to which sonoff should be connected as a client.
You can also configure wifi with the command:
It is necessary to enter (without paying attention to the terminal, which was enraged after entering the SSID, or after waiting 3 seconds until Sonoff calms down):
There are a lot of reviews of Sonoff Basic on the Internet, including in Russian, there are also articles on how to connect it to the local Smart Home systems after reflashing it.
So, if you do not have USB-UART (not yet come from China), and the Sonoff unit is already there and there is a Raspberry Pi, then this article is for you.
Here, if you have already tried to find information on how to flash this Chinese unit, then you realized that you cannot do without a soldering iron. First things first, you have to solder the comb to be able to connect our unit to the Raspberry Pi.
Next, we connect Sonoff Basic (after disconnecting it from 220V) to the Raspberry Pi, as it is shown in the picture (I took the picture, as well as the information here , and I give here, accordingly, a brief translation).
The first thing to do is to see if you have a ttyS0 port.
ls /dev/If it is not there, but there is ttyAMA0 (as in the above article), then this does not mean that everything is fine with you (I remind you that we are talking about Raspberry Pi 3 b +), because ttyAMA0 - responsible for bluetooth. This means that we need to go into the settings:
sudo raspi-configand in “Interfacing Options” turn on “Serial”, then reboot.
Next, prepare the Raspberry:
sudo systemctl stop serial-getty@ttyS0.service
sudo systemctl disable serial-getty@ttyS0.service
And edit cmdline.txt, namely delete “console = serial0,115200”:
sudo cp /boot/cmdline.txt /boot/cmdline.bak
sudo nano /boot/cmdline.txt
In addition, it is advised to attribute “enable_uart = 1” right below (of course, without quotes), to be honest, I don’t know what will happen if this is not done.
Next, install pip (if necessary) and esptool.py:
sudo apt-get install python-pip
sudo pip install esptool
Reboot Raspberry.
Download the firmware (I used ESPEasy build 120 as a stable release, but in general everything is true for other firmware as well):
wget http://www.letscontrolit.com/downloads/ESPEasy_R120.zipAfter making sure that you are in the folder in which you would like to download and then unzip your firmware.
unzip ESPEasy_R120.zipAnd should get a list of files:
ESPEasy_R120_1024.bin  ESPEasy_R120_512.bin  esptool.exe  Source
ESPEasy_R120_4096.bin  ESPEasy_R120.zip      flash.cmd
Next, disconnect Sonoff from 3.3V, hold the button on the board (there is only one button - do not mix it up), connect to 3.3V.
We make a backup of the firmware (and suddenly we want to return later, and the firmware is unique for each block).
sudo esptool.py --port /dev/ttyS0 read_flash 0x00000 0x100000 Sonoff_backup_01.binDisconnect Sonoff from 3.3V, hold the button on the board, connect to 3.3V. We erase the memory:
sudo esptool.py --port /dev/ttyAMA0 erase_flashDisconnect Sonoff from 3.3V, hold the button on the board, connect to 3.3V. Firmware (we take the firmware to 1MB, unless of course you re-soldered the memory of your block):
sudo esptool.py --port /dev/ttyS0 write_flash -fm dout 0x0 ESPEasy_R120_1024.binWell, actually, and that’s all, you had to flash your device.
When the module starts up for the first time, the wifi network “ESP_0” and the network password “configesp” will appear. You need to connect to it, after which you will be automatically redirected to the settings page, where you need to enter information about your existing wifi network, to which sonoff should be connected as a client.
You can also configure wifi with the command:
sudo miniterm.py /dev/ttyS0 115200 -eIt is necessary to enter (without paying attention to the terminal, which was enraged after entering the SSID, or after waiting 3 seconds until Sonoff calms down):
ssid yourSSID
password yourPassword