An overview of image segmentation methods in the scikit-image library
- Tutorial
Thresholding
This is the easiest way to separate objects from the background by selecting pixels above or below a certain threshold. This is usually useful when we are going to segment objects by their background. You can read more about the threshold here .
People familiar with the movie Terminator will probably agree that it was the greatest science fiction film of the era. In the film, James Cameron introduced an interesting concept of visual effects, which allowed viewers to hide behind the eyes of a cyborg called Terminator. This effect has become known as "Terminator Vision" (English Terminator Vision). In a sense, he separated the silhouettes of people from the background. This might sound completely inappropriate then, but image segmentation is an important part of many image processing techniques today.
Image segmentation
There are a number of libraries written for image analysis. In this article, we will discuss scikit-image, a Python image processing library, in detail.
Scikit-image

Scikit-image is a Python library for image processing.
Installation
scikit-image is installed as follows:
pip install -U scikit-image(Linux and OSX)
pip install scikit-image(Windows)
# For Conda-based distributions
conda install scikit-image
Python Image Overview
Before we get down to the technical aspects of image segmentation, it’s important to get a little familiar with the Scikit image ecosystem and how it processes images.
Import GrayScale Image from skimage library
The skimage data module contains several built-in examples of data sets, which are usually stored in jpeg or png format.
from skimage import data
import numpy as np
import matplotlib.pyplot as plt
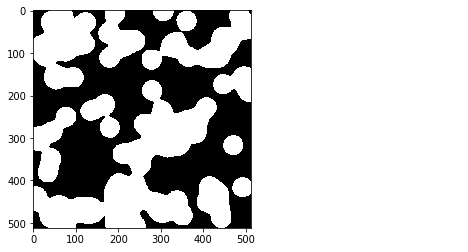
image = data.binary_blobs()
plt.imshow(image, cmap='gray')
Import color image from skimage library
from skimage import data
import numpy as np
import matplotlib.pyplot as plt
image = data.astronaut()
plt.imshow(image)
Import an image from an external source
# The I/O module is used for importing the image
from skimage import data
import numpy as np
import matplotlib.pyplot as plt
from skimage import io
image = io.imread('skimage_logo.png')
plt.imshow(image);
Download multiple images
images = io.ImageCollection('../images/*.png:../images/*.jpg')
print('Type:', type(images))
images.files
Out[]: Type:
Saving Images
#Saving file as ‘logo.png’
io.imsave('logo.png', logo)
Image segmentation
Now that we have an idea of scikit-image, we offer to consider the details of image segmentation. Image segmentation is the process of dividing a digital image into several segments in order to simplify and / or change the image representation to something more meaningful and easier to analyze.
In this article, we will consider algorithms for models taught with both a teacher (supervised) and without a teacher (unsupervised).

Some of the segmentation algorithms are available in the scikit-image library.
Segmentation with a teacher: some preliminary knowledge, possibly from human input, is used to guide the algorithm.
Segmentation without a teacher: prior knowledge is not required. These algorithms try to automatically divide the images into significant areas. The user can still configure certain parameters to obtain the desired results.
Let's try this on a tutorial image that comes with a predefined scikit-image dataset.
Regular import
import numpy as np
import matplotlib.pyplot as plt
import skimage.data as data
import skimage.segmentation as seg
import skimage.filters as filters
import skimage.draw as draw
import skimage.color as color
Simple imaging feature
def image_show(image, nrows=1, ncols=1, cmap='gray'):
    fig, ax = plt.subplots(nrows=nrows, ncols=ncols, figsize=(14, 14))
    ax.imshow(image, cmap='gray')
    ax.axis('off')
    return fig, ax
Form
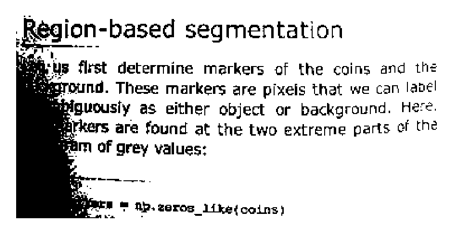
text = data.page()
image_show(text)
This image is a little darker, but maybe we can still choose a value that will give us reasonable segmentation without any complicated algorithms. Now, to help us choose this value, we will use a histogram.
In this case, the histogram shows the number of pixels in the image with different intensities found in this image. Simply put, a histogram is a graph in which the X axis shows all the values that are in the image, and the Y axis shows the frequency of these values.
fig, ax = plt.subplots(1, 1)
ax.hist(text.ravel(), bins=32, range=[0, 256])
ax.set_xlim(0, 256);
Our example turned out to be an 8-bit image, so we have 256 possible values along the X axis. The histogram shows that there is a concentration of fairly bright pixels (0: black, 255: white). This is most likely our pretty light text background, but the rest is a bit blurry. An ideal segmentation histogram would be bimodal so we can select a number right in the middle. Now let's try to create some segmented images based on a simple threshold value.
Controlled threshold
Since we ourselves choose a threshold value, we call it a controlled threshold value.
text_segmented = text > (value concluded from histogram i.e 50,70,120 )
image_show(text_segmented); |  |  |
Left: text> 50 | Mid: text> 70 | Right: text> 120.
We did not get perfect results, since the shadow on the left creates problems. Let's try with the threshold unattended now.
Uncontrolled threshold
Uncontrolled threshold Scikit-image has a number of automatic threshold determination methods that do not require input when choosing the optimal threshold. Here are some of the methods: otsu, li, local.
text_threshold = filters.threshold_  # Hit tab with the cursor after the underscore to get all the methods.
image_show(text < text_threshold); |  |
Left otsu || Right: li
In the case of local, we also need to specify block_size. Offset helps adjust the image for better results.
text_threshold = filters.threshold_local(text,block_size=51, offset=10)
image_show(text > text_threshold);
This method gives a pretty good effect. To a large extent, one can get rid of the noisy regions.
Segmentation with an algorithm for a model with a teacher
Thresholding is a very simple segmentation process, and it will not work properly on a high-contrast image, for which we will need more advanced tools.
In this section, we will use an example image that is freely available and try to segment the head part using methods with the teacher.
# import the image
from skimage import io
image = io.imread('girl.jpg')
plt.imshow(image);
Before doing any image segmentation, it is recommended to remove noise from it using some filters.
However, in our case, the image does not have significant noise, so we will accept it as is. The next step is to convert the image to grayscale using rgb2gray.
image_gray = color.rgb2gray(image)
image_show(image_gray);
We will use two segmentation methods that work on completely different principles.
Active contour segmentation
Segmentation of the active path is also called a snake and is initialized using a user-defined path or line around a region of interest, and then this path is slowly compressed and attracted or repelled by light and edges.
For our example image, let's draw a circle around the human head to initialize the snake.
def circle_points(resolution, center, radius):
"""
    Generate points which define a circle on an image.Centre refers to the centre of the circle
    """
    radians = np.linspace(0, 2*np.pi, resolution)
c = center[1] + radius*np.cos(radians)#polar co-ordinates
    r = center[0] + radius*np.sin(radians)
    return np.array([c, r]).T
# Exclude last point because a closed path should not have duplicate points
points = circle_points(200, [80, 250], 80)[:-1]
The above calculations calculate the x and y coordinates of the points on the periphery of the circle. Since we gave a resolution of 200, it will calculate 200 such points.
fig, ax = image_show(image)
ax.plot(points[:, 0], points[:, 1], '--r', lw=3)
The algorithm then segments the person’s face from the rest of the image, fitting a closed curve to the edges of the face.

We can configure parameters called alpha and beta. Higher alpha values cause the curve to contract faster, while beta makes the curve smoother.
snake = seg.active_contour(image_gray, points,alpha=0.06,beta=0.3)
fig, ax = image_show(image)
ax.plot(points[:, 0], points[:, 1], '--r', lw=3)
ax.plot(snake[:, 0], snake[:, 1], '-b', lw=3);
Random walker segmentation
In this method, segmentation is carried out using interactive labeling, which are called labels. By drawing each pixel to the label for which the highest probability is calculated, you can get high-quality image segmentation. More details on this method can be found in this work.
Next, we will again use the previous values from our example. We could have done different initializations, but for simplicity let's stick to the principle of circles.
image_labels = np.zeros(image_gray.shape, dtype=np.uint8)Random Pass Algorithm accept labels as input. Thus, we will have a large circle covering the entire face of the person, and another smaller circle near the middle of the face.
indices = draw.circle_perimeter(80, 250,20)#from here
image_labels[indices] = 1
image_labels[points[:, 1].astype(np.int), points[:, 0].astype(np.int)] = 2
image_show(image_labels);
Now let's use Random Walker and see what happens.
image_segmented = seg.random_walker(image_gray, image_labels)
# Check our results
fig, ax = image_show(image_gray)
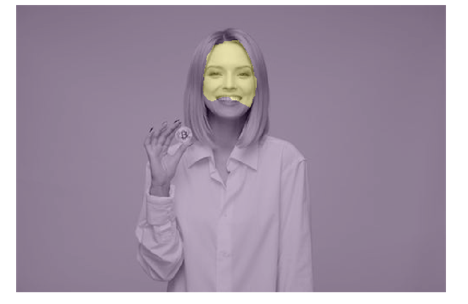
ax.imshow(image_segmented == 1, alpha=0.3);
The result is not the best, the edges of the face remained unreached. To correct this situation, we can adjust the passage parameter until we get the desired result. After several attempts, we set the value to 3000, which works quite well.
image_segmented = seg.random_walker(image_gray, image_labels, beta = 3000)
# Check our results
fig, ax = image_show(image_gray)
ax.imshow(image_segmented == 1, alpha=0.3);

This is all for segmentation with the teacher, where we had to provide certain input data, as well as configure some parameters. However, it is not always possible for a person to look at the image and then decide what contribution to give and where to start. Fortunately, for such situations, we have uncontrolled segmentation methods.
Segmentation without a teacher
Segmentation without a teacher does not require prior knowledge. Consider an image that is so large that it is impossible to see all the pixels at once. Thus, in such cases, segmentation without a teacher can split the image into several subregions, so instead of millions of pixels, you have tens or hundreds of areas. Let's look at two such algorithms:
Simple Linear Iterative Clustering
The method (English Simple Linear Iterative Clustering or SLIC) uses a machine learning algorithm called K-Means. It takes all the pixel values of the image and tries to divide them into a given number of subdomains. Read this work for detailed information.
SLIC works with different colors, so we will use the original image.
image_slic = seg.slic(image,n_segments=155)All we need to do is simply set an average value for each segment we find, which makes it look more like an image.
# label2rgb replaces each discrete label with the average interior color
image_show(color.label2rgb(image_slic, image, kind='avg'));
We reduced this image from 512 * 512 = 262,000 pixels to 155 segments.
Felzenszwalb
This method also uses a machine learning algorithm called minimum-spanning tree clustering. Felzenszwaib does not tell us the exact number of clusters into which the image will be divided. He will generate as many clusters as he sees fit for this.
image_felzenszwalb = seg.felzenszwalb(image)
image_show(image_felzenszwalb);
There are too many regions in the picture. Let's count the number of unique segments.
np.unique(image_felzenszwalb).size
3368
Now let's recolor them using the average value over the segment, as we did in the SLIC algorithm.
image_felzenszwalb_colored = color.label2rgb(image_felzenszwalb, image, kind='avg')
image_show(image_felzenszwalb_colored);
Now we get fewer segments. If we wanted even fewer segments, we could change the scale parameter. This approach is sometimes called over-segmentation.

This is more like a posterized image, which is essentially just a reduction in the number of colors. To combine them again (RAG).
Conclusion
Image segmentation is a very important step in image processing. This is an active area of research with a variety of applications, ranging from computer vision to medical images, traffic and video surveillance. Python provides a robust scikit-image library with a large number of image processing algorithms. It is available for free and without restrictions, which is backed by an active community. I recommend that you read their documentation. The original article can be found here .
