Apache Kafka + Spring Boot: Hello, microservices
- Tutorial
Hello, Habr! In this post, we will write an application on Spring Boot 2 using Apache Kafka under Linux, from installing the JRE to a working microservice application.
Colleagues from the front-end development department who saw the article complain that I am not explaining what Apache Kafka and Spring Boot are. I believe that anyone who needs to assemble a finished project using the above technologies knows what it is and why they need it. If for the reader the question is not idle, here are excellent articles on Habré, what Apache Kafka and Spring Boot are .
We can do without lengthy explanations of what Kafka, Spring Boot and Linux are, and instead, run the Kafka server from scratch on a Linux machine, write two microservices and make one of them send messages to the other - in general, configure full microservice architecture.

The post will consist of two sections. In the first we configure and run Apache Kafka on a Linux machine, in the second we write two microservices in Java.
In the startup, in which I started my professional career as a programmer, there were microservices on Kafka, and one of my microservices also worked with others through Kafka, but I did not know how the server itself worked, whether it was written as an application or is it already completely boxed product. What was my surprise and disappointment when it turned out that Kafka was still a boxed product, and my task would be not only to write a client in Java (which I love to do), as well as deploy and configure the finished application as devOps (which I hate to do). However, even if I could raise it on the Kafka virtual server in less than a day, it is really quite simple to do this. So.
Our application will have the following interaction structure:

At the end of the post, as usual, there will be links to git with working code.
I tried to raise Kafka on local Linux, on a poppy and on remote Linux. In two cases (Linux), I succeeded quite quickly. With poppy yet nothing happened. Therefore, we will raise Kafka on Linux. I chose Ubuntu 18.04.
In order for Kafka to work, she needs a Zookeeper. To do this, you must download and run it before launching Kafka.
So.
This is done by the following commands:
If everything went ok, then you can enter the command
and make sure Java is installed.
I do not like magic teams on Linux, especially when they just give a few commands and it is not clear what they are doing. Therefore, I will describe each action - what exactly it does. So, we need to download Zookeeper and unzip it to a convenient folder. It is advisable if all applications are stored in the / opt folder, that is, in our case, it will be / opt / zookeeper.
I used the command below. If you know other Linux commands that you think will allow you to do this more racially, use them. I’m a developer, not a DevOps, and I communicate with servers at the level of “the goat itself”. So, download the application:
The application is downloaded to the folder that you specify, I created the folder / home / xpendence / downloads to download there all the applications I need.
I used the command:
This command unpacks the archive into the folder in which you are located. You may then need to transfer the application to / opt / zookeeper. And you can immediately go into it and from there already unpack the archive.
In the folder / zookeeper / conf / there is a file zoo-sample.cfg, I suggest renaming it to zoo.conf, it is this file that the JVM will look for at startup. The following should be added to this file at the end:
Also, create the / var / zookeeper directory.
Go to the / opt / zookeeper folder and start the server with the command:
“STARTED” should appear.
After which, I propose to check that the server is working. We write:
A message should appear that the connection was a success. If you have a weak server and the message did not appear, try again - even when STARTED appears, the application starts listening to the port much later. When I tested all this on a weak server, it happened to me every time. If everything is connected, enter the command
What does it mean: “Are you ok?” The server should respond:
and disconnect. So, everything is according to plan. We proceed to launch Apache Kafka.
To work with Kafka we need a separate user.
There are two distributions - binary and sources. We need a binary. In appearance, the archive with the binary is different in size. The binary weighs 59 MB; the siblings weigh 6.5 MB.
Download the binary to the directory there, using the link below:
The unpacking procedure is no different from the same for Zookeeper. We also unpack the archive into the / opt directory and rename it to kafka so that the path to the / bin folder is / opt / kafka / bin
Settings are in /opt/kafka/config/server.properties. Add one line:
This setting seems to be optional, it works without it. This setting allows you to delete topics. Otherwise, you simply cannot delete topics through the command line.
We enter the command, after which Kafka should start:
If the usual actions (Kafka is written in Java and Scala) did not spill over into the log, then everything worked and you can test our service.
For experiments on Apache Kafka, I took a weak server with one core and 512 MB of RAM (but for only 99 rubles), which turned out to be a few problems for me.
Out of memory. Of course, you cannot overclock with 512 MB, and the server could not deploy Kafka due to lack of memory. The fact is that by default Kafka consumes 1 GB of memory. It is not surprising that he didn’t have enough :)
We go to kafka-server-start.sh, zookeeper-server-start.sh. There is already a line that regulates memory:
Change it to:
This will reduce the appetite of Kafka and allow you to start the server.
The second problem with a weak computer is the lack of time to connect to Zookeeper. By default, this is given 6 seconds. If the iron is weak, this, of course, is not enough. In server.properties, we increase the connection time to the zukipper:
I set half a minute.
To do this, we will open two terminals, on one we will launch the producer, on the other - the consumer.
In the first console, enter one line:
This icon should appear, meaning that the producer is ready to spam messages:
In the second console, enter the command:
Now, typing in the producer console, when you press Enter, it will appear in the consumer console. If you see on the screen approximately the same as me - congratulations, the worst is over!

Now we just have to write a couple of clients on Spring Boot that will communicate with each other through Apache Kafka.
We will write two applications that will exchange messages through Apache Kafka. The first message will be called kafka-server and will contain both the producer and the consumer. The second will be called kafka-tester, it is designed so that we have a microservice architecture.
For our projects created through the Spring Initializr, we need the Kafka module. I added Lombok and Web, but that’s a matter of taste.
The Kafka-client consists of two components - the producer (he sends messages to the Kafka-server) and the consumer (he listens to the Kafka-server and takes new messages from there on the topics he is subscribed to). Our task is to write both components and make them work.
Consumer:
We need 2 fields initialized with static data from kafka.properties.
kafka.server is the address on which our server hangs, in this case, local. By default, Kafka listens on port 9092.
kafka.group.id is a group of consumers, within which one instance of the message is delivered. For example, you have three couriers in one group, and they all listen to the same topic. As soon as a new message appears on the server with this topic, it is delivered to someone in the group. The remaining two consumers are not receiving the message.
Next, we are creating a factory for consumers - ConsumerFactory.
Initialized with the properties we need, it will serve as a standard factory for consumers in the future.
consumerConfigs are just Map configs. We provide the server address, group and deserializers.
Further, one of the most important points for a consumer. The consumer can receive both single objects and collections - for example, both StarshipDto and List. And if we get StarshipDto as JSON, then we get List as, roughly speaking, as a JSON array. Therefore, we have at least two message factories - for single messages and for arrays.
We create an instance of ConcurrentKafkaListenerContainerFactory, typed Long (message key) and AbstractDto (abstract message value) and initialize its fields with properties. We, of course, initialize the factory with our standard factory (which already contains Map configs), then we mark that we do not listen to packets (the same arrays) and specify a simple JSON converter as the converter.
When we create a factory for packages / arrays (batch), the main difference (apart from the fact that we mark that we listen to packages) is that we specify as a converter a special package converter that will convert packages consisting of from JSON strings.
And one moment. When initializing the Spring bins, the bin under the name kafkaListenerContainerFactory may not be counted and the application will be ruined. Surely there are more elegant options for solving the problem, write about them in the comments, for now I just created a bean not burdened with functionality with the same name:
The consumer is set up. We pass to the producer.
Of the static variables, we need the address of the kafka server and the producer ID. He can be anything.
In the configs, as we see, there is nothing special. Almost the same. But with regard to factories, there is a significant difference. We must register a template for each class, the objects of which we will send to the server, as well as a factory for it. We have one such pair, but there can be dozens of them.
In the template, we mark that we will serialize the objects in JSON, and this, perhaps, is enough.
We have a consumer and a producer, it remains to write a service that will send messages and receive them.
There are only two methods in our service, they are enough for us to explain the client's work. We autowire the patterns we need:
Producer Method:
All that is required to send a message to the server is to call the send method on the template and transfer the topic (topic) and our object there. The object will be serialized in JSON and will fly to the server under the specified topic.
The listening method looks like this:
We mark this method with @KafkaListener annotation, where we indicate any ID that we like, listened topics and a factory that will convert the received message to what we need. In this case, since we accept one object, we need a singleFactory. For List <?>, Specify batchFactory. As a result, we send the object to the kafka-server using the send method and get it using the consume method.
You can write a test in 5 minutes that will demonstrate the full strength of Kafka, but we will go further - spend 10 minutes and write another application that will send messages to the server that our first application will listen to.
Having the experience of writing the first application, we can easily write the second, especially if we copy the paste and the dto package, register only the producer (we will only send messages) and add the only send method to the service. Using the link below, you can easily download the project code and make sure that there is nothing complicated there.
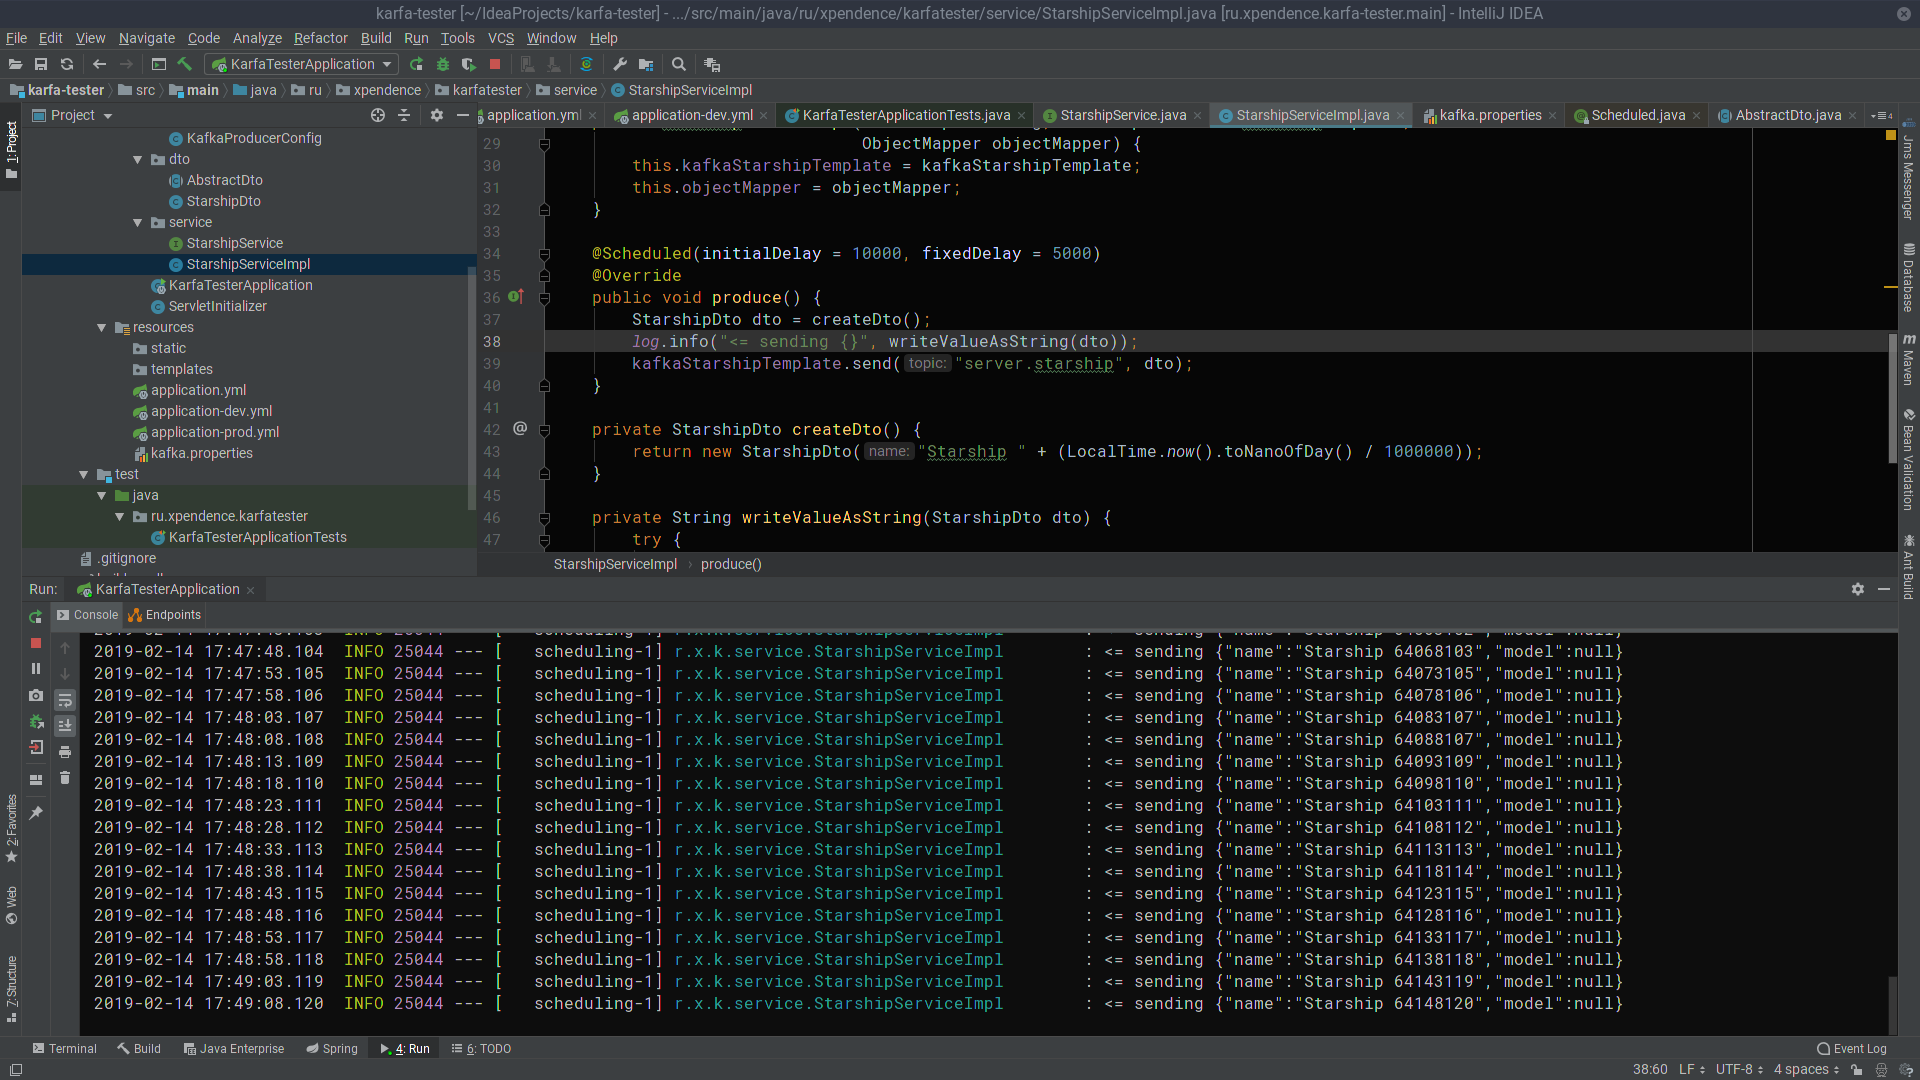
After the first 10 seconds, kafka-tester starts sending messages with the names of starships to the Kafka server every 5 seconds (the picture is clickable). There they listen and receive kafka-server (the picture is also clickable). I hope that those who dream of starting to write microservices at Kafka will succeed as easily as I did. And here are the links to the projects: → kafka-server → kafka-tester

Colleagues from the front-end development department who saw the article complain that I am not explaining what Apache Kafka and Spring Boot are. I believe that anyone who needs to assemble a finished project using the above technologies knows what it is and why they need it. If for the reader the question is not idle, here are excellent articles on Habré, what Apache Kafka and Spring Boot are .
We can do without lengthy explanations of what Kafka, Spring Boot and Linux are, and instead, run the Kafka server from scratch on a Linux machine, write two microservices and make one of them send messages to the other - in general, configure full microservice architecture.
The post will consist of two sections. In the first we configure and run Apache Kafka on a Linux machine, in the second we write two microservices in Java.
In the startup, in which I started my professional career as a programmer, there were microservices on Kafka, and one of my microservices also worked with others through Kafka, but I did not know how the server itself worked, whether it was written as an application or is it already completely boxed product. What was my surprise and disappointment when it turned out that Kafka was still a boxed product, and my task would be not only to write a client in Java (which I love to do), as well as deploy and configure the finished application as devOps (which I hate to do). However, even if I could raise it on the Kafka virtual server in less than a day, it is really quite simple to do this. So.
Our application will have the following interaction structure:
At the end of the post, as usual, there will be links to git with working code.
Deploy Apache Kaffa + Zookeeper in a virtual machine
I tried to raise Kafka on local Linux, on a poppy and on remote Linux. In two cases (Linux), I succeeded quite quickly. With poppy yet nothing happened. Therefore, we will raise Kafka on Linux. I chose Ubuntu 18.04.
In order for Kafka to work, she needs a Zookeeper. To do this, you must download and run it before launching Kafka.
So.
0. Install JRE
This is done by the following commands:
sudo apt-get update
sudo apt-get install default-jre
If everything went ok, then you can enter the command
java -versionand make sure Java is installed.
1. Download Zookeeper
I do not like magic teams on Linux, especially when they just give a few commands and it is not clear what they are doing. Therefore, I will describe each action - what exactly it does. So, we need to download Zookeeper and unzip it to a convenient folder. It is advisable if all applications are stored in the / opt folder, that is, in our case, it will be / opt / zookeeper.
I used the command below. If you know other Linux commands that you think will allow you to do this more racially, use them. I’m a developer, not a DevOps, and I communicate with servers at the level of “the goat itself”. So, download the application:
wget -P /home/xpendence/downloads/ "http://apache-mirror.rbc.ru/pub/apache/zookeeper/zookeeper-3.4.12/zookeeper-3.4.12.tar.gz"The application is downloaded to the folder that you specify, I created the folder / home / xpendence / downloads to download there all the applications I need.
2. Unpack Zookeeper
I used the command:
tar -xvzf /home/xpendence/downloads/zookeeper-3.4.12.tar.gzThis command unpacks the archive into the folder in which you are located. You may then need to transfer the application to / opt / zookeeper. And you can immediately go into it and from there already unpack the archive.
3. Edit settings
In the folder / zookeeper / conf / there is a file zoo-sample.cfg, I suggest renaming it to zoo.conf, it is this file that the JVM will look for at startup. The following should be added to this file at the end:
tickTime=2000
dataDir=/var/zookeeper
clientPort=2181
Also, create the / var / zookeeper directory.
4. Launch Zookeeper
Go to the / opt / zookeeper folder and start the server with the command:
bin/zkServer.sh start“STARTED” should appear.
After which, I propose to check that the server is working. We write:
telnet localhost 2181A message should appear that the connection was a success. If you have a weak server and the message did not appear, try again - even when STARTED appears, the application starts listening to the port much later. When I tested all this on a weak server, it happened to me every time. If everything is connected, enter the command
ruokWhat does it mean: “Are you ok?” The server should respond:
imok (Я ок!)and disconnect. So, everything is according to plan. We proceed to launch Apache Kafka.
5. We create the user under Kafka
To work with Kafka we need a separate user.
sudo adduser --system --no-create-home --disabled-password --disabled-login kafka6. Download Apache Kafka
There are two distributions - binary and sources. We need a binary. In appearance, the archive with the binary is different in size. The binary weighs 59 MB; the siblings weigh 6.5 MB.
Download the binary to the directory there, using the link below:
wget -P /home/xpendence/downloads/ "http://mirror.linux-ia64.org/apache/kafka/2.1.0/kafka_2.11-2.1.0.tgz"7. Unpack Apache Kafka
The unpacking procedure is no different from the same for Zookeeper. We also unpack the archive into the / opt directory and rename it to kafka so that the path to the / bin folder is / opt / kafka / bin
tar -xvzf /home/xpendence/downloads/kafka-2.1.0-src.tgz8. Edit settings
Settings are in /opt/kafka/config/server.properties. Add one line:
delete.topic.enable = trueThis setting seems to be optional, it works without it. This setting allows you to delete topics. Otherwise, you simply cannot delete topics through the command line.
9. We give access to the user kafka directories Kafka
chown -R kafka:nogroup /opt/kafka
chown -R kafka:nogroup /var/lib/kafka
10. The long-awaited launch of Apache Kafka
We enter the command, after which Kafka should start:
/opt/kafka/bin/kafka-server-start.sh /opt/kafka/config/server.propertiesIf the usual actions (Kafka is written in Java and Scala) did not spill over into the log, then everything worked and you can test our service.
10.1. Weak server issues
For experiments on Apache Kafka, I took a weak server with one core and 512 MB of RAM (but for only 99 rubles), which turned out to be a few problems for me.
Out of memory. Of course, you cannot overclock with 512 MB, and the server could not deploy Kafka due to lack of memory. The fact is that by default Kafka consumes 1 GB of memory. It is not surprising that he didn’t have enough :)
We go to kafka-server-start.sh, zookeeper-server-start.sh. There is already a line that regulates memory:
export KAFKA_HEAP_OPTS="-Xmx1G -Xms1G"Change it to:
export KAFKA_HEAP_OPTS="-Xmx256M -Xms128M"This will reduce the appetite of Kafka and allow you to start the server.
The second problem with a weak computer is the lack of time to connect to Zookeeper. By default, this is given 6 seconds. If the iron is weak, this, of course, is not enough. In server.properties, we increase the connection time to the zukipper:
zookeeper.connection.timeout.ms=30000I set half a minute.
11. Test Kafka-server
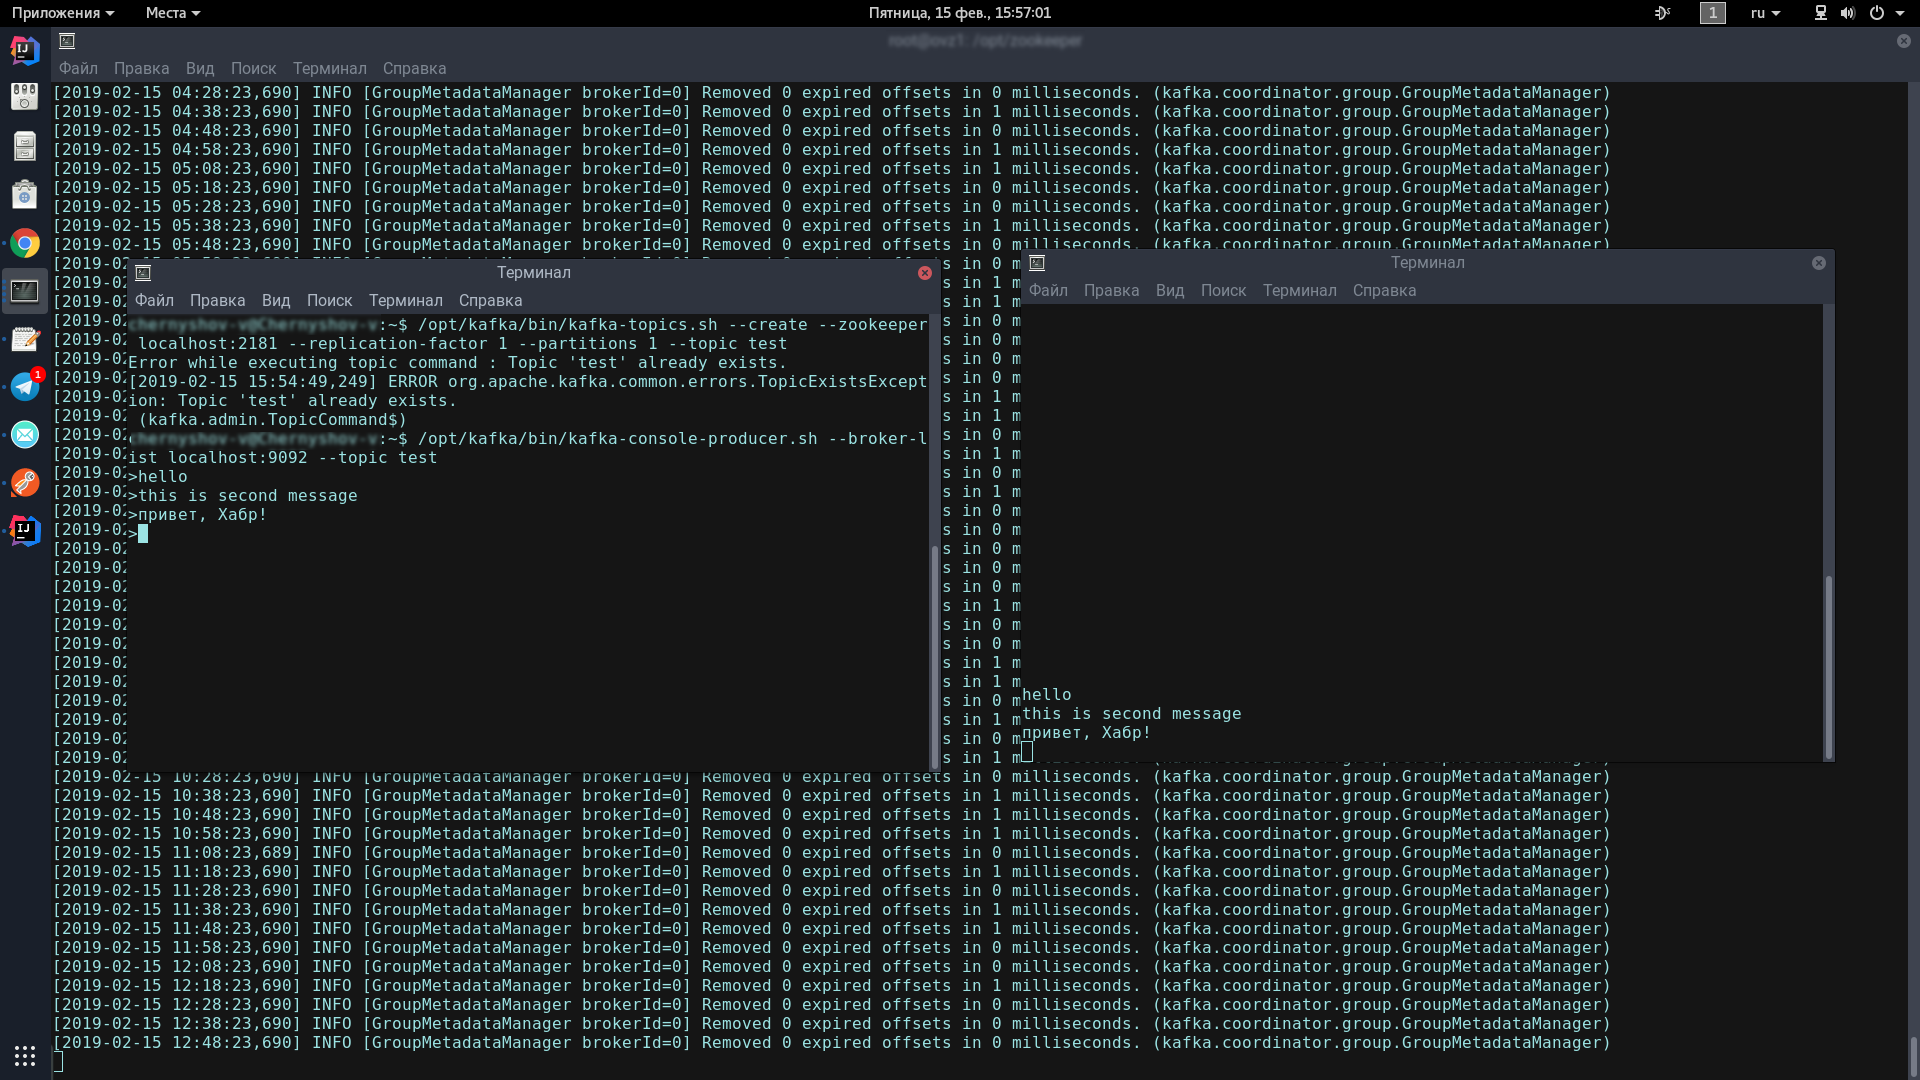
To do this, we will open two terminals, on one we will launch the producer, on the other - the consumer.
In the first console, enter one line:
/opt/kafka/bin/kafka-topics.sh --create --zookeeper localhost:2181 --replication-factor 1 --partitions 1 --topic test
/opt/kafka/bin/kafka-console-producer.sh --broker-list localhost:9092 --topic test
This icon should appear, meaning that the producer is ready to spam messages:
>In the second console, enter the command:
/opt/kafka/bin/kafka-console-consumer.sh --bootstrap-server localhost:9092 --topic test --from-beginningNow, typing in the producer console, when you press Enter, it will appear in the consumer console. If you see on the screen approximately the same as me - congratulations, the worst is over!
Now we just have to write a couple of clients on Spring Boot that will communicate with each other through Apache Kafka.
Writing an application on Spring Boot
We will write two applications that will exchange messages through Apache Kafka. The first message will be called kafka-server and will contain both the producer and the consumer. The second will be called kafka-tester, it is designed so that we have a microservice architecture.
kafka-server
For our projects created through the Spring Initializr, we need the Kafka module. I added Lombok and Web, but that’s a matter of taste.
The Kafka-client consists of two components - the producer (he sends messages to the Kafka-server) and the consumer (he listens to the Kafka-server and takes new messages from there on the topics he is subscribed to). Our task is to write both components and make them work.
Consumer:
@ConfigurationpublicclassKafkaConsumerConfig{
    @Value("${kafka.server}")
    private String kafkaServer;
    @Value("${kafka.group.id}")
    private String kafkaGroupId;
    @Beanpublic KafkaListenerContainerFactory<?> batchFactory() {
        ConcurrentKafkaListenerContainerFactory<Long, AbstractDto> factory =
                new ConcurrentKafkaListenerContainerFactory<>();
        factory.setConsumerFactory(consumerFactory());
        factory.setBatchListener(true);
        factory.setMessageConverter(new BatchMessagingMessageConverter(converter()));
        return factory;
    }
    @Beanpublic KafkaListenerContainerFactory<?> singleFactory() {
        ConcurrentKafkaListenerContainerFactory<Long, AbstractDto> factory =
                new ConcurrentKafkaListenerContainerFactory<>();
        factory.setConsumerFactory(consumerFactory());
        factory.setBatchListener(false);
        factory.setMessageConverter(new StringJsonMessageConverter());
        return factory;
    }
    @Beanpublic ConsumerFactory<Long, AbstractDto> consumerFactory(){
        returnnew DefaultKafkaConsumerFactory<>(consumerConfigs());
    }
    @Beanpublic KafkaListenerContainerFactory<?> kafkaListenerContainerFactory() {
        returnnew ConcurrentKafkaListenerContainerFactory<>();
    }
    @Beanpublic Map<String, Object> consumerConfigs(){
        Map<String, Object> props = new HashMap<>();
        props.put(ConsumerConfig.BOOTSTRAP_SERVERS_CONFIG, kafkaServer);
        props.put(ConsumerConfig.KEY_DESERIALIZER_CLASS_CONFIG, LongDeserializer.class);
        props.put(ConsumerConfig.VALUE_DESERIALIZER_CLASS_CONFIG, StringDeserializer.class);
        props.put(ConsumerConfig.GROUP_ID_CONFIG, kafkaGroupId);
        props.put(ConsumerConfig.ENABLE_AUTO_COMMIT_CONFIG, true);
        return props;
    }
    @Beanpublic StringJsonMessageConverter converter(){
        returnnew StringJsonMessageConverter();
    }
}
We need 2 fields initialized with static data from kafka.properties.
kafka.server=localhost:9092
kafka.group.id=server.broadcast
kafka.server is the address on which our server hangs, in this case, local. By default, Kafka listens on port 9092.
kafka.group.id is a group of consumers, within which one instance of the message is delivered. For example, you have three couriers in one group, and they all listen to the same topic. As soon as a new message appears on the server with this topic, it is delivered to someone in the group. The remaining two consumers are not receiving the message.
Next, we are creating a factory for consumers - ConsumerFactory.
@Beanpublic ConsumerFactory<Long, AbstractDto> consumerFactory(){
        returnnew DefaultKafkaConsumerFactory<>(consumerConfigs());
    }
Initialized with the properties we need, it will serve as a standard factory for consumers in the future.
@Beanpublic Map<String, Object> consumerConfigs(){
        Map<String, Object> props = new HashMap<>();
        props.put(ConsumerConfig.BOOTSTRAP_SERVERS_CONFIG, kafkaServer);
        props.put(ConsumerConfig.KEY_DESERIALIZER_CLASS_CONFIG, LongDeserializer.class);
        props.put(ConsumerConfig.VALUE_DESERIALIZER_CLASS_CONFIG, StringDeserializer.class);
        props.put(ConsumerConfig.GROUP_ID_CONFIG, kafkaGroupId);
        props.put(ConsumerConfig.ENABLE_AUTO_COMMIT_CONFIG, true);
        return props;
    }
consumerConfigs are just Map configs. We provide the server address, group and deserializers.
Further, one of the most important points for a consumer. The consumer can receive both single objects and collections - for example, both StarshipDto and List. And if we get StarshipDto as JSON, then we get List as, roughly speaking, as a JSON array. Therefore, we have at least two message factories - for single messages and for arrays.
@Beanpublic KafkaListenerContainerFactory<?> singleFactory() {
        ConcurrentKafkaListenerContainerFactory<Long, AbstractDto> factory =
                new ConcurrentKafkaListenerContainerFactory<>();
        factory.setConsumerFactory(consumerFactory());
        factory.setBatchListener(false);
        factory.setMessageConverter(new StringJsonMessageConverter());
        return factory;
    }
We create an instance of ConcurrentKafkaListenerContainerFactory, typed Long (message key) and AbstractDto (abstract message value) and initialize its fields with properties. We, of course, initialize the factory with our standard factory (which already contains Map configs), then we mark that we do not listen to packets (the same arrays) and specify a simple JSON converter as the converter.
When we create a factory for packages / arrays (batch), the main difference (apart from the fact that we mark that we listen to packages) is that we specify as a converter a special package converter that will convert packages consisting of from JSON strings.
@Beanpublic KafkaListenerContainerFactory<?> batchFactory() {
        ConcurrentKafkaListenerContainerFactory<Long, AbstractDto> factory =
                new ConcurrentKafkaListenerContainerFactory<>();
        factory.setConsumerFactory(consumerFactory());
        factory.setBatchListener(true);
        factory.setMessageConverter(new BatchMessagingMessageConverter(converter()));
        return factory;
    }
    @Beanpublic StringJsonMessageConverter converter(){
        returnnew StringJsonMessageConverter();
    }
And one moment. When initializing the Spring bins, the bin under the name kafkaListenerContainerFactory may not be counted and the application will be ruined. Surely there are more elegant options for solving the problem, write about them in the comments, for now I just created a bean not burdened with functionality with the same name:
@Beanpublic KafkaListenerContainerFactory<?> kafkaListenerContainerFactory() {
        returnnew ConcurrentKafkaListenerContainerFactory<>();
    }
The consumer is set up. We pass to the producer.
@ConfigurationpublicclassKafkaProducerConfig{
    @Value("${kafka.server}")
    private String kafkaServer;
    @Value("${kafka.producer.id}")
    private String kafkaProducerId;
    @Beanpublic Map<String, Object> producerConfigs(){
        Map<String, Object> props = new HashMap<>();
        props.put(ProducerConfig.BOOTSTRAP_SERVERS_CONFIG, kafkaServer);
        props.put(ProducerConfig.KEY_SERIALIZER_CLASS_CONFIG, LongSerializer.class);
        props.put(ProducerConfig.VALUE_SERIALIZER_CLASS_CONFIG, JsonSerializer.class);
        props.put(ProducerConfig.CLIENT_ID_CONFIG, kafkaProducerId);
        return props;
    }
    @Beanpublic ProducerFactory<Long, StarshipDto> producerStarshipFactory(){
        returnnew DefaultKafkaProducerFactory<>(producerConfigs());
    }
    @Beanpublic KafkaTemplate<Long, StarshipDto> kafkaTemplate(){
        KafkaTemplate<Long, StarshipDto> template = new KafkaTemplate<>(producerStarshipFactory());
        template.setMessageConverter(new StringJsonMessageConverter());
        return template;
    }
}
Of the static variables, we need the address of the kafka server and the producer ID. He can be anything.
In the configs, as we see, there is nothing special. Almost the same. But with regard to factories, there is a significant difference. We must register a template for each class, the objects of which we will send to the server, as well as a factory for it. We have one such pair, but there can be dozens of them.
In the template, we mark that we will serialize the objects in JSON, and this, perhaps, is enough.
We have a consumer and a producer, it remains to write a service that will send messages and receive them.
@Service@Slf4j
publicclassStarshipServiceImplimplementsStarshipService{
    privatefinal KafkaTemplate<Long, StarshipDto> kafkaStarshipTemplate;
    privatefinal ObjectMapper objectMapper;
    @AutowiredpublicStarshipServiceImpl(KafkaTemplate<Long, StarshipDto> kafkaStarshipTemplate,
                               ObjectMapper objectMapper){
        this.kafkaStarshipTemplate = kafkaStarshipTemplate;
        this.objectMapper = objectMapper;
    }
    @Overridepublicvoidsend(StarshipDto dto){
        kafkaStarshipTemplate.send("server.starship", dto);
    }
    @Override@KafkaListener(id = "Starship", topics = {"server.starship"}, containerFactory = "singleFactory")
    publicvoidconsume(StarshipDto dto){
        log.info("=> consumed {}", writeValueAsString(dto));
    }
    private String writeValueAsString(StarshipDto dto){
        try {
            return objectMapper.writeValueAsString(dto);
        } catch (JsonProcessingException e) {
            e.printStackTrace();
            thrownew RuntimeException("Writing value to JSON failed: " + dto.toString());
        }
    }
}
There are only two methods in our service, they are enough for us to explain the client's work. We autowire the patterns we need:
privatefinal KafkaTemplate<Long, StarshipDto> kafkaStarshipTemplate;Producer Method:
@Overridepublicvoidsend(StarshipDto dto){
        kafkaStarshipTemplate.send("server.starship", dto);
    }
All that is required to send a message to the server is to call the send method on the template and transfer the topic (topic) and our object there. The object will be serialized in JSON and will fly to the server under the specified topic.
The listening method looks like this:
@Override@KafkaListener(id = "Starship", topics = {"server.starship"}, containerFactory = "singleFactory")
    publicvoidconsume(StarshipDto dto){
        log.info("=> consumed {}", writeValueAsString(dto));
    }
We mark this method with @KafkaListener annotation, where we indicate any ID that we like, listened topics and a factory that will convert the received message to what we need. In this case, since we accept one object, we need a singleFactory. For List <?>, Specify batchFactory. As a result, we send the object to the kafka-server using the send method and get it using the consume method.
You can write a test in 5 minutes that will demonstrate the full strength of Kafka, but we will go further - spend 10 minutes and write another application that will send messages to the server that our first application will listen to.
kafka-tester
Having the experience of writing the first application, we can easily write the second, especially if we copy the paste and the dto package, register only the producer (we will only send messages) and add the only send method to the service. Using the link below, you can easily download the project code and make sure that there is nothing complicated there.
@Scheduled(initialDelay = 10000, fixedDelay = 5000)
    @Overridepublicvoidproduce(){
        StarshipDto dto = createDto();
        log.info("<= sending {}", writeValueAsString(dto));
        kafkaStarshipTemplate.send("server.starship", dto);
    }
    private StarshipDto createDto(){
        returnnew StarshipDto("Starship " + (LocalTime.now().toNanoOfDay() / 1000000));
    }
After the first 10 seconds, kafka-tester starts sending messages with the names of starships to the Kafka server every 5 seconds (the picture is clickable). There they listen and receive kafka-server (the picture is also clickable). I hope that those who dream of starting to write microservices at Kafka will succeed as easily as I did. And here are the links to the projects: → kafka-server → kafka-tester