Automation of airing a room through a window and what came of it
It all started with the fact that it became hot in the room if the computer was working, the room was not often aired for my absence or laziness (although it would seem that you just need to open the window). In short, I decided to make this "device". In essence, a temperature sensor was required, a mechanism opening and closing a window and automation that controls all this.
I was already doing a little pampering with the controllers at that time, so I decided that I needed a controller and the simplest temperature sensor (it’s also a thermistor) - it’s wonderful, it’s done, I bought these things on a breadboard, tried out the simplest automation like heating the sensor breathing - the LED lights up, the sensor cools down - the LED goes out. It turned out something like this:
Great, it works! the next question arose - breathing is all clear, but I would like specific temperature values, after a long calculation of the voltage values and translating them into temperature, I got more or less accurate temperature values that I observed on a computer monitor taking values from the COM port. Also rejoiced at this achievement (it would seem that a person needs for joy). Then an idea came up, but I would have to look at the temperature values without a computer, and indeed a separate device that works on its own and if you need to communicate with a computer - it seems like it will be interesting. The option with seven-segment indicators swept away somehow very quickly - it’s not interesting type. decided to conclude on the LCD.

I used such an indicator, began to understand what was there and what it was like, what they needed there, tested it on a breadboard and came to this conclusion - they need initial initialization, it depends on the particular indicator used, and when observing any delays, I thought that if I an analog temperature sensor with time conversion, the indicator also has all sorts of delays, and you also need a window opening mechanism, most likely you will have to do the time calculation on the engine there too.
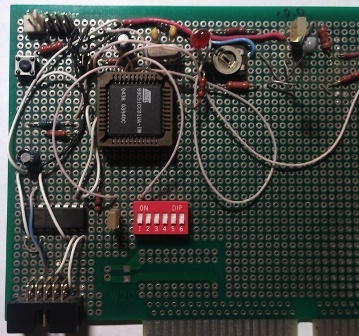
In general, I decided to make a separate module that will deal with information output (later nicknamed its MVTI text information output module), and the main controller will think about the fact that there will not even be any delays there, besides, it saves memory. I decided to use the standard COM port interface (RS-232). The task was this: I receive the characters via RS-232, I output them to the LCD, before starting all the necessary initialization is carried out, all the necessary delays are observed, all kinds of checks are made such as the number of characters to print 40 characters, transitions to a new line, and the table of correspondence of the characters of the encoding data coming from COM port and LCD, I really wanted the conclusion to be in Russian.
I dealt with this issue - created a circuit, parted the circuit board and had to start manufacturing it, something the LUT technology went bad for me, and I decided to try it in China, read an entire article about it on the hub, and decided to order it in the same place where they wrote in the article, the board manufacturer’s website. They have a minimum order of 5 pieces and add 1 to the appendage for free (in general, for any price it is more profitable than ordering from us). I ordered these 5 pieces from them, I thought it would come in handy if I still would do such modules, they turn out universal, you can just put the modem cable on the computer to zero and output something (apply power from the unit). A month later they sent me boards, soldered the elements there, wrote a program for the controller which was in the module, tested it, and I liked it as a first approximation, then quietly adjusted it as I found something. The final version came out like this.

Now I got the temperature on the LCD in the form: Temperature 23 degrees, a new problem arose; she jumped at the slightest blow of the breeze, such as opening the door of a window, he walked by himself - made averaging, it turned out to be normal. The temperature is certainly good, but I also wanted to get time there. I tried to do this, added to the code, found that there are flaws when turning off the power - it goes astray and needs to be set every time. There was not enough experience working with controllers and over time it didn’t work out very well, the seconds were different and errors quickly ran up. After trying that, I began to think what to do, Arduino developed and cheap real-time modules appeared, and I decided on that.
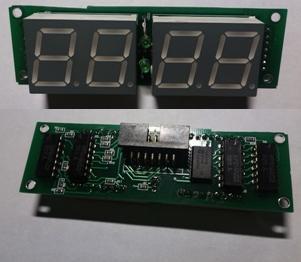
I took an Arduino Leonardo with 2 UART ports (one for a text output module, the second for a standard computer connection), a real-time module. There were no problems with libraries, there was enough code on the Internet, I quickly wrote the code, tested it and enjoyed life - the time went by and the date was there too, and when I turned off, the time did not go wrong, it was a wonderful life. But here I didn’t sit and didn’t like that on the small screen of the LCD, the time is very small, it would be necessary to come up with something, and I decided to make a time output module on seven-segment indicators. I did not find a seven-segment indicator with two points of a good size. I used 2 dual plus 2 LEDs for dots, I decided to do the same as the previous one, but not to make it frequency, but with memory chips that store the state of hours and minutes i.e. time is written there 1 time per minute, then the pins are free for other tasks. it turned out here is such a module:
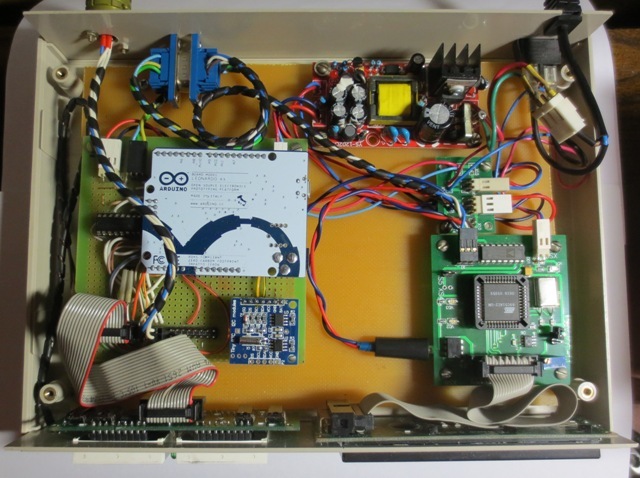
Then he found a suitable case, purchased a power supply on Ali, assembled it works - the eye pleases:


The next step is the mechanism that opens the window. My wooden window opens on the side of a narrow and long window to the top. Here, not a little time was lost until I picked up a more or less suitable option for a system that deals with opening and closing a window. At the last moment, the mechanism looks like this:

Everything was collected from improvised means, the traction was taken from the mechanism of the bar cabinet door (still of Soviet design), the stepper motor from the printer (driver on the L293 chip), the white plastic part was printed on a 3D printer. Several times the design, lightened and redone, currently performs its function, not quite satisfied with it - so I plan to modernize it. For example, a program was recorded so that at a temperature of more than 27 it opens a window, closes the window at less than 24 degrees, but it is planned to ventilate in time with a focus on temperature: if the temperature decreases during ventilation, then airing is small in time, more often, the airing itself and vice versa .
Link to the video of opening and closing the window
Lastly: It turned out to be a rather peculiar device with the possibility of further cramming into it some kind of functional, such as turning on time light sensors - a sort of nano-smart home.
PS: I will listen to opinions, ideas, comments, etc.
I was already doing a little pampering with the controllers at that time, so I decided that I needed a controller and the simplest temperature sensor (it’s also a thermistor) - it’s wonderful, it’s done, I bought these things on a breadboard, tried out the simplest automation like heating the sensor breathing - the LED lights up, the sensor cools down - the LED goes out. It turned out something like this:
Great, it works! the next question arose - breathing is all clear, but I would like specific temperature values, after a long calculation of the voltage values and translating them into temperature, I got more or less accurate temperature values that I observed on a computer monitor taking values from the COM port. Also rejoiced at this achievement (it would seem that a person needs for joy). Then an idea came up, but I would have to look at the temperature values without a computer, and indeed a separate device that works on its own and if you need to communicate with a computer - it seems like it will be interesting. The option with seven-segment indicators swept away somehow very quickly - it’s not interesting type. decided to conclude on the LCD.
I used such an indicator, began to understand what was there and what it was like, what they needed there, tested it on a breadboard and came to this conclusion - they need initial initialization, it depends on the particular indicator used, and when observing any delays, I thought that if I an analog temperature sensor with time conversion, the indicator also has all sorts of delays, and you also need a window opening mechanism, most likely you will have to do the time calculation on the engine there too.
In general, I decided to make a separate module that will deal with information output (later nicknamed its MVTI text information output module), and the main controller will think about the fact that there will not even be any delays there, besides, it saves memory. I decided to use the standard COM port interface (RS-232). The task was this: I receive the characters via RS-232, I output them to the LCD, before starting all the necessary initialization is carried out, all the necessary delays are observed, all kinds of checks are made such as the number of characters to print 40 characters, transitions to a new line, and the table of correspondence of the characters of the encoding data coming from COM port and LCD, I really wanted the conclusion to be in Russian.
I dealt with this issue - created a circuit, parted the circuit board and had to start manufacturing it, something the LUT technology went bad for me, and I decided to try it in China, read an entire article about it on the hub, and decided to order it in the same place where they wrote in the article, the board manufacturer’s website. They have a minimum order of 5 pieces and add 1 to the appendage for free (in general, for any price it is more profitable than ordering from us). I ordered these 5 pieces from them, I thought it would come in handy if I still would do such modules, they turn out universal, you can just put the modem cable on the computer to zero and output something (apply power from the unit). A month later they sent me boards, soldered the elements there, wrote a program for the controller which was in the module, tested it, and I liked it as a first approximation, then quietly adjusted it as I found something. The final version came out like this.
Now I got the temperature on the LCD in the form: Temperature 23 degrees, a new problem arose; she jumped at the slightest blow of the breeze, such as opening the door of a window, he walked by himself - made averaging, it turned out to be normal. The temperature is certainly good, but I also wanted to get time there. I tried to do this, added to the code, found that there are flaws when turning off the power - it goes astray and needs to be set every time. There was not enough experience working with controllers and over time it didn’t work out very well, the seconds were different and errors quickly ran up. After trying that, I began to think what to do, Arduino developed and cheap real-time modules appeared, and I decided on that.
I took an Arduino Leonardo with 2 UART ports (one for a text output module, the second for a standard computer connection), a real-time module. There were no problems with libraries, there was enough code on the Internet, I quickly wrote the code, tested it and enjoyed life - the time went by and the date was there too, and when I turned off, the time did not go wrong, it was a wonderful life. But here I didn’t sit and didn’t like that on the small screen of the LCD, the time is very small, it would be necessary to come up with something, and I decided to make a time output module on seven-segment indicators. I did not find a seven-segment indicator with two points of a good size. I used 2 dual plus 2 LEDs for dots, I decided to do the same as the previous one, but not to make it frequency, but with memory chips that store the state of hours and minutes i.e. time is written there 1 time per minute, then the pins are free for other tasks. it turned out here is such a module:
Then he found a suitable case, purchased a power supply on Ali, assembled it works - the eye pleases:
The next step is the mechanism that opens the window. My wooden window opens on the side of a narrow and long window to the top. Here, not a little time was lost until I picked up a more or less suitable option for a system that deals with opening and closing a window. At the last moment, the mechanism looks like this:
Everything was collected from improvised means, the traction was taken from the mechanism of the bar cabinet door (still of Soviet design), the stepper motor from the printer (driver on the L293 chip), the white plastic part was printed on a 3D printer. Several times the design, lightened and redone, currently performs its function, not quite satisfied with it - so I plan to modernize it. For example, a program was recorded so that at a temperature of more than 27 it opens a window, closes the window at less than 24 degrees, but it is planned to ventilate in time with a focus on temperature: if the temperature decreases during ventilation, then airing is small in time, more often, the airing itself and vice versa .
Link to the video of opening and closing the window
Lastly: It turned out to be a rather peculiar device with the possibility of further cramming into it some kind of functional, such as turning on time light sensors - a sort of nano-smart home.
PS: I will listen to opinions, ideas, comments, etc.