Review of the Fibaro Starter Kit. Female look at smart home
This article will focus on home automation, but not in the most common way. We all know that the best friends of girls are far from sensors and various devices. We decided to prove the opposite.
We performed an experiment where, on the one hand, the Fibaro Starter Kit, on the other, I am an athlete, a Komsomol member and just a beauty. The combination of elegant devices from Fibaro, the beautiful interface of Home Center Lite, the need to create a secure smart home led to the desire to do it yourself.
What came of it is under the cut.

Fibaro is a Z-Wave wireless intelligent building automation system.
In turn, the Fibaro Starter Kit is a very interesting and no less useful set of sensors with a controller.
Starter Kit - allows you to try the advantages of the Fibaro system and make a small smart home with your own hands. Moreover, in a format that is accessible even to the most technically savvy. All devices in the kit are powered by batteries or from a 220V outlet. This allows you to make your smart home, even where the miracle of design thought has already found its place.
Part 2. What's in the
So, inside this wonderful box are:
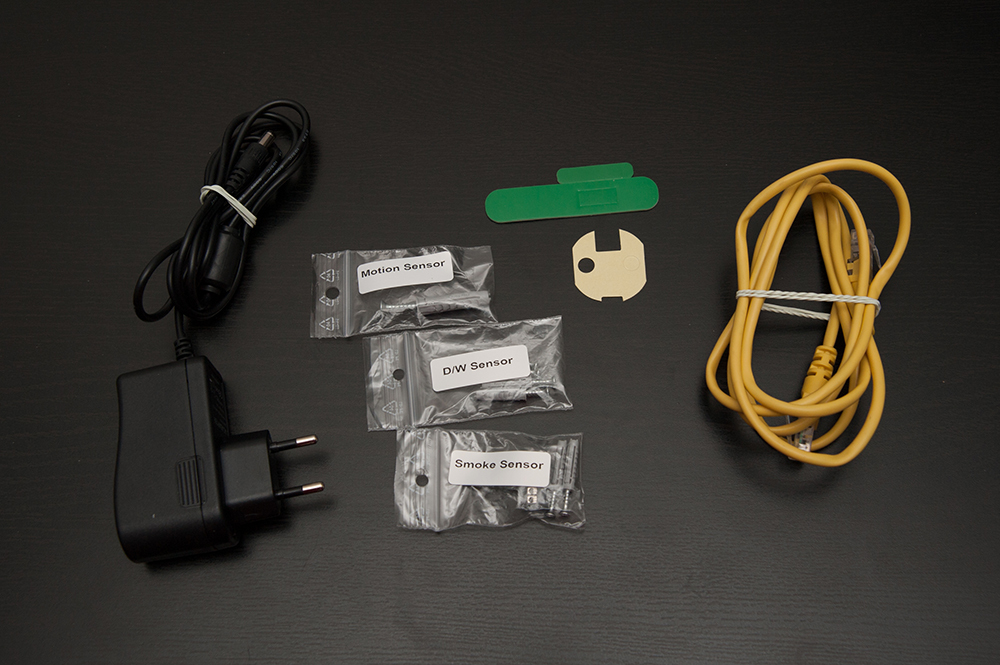
I. “Control device” or Home Center Lite controller and directly connected to it:
1. Antenna
2. Ethernet cable
3. Power adapter
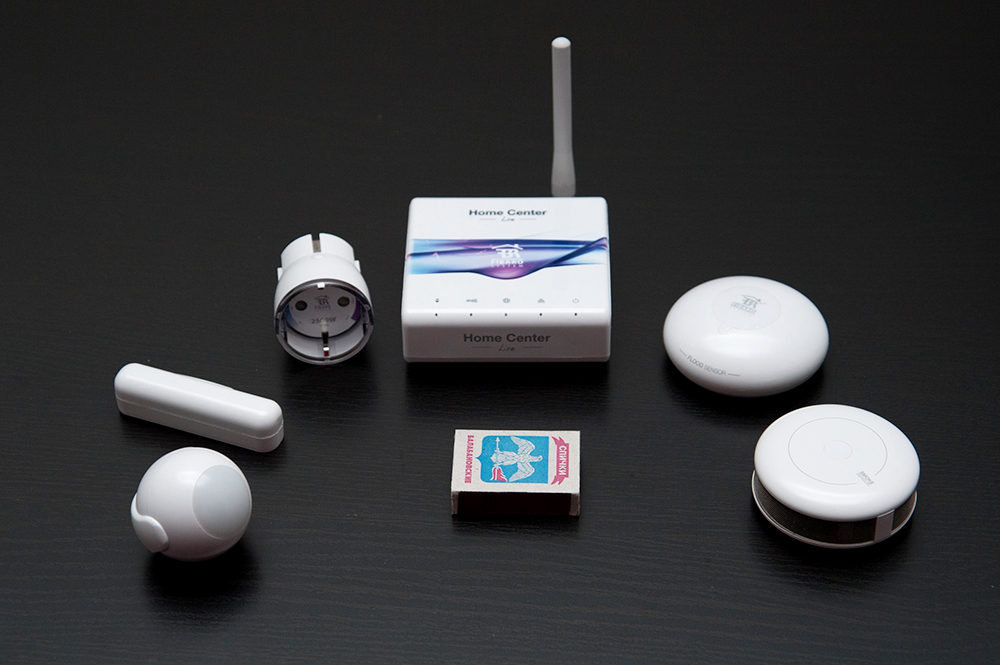
II. Controlled devices or sensors:
1. Motion sensor
2. Leakage sensor
3. Door open / close
sensor 4. Smoke sensor
5. “Smart” plug
III. Instruction manual
Yes, there are not only sensors, but I decided to start with them, it’s because there are so many interesting things (what they do and, most importantly, what they look like).
As I already wrote, we have 5 sensors, now we will consider them in more detail.
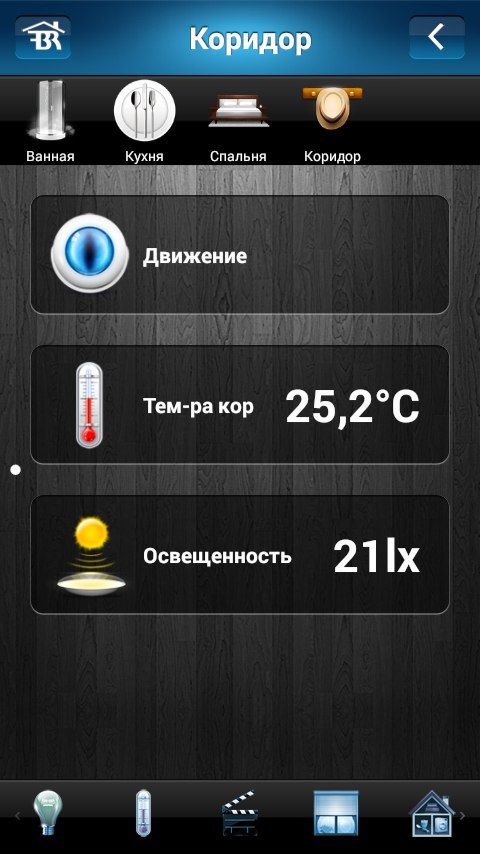
The first and perhaps the most original-looking - Fibaro Motion Sensor FGMS-001 or motion sensor.
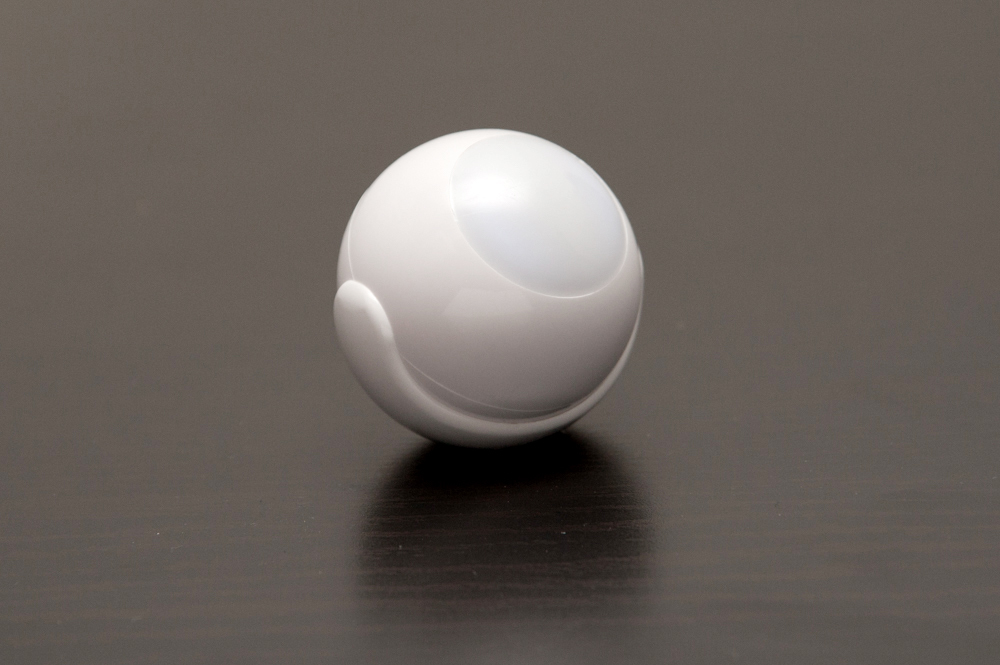
Description:
Some say that it looks just like a ball, creators that look like a cat's eye. In my opinion, he is generally alive, because he constantly "talks" about the current state with the help of different colors. Big brother watching you.
So, the size is 45mm in diameter, weight is about 40g. Inside, a button for connecting to the Z-Wave network, an LED and a CR123A battery.
What can?
- respond to movements
- measure the room temperature
- determine the lighting of the room
And all this accompanies the reaction in different colors:
- blue
- red
- white
- green
- purple The
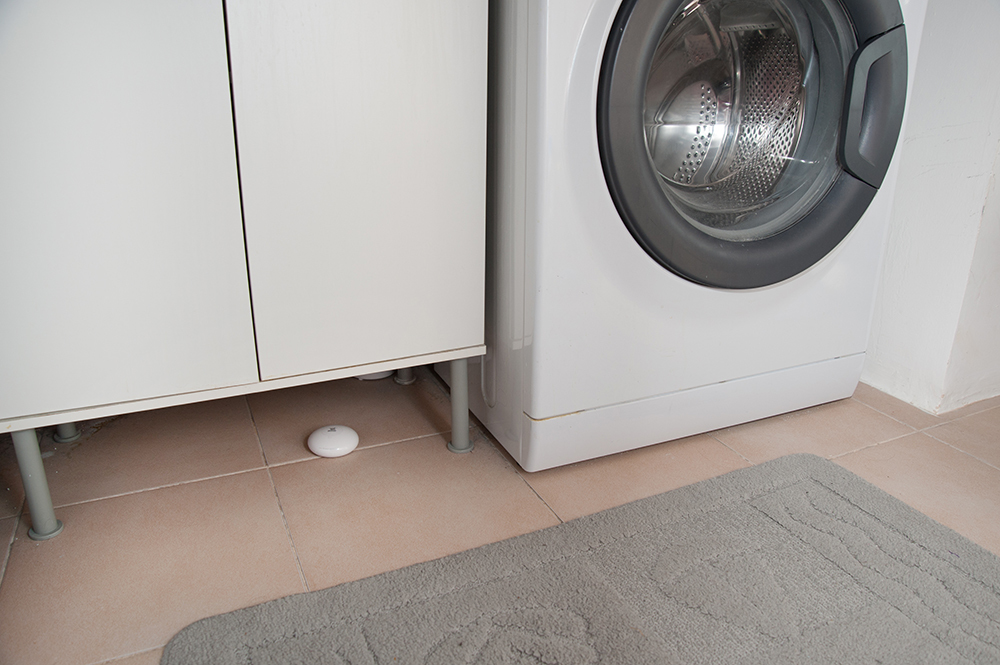
second and no less interesting - Fibaro Flood Sensor FGFS-101 or leakage sensor.
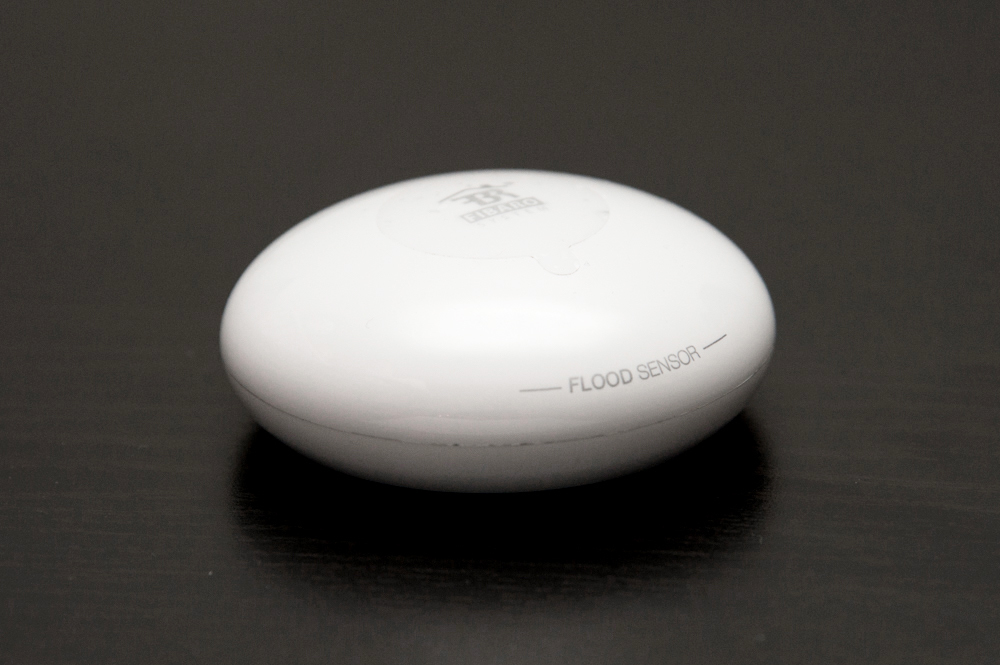
Description:
A small device, similar to a flat pebble, which informs you of a leak with a fairly loud signal, and if you configure the scenes (about which later), you will receive a notification on the phone or information appears in the Home Center. A caring sensor stands on three gold spring-loaded contacts that are located on the bottom of the plastic case, which allows you to put the sensor even on uneven surfaces.
Size: 72mm in diameter, 30mm in height. Inside there is a CR123A battery, an indicator LED, a terminal block for signaling, a wired sensor and 12V power, an audio detector and a button for connecting to the Z-Wave network.
What it can do:
- read the room temperature
- warn about a leak that has occurred with a loud signal
- show information about the status of the sensor at a given time
The third on the list is Fibaro Door / Window Sensor, FGK or a sensor for opening / closing a door (window).
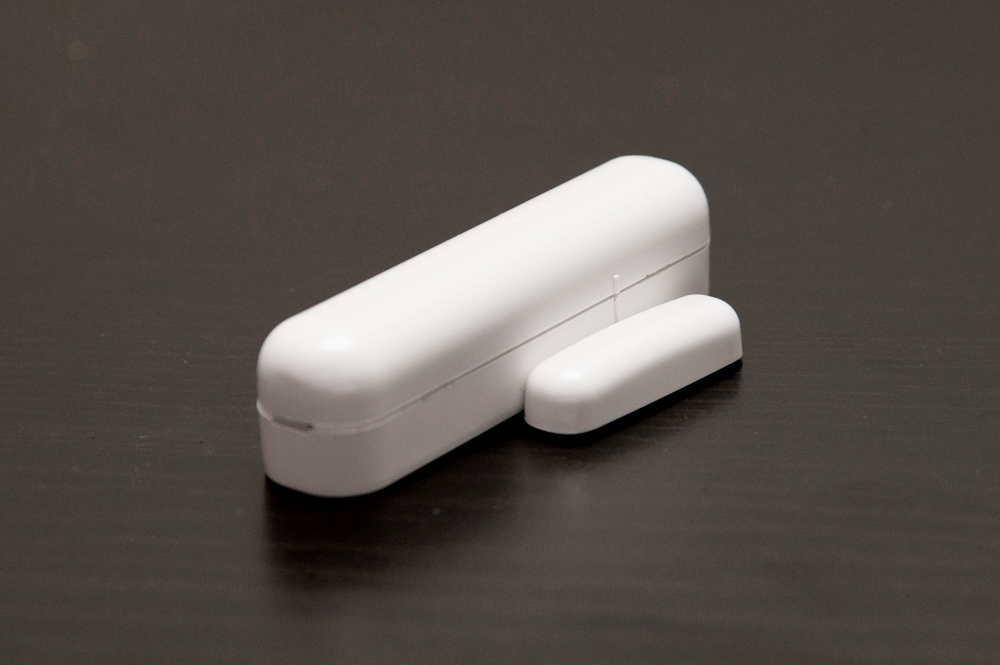
Description:
Two small parts, one of which is attached to the door jamb, the second directly to the door. The size of the large and small parts, respectively: 75mm x 18mm x 19mm and 35mm x 10mm x 8mm. Great friends with the DS18B20 temperature sensor. Inside the large part is an ER14250 1 / AA battery and an input for both the temperature sensor and the binary sensor. The Z-Wave power button is located on the back of the chassis. The smaller of the two parts is a magnet in a plastic case.
What can:
When the two parts are separated from each other, you are sent a signal that you have an uninvited guest at home. Well, if it is paired with a DS18B20, then it reads the room temperature.
The fourth in line for a description is the Fibaro SMOKE Sensor, FGSS or smoke detector.
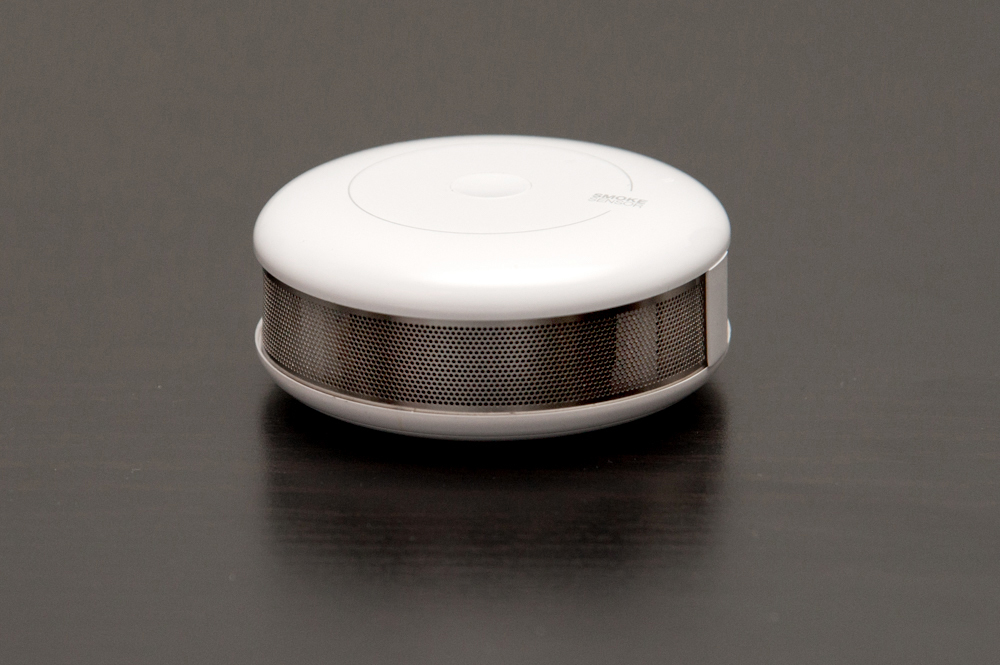
Description:
The device does not overtake the Fibaro Flood Sensor. Only it looks more like a puck due to its streamlined shape. Diameter 65mm, height 28mm. On the side there is a metal mesh for air access inside. On the top there is a button for connecting to the Z-Wave network and an indicator LED. Under the cover of the sensor is a CR123A battery, a block for wired connection, a mount for dismantling and a sound detector.
What can:
Some materials burn without smoke. That is why the Smoke Sensor has an additional protection built-in - a temperature sensor. The sensor monitors the room temperature and, even if the amount of smoke is not enough to turn on the alarm, when the temperature rises sharply, the sensor assumes a fire.
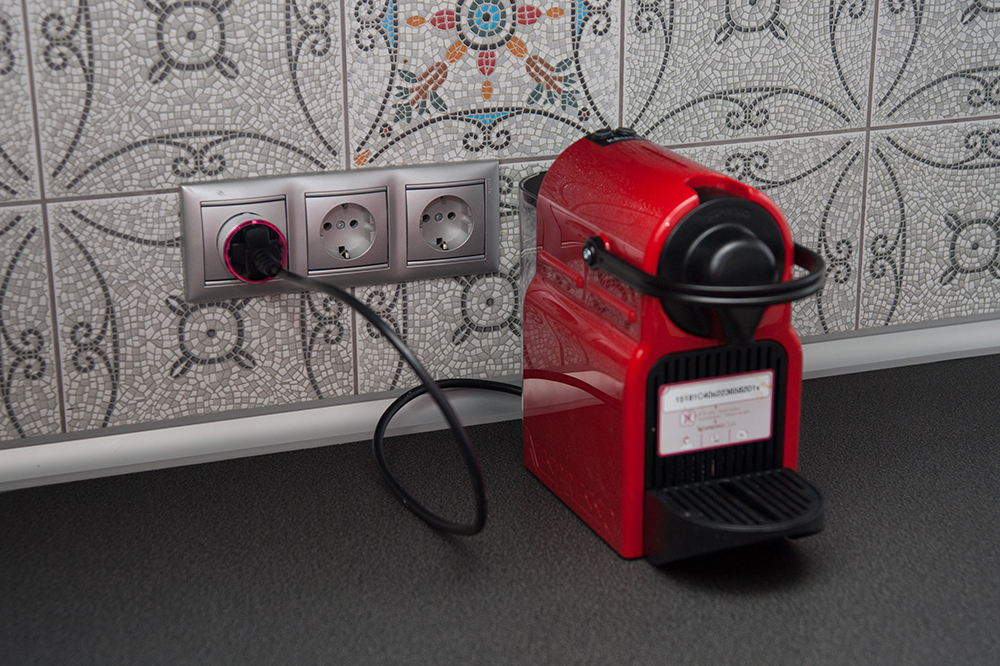
Last in line is the Fibaro Wall Plug FGWPF or smart plug.

It is smart not because it calculates double integrals, but because it monitors power consumption and turns off if it is exceeded.
Description:
A controlled adapter, in theory, is a plug with an input for the plug. Used to control devices with output power up to 2500W.
Dimensions are similar to a standard adapter of this type (inner diameter 38mm), the height of the protruding part 47mm
What can:
With the help of a plug, you can remotely turn the device on and off and monitor the energy consumed.
The LED ring-indicator visualizes the current energy consumption - from blue (low) to violet (high).
It is convenient that everything that is needed for installation is included in the kit, from
self- tapping screws to adhesive tape: Yes, and the process itself took me very little time.
Also, it should be noted that all sensors, a controller and accessories are separately more expensive than buying a Starter Kit. Upon closer inspection, the price of the kit is 52,360 rubles, the amount for the sensors and the controller is not included - 8-9 thousand more. I don’t even know what to consider as a plus or minus. The kit has everything you need for the initial equipment of a smart home. But if you want more - and you’ll definitely want more - you have to buy it yourself.
Now that all the sensors are described, their characteristics are disassembled, let's see what happens “inside” the flight control center.
So, we need to:
- turn on the controller on the local network and connect it to power
- find the IP address of the controller on the local network using fibaro finder (available for download on the official fibaro.com website in the “Support” menu for Windows and Mac)
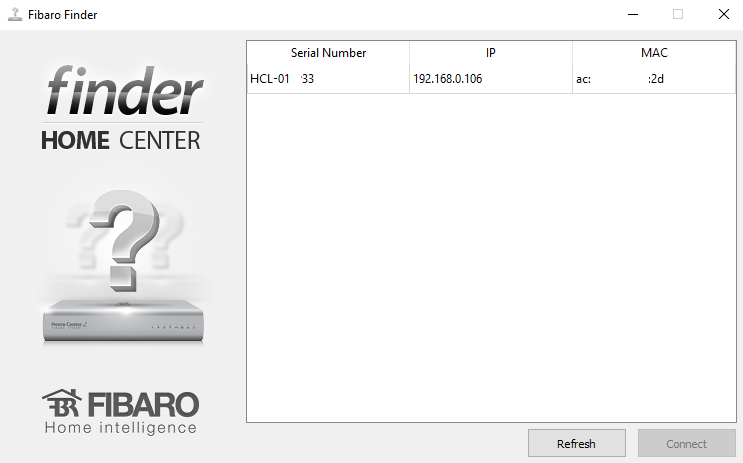
- open it web interface in the browser. On the login page, you can change the language. Enter the username and password in the fields: admin / admin and here we are - on the control page. It is a very nice and understandable interface.
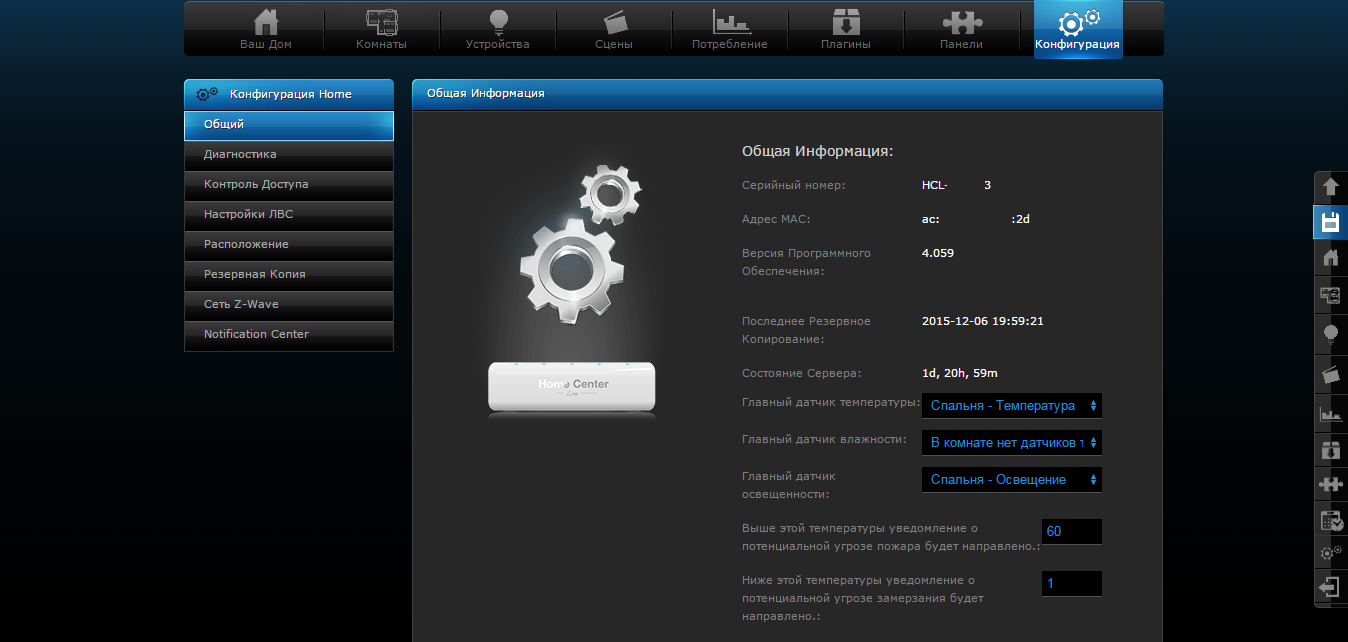
To see information about the Home Center itself, we must go to the configuration and here - the serial number, MAC address, the latest installed software and more. Here you can restart the HC. On the left is a compact control panel.
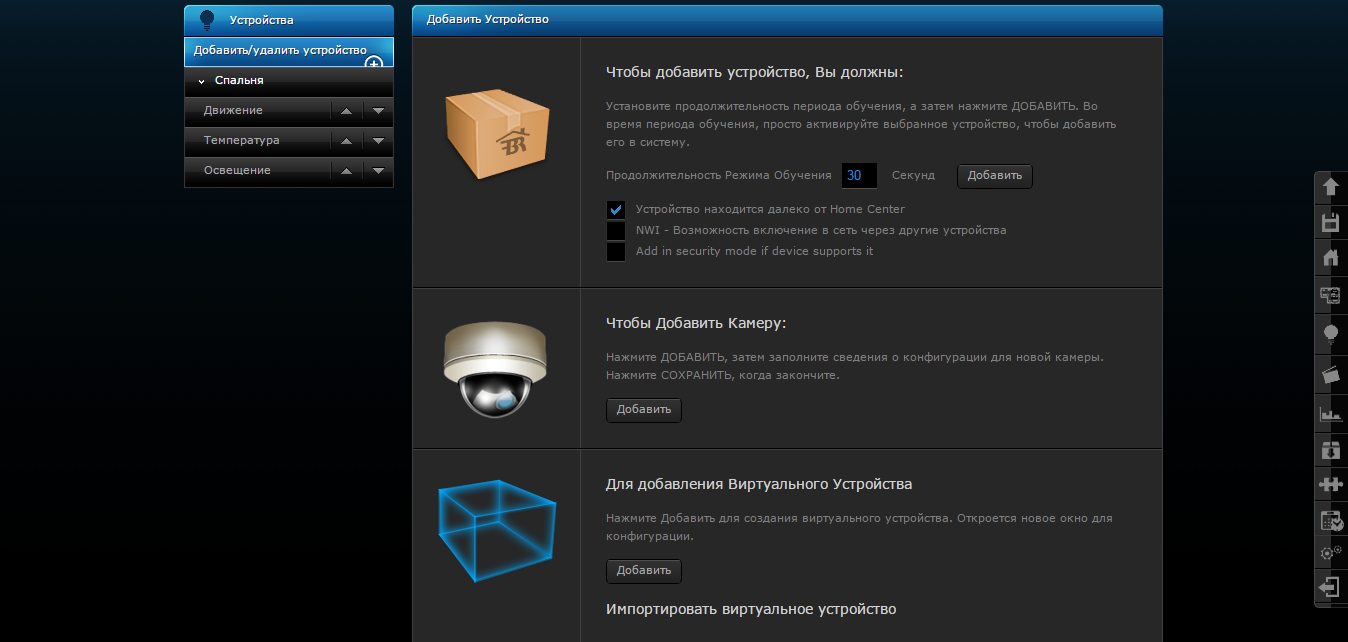
To add a device you need to go to "Devices", in the menu on the left, "Add / Remove Device". A description of how and what will appear on the screen, and, most importantly, why you need to do it. The timer for connecting the device to the network can be changed from 30 seconds to 40.50, etc. It looks like this:
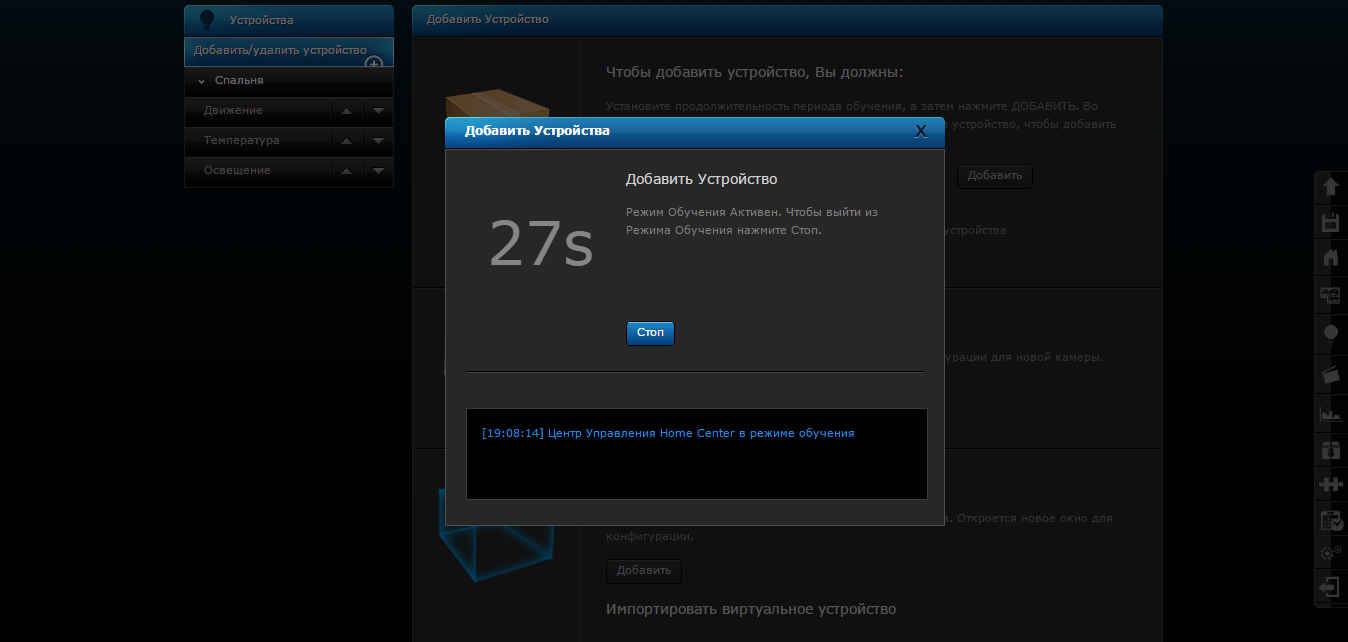
To add the device correctly - you must first insert the battery into the device itself, it should give you a signal that it turned on - it will be a sound or a blink. Then, by clicking on the “Add” web interface, we press the device button three times (for the smoke and reed sensors it is on the outside of the case, for the leakage sensor and the motion sensor - inside the case under the covers, it is enough to plug the plug into the outlet at the time of the initial additions) and we see a timer during which our sensor should turn on:
After adding devices, we get such a nice picture:

Scenes are divided into two types: "Magic" and realized using graphic blocks.
The first ones are needed for alerts and sensor monitoring. We simply select the device and say that if it worked, then a push-notification will come to the phone / mail that there is clearly someone superfluous in the apartment.
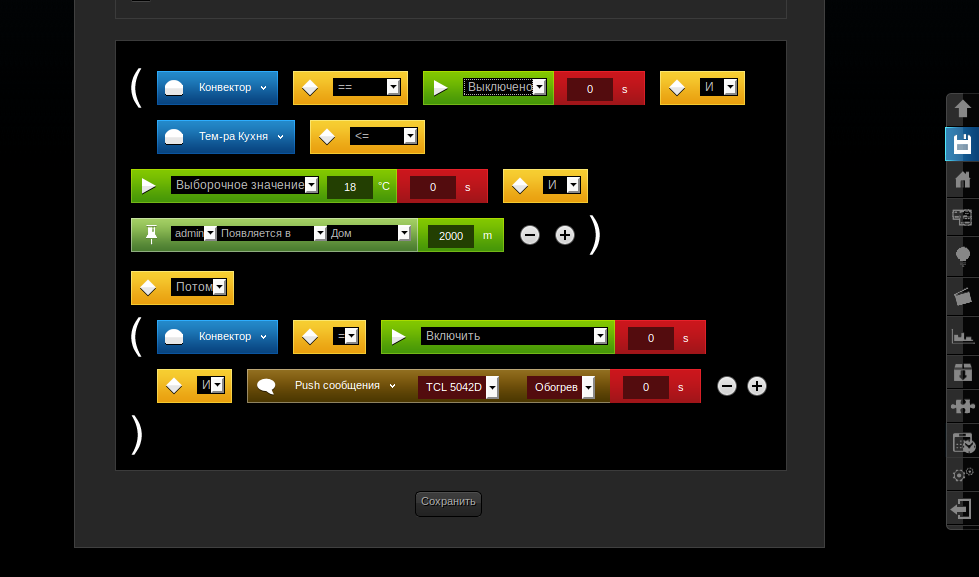
The second type of scene creation is through graphic blocks. Before your eyes, as a designer, a script is composed of different particles, which you add and expose where you need the values that suit you. Such scenarios can be complex with multiple devices.
A very good idea for the scenario comes to mind when you come to the cottage / country house or just home, and it’s cold there, and you have to wait until the convector heats up.
To warm the house before our arrival, you need two sensors, one convector and imagination. The scenario is as follows: the socket is turned off, the temperature read from the sensor is less than or equal to 16 degrees, if these conditions are met, there is a third - we should appear at a previously set point on the map, for example, not far from the house (about 1000m). When these three conditions are fulfilled, we simply plug in the outlet into which we have a convector, and while we go home, it will heat the room so that when we arrive it will be warm enough. You can also do the opposite, if the temperature in the house exceeds the desired norm, just turn off the convector, more precisely, it will turn off according to the scenario.
In fact, there are an unlimited number of ideas for scenarios, for example, you can add a camera to the Home Center and write a script in which, when the motion sensor is triggered, an alert will be sent to the phone, and a picture from the camera will be sent to the mail to see what happens while we are not at home.
Or make an alert to all family members who are closer to home - and he will come to troubleshoot.
From the base:
For remote access, we need the website home.fibaro.com, there we will register and add our HC by its MAC address and name so that we can also monitor our sensors outside the home.
And more! You can download the application for Android and iOS phones, from there you can also run scripts, monitor the status of sensors remotely, monitor the situation when we are not at home and even get a picture from the camera, if it is installed and added to HC. Sometimes the speed of data transmission from sensors to the phone in the form of push notifications may not be what you want. But this is not the drawback that puts an end to this set. Perhaps there are no such drawbacks. But there are notifications by e-mail, which is good news.
In fact, all this works great and even surprises with its simplicity and at the same time multifunctionality. Here you have both the temperature and the notification of the flood / smoke that happened, shutdown remotely, turn on while we drive home (according to the scenario). And another important aspect and a huge plus is that integration with other devices is possible, for example Sonos, Samsung Smart TV, Philips hue bulbs, Netatmo station.
However, from the minuses there is the fact that the functionality is really limited by a not very large number of devices. All in the world you can’t imagine only with this set and the flight of fantasy will last extremely short. But if more is not needed (and this often happens), then you can safely make this set a gift. Again, you can give your wife a holiday (“she won’t like it, play it myself”).
For the first acquaintance with a smart home, a very interesting and good box. It causes a strong desire to continue and increase their success in this matter.
In creating a smart home with Fibaro Home Center, all Z-Wave devices are available to us (light control - relays, dimmers, blinds, RGBW, power relay; blind control, climate control - air conditioning, batteries, underfloor heating, convectors; security sensors - movement, openings, leaks, CO; electricity meters; locks; multimedia and siren controls) and all manufacturers of Z-Wave devices with their model range (Fibaro, Z-Wave.Me, Philio, Everspring, Vision, Sigenia, Danfoss, Remotec, Eurotronic, POPP, MiCasaVera, Aeotec).
So, what did we finally get when the girl picked up a kit for home automation? Nothing terrible happened. The devices work - there is no cat floating around the apartment, neighbors will not have to call the fire department, because on the phone if a notification arrives. The set has many advantages and very few disadvantages that stem from some ideal. On this, I think, we can end and say only that when the best friends of the girls are far from diamonds, but sensors and a controller, then the house promises to be really smart and safe.
Fibaro Home Center is available in Russia from our partners 5 travel smart , that until February 10 this year, give 5% of coupon code GT_FIBARO .
Recommended retail price 52360 rub.
We performed an experiment where, on the one hand, the Fibaro Starter Kit, on the other, I am an athlete, a Komsomol member and just a beauty. The combination of elegant devices from Fibaro, the beautiful interface of Home Center Lite, the need to create a secure smart home led to the desire to do it yourself.
What came of it is under the cut.
Part 1. A bit of information
Fibaro is a Z-Wave wireless intelligent building automation system.
In turn, the Fibaro Starter Kit is a very interesting and no less useful set of sensors with a controller.
Starter Kit - allows you to try the advantages of the Fibaro system and make a small smart home with your own hands. Moreover, in a format that is accessible even to the most technically savvy. All devices in the kit are powered by batteries or from a 220V outlet. This allows you to make your smart home, even where the miracle of design thought has already found its place.
Part 2. What's in the black box of the Starter Kit box?
So, inside this wonderful box are:
I. “Control device” or Home Center Lite controller and directly connected to it:
1. Antenna
2. Ethernet cable
3. Power adapter
II. Controlled devices or sensors:
1. Motion sensor
2. Leakage sensor
3. Door open / close
sensor 4. Smoke sensor
5. “Smart” plug
III. Instruction manual
Part 3. Sensor Magic
Yes, there are not only sensors, but I decided to start with them, it’s because there are so many interesting things (what they do and, most importantly, what they look like).
As I already wrote, we have 5 sensors, now we will consider them in more detail.
The first and perhaps the most original-looking - Fibaro Motion Sensor FGMS-001 or motion sensor.
Description:
Some say that it looks just like a ball, creators that look like a cat's eye. In my opinion, he is generally alive, because he constantly "talks" about the current state with the help of different colors. Big brother watching you.
So, the size is 45mm in diameter, weight is about 40g. Inside, a button for connecting to the Z-Wave network, an LED and a CR123A battery.
What can?
- respond to movements
- measure the room temperature
- determine the lighting of the room
And all this accompanies the reaction in different colors:
- blue
- red
- white
- green
- purple The
second and no less interesting - Fibaro Flood Sensor FGFS-101 or leakage sensor.
Description:
A small device, similar to a flat pebble, which informs you of a leak with a fairly loud signal, and if you configure the scenes (about which later), you will receive a notification on the phone or information appears in the Home Center. A caring sensor stands on three gold spring-loaded contacts that are located on the bottom of the plastic case, which allows you to put the sensor even on uneven surfaces.
Size: 72mm in diameter, 30mm in height. Inside there is a CR123A battery, an indicator LED, a terminal block for signaling, a wired sensor and 12V power, an audio detector and a button for connecting to the Z-Wave network.
What it can do:
- read the room temperature
- warn about a leak that has occurred with a loud signal
- show information about the status of the sensor at a given time
The third on the list is Fibaro Door / Window Sensor, FGK or a sensor for opening / closing a door (window).
Description:
Two small parts, one of which is attached to the door jamb, the second directly to the door. The size of the large and small parts, respectively: 75mm x 18mm x 19mm and 35mm x 10mm x 8mm. Great friends with the DS18B20 temperature sensor. Inside the large part is an ER14250 1 / AA battery and an input for both the temperature sensor and the binary sensor. The Z-Wave power button is located on the back of the chassis. The smaller of the two parts is a magnet in a plastic case.
What can:
When the two parts are separated from each other, you are sent a signal that you have an uninvited guest at home. Well, if it is paired with a DS18B20, then it reads the room temperature.
The fourth in line for a description is the Fibaro SMOKE Sensor, FGSS or smoke detector.
Description:
The device does not overtake the Fibaro Flood Sensor. Only it looks more like a puck due to its streamlined shape. Diameter 65mm, height 28mm. On the side there is a metal mesh for air access inside. On the top there is a button for connecting to the Z-Wave network and an indicator LED. Under the cover of the sensor is a CR123A battery, a block for wired connection, a mount for dismantling and a sound detector.
What can:
Some materials burn without smoke. That is why the Smoke Sensor has an additional protection built-in - a temperature sensor. The sensor monitors the room temperature and, even if the amount of smoke is not enough to turn on the alarm, when the temperature rises sharply, the sensor assumes a fire.
Last in line is the Fibaro Wall Plug FGWPF or smart plug.
It is smart not because it calculates double integrals, but because it monitors power consumption and turns off if it is exceeded.
Description:
A controlled adapter, in theory, is a plug with an input for the plug. Used to control devices with output power up to 2500W.
Dimensions are similar to a standard adapter of this type (inner diameter 38mm), the height of the protruding part 47mm
What can:
With the help of a plug, you can remotely turn the device on and off and monitor the energy consumed.
The LED ring-indicator visualizes the current energy consumption - from blue (low) to violet (high).
It is convenient that everything that is needed for installation is included in the kit, from
self- tapping screws to adhesive tape: Yes, and the process itself took me very little time.
one more photo...


Also, it should be noted that all sensors, a controller and accessories are separately more expensive than buying a Starter Kit. Upon closer inspection, the price of the kit is 52,360 rubles, the amount for the sensors and the controller is not included - 8-9 thousand more. I don’t even know what to consider as a plus or minus. The kit has everything you need for the initial equipment of a smart home. But if you want more - and you’ll definitely want more - you have to buy it yourself.
Part 4. Scenes and more.
Now that all the sensors are described, their characteristics are disassembled, let's see what happens “inside” the flight control center.
So, we need to:
- turn on the controller on the local network and connect it to power
- find the IP address of the controller on the local network using fibaro finder (available for download on the official fibaro.com website in the “Support” menu for Windows and Mac)
- open it web interface in the browser. On the login page, you can change the language. Enter the username and password in the fields: admin / admin and here we are - on the control page. It is a very nice and understandable interface.
To see information about the Home Center itself, we must go to the configuration and here - the serial number, MAC address, the latest installed software and more. Here you can restart the HC. On the left is a compact control panel.
Adding devices.
To add a device you need to go to "Devices", in the menu on the left, "Add / Remove Device". A description of how and what will appear on the screen, and, most importantly, why you need to do it. The timer for connecting the device to the network can be changed from 30 seconds to 40.50, etc. It looks like this:
To add the device correctly - you must first insert the battery into the device itself, it should give you a signal that it turned on - it will be a sound or a blink. Then, by clicking on the “Add” web interface, we press the device button three times (for the smoke and reed sensors it is on the outside of the case, for the leakage sensor and the motion sensor - inside the case under the covers, it is enough to plug the plug into the outlet at the time of the initial additions) and we see a timer during which our sensor should turn on:
After adding devices, we get such a nice picture:
Create scenes.
Scenes are divided into two types: "Magic" and realized using graphic blocks.
The first ones are needed for alerts and sensor monitoring. We simply select the device and say that if it worked, then a push-notification will come to the phone / mail that there is clearly someone superfluous in the apartment.
The second type of scene creation is through graphic blocks. Before your eyes, as a designer, a script is composed of different particles, which you add and expose where you need the values that suit you. Such scenarios can be complex with multiple devices.
A very good idea for the scenario comes to mind when you come to the cottage / country house or just home, and it’s cold there, and you have to wait until the convector heats up.
To warm the house before our arrival, you need two sensors, one convector and imagination. The scenario is as follows: the socket is turned off, the temperature read from the sensor is less than or equal to 16 degrees, if these conditions are met, there is a third - we should appear at a previously set point on the map, for example, not far from the house (about 1000m). When these three conditions are fulfilled, we simply plug in the outlet into which we have a convector, and while we go home, it will heat the room so that when we arrive it will be warm enough. You can also do the opposite, if the temperature in the house exceeds the desired norm, just turn off the convector, more precisely, it will turn off according to the scenario.
In fact, there are an unlimited number of ideas for scenarios, for example, you can add a camera to the Home Center and write a script in which, when the motion sensor is triggered, an alert will be sent to the phone, and a picture from the camera will be sent to the mail to see what happens while we are not at home.
Or make an alert to all family members who are closer to home - and he will come to troubleshoot.
From the base:
- The leakage sensor will diagnose the presence of water, will inform you, but will not be able to shut off the water.
- With a smoke detector we learn about the fire, he will tell us about it.
- The socket module can be used for lighting in the living room, and if there are children, then with the help of this module they definitely will not sit behind the TV for a long time.
Part 5. Remote access.
For remote access, we need the website home.fibaro.com, there we will register and add our HC by its MAC address and name so that we can also monitor our sensors outside the home.
And more! You can download the application for Android and iOS phones, from there you can also run scripts, monitor the status of sensors remotely, monitor the situation when we are not at home and even get a picture from the camera, if it is installed and added to HC. Sometimes the speed of data transmission from sensors to the phone in the form of push notifications may not be what you want. But this is not the drawback that puts an end to this set. Perhaps there are no such drawbacks. But there are notifications by e-mail, which is good news.
Part 6. Summing up.
In fact, all this works great and even surprises with its simplicity and at the same time multifunctionality. Here you have both the temperature and the notification of the flood / smoke that happened, shutdown remotely, turn on while we drive home (according to the scenario). And another important aspect and a huge plus is that integration with other devices is possible, for example Sonos, Samsung Smart TV, Philips hue bulbs, Netatmo station.
However, from the minuses there is the fact that the functionality is really limited by a not very large number of devices. All in the world you can’t imagine only with this set and the flight of fantasy will last extremely short. But if more is not needed (and this often happens), then you can safely make this set a gift. Again, you can give your wife a holiday (“she won’t like it, play it myself”).
For the first acquaintance with a smart home, a very interesting and good box. It causes a strong desire to continue and increase their success in this matter.
In creating a smart home with Fibaro Home Center, all Z-Wave devices are available to us (light control - relays, dimmers, blinds, RGBW, power relay; blind control, climate control - air conditioning, batteries, underfloor heating, convectors; security sensors - movement, openings, leaks, CO; electricity meters; locks; multimedia and siren controls) and all manufacturers of Z-Wave devices with their model range (Fibaro, Z-Wave.Me, Philio, Everspring, Vision, Sigenia, Danfoss, Remotec, Eurotronic, POPP, MiCasaVera, Aeotec).
So, what did we finally get when the girl picked up a kit for home automation? Nothing terrible happened. The devices work - there is no cat floating around the apartment, neighbors will not have to call the fire department, because on the phone if a notification arrives. The set has many advantages and very few disadvantages that stem from some ideal. On this, I think, we can end and say only that when the best friends of the girls are far from diamonds, but sensors and a controller, then the house promises to be really smart and safe.
Fibaro Home Center is available in Russia from our partners 5 travel smart , that until February 10 this year, give 5% of coupon code GT_FIBARO .
Recommended retail price 52360 rub.