First look at react-native
If you are a front-end developer with react + redux experience, then you should definitely pay attention to such an interesting tool as react-native. It allows you to develop cross-platform applications for ios and android. React-native is under active development and releases updates every month.
A year ago, I had a desire to try this technology and I began to write a dictionary application that allows you to save the category of English words with their translation. The react-native version at that time was 0.37, now version 0.52. A few weeks ago, I decided to resume development and ran into a standard problem of fast-growing projects, namely a fairly frequent and dramatic change in functionality. I had to rewrite some things in order for the application to start. At first I didn’t like it much, but then I realized that these changes increase the speed and quality of application development. Further I would like to briefly review the main development points on react-native that I encountered in the process.
At the moment, you can create an application in 2 ways: usingcreate-react-native-app and react-native init. Create-react-native-app is an npm package that allows you to create the initial structure of an application and launch it on a smartphone without installing an environment for each platform. However, if you need to add native code to the application or connect a library that does this, then you still have to install the environment.
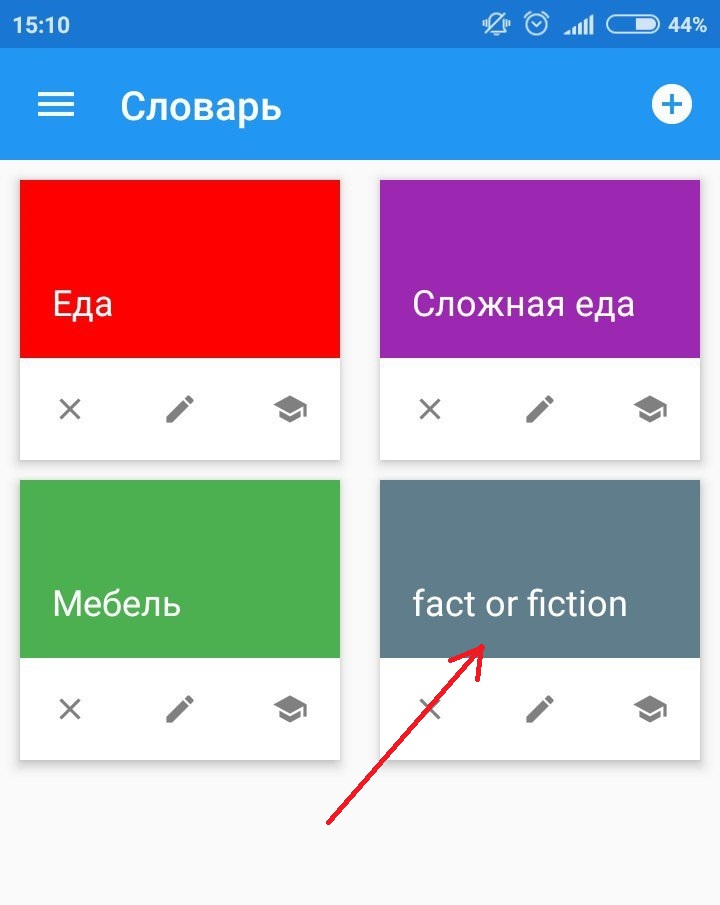
And now you already have a finished project, but what to do next? After all, we have neither CSS nor HTML. But we have jsx syntax, as well as stylization syntax, very similar to inline styles in html. For layout layout flexbox is used the same as on the web. In react-native, there are no elements familiar to the HTML developer frontend; instead, there are react-native components for typesetting, a description of which can be found onofficial website . There are cross-platform components (View, Button, TextInput), as well as platform-dependent components (DatePickerIOS, ProgressBarAndroid and others). Let's look at component development using the example of creating a card to display a category of words.
Below is the jsx markup for this component.
View component is similar to div on the web and is one of the main when creating a component. TouchableNativeFeedback is a component that allows you to handle clicking on an element embedded in it. ColoredFlatButton and Icon components from the react-native-material-kit library. As you can see from the example above, the layout in react-native is no different from the layout in react, except that components from react-native are used instead of HTML elements.
Further we will consider stylization of this component.
In order to create styles, you need to import the StyleSheet class from react-native and pass the styles object to it. To apply a style to an element, you need to specify it in the style attribute.
I think that we will not understand the styles, a person familiar with css and so it is clear. The only difference is that the dimensions are indicated not in CSS units, but in Density-independent Pixels. These are units of measurement that allow the application to look the same on different screens and resolutions in iOS and Android.
After more than one page appears in the application, it is worth considering how to make the transition between them. Until recently, adding navigation to the application was quite difficult.
I will give an example of how this was done before.
Agree, it doesn’t look very good? Now the situation has changed, several packages have appeared that are recommended in the documentation ( native-navigation , react-native-navigation , react-navigation ). I used react-navigation. Everything turned out to be simple, just import the navigator and specify the settings.
The first parameter passes the application’s routes, and you can also specify the settings for the header of each page. The second parameter transfers the settings for the Drawer component - this is the menu that opens on the left by clicking on the burger icon. It is possible to integrate with redux.
After the navigation has appeared in the application and several screens, it is worth thinking about saving data. If the application does not use an Internet connection, then you need to store data on the device. For this we have SQLite. To work with the db, I used the react-native-sqlite-storage package. I tidied up the installation a bit, but the problem turned out to be obvious, after adding this library to the project, I had to reinstall the application on the device. I used a method in which the project already has a database that is used when installing the application on the device, how to do this is described on the module page in github. To establish a connection you need only one line.
As well as a simple example of a database query.
In conclusion, I can say that after using react-native, I was satisfied with this technology. Convenient debugging in the browser, no difference from debugging web applications. If there is no functionality, you can always find the library in the community of react-native specialists.
Repository Link
A year ago, I had a desire to try this technology and I began to write a dictionary application that allows you to save the category of English words with their translation. The react-native version at that time was 0.37, now version 0.52. A few weeks ago, I decided to resume development and ran into a standard problem of fast-growing projects, namely a fairly frequent and dramatic change in functionality. I had to rewrite some things in order for the application to start. At first I didn’t like it much, but then I realized that these changes increase the speed and quality of application development. Further I would like to briefly review the main development points on react-native that I encountered in the process.
At the moment, you can create an application in 2 ways: usingcreate-react-native-app and react-native init. Create-react-native-app is an npm package that allows you to create the initial structure of an application and launch it on a smartphone without installing an environment for each platform. However, if you need to add native code to the application or connect a library that does this, then you still have to install the environment.
And now you already have a finished project, but what to do next? After all, we have neither CSS nor HTML. But we have jsx syntax, as well as stylization syntax, very similar to inline styles in html. For layout layout flexbox is used the same as on the web. In react-native, there are no elements familiar to the HTML developer frontend; instead, there are react-native components for typesetting, a description of which can be found onofficial website . There are cross-platform components (View, Button, TextInput), as well as platform-dependent components (DatePickerIOS, ProgressBarAndroid and others). Let's look at component development using the example of creating a card to display a category of words.
Below is the jsx markup for this component.
 onCardBodyClick(categoryId, categoryName)}
        background={TouchableNativeFeedback.Ripple('black')}
    >
        {categoryName} onRemove(categoryId)}>
             onEdit(categoryId)}>
             onStudy(categoryId)}>
View component is similar to div on the web and is one of the main when creating a component. TouchableNativeFeedback is a component that allows you to handle clicking on an element embedded in it. ColoredFlatButton and Icon components from the react-native-material-kit library. As you can see from the example above, the layout in react-native is no different from the layout in react, except that components from react-native are used instead of HTML elements.
Further we will consider stylization of this component.
const styles = StyleSheet.create({
   card: {
       marginTop: 10,
       width: 160,
       height: 140,
       justifyContent: 'flex-end',
   },
   cardBody: {
       flex: 1,
       padding: 16,
       justifyContent: 'flex-end',
   },
   bodyText: {
       fontSize: 18,
       color: 'white',
   },
   cardActions: {
       padding: 8,
       flexDirection: 'row',
       backgroundColor: 'white',
       justifyContent: 'space-between',
       alignItems: 'flex-end',
   },
});
In order to create styles, you need to import the StyleSheet class from react-native and pass the styles object to it. To apply a style to an element, you need to specify it in the style attribute.
I think that we will not understand the styles, a person familiar with css and so it is clear. The only difference is that the dimensions are indicated not in CSS units, but in Density-independent Pixels. These are units of measurement that allow the application to look the same on different screens and resolutions in iOS and Android.
After more than one page appears in the application, it is worth considering how to make the transition between them. Until recently, adding navigation to the application was quite difficult.
I will give an example of how this was done before.
const _navigator = null;
class EnglishApp extends Component {
   onNavBackPress = () => {
       _navigator.pop();
   };
   renderScene = (route, navigator) => {
       _navigator = navigator;
       switch (route.id) {
           case routeIDs.NEW_WORD:
               return ;
           case routeIDs.WORD_LIST:
               return ;
       }
   };
   render() {
       return (
            Navigator.SceneConfigs.FloatFromRight}
           />
       );
   }
}
Agree, it doesn’t look very good? Now the situation has changed, several packages have appeared that are recommended in the documentation ( native-navigation , react-native-navigation , react-navigation ). I used react-navigation. Everything turned out to be simple, just import the navigator and specify the settings.
const RootNavigator = DrawerNavigator(
   {
       [RoutesID.CATEGORY]: {
           screen: CategoryScreen,
           navigationOptions: {
               drawerLabel: 'Категории',
               drawerIcon: ({ tintColor }) => (

               ),
           },
       },
       [RoutesID.NEW_WORD]: {
           screen: NewWordScreen,
           navigationOptions: {
               drawerLabel: () => null,
           },
       },
   },
   {
       drawerWidth: 250,
       drawerPosition: 'left',
       contentOptions: {
           inactiveTintColor: 'darkgray',
       },
       drawerOpenRoute: 'DrawerOpen',
       drawerCloseRoute: 'DrawerClose',
       drawerToggleRoute: 'DrawerToggle',
   },
);
The first parameter passes the application’s routes, and you can also specify the settings for the header of each page. The second parameter transfers the settings for the Drawer component - this is the menu that opens on the left by clicking on the burger icon. It is possible to integrate with redux.
After the navigation has appeared in the application and several screens, it is worth thinking about saving data. If the application does not use an Internet connection, then you need to store data on the device. For this we have SQLite. To work with the db, I used the react-native-sqlite-storage package. I tidied up the installation a bit, but the problem turned out to be obvious, after adding this library to the project, I had to reinstall the application on the device. I used a method in which the project already has a database that is used when installing the application on the device, how to do this is described on the module page in github. To establish a connection you need only one line.
open() {
    return SQLite.openDatabase({ name: 'englishAppDB.db', createFromLocation: 1 }).then(
        (db) => {
            this.db = db;
            Promise.resolve();
        },
        error => Promise.reject(error),
    );
}
As well as a simple example of a database query.
    getAllCategories() {
        return this.db.executeSql('SELECT * FROM category', []).then(
            ([{ rows }]) => {
                let category = new List();
                for (let i = 0; i < rows.length; i += 1) {
                    category = category.push(new CategoryRecord({
                        id: rows.item(i).Id,
                        name: rows.item(i).name,
                        color: rows.item(i).color,
                    }));
                }
                return category;
            },
            error => Promise.reject(error),
        );
    }
In conclusion, I can say that after using react-native, I was satisfied with this technology. Convenient debugging in the browser, no difference from debugging web applications. If there is no functionality, you can always find the library in the community of react-native specialists.
Repository Link