Setting up a WEB system - testing based on headless chromium-browser, chromedriver, nightwatch and node.js on Ubuntu

Foreword
Hello, Habr! This problem arose with my problem, which was to create a robot for authorization on Instagram, which would like me. I will not write the whole task, I will write only part of the implementation in the form of setting up the necessary tools on the remote server.
WEB testing is a voluminous and ambiguous sphere, which can consist in solving problems not only in terms of testing WEB applications, but, for example, in terms of building parsers, IoT robots and bots for working with social networks and all this using only JavaScript !
It’s possible that you don’t like the phrase “testing”, perhaps partly because this phrase contains more interesting things that, for example, will allow us to write a bot that can log in to Instagram, Facebook and do a number actions on our behalf and at the same time it’s tedious to observe how our front-end is carried out, but testing makes sense and is already standardized by the W3C community and continues to develop.
Brief description of the task
What task do we set to solve with testing? All that is needed is for some program to open a browser and automatically click links there, drive in texts and show what we get or return the result parameter that we need. And all this needs to be done on Linux - the Ubuntu 16.04 distribution, which does not have a GUI, i.e. we only have a console and launch a familiar browser, as a full-fledged computer will fail.
What is needed for a test solution without a GUI?
All that is needed for modern, "exclusive" JavaScript testing:
- Headless Chromium Browser v 59 ( chromium-browser ) - a headless browser in the console;
- Node.js ( nodejs ) - JavaScript server;
- WebDriver ( chromedriver ) - a driver for processing JavaScript tests and working with chromium-browser through Node.js;
- Nightwatch.js ( nightwatch ) is a well-known library for writing and running autotests through LinkedIn's Node.js.
Server installation
We will write the steps for the sequential installation of all components for testing.

1). Install cromium-browser . Before installing chromium-browser, you will need to install all the dependencies necessary for it, so you will need to perform a series of actions.
Install the dependencies:
sudo apt-get -f installIf we had the first installation attempts, but placed the absence of dependencies, it would be good if you delete the downloaded files in / var / cache / apt / archives by running the command:
sudo rm /var/cache/apt/archives/chromium*Now install cromium-browser itself:
sudo apt-get install chromium-browser
2). Install nodejs . How to install Node.js and all installation methods are described in detail here .
One of the easiest installation methods:
It is likely that this method will install the old stable version v4.2.6 from the Ubuntu repository, under which this test example has not been tested. It is optimal for stable operation if you install version 7 or higher using PPA or NVM
sudo apt-get update
sudo apt-get install nodejs
You will also need a package manager, through which you will need to install chromedriver and nightwatch :
sudo apt-get install npmWe will need them to process JavaScript tests from Node.js.

3). Install chromedriver. This driver acts as a WebDriver providing an API, for example, to be able to click on links and drive texts into text fields and forms, for this we will use Chromedriver. To install chromedriver, execute the command:
npm install chromedriver
4). Installing a nightwatch . Nightwatch.js is a library for writing and running JavaScript self-tests:
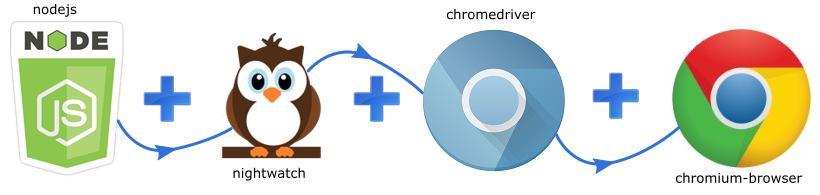
npm install nightwatchTesting scheme
Briefly, the whole scheme looks like the tests on Nightwatch.js send requests to Chromedriver, and Chromedriver calls the Chrome Browser to execute the tests (filling out the form fields and clicking on the links):
Set up and run the first test
The Nightwatch.js configuration file is by default located in the node_modules / nightwatch / bin folder and the settings are taken by default from there and in order to set our user settings for Nightwatch.js you need to create the nightwatch.json file in the root of the project and write everything you need there so that Chromedriver used directly (without Selenium and other third-party things) and Chromium started in "headless" mode:
{
  "src_folders": ["tests"], // путь к папке с тестами
  "output_folder": "reports",
  "custom_commands_path": "",
  "custom_assertions_path": "",
  "page_objects_path": "",
  "globals_path": "globals.js", // путь к файлу, в котором задаётся глобальный контекст для всех тестов
  "selenium": {
    "start_process": false // отменяем запуск Селениума, т.к. будем обращаться к Chromedriver напрямую
  },
  "test_settings": {
    "default": {
      "selenium_port": 9515, // номер порта Chromedriver по умолчанию ("selenium_" в имени поля — это пережиток прошлого)
      "selenium_host": "localhost",
      "default_path_prefix" : "",
      "desiredCapabilities": {
        "browserName": "chrome",
        "chromeOptions" : {
          "args" : ["--no-sandbox", "--headless", "--disable-gpu"], // специальные флаги для работы Хрома в headless-режиме
          "binary" : "/usr/bin/chromium-browser" // путь к исполняемому файлу Хрома
        },
        "acceptSslCerts": true
      }
    }
  }
}
You need to pay attention to the line with globals.js . Inside this file, you can set a global context for all tests. We will write there so that Chromedriver starts before running all the tests and nails at the end:
const chromedriver = require('chromedriver');
module.exports = {
  before: function(done) {
    chromedriver.start();
    done();
  },
  after: function(done) {
    chromedriver.stop();
    done();
  }
};
Now you need to write any test to verify the health of the testing system. For example, you need to open google.com, search for something and check the search results. Of course, the Nightwatch.js API provides a whole bunch of various methods for all kinds of checks, but for starters we have enough:
module.exports = {
  'Test google.com': function(browser) {
    const firstResultSelector = '#rso cite._Rm';
    browser
      .url('http://google.com', () => {
        console.log('Loading google.com...');
      })
      .waitForElementVisible('#lst-ib', 5000)
      .execute(function() {
        document.getElementById('lst-ib').value = 'Блог WebSofter!';
      })
      .submitForm('form')
      .waitForElementVisible(firstResultSelector, 5000)
      .getText(firstResultSelector, result => {
        browser.assert.equal(result.value, 'blog.websofter.ru/');
      })
      .end();
  }
};
Run through the console by the command:
nightwatch --test google.jsComment. Firstly, if Node.js is installed via nvm, then you need to activate the session through the command:nvm ~/.profile
secondly, to run the test, you need to create package.json with the project data in the root of the project, and google.js must be specified in the form of the launched file via the command:npm init
Next, we already run the command to run our test:nightwatch --test google.js
The result of the above code in the files will be the result in the console:
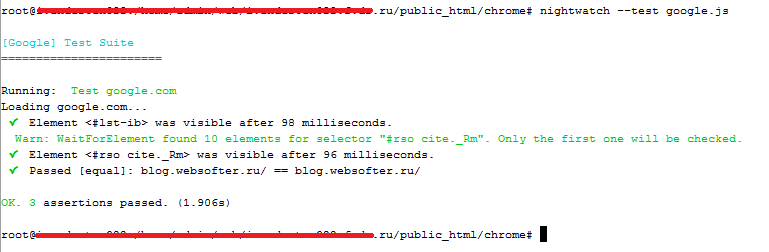
That is, we go to the main Google site, drive the phrase “WebSofter Blog!” Into the search and as a result, the address of our blog is compared for the presence of certain tags on the search result page.
You can download the working example from this article here .
Conclusion
Initially, Nightwatch.js was focused on working with Selenium. But today she knows how to work with chromedriver directly and the need for Selenium is even less necessary in PhantomJS, although it is possible to integrate with them.
Caution! Headless Chrome is available on Mac and Linux in v59. Windows support is included with Chrome v60. To check which version of Chrome you have, open
chrome://versionHeadless Chrome comes in version 59 of Chrome. This is a way to launch the Chrome browser in a headless environment, i.e. in a console without a GUI. PhantomJS worked similarly. Chrome brings to the command line all the modern web platform features provided by Chromium and the Blink engine.
Why is this useful?
A headless browser is a great tool for automated testing and server environments where you don't need a visible user interface shell. For example, you can perform some tests on a real web page, create a PDF file, or just check how the browser displays the URL. You can additionally find out on the link