Transferring PBX configuration to 3CX PBX Express service
- Tutorial
In this article we will explain how to restore backup copies of existing PBX installations when using 3CX PBX Express. The ability to restore the configuration allows, for example, to move the local server to the cloud, change the hosting or restore the PBX in the cloud after a serious local failure. The only requirement when moving the configuration is the option “License data and FQDN name” in the backup must be enabled.
Before moving your PBX to the PBX Express service, please note the following:
3CX clients will automatically connect as soon as the server is available again under their FQDN, and then automatically update the configuration. IP phones may need to be reconfigured. As a rule, the auto-tuning parameters of phones in the 3CX interface need to be changed from “Local Network” to “STUN” or “SBC”. If the phones use a STUN server, they must reconnect as soon as the PBX server is available again. When using the SBC utility, make sure that it is configured in accordance with the configuration of the cloud PBX.
You can check the resolution of the new IP address of the PBX (after some time, when the replication of changes in DNS is completed) with the 'nslookup [3CX-FQDN]' command. If you are using the FQDN from 3CX, use the command 'nslookup [3CX-FQDN] 8.8.8.8'. Remember that changes to the DNS can replicate from 8 minutes to 6 hours.
When transferring the PBX to the cloud hosting PBX Express HTTPS, the port of the 3CX server will be set to 443, the ports of SIP and 3CX Tunnel to 5060 and 5090, respectively.
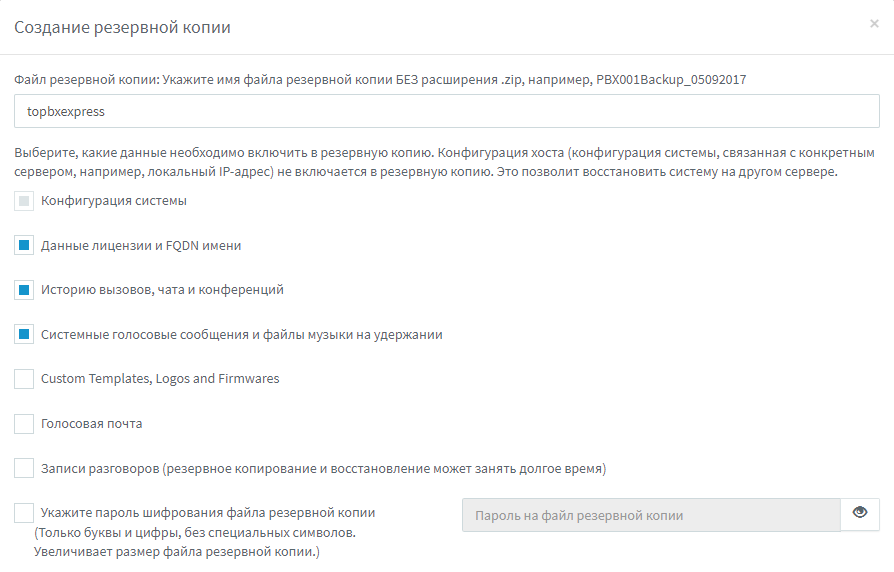
As mentioned above, be sure to check the “License data and FQDN name” option. It is also recommended to set the option “System voice messages and music files on hold”. Do not use uppercase characters, special characters, or spaces in the name. If desired, you can encrypt the backup with a password.
If possible, it is not recommended to transfer call history, custom templates, voice mail and call recordings, because this will significantly increase the size of the backup file. Accordingly, the data recovery time on the new server will increase - you will not be able to predict when the transfer will end.
To recover, the archive file must be accessible via HTTP or HTTPs. You can use any web server, as well as Dropbox, OneDrive or Google Drive.
Download the backup file from the 3CX management interface.
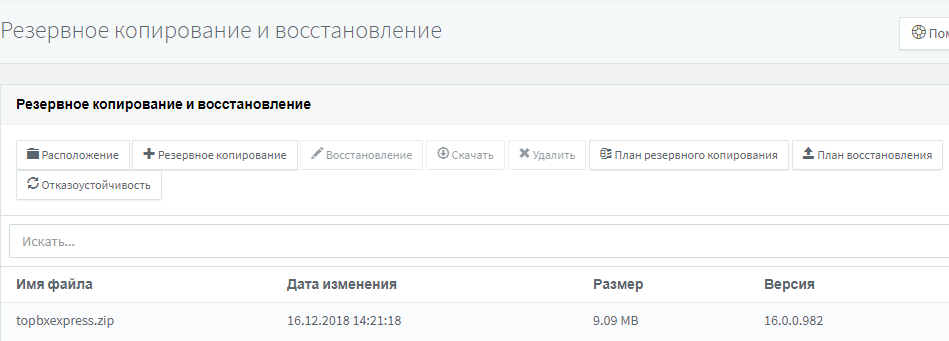
And transfer it to the appropriate storage.
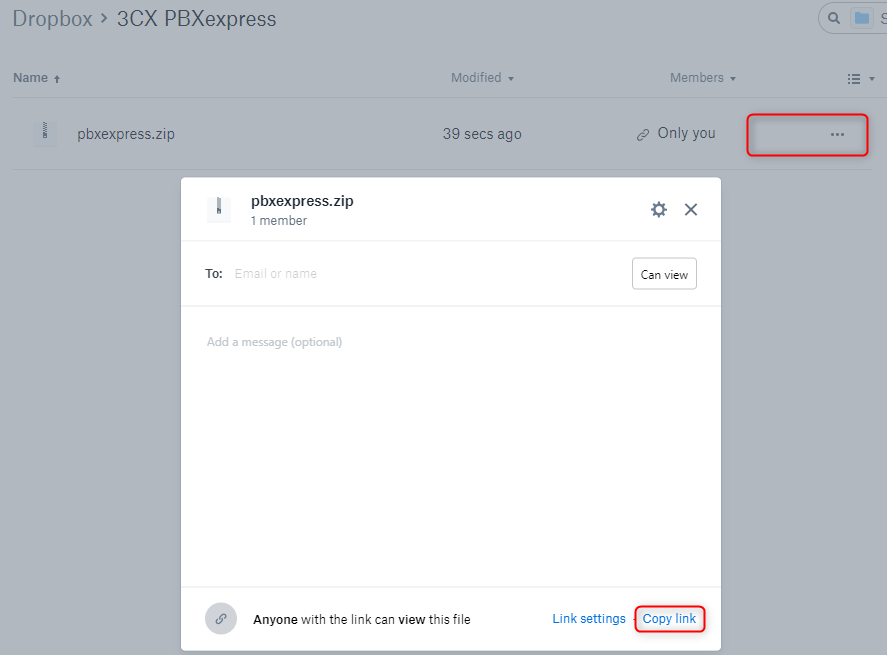
Upload the file to Dropbox, click on it and select “Share”> “Create Link”> “Copy Link”.
In Google Drive, the option to create a shared link should be selected, as shown below:
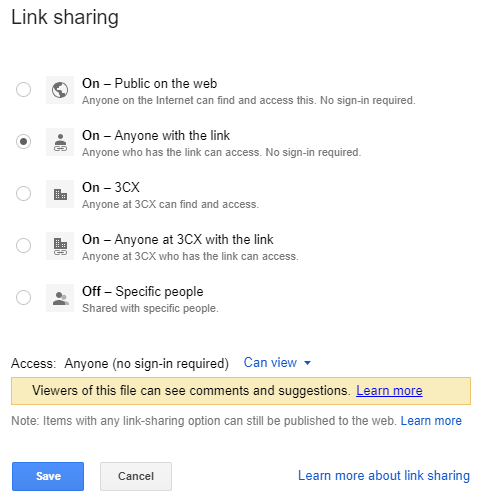
Then copy the link.
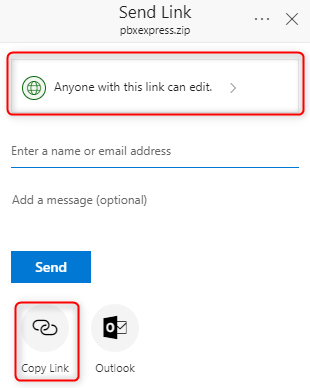
In Microsoft OneDrive, right-click on the file and select Share. Set the parameters as shown below and click “Copy Link”.
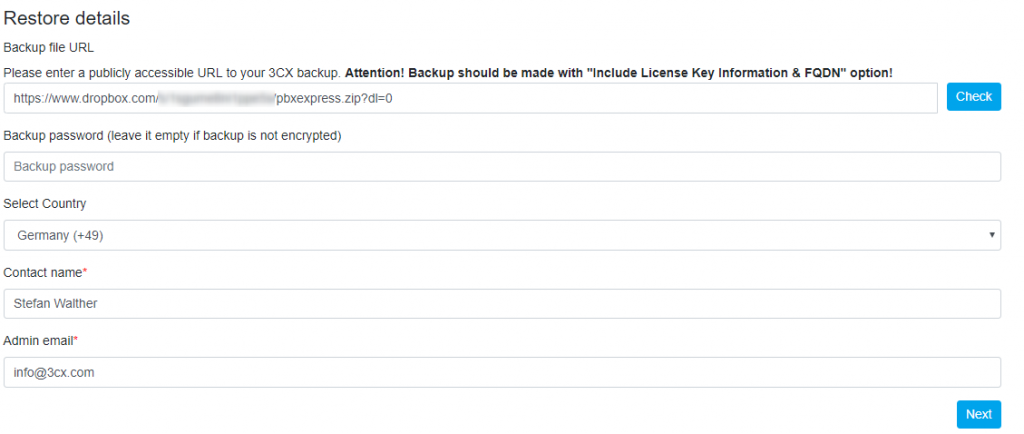
Go to https://pbxexpress.3cx.com and select restore backup. Insert the archive link and enter the password if you used encryption. Also specify the time zone of the instance of the PBX and the administrator's e-mail address (a notification about the restoration will come to it)
The backup file will be downloaded directly from its location to the cloud copy of the PBX - and the system will be ready to work in a couple of minutes.
Learn more about the 3CX PBX Express service .
Before moving your PBX to the PBX Express service, please note the following:
- Stop all services of your current (old) PBX before restoring the configuration in the cloud.
- The IP address of the PBX server in the public DNS will be changed automatically if the FQDN from 3CX is used and the address in the 3CX parameters (Settings → Network → Public IP) is set as dynamic.
- The IP address must be changed manually if the FQDN from 3CX is used and the address in the 3CX parameters is set as static (Settings → Network → Public IP).
- If using a custom FQDN, change the external address in 3CX and update the A-record in public DNS, which should now point to the new IP address of the server.
3CX clients will automatically connect as soon as the server is available again under their FQDN, and then automatically update the configuration. IP phones may need to be reconfigured. As a rule, the auto-tuning parameters of phones in the 3CX interface need to be changed from “Local Network” to “STUN” or “SBC”. If the phones use a STUN server, they must reconnect as soon as the PBX server is available again. When using the SBC utility, make sure that it is configured in accordance with the configuration of the cloud PBX.
You can check the resolution of the new IP address of the PBX (after some time, when the replication of changes in DNS is completed) with the 'nslookup [3CX-FQDN]' command. If you are using the FQDN from 3CX, use the command 'nslookup [3CX-FQDN] 8.8.8.8'. Remember that changes to the DNS can replicate from 8 minutes to 6 hours.
When transferring the PBX to the cloud hosting PBX Express HTTPS, the port of the 3CX server will be set to 443, the ports of SIP and 3CX Tunnel to 5060 and 5090, respectively.
Create backup

As mentioned above, be sure to check the “License data and FQDN name” option. It is also recommended to set the option “System voice messages and music files on hold”. Do not use uppercase characters, special characters, or spaces in the name. If desired, you can encrypt the backup with a password.
If possible, it is not recommended to transfer call history, custom templates, voice mail and call recordings, because this will significantly increase the size of the backup file. Accordingly, the data recovery time on the new server will increase - you will not be able to predict when the transfer will end.
Restore backup
To recover, the archive file must be accessible via HTTP or HTTPs. You can use any web server, as well as Dropbox, OneDrive or Google Drive.
Download the backup file from the 3CX management interface.

And transfer it to the appropriate storage.
Dropbox
Upload the file to Dropbox, click on it and select “Share”> “Create Link”> “Copy Link”.

Google drive
In Google Drive, the option to create a shared link should be selected, as shown below:

Then copy the link.
Backup on Microsoft OneDrive
In Microsoft OneDrive, right-click on the file and select Share. Set the parameters as shown below and click “Copy Link”.

Recovery in PBX Express
Go to https://pbxexpress.3cx.com and select restore backup. Insert the archive link and enter the password if you used encryption. Also specify the time zone of the instance of the PBX and the administrator's e-mail address (a notification about the restoration will come to it)

The backup file will be downloaded directly from its location to the cloud copy of the PBX - and the system will be ready to work in a couple of minutes.
Learn more about the 3CX PBX Express service .
