Creating an encrypted Kali Linux Encrypted Persistence flash drive
This article describes a method for creating a bootable USB flash drive with the Kali Linux system, the functionality of which allows you to create an encrypted partition where all its parameters, installed programs and data will be stored. Encryption is performed using the aes algorithm with a 256-bit key (you can configure encryption to your taste by studying the cryptsetup command).
To record an image, use the Rufus program . Select the device on which the image will be unpacked, then select the iso-image of the system and select the DD-image from the drop-down list.

After the image is deployed, the partition structure of the flash drive will take the following form:

Partition structure:
- 2.80 GB - Kali Linux system image;
- 102 Mb - bootloader;
- 11.42 GB is an unallocated area that will be used for encryption.
Boot from the USB flash drive and select the Live menu item (686-pae) .

Start a terminal and run the gparted command to start the partition editor.

In the window that opens, select the flash drive from which you booted from the drop-down list.

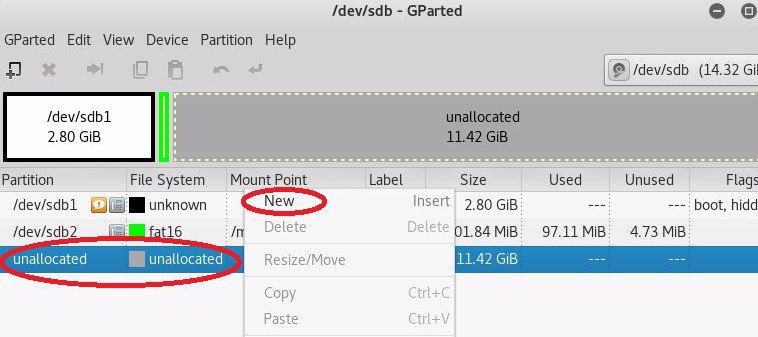
Next, select the unallocated disk space and create a new partition (ext4).
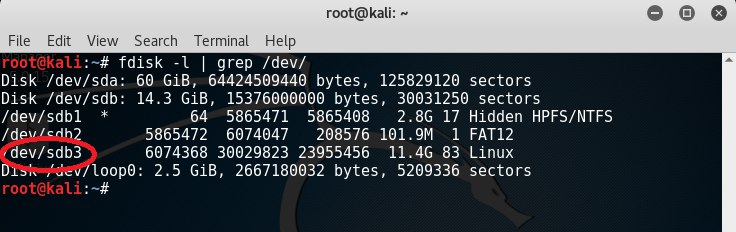
After creating the partition, open a terminal and run the command fdisk –l | grep / dev / to display available devices. We are interested in the device / dev / sdb3 .
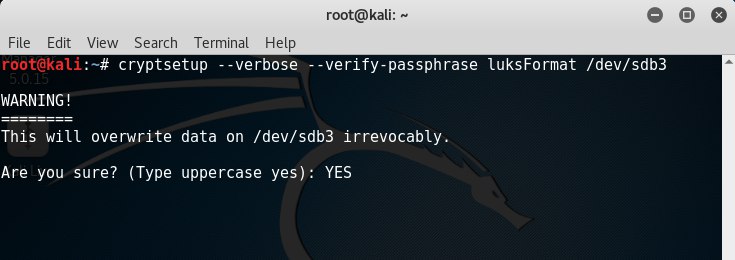
To encrypt the partition, enter the command cryptsetup --verbose --verify-passphrase luksFormat / dev / sdb3 , then enter YES .
After that, the program will require you to enter a password under which the partition will be encrypted and prompt you to confirm it.
Connect the encrypted partition with the cryptsetup luksOpen / dev / sdb3 usb_part_open command , enter the password. The section is initialized as a device named usb_part_open .

Run fdisk –l | grep / dev / and make sure the device / dev / mapper / usb_part_open is connected.

Fill the device with random, pseudo-random numbers or zeros by performing one of the commands of your choice:
- dd if = / dev / random of = / dev / mapper / usb_part_open - this command will fill the device with random numbers. The operation will be performed for a long time (count in days);
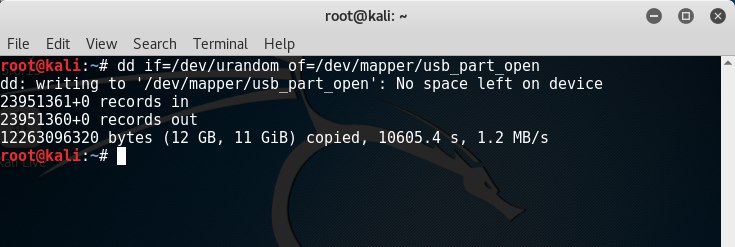
- dd if = / dev / urandom of = / dev / mapper / usb_part_open - this command fills the device with pseudo-random numbers. The operation will take a long time (count in hours);
- dd if = / dev / zero of = / dev / mapper / usb_part_open - padding with zeros.
Format the section filled with random numbers with the command mkfs.ext4 / dev / mapper / usb_part_open .

Name the section “persistence” with the command e2label / dev / mapper / usb_part_open persistence .

Mount this section to a previously created folder, for example, / mnt / usb_part with the mount / dev / mapper / usb_part_open / mnt / usb_part command (usually this command is not required in new versions of the system, the section is automatically connected after formatting and is detected in the explorer).

Create a configuration file in the root of the encrypted partition with the command echo “/ union”> /mnt/usb_part/persistence.conf .

Close the encrypted section with the cryptsetup luksClose / dev / mapper / usb_part_open command .

Reboot the system and log in with Live USB Encrypted Persistence .

When downloading, you will need to enter the password for the encrypted partition (when entering the password, the characters are not displayed).

The creation of the encrypted system is completed.
When you boot the OS for the first time in Encrypted Persistence mode , system files and folders are created on the encrypted partition, follow these steps to view them:
- Reboot the system in unencrypted Live mode (686-pae) .

- connect the encrypted partition as a device with the cryptsetup luksOpen / dev / sdb3 usb_part_open command .

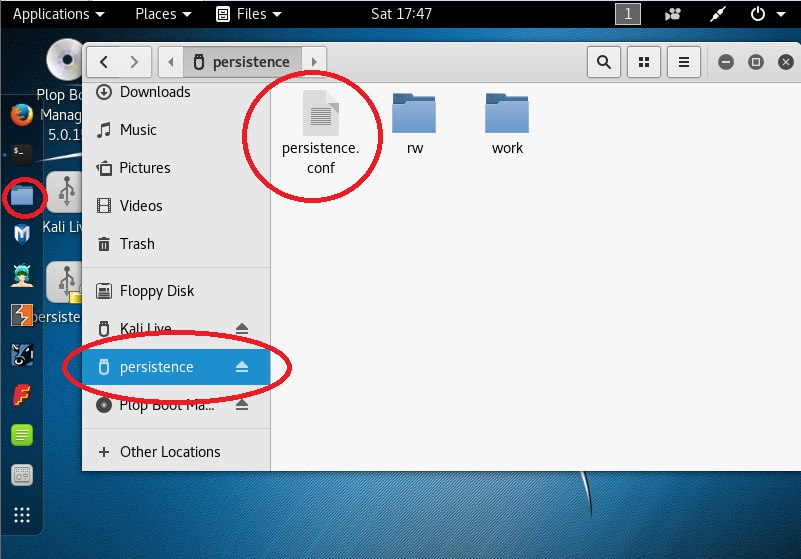
- Open File Explorer and select the connected persistence device . You will see the persistence.conf configuration file created earlier and the system folders. In the rw folder is our encrypted system, under which we boot. Therefore, in the rw folder all changes made to the system loaded in encrypted mode are saved.
If you boot in normal (unencrypted) mode, then after a reboot all changes and files are deleted.
Thanks for attention!
1. Creating a bootable flash drive
To record an image, use the Rufus program . Select the device on which the image will be unpacked, then select the iso-image of the system and select the DD-image from the drop-down list.
After the image is deployed, the partition structure of the flash drive will take the following form:
Partition structure:
- 2.80 GB - Kali Linux system image;
- 102 Mb - bootloader;
- 11.42 GB is an unallocated area that will be used for encryption.
2. Creating an encrypted partition and setting its parameters
Boot from the USB flash drive and select the Live menu item (686-pae) .
Start a terminal and run the gparted command to start the partition editor.
In the window that opens, select the flash drive from which you booted from the drop-down list.
Next, select the unallocated disk space and create a new partition (ext4).
After creating the partition, open a terminal and run the command fdisk –l | grep / dev / to display available devices. We are interested in the device / dev / sdb3 .
To encrypt the partition, enter the command cryptsetup --verbose --verify-passphrase luksFormat / dev / sdb3 , then enter YES .
After that, the program will require you to enter a password under which the partition will be encrypted and prompt you to confirm it.
Connect the encrypted partition with the cryptsetup luksOpen / dev / sdb3 usb_part_open command , enter the password. The section is initialized as a device named usb_part_open .
Run fdisk –l | grep / dev / and make sure the device / dev / mapper / usb_part_open is connected.
Fill the device with random, pseudo-random numbers or zeros by performing one of the commands of your choice:
- dd if = / dev / random of = / dev / mapper / usb_part_open - this command will fill the device with random numbers. The operation will be performed for a long time (count in days);
- dd if = / dev / urandom of = / dev / mapper / usb_part_open - this command fills the device with pseudo-random numbers. The operation will take a long time (count in hours);
- dd if = / dev / zero of = / dev / mapper / usb_part_open - padding with zeros.
Format the section filled with random numbers with the command mkfs.ext4 / dev / mapper / usb_part_open .
Name the section “persistence” with the command e2label / dev / mapper / usb_part_open persistence .
Mount this section to a previously created folder, for example, / mnt / usb_part with the mount / dev / mapper / usb_part_open / mnt / usb_part command (usually this command is not required in new versions of the system, the section is automatically connected after formatting and is detected in the explorer).
Create a configuration file in the root of the encrypted partition with the command echo “/ union”> /mnt/usb_part/persistence.conf .
Close the encrypted section with the cryptsetup luksClose / dev / mapper / usb_part_open command .
Reboot the system and log in with Live USB Encrypted Persistence .
When downloading, you will need to enter the password for the encrypted partition (when entering the password, the characters are not displayed).
The creation of the encrypted system is completed.
3. Health Check
When you boot the OS for the first time in Encrypted Persistence mode , system files and folders are created on the encrypted partition, follow these steps to view them:
- Reboot the system in unencrypted Live mode (686-pae) .
- connect the encrypted partition as a device with the cryptsetup luksOpen / dev / sdb3 usb_part_open command .
- Open File Explorer and select the connected persistence device . You will see the persistence.conf configuration file created earlier and the system folders. In the rw folder is our encrypted system, under which we boot. Therefore, in the rw folder all changes made to the system loaded in encrypted mode are saved.
If you boot in normal (unencrypted) mode, then after a reboot all changes and files are deleted.
Thanks for attention!