Optimizing the work of a portal design team with Sketch and the cloud
When working in a product team on one or several projects, we inevitably come to the need to organize a common process and workspace. Someone solves this issue by adding tools for collaboration, someone even builds their product around it. However, we turned to the experience of our closest fellow developers. They know how to optimize their work and interaction, like no other, and therefore are a great example for inspiration.

And what, in fact, do we need for effective collaboration? First of all, we need a space for storing working materials, organized according to a scheme that is understandable to all participants in the process. Secondly, the ability for several people to work on the same project (including on the same file), always having the latest version before their eyes and not being afraid to break something.
When more than one designer works on a product, they simply need to build a common space so that nothing impedes effective work. How often do you hear: “Hey, where does this layout lie with us?”, “How can I find layouts for such a project?”, “And where are the assets used in the layout?” A little tediousness and pedantry allowed us to almost forget about these questions.
All the designers of our portal team work in a shared cloud, divided into project folders:

However, until the time of unification inside these folders, each team managed in its own way. Each designer or group of designers used their own file organization and naming scheme. As a result, only the authors themselves could understand this system, and the search for the right turned into torture.
Obviously, some variations are inevitable due to platform differences (design of mobile applications and web interfaces) or design specifics (a product in the stage of a large redesign or an iteratively improving service), but we just needed to put things in order at least at the basic levels.
Having assembled the entire team, over several unusually noisy sessions, we agreed to the following format:
At the root of the product folder there is a breakdown into the platforms used in the project. The main portal projects Mail.Ru survived several notable redesigns, so we broke the next level into “generations” of products. This basic stage allowed us to sort through the basis and separate the relevant materials from the obviously obsolete ones.
I’ll note that we sent the outdated mock-ups to the Arсhive folder (each project has its own curve), because practice shows that we turn to them extremely rarely and don’t see any reason to invest time in putting things in order there.
At the next level, as I already mentioned, variations are possible, but in general terms it looks like this:
Our team has historically developed two patterns of organizing files: mobile designers laid out files on screens, and those who were involved in the web - by features or tasks.
With the advent of Sketch, mobile designers no longer needed to split the structure so much, so screen splitting became optional for them. In web projects, we settled on a breakdown by task name (optionally, you can add a task number to this). This turned out to be quite informative and greatly simplified the search for the right one.
There are several required sections inside the task folder:
Having agreed to this scheme, we carried out several planned “subbotniks”, rather quickly sorting out the rubble accumulated over the years.
Now starting to work on the project, the designer does not have to look at the folders "_final", "_final-ok", "_new", etc. with pain in his heart. Now we always know where to get materials on the project, as well as which layout is most relevant. Sketch helps us a lot in this.
Sketch has dramatically changed the way we structure our layouts. Augean stables from 50 psd-shnik “ver.1, ver.2, ... ver.90” and causing my poppy files with all conditions in hidden folders or layer comps to smoke were left in the past. Everything has become much simpler.
The combination of artboards and pages in Sketch allows you to store the entire interface in one master file without any problems or performance impairment. The scheme is quite simple:
Take, for example, the Mail.Ru Mail interface: the picture is clickable. The main screens of the Mail are laid out on pages: a list of letters, a letter, writing a letter, settings. By artboard status: search, notifications, drop-down menus, etc. If necessary, individual pages can be reserved for draft intermediate options or interface versions - this will allow you to keep them handy and quickly find them in the process. Thus, we form a master file - the main layout containing the most current state of the interface.
I mentioned earlier that we were inspired by the experience of fellow developers, and now we have come to the stage where this is most pronounced. Developers are great optimizers. They damn don't like wasting time. And on their shoulders lies a great responsibility - because they constantly make changes to the product code, and many people do it at the same time, sometimes not directly connected to each other.
In each project there is a “master” - the entire current set of project files, which are now in production. It would be too risky to make changes immediately to the master, because this can unpredictably affect the project. In this regard, Git appeared as a system for controlling changes and versions. Developers commit changes to individual branches, and after passing checks, these changes are accepted and added to the wizard. As a result, many people, working simultaneously, safely and in a controlled manner update the product.

How can this help us? No, we did not use Git (although we could, and some go exactly that way), but we revised the existing tools a bit. If we use the concepts of developers, then we also have our own “master” - the main sketch file with all the screens and interface states. It should be stored in the root of the project folder and be as relevant as possible. It is untouchable, only a few people in a team can make changes to it directly. There are also "branches" - individual files, copies of the main, in which you make any changes in the framework of a particular task. Each task has its own branch. As soon as the task is completed and the changes are agreed, you can take the corrected part from the branch and enter it into the master file.
To quickly create branches without touching the master, we use sketch templates (Oleg Andrianov, who used this in the team of Odnoklassnikov, shared his idea with us at one time). To do this, create a shortcut (hard-link) to the master file in the sketch template folder. The master file lies on our shared cloud, and each designer has a shortcut to it on the machine.

In order to create a connection, you need to register one simple command in the terminal (terminal.app):
Pictures are clickable
Now you can get a copy of the very current master through the menu of templates and work with it without any harm. Since the wizard is stored in a shared folder, when it is updated, all designers see the current version instantly. In the templates, we placed the UI Kit in the same way for quick access to components.
This technique, of course, works for any sketch files, so we did not stop at the UI Kit and added other commonly used files to the templates, for example, a pack with icons and illustrations. Now, if necessary, add an interface icon or a small illustration to the layout, we turn to this template, where they are in svg, ready for export.
One could get confused in such a large (and constantly expanding) document, however, the search for a sketch helps out. If the layers are logically named, then finding the right one is easy. And the “cmd + 2” keyboard shortcut takes you to the selected item. The picture is clickable. The scheme described above allows our portal team to work on a group of projects, always using the latest versions of files that are at hand, and making changes is not destructive. The process initially does not work by itself and requires some consciousness from the participants, but in practice a habit is developed in a couple of weeks and happiness sets in.

And what, in fact, do we need for effective collaboration? First of all, we need a space for storing working materials, organized according to a scheme that is understandable to all participants in the process. Secondly, the ability for several people to work on the same project (including on the same file), always having the latest version before their eyes and not being afraid to break something.
File Storage and Naming
When more than one designer works on a product, they simply need to build a common space so that nothing impedes effective work. How often do you hear: “Hey, where does this layout lie with us?”, “How can I find layouts for such a project?”, “And where are the assets used in the layout?” A little tediousness and pedantry allowed us to almost forget about these questions.
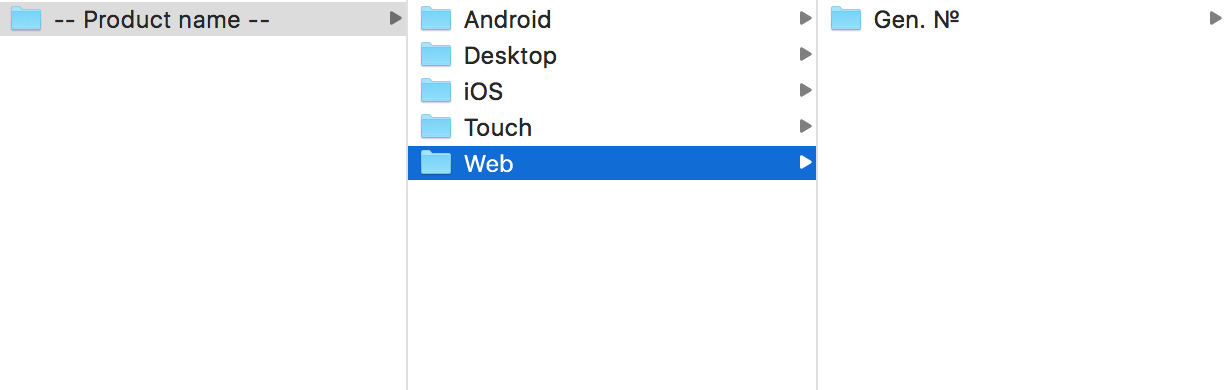
All the designers of our portal team work in a shared cloud, divided into project folders:
However, until the time of unification inside these folders, each team managed in its own way. Each designer or group of designers used their own file organization and naming scheme. As a result, only the authors themselves could understand this system, and the search for the right turned into torture.
Obviously, some variations are inevitable due to platform differences (design of mobile applications and web interfaces) or design specifics (a product in the stage of a large redesign or an iteratively improving service), but we just needed to put things in order at least at the basic levels.
Having assembled the entire team, over several unusually noisy sessions, we agreed to the following format:
At the root of the product folder there is a breakdown into the platforms used in the project. The main portal projects Mail.Ru survived several notable redesigns, so we broke the next level into “generations” of products. This basic stage allowed us to sort through the basis and separate the relevant materials from the obviously obsolete ones.
I’ll note that we sent the outdated mock-ups to the Arсhive folder (each project has its own curve), because practice shows that we turn to them extremely rarely and don’t see any reason to invest time in putting things in order there.
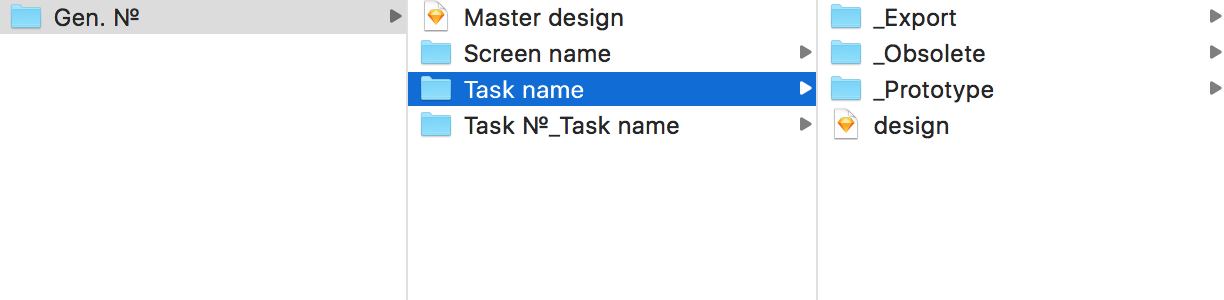
At the next level, as I already mentioned, variations are possible, but in general terms it looks like this:
Our team has historically developed two patterns of organizing files: mobile designers laid out files on screens, and those who were involved in the web - by features or tasks.
With the advent of Sketch, mobile designers no longer needed to split the structure so much, so screen splitting became optional for them. In web projects, we settled on a breakdown by task name (optionally, you can add a task number to this). This turned out to be quite informative and greatly simplified the search for the right one.
There are several required sections inside the task folder:
- _Export - for all exported assets: icons, screenshots, background images, etc .;
- _Obsolete - for draft and obsolete layouts.
Having agreed to this scheme, we carried out several planned “subbotniks”, rather quickly sorting out the rubble accumulated over the years.
Now starting to work on the project, the designer does not have to look at the folders "_final", "_final-ok", "_new", etc. with pain in his heart. Now we always know where to get materials on the project, as well as which layout is most relevant. Sketch helps us a lot in this.
Organization of layouts
Sketch has dramatically changed the way we structure our layouts. Augean stables from 50 psd-shnik “ver.1, ver.2, ... ver.90” and causing my poppy files with all conditions in hidden folders or layer comps to smoke were left in the past. Everything has become much simpler.
The combination of artboards and pages in Sketch allows you to store the entire interface in one master file without any problems or performance impairment. The scheme is quite simple:
- pages are used to split the interface into screens;
- artboards - to display the states of a single screen.
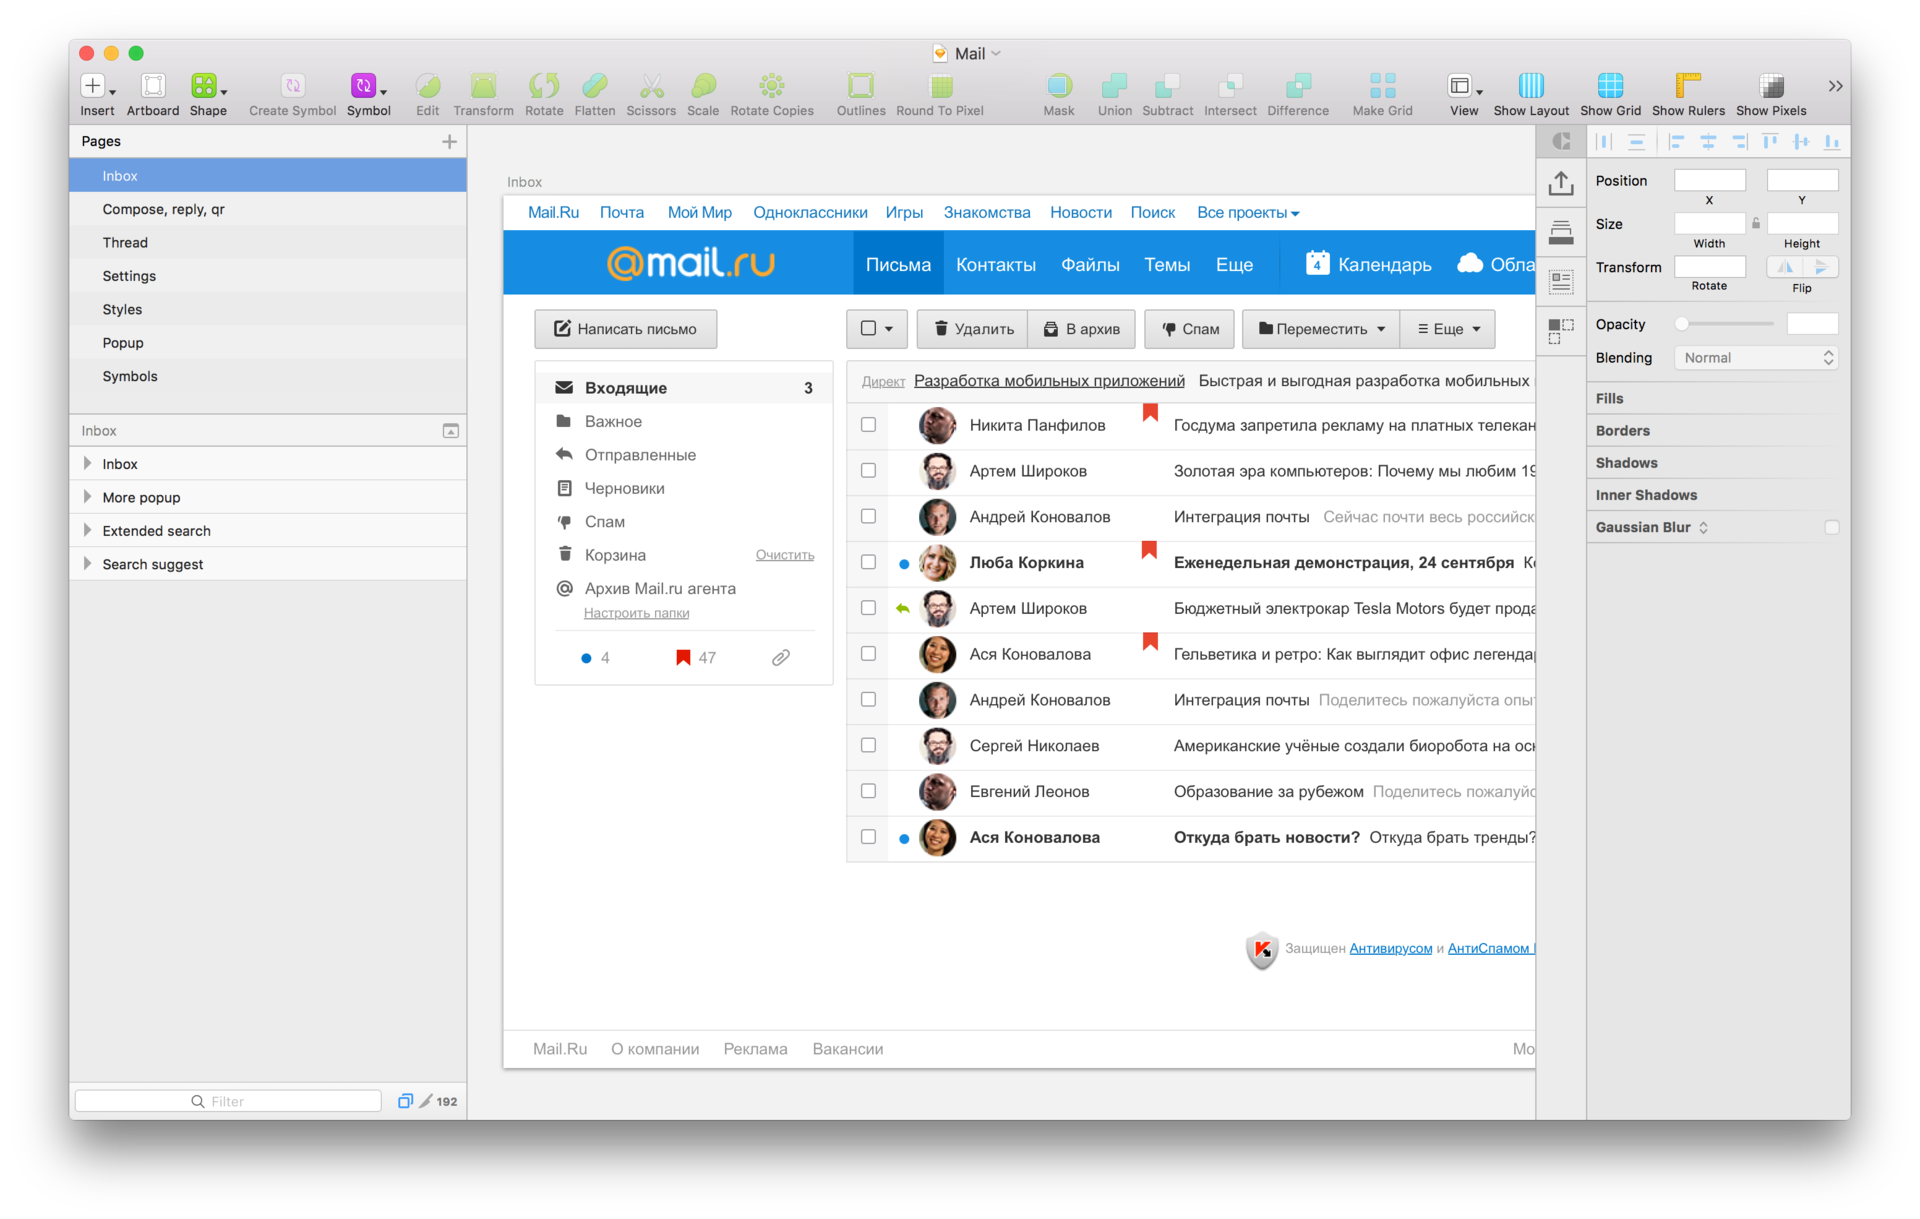
Take, for example, the Mail.Ru Mail interface: the picture is clickable. The main screens of the Mail are laid out on pages: a list of letters, a letter, writing a letter, settings. By artboard status: search, notifications, drop-down menus, etc. If necessary, individual pages can be reserved for draft intermediate options or interface versions - this will allow you to keep them handy and quickly find them in the process. Thus, we form a master file - the main layout containing the most current state of the interface.
Master files and templates
I mentioned earlier that we were inspired by the experience of fellow developers, and now we have come to the stage where this is most pronounced. Developers are great optimizers. They damn don't like wasting time. And on their shoulders lies a great responsibility - because they constantly make changes to the product code, and many people do it at the same time, sometimes not directly connected to each other.
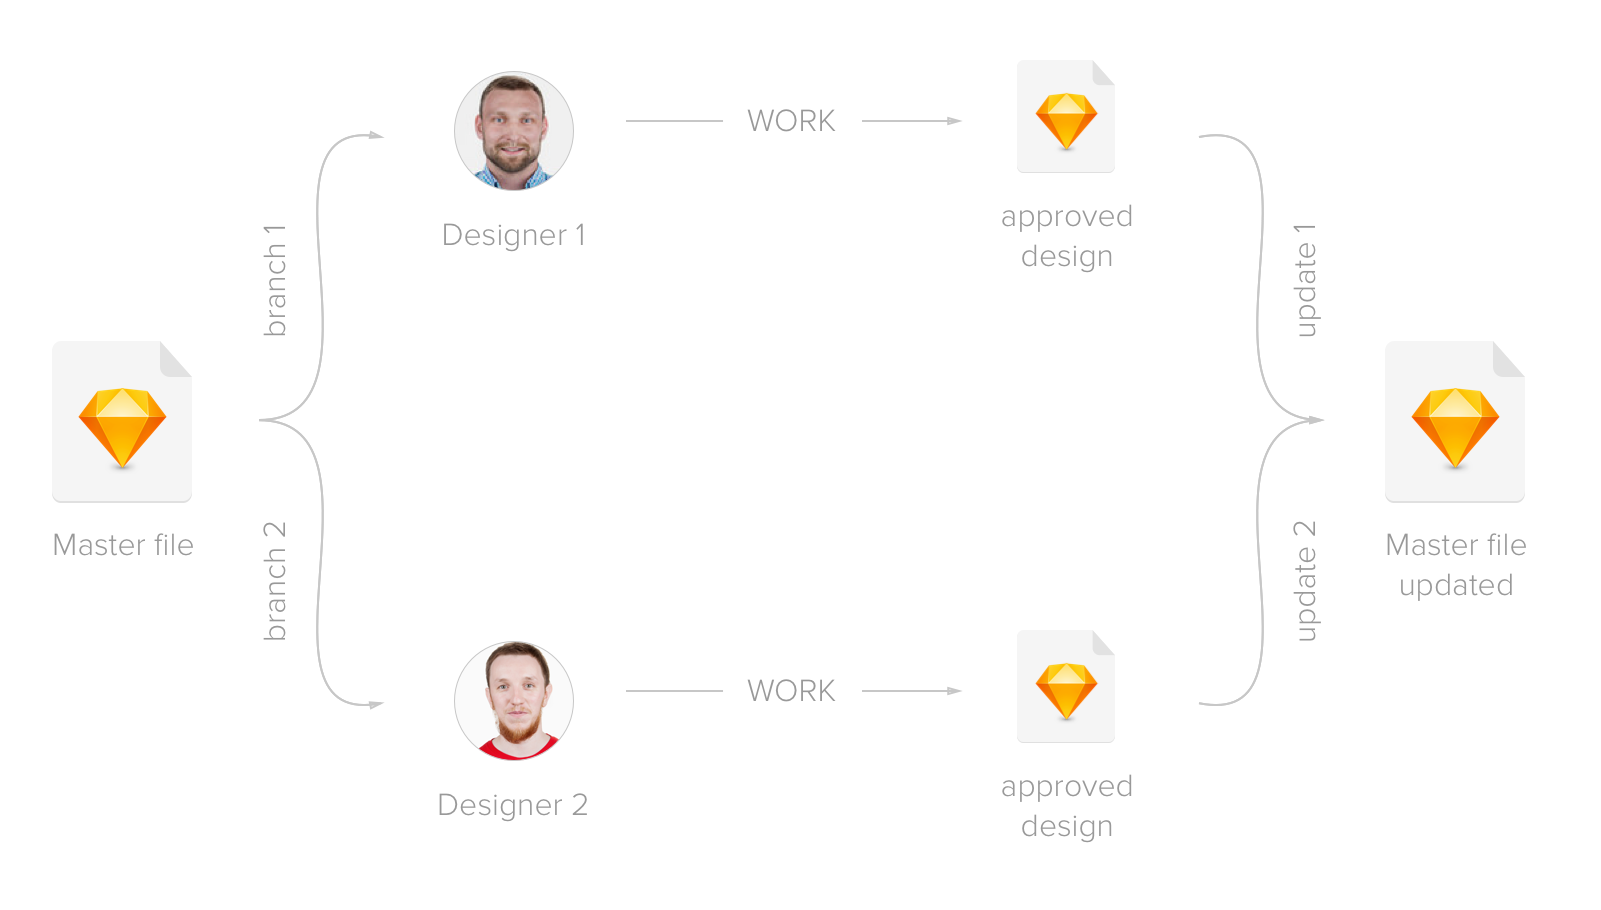
In each project there is a “master” - the entire current set of project files, which are now in production. It would be too risky to make changes immediately to the master, because this can unpredictably affect the project. In this regard, Git appeared as a system for controlling changes and versions. Developers commit changes to individual branches, and after passing checks, these changes are accepted and added to the wizard. As a result, many people, working simultaneously, safely and in a controlled manner update the product.
How can this help us? No, we did not use Git (although we could, and some go exactly that way), but we revised the existing tools a bit. If we use the concepts of developers, then we also have our own “master” - the main sketch file with all the screens and interface states. It should be stored in the root of the project folder and be as relevant as possible. It is untouchable, only a few people in a team can make changes to it directly. There are also "branches" - individual files, copies of the main, in which you make any changes in the framework of a particular task. Each task has its own branch. As soon as the task is completed and the changes are agreed, you can take the corrected part from the branch and enter it into the master file.
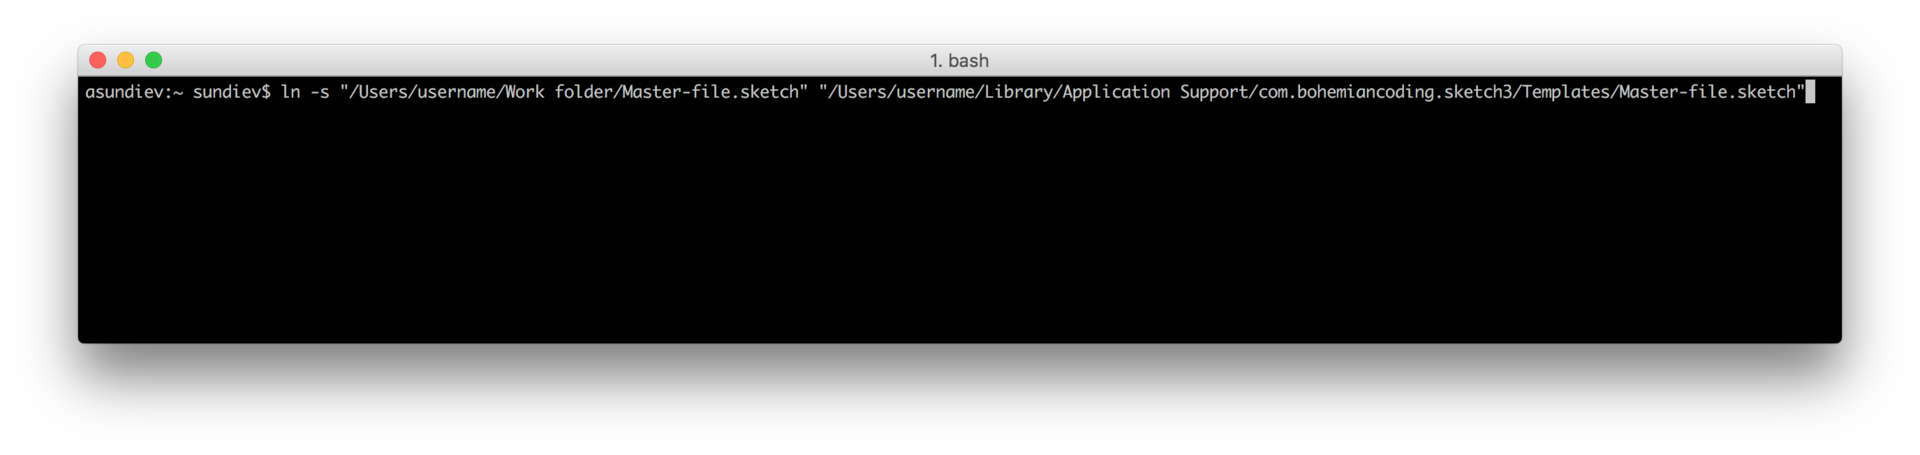
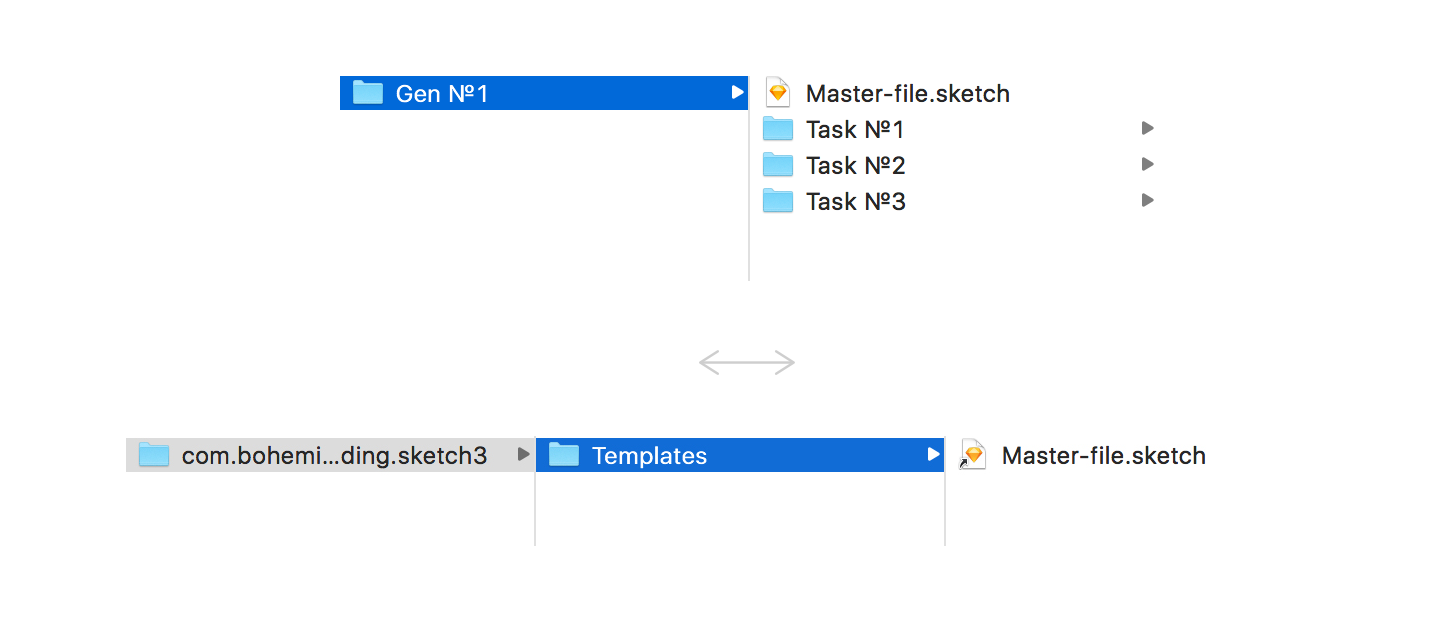
To quickly create branches without touching the master, we use sketch templates (Oleg Andrianov, who used this in the team of Odnoklassnikov, shared his idea with us at one time). To do this, create a shortcut (hard-link) to the master file in the sketch template folder. The master file lies on our shared cloud, and each designer has a shortcut to it on the machine.
In order to create a connection, you need to register one simple command in the terminal (terminal.app):
ln -s "/Users/username/Work folder/Master-file.sketch" "/Users/username/Library/Application Support/com.bohemiancoding.sketch3/Templates/Master-file.sketch"- The first block in quotation marks is the path to the folder where the master file lies.
- The second block is the path to the Templates folder in the sketch.
Pictures are clickable
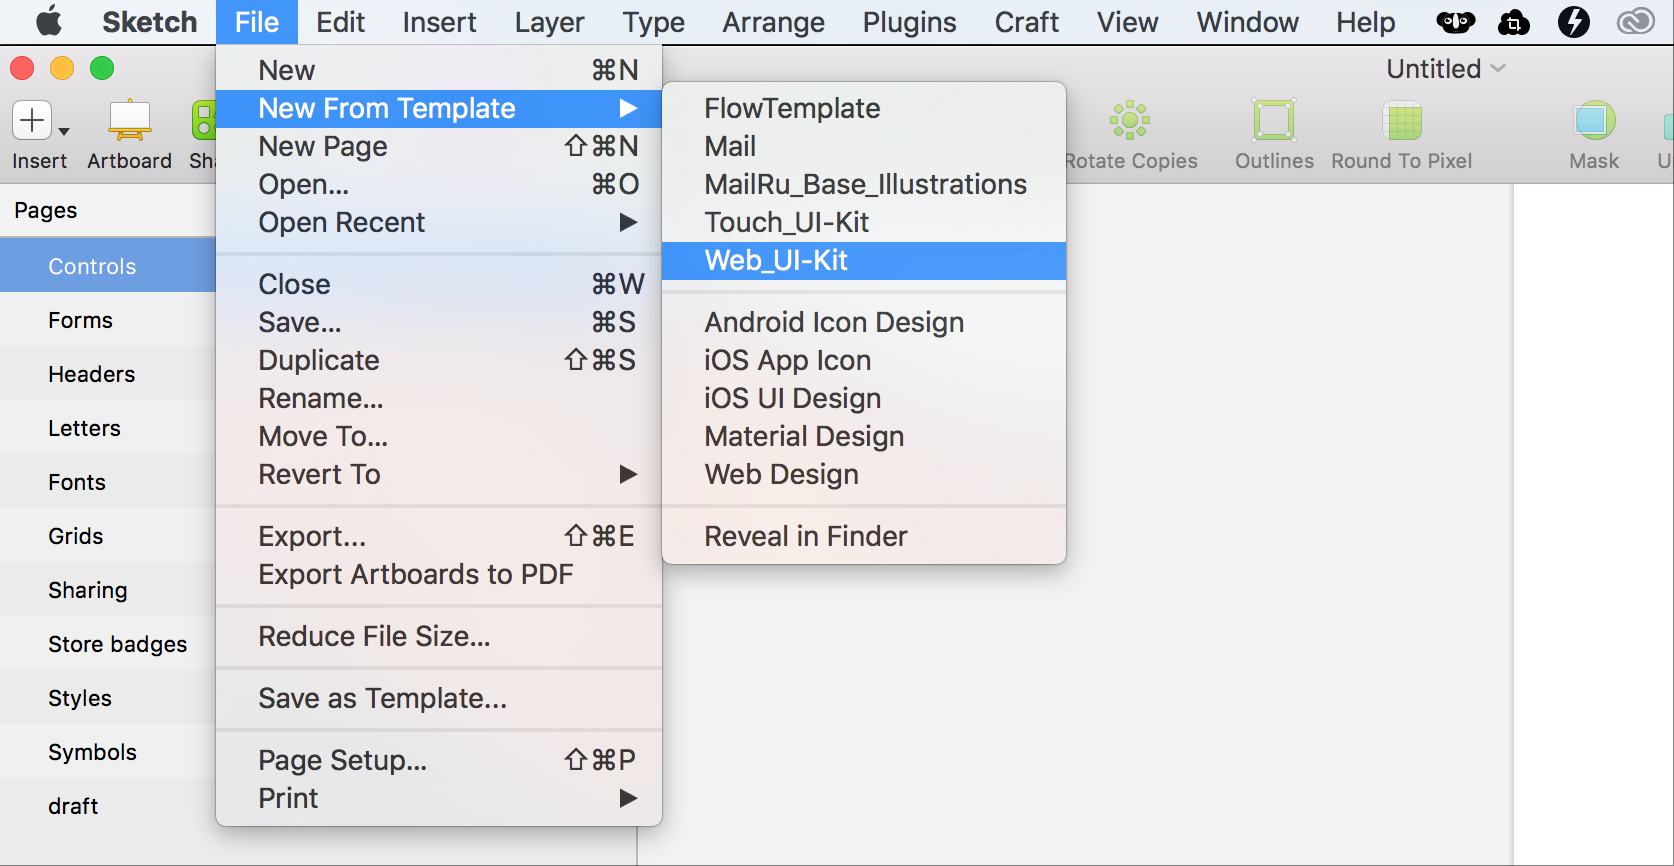
Now you can get a copy of the very current master through the menu of templates and work with it without any harm. Since the wizard is stored in a shared folder, when it is updated, all designers see the current version instantly. In the templates, we placed the UI Kit in the same way for quick access to components.
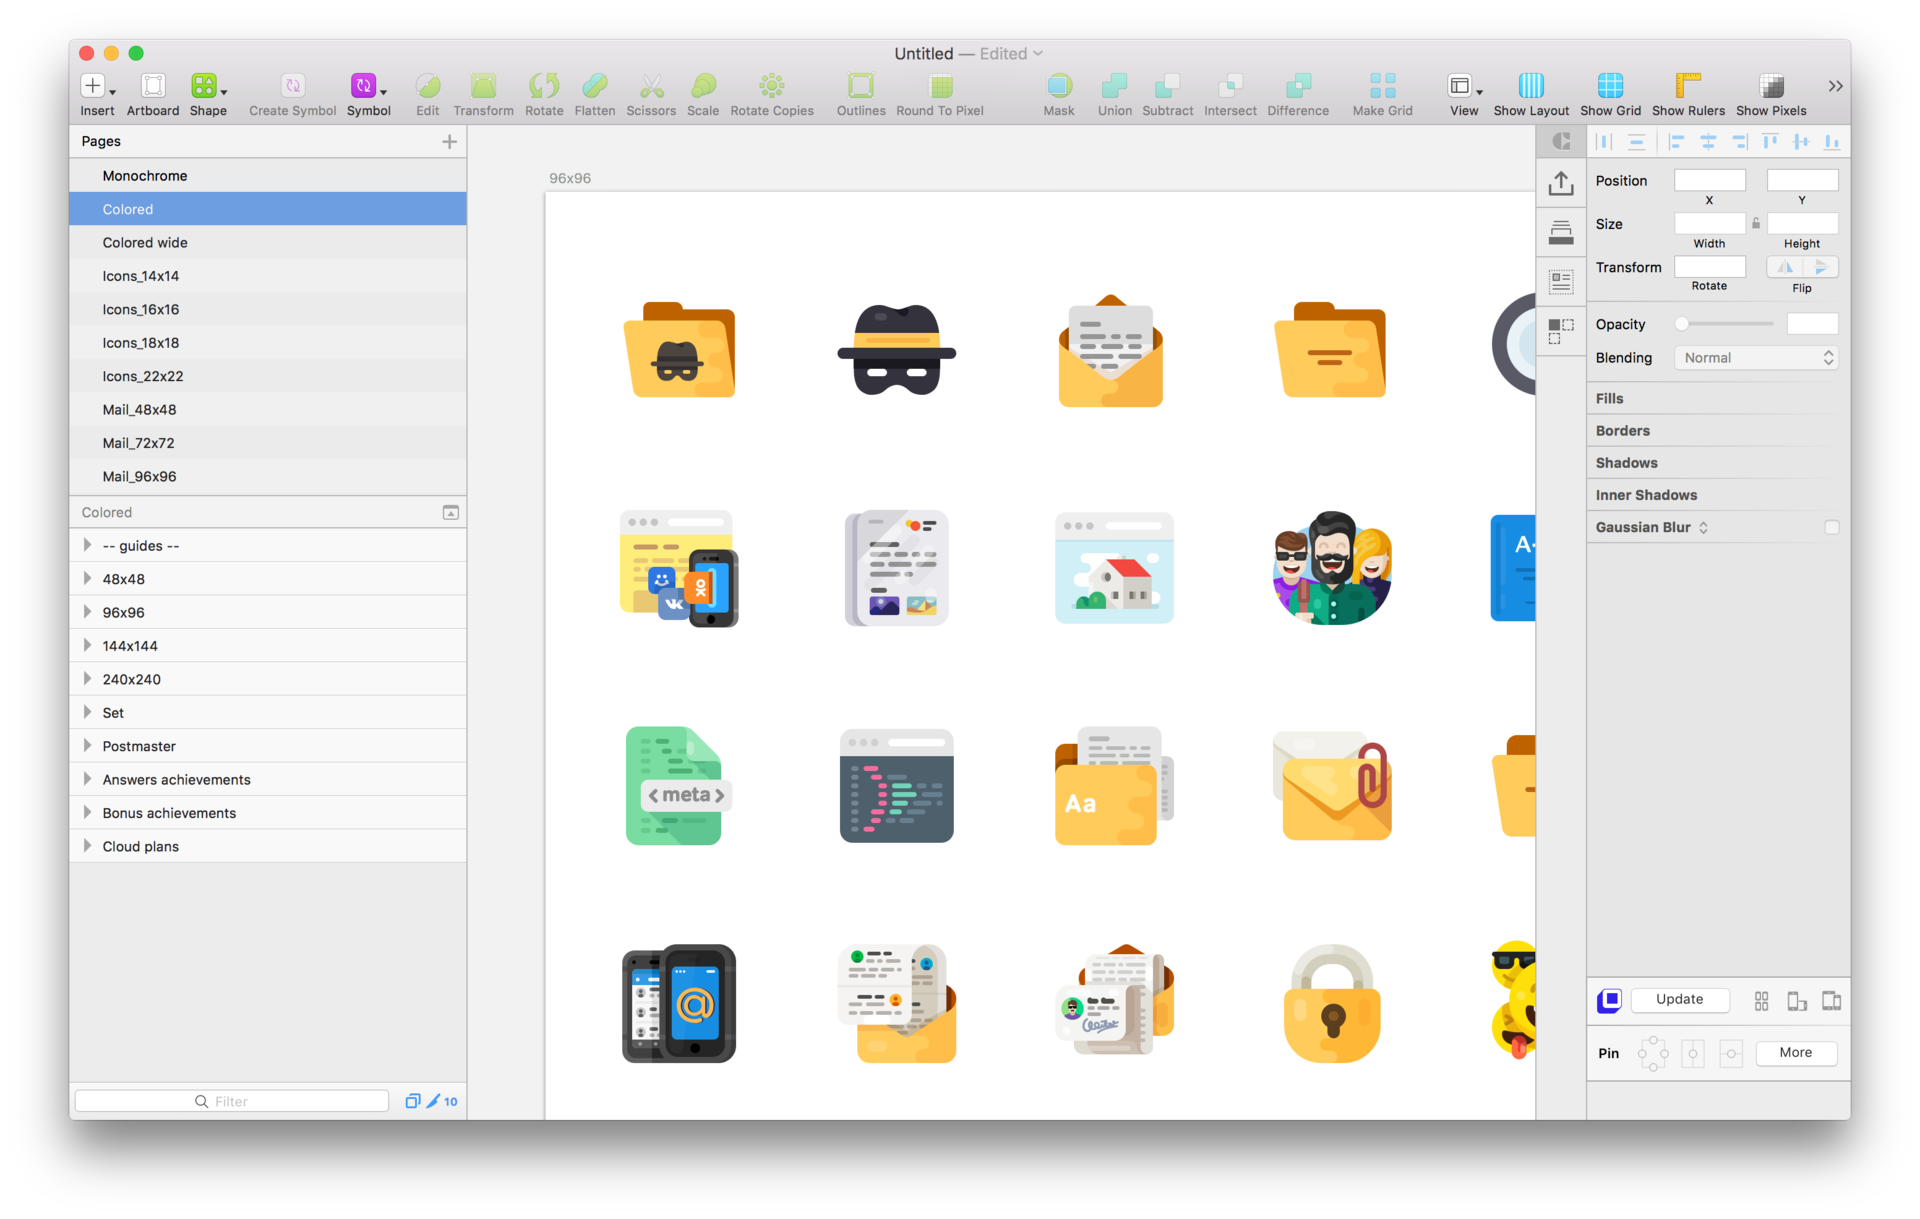
This technique, of course, works for any sketch files, so we did not stop at the UI Kit and added other commonly used files to the templates, for example, a pack with icons and illustrations. Now, if necessary, add an interface icon or a small illustration to the layout, we turn to this template, where they are in svg, ready for export.
One could get confused in such a large (and constantly expanding) document, however, the search for a sketch helps out. If the layers are logically named, then finding the right one is easy. And the “cmd + 2” keyboard shortcut takes you to the selected item. The picture is clickable. The scheme described above allows our portal team to work on a group of projects, always using the latest versions of files that are at hand, and making changes is not destructive. The process initially does not work by itself and requires some consciousness from the participants, but in practice a habit is developed in a couple of weeks and happiness sets in.