How to test smart contracts
- Tutorial

The terms of a smart contract cannot be changed. Therefore, whenever you create a smart contract, you need to make sure that it works correctly. Testing is a safe way to test a contract in different situations. In this tutorial, you will learn what steps to take to do this.
I will tell:
- How to prepare a test environment.
- How to write JavaScript tests and execute them in Truffle .
The tutorial is designed for beginners who have just begun to delve into the development and testing of smart contracts for Ethereum. To understand this tutorial, you must have at least a basic level of knowledge of JavaScript and Solidity .
1. How to prepare a test environment
There are many ways to test smart contracts, but Truffle is the most popular tool for writing tests using JavaScript . At Truffle, you can write unit tests as well as conduct comprehensive integration testing with real parameters from the production environment.
First you need to install the latest version of Node.js from the official site .
Then open the terminal and install Truffle using the following command:
npm install -g truffleAfter installing Truffle , without closing the terminal, create the Funding directory :
mkdir FundingNext, go to the directory with the command:
cd FundingTo initialize the directory run the command:
truffle initAfter executing the command , the following folders and files will be created in the Funding directory :
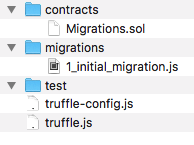
Next we will work with each directory. For now, let's continue to prepare the test environment.
To run the tests will need a Javascript library.
Mocha is a library that contains common functions for testing, including describe and it .
Chai is a library that supports various functions for checks. There are different "styles" of checking the results, and Chai gives us this opportunity. In the tutorial we will use Should .
By default, Mocha is included in Truffle, we can use library functions without any problems. Chai must be installed manually. To do this, use the terminal and in the root directory of the project, run the command:
npm install chaiI also installed the chai-bignumber library to compare numbers with arbitrary precision:
npm install --save-dev chai-bignumber At this test environment is ready. Now you can start developing a smart contract and tests for it.
2. How to write JavaScript tests and execute them in Truffle
To develop tests need a smart contract. We will develop a contract that allows you to collect donations, set a specific amount to achieve collection and withdraw funds. If someone donates more, then the difference between the amount that was accumulated and the amount that needs to be collected will be returned to him.
Go to the directory Funding -> contracts . In Funding / contracts we will create a Funding.sol file with the .sol extension - this will be a smart contract for testing.
Add the following code to Funding.sol :
pragma solidity 0.4.24;
contract Funding {
    uint public raised;
    uint public goal;
    address public owner;
    event Donated(uint donation);
    event Withdrew(uint amount);
    modifier onlyOwner() {
        require(owner == msg.sender);
        _;
    }
    modifier isFinished() {
        require(isFunded());
        _;
    }
    modifier notFinished() {
        require(!isFunded());
        _;
    }
    constructor (uint _goal) public {
        owner = msg.sender;
        goal = _goal;
    }
    functionisFunded() publicviewreturns (bool) {
        return raised >= goal;
    }
    functiondonate() publicpayablenotFinished{
        uint refund;
        raised += msg.value;
        if (raised > goal) {
            refund = raised - goal;
            raised -= refund;
            msg.sender.transfer(refund);
        }
        emit Donated(msg.value);
    }
    functionwithdraw() publiconlyOwnerisFinished{
        uint amount = address(this).balance;
        owner.transfer(amount);
        emit Withdrew(amount);
    }
}
The contract is ready. We deploy a smart contract through migration.
Migrations are JavaScript files that help you deploy contracts on Ethereum. This is the main way to deploy contracts.
Go to the directory Funding -> migrations and create the file 2_funding.js , adding the following code to it:
const Funding = artifacts.require("./Funding.sol");
const ETHERS = 10**18;
const GOAL = 20 * ETHERS;
module.exports = function(deployer) {
    deployer.deploy(Funding, GOAL);
};
To run tests, you need to use the truffle test command . In the terminal, go to the root directory Funding , which was created during the preparation of the test environment and enter:
truffle testIf the following conclusion appears in the terminal, then everything is done correctly:
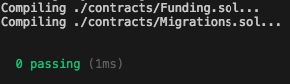
Now let's start writing tests.
Owner check
Go to the directory Funding -> test and create a file test_funding.js with the extension .js . This is the file in which the tests will be written.
The following code should be added to the test_funding.js file :
const Funding = artifacts.require("Funding");
require("chai").use(require("chai-bignumber")(web3.BigNumber)).should();
contract("Funding", function([account, firstDonator, secondDonator]) {
const ETHERS = 10**18;
const GAS_PRICE = 10**6;
let fundingContract = null;
  it("should check the owner is valid", async () => {
    fundingContract = await Funding.deployed();
    const owner = await fundingContract.owner.call()
    owner.should.be.bignumber.equal(account);
  });
In the test, we verify that the Funding contract stores the address of the owner who has expanded the contract. In our case, account is the first element of the array. Truffle allows you to use up to ten addresses, in the tests we need only three addresses.
Acceptance of donations and verification of the end of the fundraising
In this section we will check:
- Reception and amount of donations.
- Reached a certain amount of donations.
- What happens if you donate more than you need to collect.
- The total amount of donations.
- Is it possible to continue fundraising if the necessary amount is collected?
We write and analyze the tests:
. . . . . . . . . . . . . . . . . . . . . .
const ETHERS = 10**18;
const GAS_PRICE = 10**6;
let fundingContract = null;
let txEvent;
functionfindEvent(logs, eventName) {
  let result = null;
  for (let log of logs) {
    if (log.event === eventName) {
      result = log;
      break;
    }
  }
  return result;
};
  it("should accept donations from the donator #1", async () => {
    const bFirstDonator= web3.eth.getBalance(firstDonator);
    const donate = await fundingContract.donate({
                                                  from: firstDonator,
                                                  value: 5 * ETHERS,
                                                  gasPrice: GAS_PRICE
                                               });
    txEvent = findEvent(donate.logs, "Donated");
    txEvent.args.donation.should.be.bignumber.equal(5 * ETHERS);
    const difference = bFirstDonator.sub(web3.eth.getBalance(firstDonator)).sub(new web3.BigNumber(donate.receipt.gasUsed * GAS_PRICE));
    difference.should.be.bignumber.equal(5 * ETHERS);
  });
Before analyzing the test, I want to note 2 points:
- To find events (events) and check its arguments, a small findEvent function was written .
- For the convenience of testing and calculations, the own cost of gas was set (constant GAS_PRICE).
Now we analyze the test. In the test, we checked:
- that we can accept donations by calling the donate () method ;
- that the amount donated to us is correctly indicated;
- that the one who donated funds, the balance decreased by the donated amount.
it("should check if donation is not completed", async () => {
  const isFunded = await fundingContract.isFunded();
  isFunded.should.be.equal(false);
});
In this test, we checked that the fundraising was not over yet.
it("should not allow to withdraw the fund until the required amount has
  been collected", async () => {
  let isCaught = false;
  try {
    await fundingContract.withdraw({ gasPrice: GAS_PRICE });
  } catch (err) {
      isCaught = true;
  }
  isCaught.should.be.equal(true);
});
In the test we checked that we could not withdraw funds until the amount we needed was collected.
it("should accept donations from the donator #2", async () => {
  const bSecondDonator= web3.eth.getBalance(secondDonator);
  const donate = await fundingContract.donate({
                                                from: secondDonator,
                                                value: 20 * ETHERS,
                                                gasPrice: GAS_PRICE
                                             });
  txEvent = findEvent(donate.logs, "Donated");
  txEvent.args.donation.should.be.bignumber.equal(20 * ETHERS);
  const difference = bSecondDonator.sub(web3.eth.getBalance(secondDonator)).sub(new web3.BigNumber(donate.receipt.gasUsed * GAS_PRICE));
 difference.should.be.bignumber.equal(15 * ETHERS);
});
The test checked that if you donate a large amount, the donate () method calculates and returns the funds to the person who donated more than you need. This amount is equal to the difference between the amount that is accumulated and the amount you want to collect.
it("should check if the donation is completed", async () => {
  const notFunded = await fundingContract.isFunded();
  notFunded.should.be.equal(true);
});
it("should check if donated amount of money is correct", async () => {
  const raised = await fundingContract.raised.call();
  raised.should.be.bignumber.equal(20 * ETHERS);
});
it("should not accept donations if the fundraising is completed", async () => {
  let isCaught = false;
  try {
    await fundingContract.donate({ from: firstDonator, value: 10 * ETHERS });
  } catch (err) {
        isCaught = true;
  }
  isCaught.should.be.equal(true);
});
In these three tests, we checked:
- that the fundraising is completed;
- that the donation amount is correct;
- that no one else can donate since the fundraising is completed.
Withdrawal of funds
In the previous section of the tutorial, we collected the amount we need, now we can withdraw it:
  . . . . . . . . . . . . . . . . . . . . . .
  it("should allow the owner to withdraw the fund", async () => {
    const bAccount = web3.eth.getBalance(account);
    const withdraw = await fundingContract.withdraw({ gasPrice: GAS_PRICE });
    txEvent = findEvent(withdraw.logs, "Withdrew");
    txEvent.args.amount.should.be.bignumber.equal(20 * ETHERS);
    const difference = web3.eth.getBalance(account).sub(bAccount);
    difference.should.be.bignumber.equal(await fundingContract.raised.call() - withdraw.receipt.gasUsed * GAS_PRICE);
});
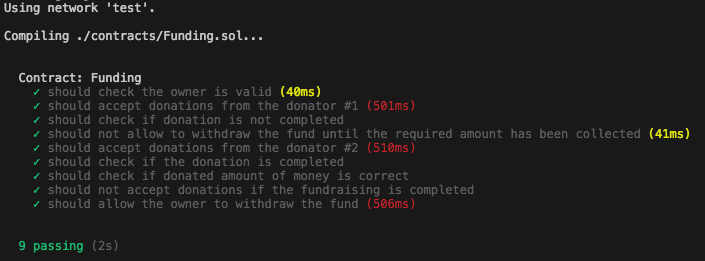
By calling the function withdraw () , we have withdrawn the funds of the owner of the smart contract, in our case it is an account . Then we checked that we really got the amount we needed. For this, the difference between the balance before and after the withdrawal of funds was recorded in the difference constant . The result was compared with the amount of donations minus the transaction fee. As mentioned above, for the convenience of testing and calculations, I set my own price for gas . Let's run the
written tests with the truffle test command . If everything is done correctly, the result should be as follows:
Result
I tried to describe the steps of testing smart contracts in a simple and understandable language: from preparing a test environment to writing the tests themselves.
Now you can test any smart contract and make sure that it works correctly.