How to set up Continuous Deployment for your project: personal experience
Translated for you by Julius Minmo ’s article on setting up Continuous Deployment for your project. Automation allows you to save a lot of time and effort. The article will be useful, first of all, for novice programmers.
Continuous deployment is a great thing. Once we commit a project and then everything happens automatically, the observation of this process is simply hypnotizing. In this article I will show how you can configure everything for a home project.
We remind: for all readers of "Habr" - a discount of 10,000 rubles when recording for any Skillbox course on the promotional code "Habr".So, first, let's look at the diagram, which explains the difference between Continuous Delivery and Continuous Deployment.
Skillbox recommends: Online course "Profession Frontend Developer" .
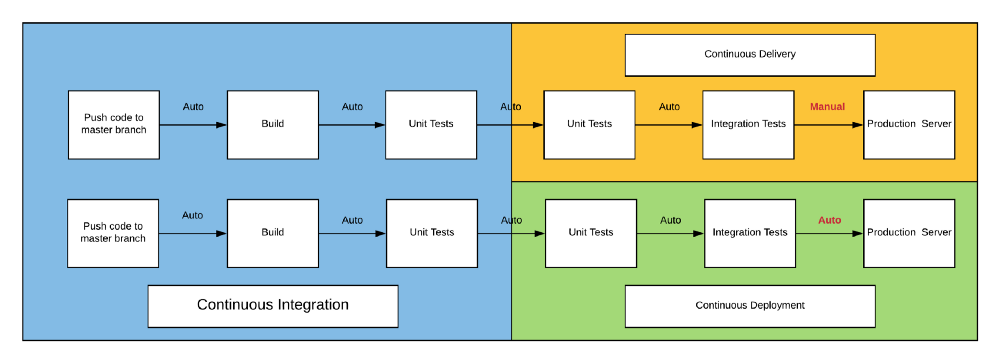
In the case of a home project, we select Continuous Deployment, since no one but you (the project) works with it and no one depends on it. Well, since in most cases I want the changes to be immediately deployed, the choice is obvious. If you later want to change the process, you can always do it.
You will learn the following:
- How to make a dockerfile.
- How to upload a project to GitHub.
- How to automatically build a docker image on Docker Hub.
- How to automatically download and launch an image from Watchtower.
What is needed:
- A basic understanding of what Docker and Dockerfile are.
- Installed git.
- Account at <a href='https://hub.docker.com/"> Docker Hub
Server (physical or virtual) running Docker.
Here are my GitHub and Docker Hub repositories that I work with.
Why do I use Docker?
It makes it possible to use the same environment for different processes, which excludes the appearance of heisenbags and the problem “it only works on my machine”. Containers are isolated, which is good from a cybersecurity point of view. There are more advantages, but in my opinion, these two are the main ones.
Configuring Dockerfile
First we need a Dockerfile for the project. This file is always called exactly and has no extension. It is always located in the main project directory.
It starts with the FROM operator, which tells Docker which basic image we start with. You can draw an analogy with painting. We can imagine this image as a finished canvas with a painted background and the missing main element of the composition (your program).
Next, copy the project files into the container using the COPY ... command.
It allows you to pick up files from the initial location to the current location - of course, inside the container.
Next, you need to install dependencies, for this I use Python PIP. The main thing to remember is the launch of commands in the container with RUN.
From python: 3.7
COPY ..
RUN pip install -r requirements.txt
Everything is simple, right? Now you can run the program in a container.
CMD ["python", "./my_script.py"]
Now that's all, you have finished the Dockerfile and can manually create an image and a container. Now just skip this moment.
Now let's create a repository in GitHub, but remember that the line “Initialize this repository with a README” doesn't need to be touched.

Now copy the URL.

Open cmd / shell project root directory. Now you need to initialize the repository, add files, configure remote mode, commit files and send the project to GitHub.
git init
git add *
git remote add origin https://github.com/<user>/<repository>.git
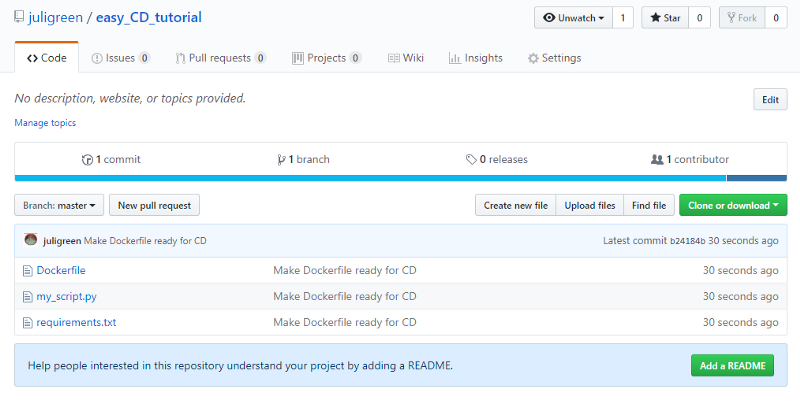
git commit -a -m "Make Dockerfile ready for CD"
git push -u origin masterIf everything is OK, the GitHub repository will look like this:
We are halfway to success!
Now you need to connect GitHub to Docker Hub. To do this, go to the account settings.

Scroll down and connect.

Now create a repository in the Docker Hub.

Call your repo and click on the icon GitHub or Bitbucket. Then we select the organization (usually your nickname) and the name of the project. If desired, the settings can be changed.

And now the last step - here we need a Watchtower on the target machine. This is a program that allows you to automate the process. If an update appears, Watchtower removes the original container and creates a container from the new image with the same settings.
The good news is that you can install Watchtower with Docker, for this you need to enter the following command into the terminal:
docker run -d --name watchtower -v /var/run/docker.sock:/var/run/docker.sock v2tec/watchtowerAnd now we launch the container for your project!
docker run -d --name <my-project> <username>/<my-project>-d allows the program to work in the background, so that it does not close if you close the terminal.
In conclusion, if you send a commit to the GitHub repository, the Docker Hub will automatically create a Docker image. Then the Watchtower will already interact with it.
As for the tests, you can use Travis CI. You can read about it here , but the bottom line is that you add another file to your repository, which contains instructions for an external server to run unit tests or any other instructions.
Skillbox recommends:
- Online course "Python-developer from scratch . "
- Практический годовой курс «PHP-разработчик с нуля до PRO».
- Образовательный онлайн-курс «Профессия Java-разработчик».