Backup VM ESXi using Bareos
- Tutorial

We are continuing a series of publications on backup options using Bareos. This article will talk about backing up VM ESXi with Bareos.
Previous posts: “
Backup using Open Source Solutions - Bareos” To back up VMware ESXi virtual machines, they often use tools such as Veeam or the ghettovcb script. In this article, we will consider a method for backing up a virtual machine using Bareos 16.2, namely, we will use one of the plugins that allows us to extend the functionality of Bareos - vmware-plugin. In the 16th version, the location of the configuration files has been changed, now each resource (pool, client, job, etc.) is distributed in its own directories, multilingualism for the web UI has been added, the MySQL plugin has been improved, more detailed documentation can be viewedhere .
For this example, we have ESXi 6.0 (the Evaluation license is enough for the plugin to work) and a server under CentOS 7 on which Bareos will be installed.
Add a repository:
wget http://download.bareos.org/bareos/release/16.2/CentOS_7/bareos.repo -O /etc/yum.repos.d/bareos.repoInstall the necessary components:
yum install -y bareos-client bareos-database-tools bareos-filedaemon bareos-database-postgresql bareos bareos-bconsole bareos-database-common bareos-storage bareos-director bareos-commonInstall the database:
yum install -y postgresql-server postgresql-contribAfter installation, execute:
# postgresql-setup initdbWe execute the database preparation scripts installed with Bareos:
su postgres -c /usr/lib/bareos/scripts/create_bareos_database
su postgres -c /usr/lib/bareos/scripts/make_bareos_tables
su postgres -c /usr/lib/bareos/scripts/grant_bareos_privileges
More information about installation and a description of the components, as well as a description of the main directives, can be found here.
The list of directories in version 16 looks like this:
/bareos-dir-export
/bareos-dir.d
     	/catalog
     	/client
    	/console
    	/counter
    	/director
    	/fileset
    	/job
    	/jobdefs
    	/messages
    	/pool
    	/profile
    	/schedule
    	/storage
/bareos-fd.d
	     /client
	     /director
	    /messages
/bareos-sd.d
	/autochanger
	/device
	/director
	/messages
	/ndmp
	/storage
/tray-monitor.d
	/client
	/director
	/storage
bconsole.conf
Each subdirectory has its own configuration file responsible for the resource corresponding to the name of the directory.
Before making any settings, you need to make sure that all the requirements for the VMware plugin work are met. The official list of requirements can be viewed here .
You need to install all the dependencies before installing the plugin.
Add one of the EPEL repositories, as we will need some packages for further installation:
rpm -ivh
yum install python
yum install python-pip
yum install python-wheel
pip install --upgrade pip
pip install pyvmomi
yum install python-pyvmomi
После можем установить сам плагин:
yum install bareos-vmware-plugin
A mandatory requirement is that the ESXi VM support and enable CBT (Changed Block Tracking). The VMware website indicates how this option is enabled, but there is an easier way - using a script. The script itself is called vmware_cbt_tool and you can get it on GitHub.
After downloading to the BareOS server, and going to the script directory, you need to do the following:
./vmware_cbt_tool.py -s 172.17.10.1 -u bakuser -p kJo@#!a -d ha-datacenter -f / -v ubuntu --infoBy options:
-s - server address
-u - user on ESXi (specially introduced user bakuser)
-p - his password
-d - name of our “datacenter” in ESXi, by default “ha-datacenter”
-f - folder with our VMs, root by default
-v - the name of the VM itself
--info - will show us the current CBT settings for VM

Having run the command, you should see:
INFO: VM ubuntu CBT supported: True
INFO: VM ubuntu CBT enabled: False
That is, CBT is supported, but not currently enabled, so we’ll turn it on with the same script by adding the --enablecbt option at the end of the command
./vmware_cbt_tool.py -s 172.17.10.1 -u bakuser -p kJo@#!a -d ha-datacenter -f / -v ubuntu --enablecbtAs a result, we will see the following:
INFO: VM ubuntu CBT supported: True
INFO: VM ubuntu CBT enabled: False
INFO: VM ubuntu trying to enable CBT now
INFO: VM ubuntu trying to create and remove a snapshot to activate CBT
INFO: VM ubuntu successfully created and removed snapshot
CBT has been successfully enabled.
Now you need to go to the settings of BareOS itself, you can also be guided by the official documentation.
The contents of the configs are:
/etc/bareos/bareos-dir.d/client/bareos-fd.conf
Client {
  Name = vmware
 #Адрес клиента оставляем именно localhost
 Address = localhost
  Password = "wai2Aux0"
}
/etc/bareos/bareos-dir.d/director/bareos-dir.conf
Director {
  Name = "bareos-dir"
  QueryFile = "/usr/lib/bareos/scripts/query.sql"
  Maximum Concurrent Jobs = 10
  Password = "wai2Aux0"
  Messages = Standard
  Auditing = yes
}
The following file in this example is one of the most important, because it specifies options for the plugin
/etc/bareos/bareos-dir.d/fileset/SelfTest.conf
FileSet {
  Name = "vm-ubuntu"
  Include {
    Options {
         signature = MD5
         Compression = GZIP
    }
    Plugin = "python:module_path=/usr/lib64/bareos/plugins/vmware_plugin:module_name=bareos-fd-vmware:dc=ha-datacenter:folder=/:vmname=ubuntu:vcserver=172.17.10.1:vcuser=bakuser:vcpass=kJo@#!a"
  }
}
python: module_path = / usr / lib64 / bareos / plugins / vmware_plugin - indicate where the plugin is located
module_name = bareos-fd-vmware - specify its name
dc - name datacenter in ESXi
folder - folder with VM, default root
vmname - virtual name
vcserver machines - vcuser server
address - user login specially created for working with vcpass
backup - his password
Job description for backup:
/etc/bareos/bareos-dir.d/job/backup-bareos-fd.conf
Job {
  Name = "vm-ubuntu-backup-job"
  JobDefs = "DefaultJob"
  Client = "vmware"
}
/etc/bareos/bareos-dir.d/jobdefs/DefaultJob.conf
JobDefs {
  Name = "DefaultJob"
  Type = Backup
  Level = Incremental
  FileSet = "vm-ubuntu"
  Schedule = "WeeklyCycle"
  Storage = bareos-sd
  Messages = Standard
  Pool = Incremental
  Priority = 10
  Write Bootstrap = "/var/lib/bareos/%c.bsr"
  Full Backup Pool = Full
  Differential Backup Pool = Differential
  Incremental Backup Pool = Incremental
}
Job Description for Recovery:
/etc/bareos/bareos-dir.d/job/RestoreFiles.conf
Job {
  Name = "RestoreFiles"
  Type = Restore
  Client = vmware
  FileSet = "vm-ubuntu"
  Storage = bareos-sd
  Pool = Incremental
  Messages = Standard
  Where = /tmp/
}
Alert settings:
/etc/bareos/bareos-dir.d/messages/Standard.conf
Messages {
  Name = Standard
# Описание команды для отправки email
  mailcommand = "/usr/bin/bsmtp -h localhost -f \"\(Bareos\) \<%r\>\" -s \"Bareos: Intervention needed for %j\" %r"
  operator = root@localhost = mount
  #Отправляем уведомление о всех основных событиях
mail = admin@testdomain.com = alert,error,fatal,terminate, !skipped
# В консоль отображаем все основные события
 console = all, !skipped, !saved
# Указываем, что будет записываться в лог, т.е. все
append = "/var/log/bareos/bareos.log" = all, !skipped
# Отправлять сообщения в каталог БД
catalog = all
}
The type of letter that arrives will be displayed later for clarity.
Description of pools:
/etc/bareos/bareos-dir.d/pool/Full.conf
Pool {
  Name = Full
  Pool Type = Backup
  Recycle = yes
  AutoPrune = yes
  Volume Retention = 365 days
  Maximum Volume Bytes = 50G
  Maximum Volumes = 100
  Label Format = "Full-"
}
/etc/bareos/bareos-dir.d/pool/Incremental.conf
Pool {
  Name = Incremental
  Pool Type = Backup
  Recycle = yes
  AutoPrune = yes
  Volume Retention = 30 days
  Maximum Volume Bytes = 1G
  Maximum Volumes = 100
  Label Format = "Incremental-"
}
We will not give an example of the Differential pool, because although it is specified in JobDefs, we will not use it.
Schedule Setting:
/etc/bareos/bareos-dir.d/schedule/WeeklyCycle.conf
Schedule {
  Name = "WeeklyCycle"
# Первого числа в 21:00 запускается полный бекап
Run = Full on 1 at 21:00
# С второго по 31 число в час ночи запускается также полный бэкап
Run = Full 2-31 at 01:00
# С 2 по 31 число в 10,15 и 19:00 запускается инкрементальный бэкап
Run = Incremental on 2-31 at 10:00
  Run = Incremental on 2-31 at 15:00
  Run = Incremental on 2-31 at 19:00
}
Description of connection to the site:
/etc/bareos/bareos-dir.d/storage/File.conf
Storage {
  Name = bareos-sd
  Address = localhost
  Password = "wai2Aux0"
  Device = FileStorage
  Media Type = File
}
Settings of the page itself:
/etc/bareos/bareos-sd.d/device/FileStorage.conf
Device {
  Name = FileStorage
  Media Type = File
  Archive Device = /opt/backup
  LabelMedia = yes;
  Random Access = yes;
  AutomaticMount = yes;
  RemovableMedia = no;
  AlwaysOpen = no;
 }
Parameters for connecting the board to the director:
/etc/bareos/bareos-sd.d/director/bareos-dir.conf
Director {
  Name = bareos-dir
  Password = "wai2Aux0"
}
Notification parameters used:
/etc/bareos/bareos-sd.d/messages/Standard.conf
Messages {
  Name = Standard
  Director = bareos-dir = all
}
/etc/bareos/bareos-sd.d/storage/bareos-sd.conf
Storage {
  Name = bareos-sd
  Maximum Concurrent Jobs = 20
}
It is absolutely necessary to connect the plug-in on the server side, this is done in the following config:
/etc/bareos/bareos-fd.d/client/myself.conf
Client {
  Name = vmware
  Maximum Concurrent Jobs = 20
# Подключение плагинов
  Plugin Directory = /usr/lib64/bareos/plugins
  Plugin Names = "python"
}
Connection to the director:
/etc/bareos/bareos-fd.d/director/bareos-dir.conf
Director {
  Name = bareos-dir
  Password = "wai2Aux0"
}
Type of notifications sent to the director:
/etc/bareos/bareos-fd.d/messages/Standard.conf
Messages {
  Name = Standard
  Director = bareos-dir = all, !skipped, !restored
}
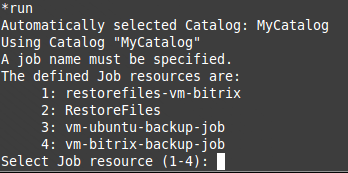
Forcibly back up in manual mode, for this we enter the bconsole
*run
Automatically selected Catalog: MyCatalog
Using Catalog "MyCatalog"
A job name must be specified.
The defined Job resources are:
1: RestoreFiles
2: vm-ubuntu-backup-job
Select Job resource (1-2): 2
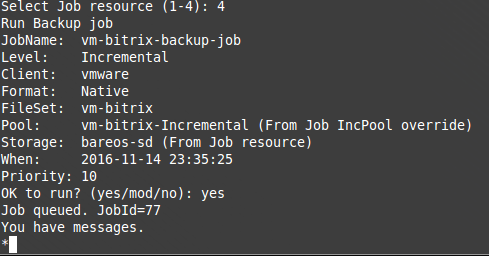
Run Backup job
JobName: vm-ubuntu-backup-job
Level: Incremental
Client: vmware
Format: Native
FileSet: vm-ubuntu
Pool: Incremental (From Job IncPool override)
Storage: bareos-sd (From Job resource)
When: 2016-11-14 07:22:11
Priority: 10
OK to run? (yes/mod/no): yes
With the message command, we can observe what is happening with the task, we see that the process started successfully:
14-Nov 07:22 vmware JobId 66: python-fd: Starting backup of /VMS/ha-datacenter/ubuntu/[datastore1] ubuntu/ubuntu.vmdk_cbt.json
14-Nov 07:22 vmware JobId 66: python-fd: Starting backup of /VMS/ha-datacenter/ubuntu/[datastore1] ubuntu/ubuntu.vmdk
During the execution of the task on the ESXi side, you can observe that the corresponding notifications appear in the message output console that the disk of the virtual machine is being accessed, and that the temporary snapshot is deleted at the end.

The incoming message looks something like this:
13-Nov 22:47 bareos-dir JobId 36: No prior Full backup Job record found.
13-Nov 22:47 bareos-dir JobId 36: No prior or suitable Full backup found in catalog. Doing FULL backup.
13-Nov 22:47 bareos-dir JobId 36: Start Backup JobId 36, Job=vm-ubuntu-backup-job.2016-11-13_22.47.47_04
13-Nov 22:47 bareos-dir JobId 36: Using Device "FileStorage" to write.
13-Nov 22:47 bareos-sd JobId 36: Volume "Full-0001" previously written, moving to end of data.
13-Nov 22:47 bareos-sd JobId 36: Ready to append to end of Volume "Full-0001" size=583849836
13-Nov 22:47 vmware JobId 36: python-fd: Starting backup of /VMS/ha-datacenter/ubuntu/[datastore1] ubuntu/ubuntu.vmdk_cbt.json
13-Nov 22:47 vmware JobId 36: python-fd: Starting backup of /VMS/ha-datacenter/ubuntu/[datastore1] ubuntu/ubuntu.vmdk
13-Nov 22:51 bareos-sd JobId 36: Elapsed time=00:04:01, Transfer rate=2.072 M Bytes/second
13-Nov 22:51 bareos-dir JobId 36: Bareos bareos-dir 16.2.4 (01Jul16):
  Build OS:               x86_64-redhat-linux-gnu redhat CentOS Linux release 7.0.1406 (Core)
  JobId:                  36
  Job:                    vm-ubuntu-backup-job.2016-11-13_22.47.47_04
  Backup Level:           Full (upgraded from Incremental)
  Client:                 "vmware" 16.2.4 (01Jul16) x86_64-redhat-linux-gnu,redhat,CentOS Linux release 7.0.1406 (Core) ,CentOS_7,x86_64
  FileSet:                "vm-ubuntu" 2016-11-13 22:47:47
  Pool:                   "Full" (From Job FullPool override)
  Catalog:                "MyCatalog" (From Client resource)
  Storage:                "bareos-sd" (From Job resource)
  Scheduled time:         13-Nov-2016 22:47:45
  Start time:             13-Nov-2016 22:47:50
  End time:               13-Nov-2016 22:51:51
  Elapsed time:           4 mins 1 sec
  Priority:               10
  FD Files Written:	  2
  SD Files Written:	  2
  FD Bytes Written:	  499,525,599 (499.5 MB)
  SD Bytes Written:	  499,527,168 (499.5 MB)
  Rate:                   2072.7 KB/s
  Software Compression:   73.1 % (gzip)
  VSS:                    no
  Encryption:             no
  Accurate:               no
  Volume name(s):         Full-0001
  Volume Session Id:	  9
  Volume Session Time:    1479067525
  Last Volume Bytes:	  1,083,996,610 (1.083 GB)
  Non-fatal FD errors:    0
  SD Errors:              0
  FD termination status:  OK
  SD termination status:  OK
  Termination:            Backup OK
As you can see, the message says about a successful backup, the backup type is Full, 499.5 Mb is recorded (on the ESXi side, the vmdk file occupies 560 M). In the FileSet settings, we set the type of gzip compression, which in this message is also visible in the line Software Compression.
The error message will look as follows. In this example, as you can see, the error was modeled if you did not activate CBT mode for VM, which we turned on in the previous steps using a special script.
Expand
14-Nov 01:17 vmware JobId 39: Fatal error: python-fd: Error VM VMBitrix5.1.8 is not CBT enabled
14-Nov 01:17 vmware JobId 39: Fatal error: fd_plugins.c:654 Command plugin "python:module_path=/usr/lib64/bareos/plugins/vmware_plugin:module_name=bareos-fd-vmware:dc=ha-datacenter:folder=/:vmname=VMBitrix5.1.8:vcserver=172.17.10.1:vcuser=bakuser:vcpass=kJo@#!a" requested, but is not loaded.
14-Nov 01:17 bareos-dir JobId 39: Error: Bareos bareos-dir 16.2.4 (01Jul16):
  Build OS:               x86_64-redhat-linux-gnu redhat CentOS Linux release 7.0.1406 (Core)
  JobId:                  39
  Job:                    vm-bitrix-backup-job.2016-11-14_01.17.51_04
  Backup Level:           Full (upgraded from Incremental)
  Client:                 "vmware" 16.2.4 (01Jul16) x86_64-redhat-linux-gnu,redhat,CentOS Linux release 7.0.1406 (Core) ,CentOS_7,x86_64
  FileSet:                "vm-bitrix-fileset" 2016-11-14 01:17:51
  Pool:                   "vm-bitrix-Full" (From Job FullPool override)
  Catalog:                "MyCatalog" (From Client resource)
  Storage:                "bareos-sd" (From Job resource)
  Scheduled time:         14-Nov-2016 01:17:47
  Start time:             14-Nov-2016 01:17:53
  End time:               14-Nov-2016 01:17:54
  Elapsed time:           1 sec
  Priority:               10
  FD Files Written:	  0
  SD Files Written:	  0
  FD Bytes Written:	  0 (0 B)
  SD Bytes Written:	  0 (0 B)
  Rate:                   0.0 KB/s
  Software Compression:   None
  VSS:                    no
  Encryption:             no
  Accurate:               no
  Volume name(s):
  Volume Session Id:	  12
  Volume Session Time:    1479067525
  Last Volume Bytes:	  0 (0 B)
  Non-fatal FD errors:    1
  SD Errors:              0
  FD termination status:  Fatal Error
  SD termination status:  Canceled
  Termination:            *** Backup Error ***
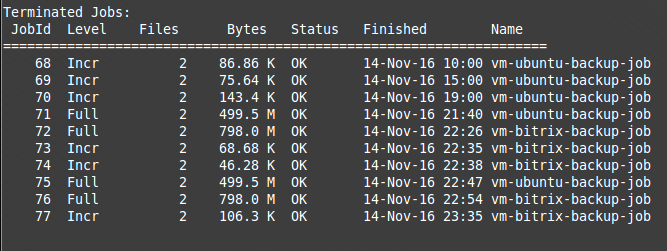
According to our schedule, in the Schedule {} directive of the director’s settings, 3 incremental backups were to be performed during the day (the last backup in the Full list was done manually). In bconsole, using the “status dir” command, you can see how much the size of incremental backups differs from the full backup:

As for recovery, it can be done directly to the host with ESXi, which is done by default, but for this the virtual machine itself must be turned off. Or, recovery can be performed on the server with BareOS. Consider both options.
When recovering locally to a server with BareOS. Go to bconsole:
*restore
Automatically selected Catalog: MyCatalog
Using Catalog "MyCatalog"
First you select one or more JobIds that contain files
to be restored. You will be presented several methods
of specifying the JobIds. Then you will be allowed to
select which files from those JobIds are to be restored.
To select the JobIds, you have the following choices:
     1: List last 20 Jobs run
     2: List Jobs where a given File is saved
     3: Enter list of comma separated JobIds to select
     4: Enter SQL list command
     5: Select the most recent backup for a client
     6: Select backup for a client before a specified time
     7: Enter a list of files to restore
     8: Enter a list of files to restore before a specified time
     9: Find the JobIds of the most recent backup for a client
    10: Find the JobIds for a backup for a client before a specified time
    11: Enter a list of directories to restore for found JobIds
    12: Select full restore to a specified Job date
    13: Cancel
Select item:  (1-13): 3
Enter JobId(s), comma separated, to restore: 66
Building directory tree for JobId(s) 66 ...
1 files inserted into the tree.
You are now entering file selection mode where you add (mark) and
remove (unmark) files to be restored. No files are initially added, unless
you used the "all" keyword on the command line.
Enter "done" to leave this mode.
cwd is: /
$ ls
VMS/
$ mark *
1 file marked.
$ done
Defined Clients:
1: vmware
...
Select the Client (1-4): 1
Using Catalog "MyCatalog"
Client "bareos-fd" not found.
Automatically selected Client: vmware
Restore Client "bareos-fd" not found.
Automatically selected Client: vmware
Run Restore job
JobName:         RestoreFiles
Bootstrap:       /var/lib/bareos/bareos-dir.restore.1.bsr
Where:           /tmp/
Replace:         Always
FileSet:         vm-ubuntu
Backup Client:   bareos-fd
Restore Client:  vmware
Format:          Native
Storage:         bareos-sd
When:            2016-11-14 07:37:57
Catalog:         MyCatalog
Priority:        10
Plugin Options:  *None*
OK to run? (yes/mod/no): mod
Parameters to modify:
     1: Level
     2: Storage
     3: Job
     4: FileSet
     5: Restore Client
     6: Backup Format
     7: When
     8: Priority
     9: Bootstrap
    10: Where
    11: File Relocation
    12: Replace
    13: JobId
    14: Plugin Options
Select parameter to modify (1-14): 14
Please enter Plugin Options string: python:localvmdk=yes
Run Restore job
JobName:         RestoreFiles
Bootstrap:       /var/lib/bareos/bareos-dir.restore.1.bsr
Where:           /tmp/
Replace:         Always
FileSet:         vm-ubuntu
Backup Client:   vmware
Restore Client:  vmware
Format:          Native
Storage:         bareos-sd
When:            2016-11-14 07:37:57
Catalog:         MyCatalog
Priority:        10
Plugin Options:  python:localvmdk=yes
OK to run? (yes/mod/no): yes
After that, you can go to the / tmp folder and see the restored vmdk file.
cd /tmp/" [datastore1] ubuntu"
ls
ubuntu.vmdk
Restoring directly to ESXi does not require any changes before performing restore, but as described earlier, you must turn off the virtual machine before otherwise an error will occur:
JobId 80: Fatal error: python-fd: Error VM VMBitrix5.1.8 must be poweredOff for restore, but is poweredOn
As a test, it is enough to create a couple of test files in the virtual machine, run Job on the backup. Delete these files, turn off the machine, and restore through the restore command without making any changes as in the previous example, as a rule, the deleted files will be in the same place.
Now consider the possibility of adding backup for another VM, its name is “VMBitrix5.1.8”
Important! First, you need to connect plug-ins for working with VMware in the director’s settings in the file /etc/bareos/bareos-dir.d/director/bareos-dir.conf otherwise when connecting additional tasks for VM backup we get an error about the plug-in not loaded:
Example:
JobId 41: Fatal error: fd_plugins.c:654 Command plugin "python:module_path=/usr/lib64/bareos/plugins/vmware_plugin:module_name=bareos-fd-vmware:dc=ha-datacenter:folder=/:vmname=" requested, but is not loaded
Now the file /etc/bareos/bareos-dir.d/director/bareos-dir.conf should look like this:
Director {                            # define myself
  Name = "bareos-dir"
  QueryFile = "/usr/lib/bareos/scripts/query.sql"
  Maximum Concurrent Jobs = 10
  Password = "wai2Aux0"         # Console password
  Messages = Standard
  Auditing = yes
  Plugin Directory = /usr/lib64/bareos/plugins
  Plugin Names = "python"
}
As you can see the lines below and completed the plug-in connection:
Plugin Directory = /usr/lib64/bareos/plugins
  Plugin Names = "python"
Next, we go on to edit the FileSet directive {} for backup of the second virtual machine
/etc/bareos/bareos-dir.d/fileset/SelfTest.confAfter adding new lines for backup of the VMBitrix5.1.8 virtual machine, the file looks like this:
FileSet {
  Name = "vm-ubuntu"
  Include {
    Options {
         signature = MD5
         Compression = GZIP
    }
    Plugin = "python:module_path=/usr/lib64/bareos/plugins/vmware_plugin:module_name=bareos-fd-vmware:dc=ha-datacenter:folder=/:vmname=ubuntu:vcserver=172.17.10.1:vcuser=bakuser:vcpass=qLpE1QQv"
  }
}
FileSet {
  Name = "vm-bitrix"
  Include {
    Options {
         signature = MD5
         Compression = GZIP
    }
    Plugin = "python:module_path=/usr/lib64/bareos/plugins/vmware_plugin:module_name=bareos-fd-vmware:dc=ha-datacenter:folder=/:vmname=VMBitrix5.1.8:vcserver=172.17.10.1:vcuser=bakuser:vcpass=kJo@#!a"
  }
}
Let's move on to adding a new Job for the backup of the new VM. Create a backup-bareos-bitrix.conf file in the /etc/bareos/bareos-dir.d/job directory. In this file we will write the parameters for the new Job (the group and owner of all created files should be “bareos”):
Job {
  Name = "vm-bitrix-backup-job"
  Client = "vmware"
  Type = Backup
  Level = Incremental
  FileSet = "vm-bitrix"
  Schedule = "WeeklyCycle"
  Storage = bareos-sd
  Messages = Standard
  Pool = vm-bitrix-Incremental
  Priority = 10
  Write Bootstrap = "/var/lib/bareos/%c.bsr"
  Full Backup Pool = vm-bitrix-Full
  Incremental Backup Pool = vm-bitrix-Incremental
}
It is also necessary to create a Job for recovery if necessary for the second VMBitrix5.1.8 virtual machine. Create the file /etc/bareos/bareos-dir.d/job/restorefiles-vm-bitrix.conf.
Its contents:
Job {
  Name = "restorefiles-vm-bitrix"
  Type = Restore
  Client = vmware
  FileSet = "vm-bitrix"
  Storage = bareos-sd
  Pool =  vm-bitrix-Incremental
  Messages = Standard
  Where = /tmp/
}
Be sure to comply with the correspondence between FileSet and Pool.
As you can see, it is also necessary to create new pools. Go to the /etc/bareos/bareos-dir.d/pool directory.
Create two files Full-vm-bitrix.conf and Incremental-vm-bitrix.conf. We give the contents of each:
# cat  /etc/bareos/bareos-dir.d/pool/Full-vm-bitrix.conf
Pool {
  Name = vm-bitrix-Full
  Pool Type = Backup
  Recycle = yes
  AutoPrune = yes
  Volume Retention = 365 days
  Maximum Volume Bytes = 50G
  Maximum Volumes = 100
  Label Format = "Full-vm-bitrix-"
}
# cat /etc/bareos/bareos-dir.d/pool/Incremental-vm-bitrix.conf
Pool {
  Name = vm-bitrix-Incremental
  Pool Type = Backup
  Recycle = yes
  AutoPrune = yes
  Volume Retention = 30 days
  Maximum Volume Bytes = 1G
  Maximum Volumes = 100
  Label Format = "Incremental-vm-bitrix-"
}
Again, as in the previous steps, you need to activate CBT for the second VM through the vmware_cbt_tool script.
After making any changes to the config, you must restart the services:
systemctl restart bareos-fd
systemctl restart bareos-dir
If no errors have occurred, then you can go to the bconsole console again and see the Job added for the new VM.
List of new Job:
Run a new task:
Partial output of the “status dir” command after successful backup:
As for restoring the second virtual machine, it’s nothing does not differ from the recovery example of the first. Adding additional tasks to backup additional VMs is similar to adding tasks to backup the second VM.

SIM-CLOUD - Failover Cloud in Germany
Dedicated Servers in Reliable Germany Data Centers!
Any configuration, quick assembly and free installation