Install VMware Tools on a Linux virtual machine
In this article, we will look at how to deploy VMware Tools on Linux virtual machines. Deploying VMTools in a guest operating system of a virtual machine improves their performance and manageability. With VMTools, some of the drivers included in the OS are replaced with a version optimized for virtualization; one such example is the vmxnet3 driver. In addition, VMTools provides API frameworks, such as VIX, that allow software management of virtual machines, as well as disclosure of virtual machine information, such as IP addresses when using clients for vSphere.
VMware Tools is supported on 32-bit and 64-bit operating systems, including Microsoft, Apple, NetWare, Solaris, redhat and others. The guest OS compatibility guide provides a complete list of supported guest operating systems along with the supported features of VMware Tools. We will show how to deploy VMware Tools on two Linux distributions, namely CentOS and Debian.
Depending on the Linux distribution, there are several installation methods for VMware Tools. The first and most commonly used method is ISO installation. An ISO file containing vmtools binaries (installation files, scripts, etc.) is mounted on a virtual CD-ROM from the guest menu of the virtual machine. After that, vmtools are installed by executing a Perl script.
Another popular method that is gaining momentum is VMware's Open-VM-Tools (OVT). This allows vmtools to automatically configure itself during OS installation. Alternatively, they can be installed on a later one using the OS or from the repository using a package of management tools such as YUM or APT.
As of February 2016, Linux distributions supporting OVT are as follows;
Let's talk about both methods, starting with ISO. To illustrate the deployment process, we first deploy vmtools on a Centos 6.x 32 virtual machine. As you can see in the figure, initially vmtools were not deployed on virtual machines.
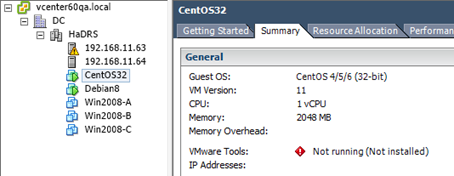
Figure 1 - CentOS VM without vmtools
To start the installation, right-click on the name of the virtual machine, select “Guest” and click “Install / Upgrade VMware Tools”. Click OK to confirm.

Figure 2 - Start of the vmtools installation process
What is happening: the corresponding ISO image is mounted for the Linux distribution on which you want to install vmtools. To do this, make sure that the correct operating system has been selected for the virtual machine. To do this, check the type of operating system in the properties of the VM (Fig. 3). You must turn off the VM if you change the wrong type of OS.

Figure 3 - Checking the OS type
Once this is done, log in as an administrator and follow the next steps and run the commands. Depending on the distribution, some steps may vary slightly.
Create a folder and mount the ISO image.

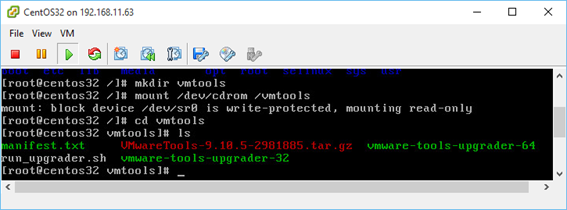
Figure 4 - Creating an ISO image
Then unzip the vmtools archive and copy the folders to Temp.


Figure 5 - Extracting vmtools folders
As it sometimes happens, missing dependencies can be detected, especially on newly installed virtual machines. For example, we first had to run the following command in order to extract YUM and install the packages (Figure 6) necessary to ensure the successful installation of vmtools.


Figure 6 - Installing the missing dependencies
Now go to the / tmp folder and run the Perl installation script. You should enable the default settings if you are not going to configure the installation process manually.


Figure 7 - Installing vmtools using a Perl script

Figure 8 - Completion of the Perl script execution
process You can check if the installation process has completed by viewing the status of VMware Tools in the vSphere client (Figure 9).

Figure 9 - vmtools installed correctly
Sometimes, depending on the selected Linux distribution and its configuration, you may encounter a compiler error while executing the Perl installation script.
The next step is optional, but if you have an insurmountable need to keep everything in the strictest order, you can run the following commands to clear the extra installation files:


»The video shows the whole process described here: watch
In this example, we install open-vm-tools on a 64-bit Debian distribution. An excellent example is on the VMware website, so we will not reinvent the wheel and show the installation process in the video.
Watch
When installing OVT, you may notice that the vmtools status is shown as “Running (Guest Managed)”, as shown in Figure 10. For third-party vmtools, the status will be “Running (3rd-party / Independent)”. This is normal and expected from OSP (Operating System Specific Packages), which use basic software and installation mechanisms on guest OSs to update vmtools.

Figure 10 - Status of vmtools
VMware supports a list of Linux distributions as well as other operating systems. A complete list can be found on the VMware website. If a specific distribution is not in the list, you can make sure vmtools are supported only by visiting the provider's website. One such example is Arch Linux.
VMware Tools is supported on 32-bit and 64-bit operating systems, including Microsoft, Apple, NetWare, Solaris, redhat and others. The guest OS compatibility guide provides a complete list of supported guest operating systems along with the supported features of VMware Tools. We will show how to deploy VMware Tools on two Linux distributions, namely CentOS and Debian.
Installation methods
Depending on the Linux distribution, there are several installation methods for VMware Tools. The first and most commonly used method is ISO installation. An ISO file containing vmtools binaries (installation files, scripts, etc.) is mounted on a virtual CD-ROM from the guest menu of the virtual machine. After that, vmtools are installed by executing a Perl script.
Another popular method that is gaining momentum is VMware's Open-VM-Tools (OVT). This allows vmtools to automatically configure itself during OS installation. Alternatively, they can be installed on a later one using the OS or from the repository using a package of management tools such as YUM or APT.
As of February 2016, Linux distributions supporting OVT are as follows;
- Fedora 19 and later;
- Debian 7.x and later;
- openSUSE 11.x and later;
- Ubuntu Weseries (12.04 LTS, 13.10 and later)
- Red Hat Enterprise Linux 7.0 and later;
- CentOS 7.0 and later;
- Oracle Linux 7.0 and later;
- SUSE Linux Enterprise 12 and later.
ISO Method
Let's talk about both methods, starting with ISO. To illustrate the deployment process, we first deploy vmtools on a Centos 6.x 32 virtual machine. As you can see in the figure, initially vmtools were not deployed on virtual machines.
Figure 1 - CentOS VM without vmtools
To start the installation, right-click on the name of the virtual machine, select “Guest” and click “Install / Upgrade VMware Tools”. Click OK to confirm.
Figure 2 - Start of the vmtools installation process
What is happening: the corresponding ISO image is mounted for the Linux distribution on which you want to install vmtools. To do this, make sure that the correct operating system has been selected for the virtual machine. To do this, check the type of operating system in the properties of the VM (Fig. 3). You must turn off the VM if you change the wrong type of OS.
Figure 3 - Checking the OS type
Once this is done, log in as an administrator and follow the next steps and run the commands. Depending on the distribution, some steps may vary slightly.
Create a folder and mount the ISO image.
Figure 4 - Creating an ISO image
Then unzip the vmtools archive and copy the folders to Temp.
Figure 5 - Extracting vmtools folders
As it sometimes happens, missing dependencies can be detected, especially on newly installed virtual machines. For example, we first had to run the following command in order to extract YUM and install the packages (Figure 6) necessary to ensure the successful installation of vmtools.
Figure 6 - Installing the missing dependencies
Now go to the / tmp folder and run the Perl installation script. You should enable the default settings if you are not going to configure the installation process manually.
Figure 7 - Installing vmtools using a Perl script
Figure 8 - Completion of the Perl script execution
process You can check if the installation process has completed by viewing the status of VMware Tools in the vSphere client (Figure 9).
Figure 9 - vmtools installed correctly
Sometimes, depending on the selected Linux distribution and its configuration, you may encounter a compiler error while executing the Perl installation script.
The next step is optional, but if you have an insurmountable need to keep everything in the strictest order, you can run the following commands to clear the extra installation files:
»The video shows the whole process described here: watch
Install open-vm-tools from the repository
In this example, we install open-vm-tools on a 64-bit Debian distribution. An excellent example is on the VMware website, so we will not reinvent the wheel and show the installation process in the video.
Watch
When installing OVT, you may notice that the vmtools status is shown as “Running (Guest Managed)”, as shown in Figure 10. For third-party vmtools, the status will be “Running (3rd-party / Independent)”. This is normal and expected from OSP (Operating System Specific Packages), which use basic software and installation mechanisms on guest OSs to update vmtools.
Figure 10 - Status of vmtools
What about other Linux distributions?
VMware supports a list of Linux distributions as well as other operating systems. A complete list can be found on the VMware website. If a specific distribution is not in the list, you can make sure vmtools are supported only by visiting the provider's website. One such example is Arch Linux.