Turning a Java / JVM application into a daemon
- Tutorial
How often do you write a shell script and a batch file to run your jvm application, and how often do you copy from another project?

You can use appassembler-maven-plugin to generate scripts to launch our program and create a daemon from it. The plugin does all the routine work on configuring java service wrapper , generating scripts and building the application for us.
But we will simplify our lives and use an automated solution to create the skeleton of maven artifacts to build our demons. Generator plugin com.github.igor-suhorukov: daemon-archetype for maven, which is available in the central repository and on github . And under the hood, anyway, appassembler-maven-plugin!
All you need to do to create the skeleton of the daemon is to execute the create command in interactive mode, and then configure what happened for the project:
Important notice! The java service wrapper daemon is stopped by a SIGINT signal, therefore, to correctly release resources, you need to register your Runtime.getRuntime (). AddShutdownHook (...).
The parameters groupId, artifactId, version do not deserve special attention, since they are required by any archetype plugin and this is what will be in the corresponding pom.xml tags.
The entry-point-class parameter must specify the fully qualified name of the class, the method public static void main (String []) of which the daemon will call at startup. In the case of a java application, you can specify a class with the main method both from the main-artifact * project dependency and from the src / main / java directory of the current project.
The parameters main-artifact-artifactId, main-artifact-groupId, main-artifact-version indicate a dependency that contains an entry-point-class . Transitive dependencies for main-artifact * are also packaged in the assembly.
launcher-name defines the name of the daemon script in the bin directory.
For sample, create a git server daemon. By executing a command in the console, or by specifying the same parameters in interactive mode:
After we edit the resulting pom.xml, adding the following configuration fragment to the program and daemon tags:
We execute the command:
After the assembly, the target directory will contain an archive with the daemon: gitblit-launcher-1.0-SNAPSHOT-daemon.tgz and two archives in the tgz and zip format with the usual scripts for launching the console application gitblit-launcher-1.0-SNAPSHOT-assembly.tgz, gitblit- launcher-1.0-SNAPSHOT-assembly.zip.
In our example, the jar file from com.github.igor-suhorukov: groovy-grape-aether: 2.4.5.4 is packed into the assembly with the daemon . The daemon will start the JVM with the main class com.github.igorsuhorukov.groovy.GroovyMain specified and pass the path to the Groovy script raw.githubusercontent.com/igor-suhorukov/git-configuration/master/gitblit.groovy as its parameter .
The Groovy script downloads gitblit.war from the project repository, unpacks it into the user's home directory and replaces the path to the repository repository in the gitblit configuration. After that, it starts the jetty server and gitblit inside it.
You can watch a screencast with an example of creating and working a demon.
You can create a daemon and scripts to build the application with just one command.
You can use appassembler-maven-plugin to generate scripts to launch our program and create a daemon from it. The plugin does all the routine work on configuring java service wrapper , generating scripts and building the application for us.
But we will simplify our lives and use an automated solution to create the skeleton of maven artifacts to build our demons. Generator plugin com.github.igor-suhorukov: daemon-archetype for maven, which is available in the central repository and on github . And under the hood, anyway, appassembler-maven-plugin!
All you need to do to create the skeleton of the daemon is to execute the create command in interactive mode, and then configure what happened for the project:
mvn archetype:generate -DarchetypeGroupId=com.github.igor-suhorukov -DarchetypeArtifactId=daemon-archetype -DarchetypeVersion=0.1Important notice! The java service wrapper daemon is stopped by a SIGINT signal, therefore, to correctly release resources, you need to register your Runtime.getRuntime (). AddShutdownHook (...).
Daemon-archetype plugin configuration
The parameters groupId, artifactId, version do not deserve special attention, since they are required by any archetype plugin and this is what will be in the corresponding pom.xml tags.
The entry-point-class parameter must specify the fully qualified name of the class, the method public static void main (String []) of which the daemon will call at startup. In the case of a java application, you can specify a class with the main method both from the main-artifact * project dependency and from the src / main / java directory of the current project.
The parameters main-artifact-artifactId, main-artifact-groupId, main-artifact-version indicate a dependency that contains an entry-point-class . Transitive dependencies for main-artifact * are also packaged in the assembly.
launcher-name defines the name of the daemon script in the bin directory.
Example: git daemon of a gitblit server.
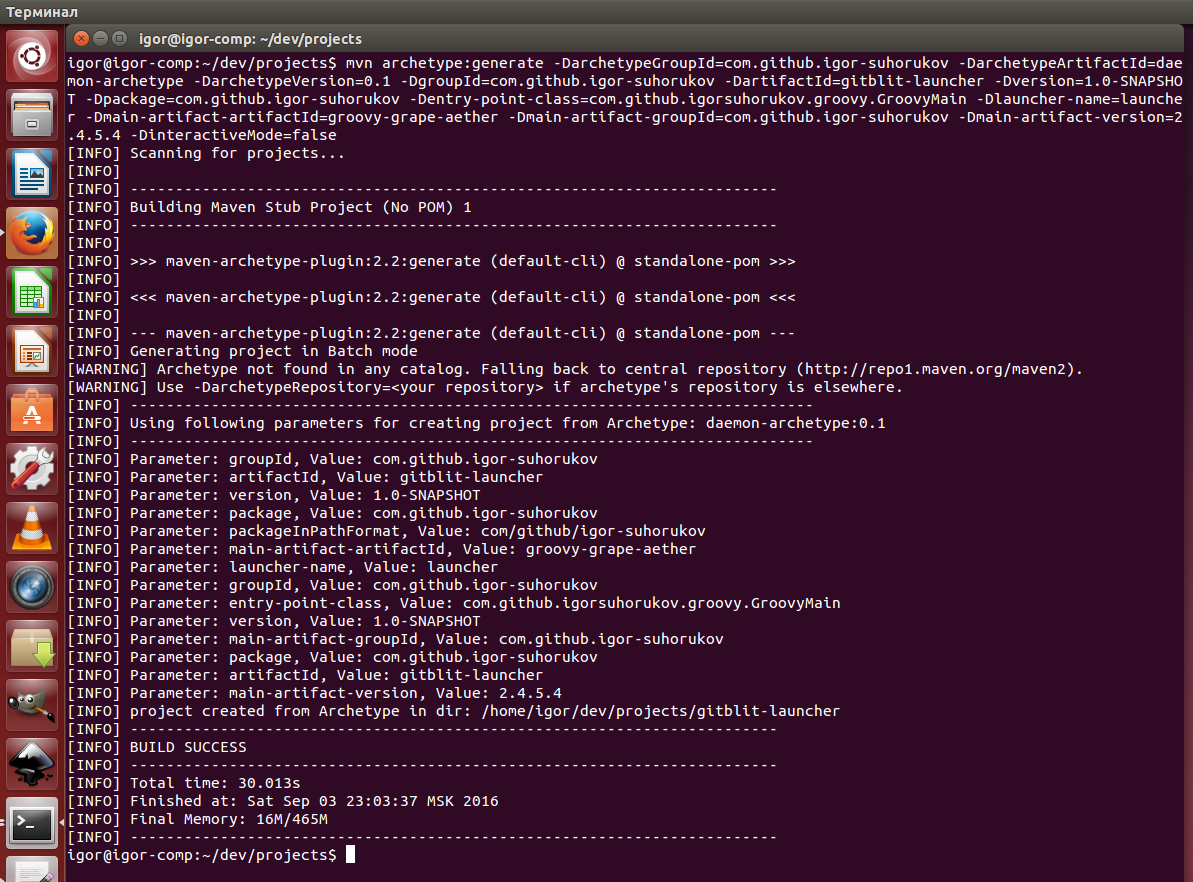
For sample, create a git server daemon. By executing a command in the console, or by specifying the same parameters in interactive mode:
mvn archetype:generate -DarchetypeGroupId=com.github.igor-suhorukov -DarchetypeArtifactId=daemon-archetype -DarchetypeVersion=0.1 -DgroupId=com.github.igor-suhorukov -DartifactId=gitblit-launcher -Dversion=1.0-SNAPSHOT -Dpackage=com.github.igor-suhorukov -Dentry-point-class=com.github.igorsuhorukov.groovy.GroovyMain -Dlauncher-name=launcher -Dmain-artifact-artifactId=groovy-grape-aether -Dmain-artifact-groupId=com.github.igor-suhorukov -Dmain-artifact-version=2.4.5.4 -DinteractiveMode=falseAfter we edit the resulting pom.xml, adding the following configuration fragment to the program and daemon tags:
https://raw.githubusercontent.com/igor-suhorukov/git-configuration/master/gitblit.groovy We execute the command:
mvn packageAfter the assembly, the target directory will contain an archive with the daemon: gitblit-launcher-1.0-SNAPSHOT-daemon.tgz and two archives in the tgz and zip format with the usual scripts for launching the console application gitblit-launcher-1.0-SNAPSHOT-assembly.tgz, gitblit- launcher-1.0-SNAPSHOT-assembly.zip.
In our example, the jar file from com.github.igor-suhorukov: groovy-grape-aether: 2.4.5.4 is packed into the assembly with the daemon . The daemon will start the JVM with the main class com.github.igorsuhorukov.groovy.GroovyMain specified and pass the path to the Groovy script raw.githubusercontent.com/igor-suhorukov/git-configuration/master/gitblit.groovy as its parameter .
The Groovy script downloads gitblit.war from the project repository, unpacks it into the user's home directory and replaces the path to the repository repository in the gitblit configuration. After that, it starts the jetty server and gitblit inside it.
gitblit.groovy
import com.github.igorsuhorukov.smreed.dropship.MavenClassLoader
@Grab(group='org.codehaus.plexus', module='plexus-archiver', version='2.10.2')
import org.codehaus.plexus.archiver.zip.ZipUnArchiver
@Grab(group='org.codehaus.plexus', module='plexus-container-default', version='1.6')
import org.codehaus.plexus.logging.console.ConsoleLogger
@Grab(group = 'org.eclipse.jetty', module = 'jetty-runner', version = '9.3.7.RC1' )
import org.eclipse.jetty.runner.Runner
def gitblit = new File(MavenClassLoader.using('http://gitblit.github.io/gitblit-maven').resolveArtifact('com.gitblit:gitblit:war:1.7.1').getFile())
File gitblitDirectory = new File(System.getProperty('user.home'), gitblit.getName().replace('.war',''))
if(!gitblitDirectory.exists()){
    gitblitDirectory.mkdir()
    ZipUnArchiver unArchiver = new ZipUnArchiver()
    unArchiver.setSourceFile(gitblit)
    unArchiver.enableLogging(new ConsoleLogger(ConsoleLogger.LEVEL_DEBUG,"Logger"))
    unArchiver.setDestDirectory(gitblitDirectory)
    unArchiver.extract()
    def dataPath = new File(System.getProperty('user.home'), '.gitblit_data')
    if(!dataPath.exists()){ dataPath.mkdir() }
    def webXml = new File(gitblitDirectory.getAbsoluteFile(), 'WEB-INF/web.xml')
    webXmlText = webXml.text
    webXml.withWriter { w -> w << webXmlText.replace('${contextFolder}/WEB-INF/data', dataPath.getAbsolutePath()) }
}
Runner.main([gitblitDirectory] as String[])
You can watch a screencast with an example of creating and working a demon.
You can create a daemon and scripts to build the application with just one command.