Using Retrofit 2.x as a REST Client - Tutorial
- Transfer
- Tutorial
1. Retrofit
1.1. What is Retrofit?
Retrofit is a REST client for Java and Android. It makes it easy to get and load JSON (or other structured data) through a REST-based web service. In Retrofit, you configure which converter is used to serialize data. Usually GSon is used for JSON, but you can add your own converters to process XML or other protocols. Retrofit uses the OkHttp library for HTTP requests.
You can create JSON-based Java objects using the following tool: www.jsonschema2pojo.org This can be useful for creating complex Java data structures from existing JSON.
1.2. Using Retrofit
To work with Retrofit, you will need the following three classes:
- Model class that is used as a JSON model
- Interfaces that identify possible HTTP operations
- The Retrofit.Builder class is an instance that uses the Builder interface and API to define a URL endpoint definition for HTTP operations.
Each interface method represents one of the possible API calls. It must have an HTTP annotation (GET, POST, etc.) to indicate the type of request and relative URL. The return value completes the response in the Call object with the expected result type.
@GET("users")
Call> getUsers();
You can use the replacement blocks and query parameters to configure the URL. The replacement block is appended to the relative URL using {}. Using the @ Path annotation for a method parameter, the value of this parameter is bound to a specific replacement block.
@GET("users/{name}/commits")
Call> getCommitsByName(@Path("name") String name);
Query parameters are added using the @ Query annotation to the method parameter. They are automatically added at the end of the URL.
@GET("users")
Call getUserById(@Query("id") Integer id);
The @ Body annotation to the method parameter tells Retrofit to use the object as the request body to call.
@POST("users")
Call postUser(@Body User user)
2. Prerequisites
The following examples use the Eclipse IDE with the Gradle build system.
This exercise assumes that you are familiar with Gradle and using Gradle with Eclipse .
Other development environments, such as Visual Studio Code or IntelliJ, do the same, so you can use your favorite tool.
3. Exercise: First Retrofit Client
In this exercise, you will create a standalone REST client. Responses are generated by the Mock server.
3.1. Creating and setting up a project
Create a new Gradle project named com.vogella.retrofitgerrit. Add a new package to src / main / java named com.vogella.retrofitgerrit.
Add the following dependencies to the build.gradle file.
// retrofit
implementation 'com.squareup.retrofit2:retrofit:2.1.0'
implementation 'com.squareup.retrofit2:converter-gson:2.1.0'
// Junit
testImplementation("org.junit.jupiter:junit-jupiter-api:5.0.0")
testRuntime("org.junit.jupiter:junit-jupiter-engine:5.0.0")
// to run JUnit 3/4 tests:
testImplementation("junit:junit:4.12")
testRuntime("org.junit.vintage:junit-vintage-engine:4.12.0")
3.2. Define API and Retrofit Adapter
In Gerrit's JSON response, we are only interested in the question of changes. Therefore, create the following data class in the previously added default package.
package com.vogella.java.retrofitgerrit;
public class Change {
    String subject;
    public String getSubject() {
        return subject;
    }
    public void setSubject(String subject) {
        this.subject = subject;
    }
}
Define the REST API for Retrofit through the following interface.
package com.vogella.java.retrofitgerrit;
import java.util.List;
import retrofit2.Call;
import retrofit2.http.GET;
import retrofit2.http.Query;
public interface GerritAPI {
    @GET("changes/")
    Call> loadChanges(@Query("q") String status);
}
Create the following controller class. This class creates a Retrofit client, calls the Gerrit API, and processes the result (prints the result of the call to the console).
package com.vogella.java.retrofitgerrit;
import java.util.List;
import com.google.gson.Gson;
import com.google.gson.GsonBuilder;
import retrofit2.Call;
import retrofit2.Callback;
import retrofit2.Response;
import retrofit2.Retrofit;
import retrofit2.converter.gson.GsonConverterFactory;
public class Controller implements Callback> {
    static final String BASE_URL = "https://git.eclipse.org/r/";
    public void start() {
        Gson gson = new GsonBuilder()
                .setLenient()
                .create();
        Retrofit retrofit = new Retrofit.Builder()
                .baseUrl(BASE_URL)
                .addConverterFactory(GsonConverterFactory.create(gson))
                .build();
        GerritAPI gerritAPI = retrofit.create(GerritAPI.class);
        Call> call = gerritAPI.loadChanges("status:open");
        call.enqueue(this);
    }
    @Override
    public void onResponse(Call> call, Response> response) {
        if(response.isSuccessful()) {
            List changesList = response.body();
            changesList.forEach(change -> System.out.println(change.subject));
        } else {
            System.out.println(response.errorBody());
        }
    }
    @Override
    public void onFailure(Call> call, Throwable t) {
        t.printStackTrace();
    }
}
Create a class with a main method to start the controller.
package com.vogella.java.retrofitgerrit;
public class Main {
    public static void main(String[] args) {
        Controller controller = new Controller();
        controller.start();
    }
}
4. Retrofit converters and adapters
4.1. Retrofit Converters
Retrofit can be configured to use a specific converter. This converter handles (de) serialization of data. Several converters are already available for various serialization formats.
- To convert to JSON and vice versa:
- Gson: com.squareup.retrofit: converter-gson
- Jackson: com.squareup.retrofit: converter-jackson
- Moshi: com.squareup.retrofit: converter-moshi
- To convert to Protocol Buffers and vice versa:
- Protobuf: com.squareup.retrofit: converter-protobuf
- Wire: com.squareup.retrofit: converter-wire
- To convert to XML and vice versa:
- Simple XML: com.squareup.retrofit: converter-simplexml
In addition to the listed converters, you can also create your own to process other protocols by extending the Converter.Factory class.
4.2. Retrofit Adapters
Retrofit can also be extended with adapters for interfacing with other libraries such as RxJava 2.x, Java 8, and Guava.
An overview of the available adapters can be found at Github square / retrofit / retrofit-adapters / .
For example, the RxJava 2.x adapter can be connected using Gradle:
compile 'com.squareup.retrofit2:adapter-rxjava2:latest.version'or using Apache Maven:
com.squareup.retrofit2 adapter-rxjava2 latest.version To add an adapter, you must use the retrofit2.Retrofit.Builder.addCallAdapterFactory (Factory) method.
Retrofit retrofit = new Retrofit.Builder()
    .baseUrl("https://api.example.com/")
    .addCallAdapterFactory(RxJava2CallAdapterFactory.create())
    .build();
Using this adapter, Retrofit interfaces can return RxJava 2.x types, for example, Observable, Flowable, or Single, etc.
@GET("users")
Observable> getUsers();
5. Retrofit authentication
Retrofit supports API calls that require authentication. Authentication can be done using a username and password (Http Basic authentication) or an API token.
There are two ways to manage authentication. The first method is to manage the request header using annotations. Another way is to use an OkHttp interceptor for this.
5.1. Authentication with annotations
Suppose you want to request information about a user for whom authentication is required. You can do this by adding a new parameter to the API definition, for example:
@GET("user")
Call getUserDetails(@Header("Authorization") String credentials)
Using the @ Header ("Authorization") annotation, you tell Retrofit to add the Authorization header to the request with the value you are passing.
To generate credentials for Basic authentication, you can use the OkHttps Credentials class with its base (String, String) method. The method accepts a username and password and returns authentication credentials for the Http Basic scheme.
Credentials.basic("ausername","apassword");If you want to use the API token and not use the Basic scheme, just call the getUserDetails (String) method with your token.
5.2. Authentication with OkHttp interceptors.
The method above adds credentials only if you request user data. If you have more calls that require authentication, you can use an interceptor to do this. An interceptor is used to modify each request before it is executed and sets the request header. The advantage is that you do not need to add @ Header ("Authorization") to each API method definition.
To add an interceptor, you must use the okhttp3.OkHttpClient.Builder.addInterceptor (Interceptor) method in OkHttp Builder.
OkHttpClient okHttpClient = new OkHttpClient().newBuilder().addInterceptor(new Interceptor() {
            @Override
            public okhttp3.Response intercept(Chain chain) throws IOException {
                Request originalRequest = chain.request();
                Request.Builder builder = originalRequest.newBuilder().header("Authorization",
                        Credentials.basic("aUsername", "aPassword"));
                Request newRequest = builder.build();
                return chain.proceed(newRequest);
            }
        }).build();
The client created by OkHttp must be added to your Retrofit client using the retrofit2.Retrofit.Builder.client (OkHttpClient) method.
Retrofit retrofit = new Retrofit.Builder()
    .baseUrl("https://api.example.com/")
    .client(okHttpClient)
    .build();
As you have noticed, the Credentials class is used here for Basic authorization.
Again, if you want to use the API token, just use the token instead.
6. Exercise: Using Retrofit to Request Gerrit in Java
The following section describes how to create a minimal Java application that uses Retrofit to retrieve open change objects from the Gerrit API. Results are printed in the console.
6.1. Creating and setting up a project
This exercise assumes that you are familiar with Gradle and Buildship for Eclipse .
Create a new Gradle project named com.vogella.java.retrofitgerrit. Add a new package to src / main / java named com.vogella.java.retrofitgerrit.
Add the following dependencies to the build.gradle file.
// retrofit
implementation 'com.squareup.retrofit2:retrofit:2.1.0'
implementation 'com.squareup.retrofit2:converter-gson:2.1.0'
// Junit
testImplementation("org.junit.jupiter:junit-jupiter-api:5.0.0")
testRuntime("org.junit.jupiter:junit-jupiter-engine:5.0.0")
// to run JUnit 3/4 tests:
testImplementation("junit:junit:4.12")
testRuntime("org.junit.vintage:junit-vintage-engine:4.12.0")
6.2. Define API and Retrofit Adapter
In Gerrit's JSON response, we are only interested in the question of changes. Therefore, create the following data class in the previously added default package.
package com.vogella.java.retrofitgerrit;
public class Change {
    String subject;
    public String getSubject() {
        return subject;
    }
    public void setSubject(String subject) {
        this.subject = subject;
    }
}
Define the REST API for Retrofit using the following interface.
package com.vogella.java.retrofitgerrit;
import java.util.List;
import retrofit2.Call;
import retrofit2.http.GET;
import retrofit2.http.Query;
public interface GerritAPI {
    @GET("changes/")
    Call> loadChanges(@Query("q") String status);
}
Create the following controller class. This class creates a Retrofit client, calls the Gerrit API, and processes the result (prints the result of the call to the console).
package com.vogella.java.retrofitgerrit;
import java.util.List;
import com.google.gson.Gson;
import com.google.gson.GsonBuilder;
import retrofit2.Call;
import retrofit2.Callback;
import retrofit2.Response;
import retrofit2.Retrofit;
import retrofit2.converter.gson.GsonConverterFactory;
public class Controller implements Callback> {
    static final String BASE_URL = "https://git.eclipse.org/r/";
    public void start() {
        Gson gson = new GsonBuilder()
                .setLenient()
                .create();
        Retrofit retrofit = new Retrofit.Builder()
                .baseUrl(BASE_URL)
                .addConverterFactory(GsonConverterFactory.create(gson))
                .build();
        GerritAPI gerritAPI = retrofit.create(GerritAPI.class);
        Call> call = gerritAPI.loadChanges("status:open");
        call.enqueue(this);
    }
    @Override
    public void onResponse(Call> call, Response> response) {
        if(response.isSuccessful()) {
            List changesList = response.body();
            changesList.forEach(change -> System.out.println(change.subject));
        } else {
            System.out.println(response.errorBody());
        }
    }
    @Override
    public void onFailure(Call> call, Throwable t) {
        t.printStackTrace();
    }
}
Create a class with a main method to start the controller.
package com.vogella.java.retrofitgerrit;
public class Main {
    public static void main(String[] args) {
        Controller controller = new Controller();
        controller.start();
    }
}
7. Exercise: Using Retrofit to Convert an XML Response from an RSS Feed
This section describes how to use Retrofit to transform an XML response using SimpleXMLConverter.
A minimal Java application is created that requests the Vogella RSS feed ( http://vogella.com/article.rss ) and prints the channel name, title and article links.
7.1. Creating and setting up a project
This exercise assumes that you are familiar with Gradle and Buildship for Eclipse .
Create a new Gradle project named com.vogella.java.retrofitxml. Add a new package to src / main / java named com.vogella.java.retrofitxml.
Add the following dependencies to the build.gradle file.
implementation 'com.squareup.retrofit2:retrofit:2.1.0'
implementation 'com.squareup.retrofit2:converter-simplexml:2.1.0'
7.2. Defining an XML View
An RSS feed is as follows:
Eclipse and Android Information http://www.vogella.com
Eclipse and Android Information en Creative Commons Attribution-NonCommercial-ShareAlike 3.0 Germany (CC BY-NC-SA 3.0) Tue, 03 May 2016 11:46:11 +0200 Android user interface testing with Espresso - Tutorial This tutorial describes how to test Android applications with the Android Espresso testing framework. http://www.vogella.com/tutorials/AndroidTestingEspresso/article.html
lars.vogel@vogella.com (Lars Vogel) http://www.vogella.com/tutorials/AndroidTestingEspresso/article.html Using the Gradle build system in the Eclipse IDE - Tutorial This article describes how to use the Gradle tooling in Eclipse http://www.vogella.com/tutorials/EclipseGradle/article.html
lars.vogel@vogella.com (Lars Vogel) http://www.vogella.com/tutorials/EclipseGradle/article.html Unit tests with Mockito - Tutorial This tutorial explains testing with the Mockito framework for writting software tests. http://www.vogella.com/tutorials/Mockito/article.html
lars.vogel@vogella.com (Lars Vogel) http://www.vogella.com/tutorials/Mockito/article.html In addition to the XML header, this file consists of various XML elements. An RSS element contains a channel element that contains other elements (for example, title, description, pubDate) and several item elements (articles).
Create the following two data classes: RSSFeed and Article.
package com.vogella.java.retrofitxml;
import org.simpleframework.xml.Element;
import org.simpleframework.xml.Root;
@Root(name = "item", strict = false)
public class Article {
    @Element(name = "title")
    private String title;
    @Element(name = "link")
    private String link;
    public String getTitle() {
        return title;
    }
    public void setTitle(String title) {
        this.title = title;
    }
    public String getLink() {
        return link;
    }
    public void setLink(String link) {
        this.link = link;
    }
}
package com.vogella.java.retrofitxml; import java.util.List; import org.simpleframework.xml.Element; import org.simpleframework.xml.ElementList; import org.simpleframework.xml.Path; import org.simpleframework.xml.Root; @Root(name="rss", strict=false) public class RSSFeed { @Element(name="title") @Path("channel") private String channelTitle; @ElementList(name="item", inline=true) @Path("channel") private ListarticleList; public String getChannelTitle() { return channelTitle; } public void setChannelTitle(String channelTitle) { this.channelTitle = channelTitle; } public ListgetArticleList() { return articleList; } public void setArticleList(ListarticleList) { this.articleList = articleList; } }
The Article class represents one article and retains only the title and link to the article. These are the only fields that interest us.
Annotation @ Root marks a class as subject to (de) serialization. Optionally, you can specify a name in the @ Root annotation that matches the name of the XML element. If no name is specified, the class name is used as the name of the XML element. Since the class name (RSSFeed) is different from the XML element name (rss), we need to specify the name.
When strict is set to false, strict parsing is disabled. This tells the parser not to interrupt or throw an exception if an XML element or attribute is found for which no mapping is provided. Since the rss element has a version attribute for which there is no corresponding field, the application will generate an error if the strict parameter is not set to false.
Using the @ Element annotation, an XML element is represented. If necessary, you can specify the XML name of the element represented by this field. If no name is specified, the field name is used.
The articleList field is annotated with @ ElementList. This shows that this field is used to store a collection (in our case: List) of XML elements with the same name. When inline is set to true, this means that the items in the collection are listed one after the other immediately inside the specified item and do not have an intermediate parent.
Using the @ Path annotation, you can specify the path to an XML element within the XML tree. This is useful if you do not want to model a complete XML tree with Java objects. For the name of the channel and several item-elements, we can directly point to specific elements in the channel-element.
7.3. Defining an API and Retrofit Adapter
Define the REST API for Retrofit through the following interface.
package com.vogella.java.retrofitxml;
import retrofit2.Call;
import retrofit2.http.GET;
public interface VogellaAPI {
    @GET("article.rss")
    Call loadRSSFeed();
}
Create the following controller class. This class creates a Retrofit client, calls the Vogella API, and processes the result.
package com.vogella.java.retrofitxml;
import retrofit2.Call;
import retrofit2.Callback;
import retrofit2.Response;
import retrofit2.Retrofit;
import retrofit2.converter.simplexml.SimpleXmlConverterFactory;
public class Controller implements Callback {
    static final String BASE_URL = "http://vogella.com/";
    public void start() {
        Retrofit retrofit = new Retrofit.Builder().baseUrl(BASE_URL)
                .addConverterFactory(SimpleXmlConverterFactory.create()).build();
        VogellaAPI vogellaAPI = retrofit.create(VogellaAPI.class);
        Call call = vogellaAPI.loadRSSFeed();
        call.enqueue(this);
    }
    @Override
    public void onResponse(Call call, Response response) {
        if (response.isSuccessful()) {
            RSSFeed rss = response.body();
            System.out.println("Channel title: " + rss.getChannelTitle());
            rss.getArticleList().forEach(
                    article -> System.out.println("Title: " + article.getTitle() + " Link: " + article.getLink()));
        } else {
            System.out.println(response.errorBody());
        }
    }
    @Override
    public void onFailure(Call call, Throwable t) {
        t.printStackTrace();
    }
}
The last step is to create a class with a main method to start the controller.
package com.vogella.java.retrofitxml;
public class Application {
    public static void main(String[] args) {
        Controller ctrl = new Controller();
        ctrl.start();
    }
}
8. Exercise: Creating an Application to Request StackOverflow
StackOverflow is a popular site for programming-related issues. It also provides a REST API, well documented on the Stackoverflow API page .
In this exercise you will use the REST Retrofit library. You will use it to query StackOverflow tag questions and their answers.
In our example, we use the following request URL. Open this URL in a browser and look at the answer.
https://api.stackexchange.com/2.2/search?order=desc&sort=votes&tagged=android&site=stackoverflow8.1. Creating and setting up a project
Create an Android app called com.vogella.android.stackoverflow. Use com.vogella.android.stackoverflow as the name of a top-level package.
Add the following dependencies to the build.gradle file.
compile "com.android.support:recyclerview-v7:25.3.1"
compile 'com.google.code.gson:gson:2.8.1'
8.2. Creating a data model
We are interested in questions and answers from Stackoverflow. For this purpose, create the following two data classes.
package com.vogella.android.stackoverflow;
import com.google.gson.annotations.SerializedName;
public class Question {
    public String title;
    public String body;
    @SerializedName("question_id")
    public String questionId;
    @Override
    public String toString() {
        return(title);
    }
}
package com.vogella.android.stackoverflow;
import com.google.gson.annotations.SerializedName;
public class Answer {
@SerializedName("answer_id")
public int answerId;
@SerializedName("is_accepted")
public boolean accepted;
public int score;
@Override
public String toString() {
return answerId + " - Score: " + score + " - Accepted: " + (accepted ? "Yes" : "No");
}
}8.3. Creating activity and layout
Set activity_main.xml for your activity.
Add the adapter recycler view class named RecyclerViewAdapter to your project.
One possible implementation is as follows.
package com.vogella.android.stackoverflow;
import android.support.v7.widget.RecyclerView;
import android.view.LayoutInflater;
import android.view.View;
import android.view.ViewGroup;
import android.widget.TextView;
import java.util.List;
public class RecyclerViewAdapter extends RecyclerView.Adapter {
    private List data;
    public class ViewHolder extends RecyclerView.ViewHolder {
        public TextView text;
        public ViewHolder(View v) {
            super(v);
            text = (TextView) v.findViewById(android.R.id.text1);
        }
    }
    public RecyclerViewAdapter(List data) {
        this.data = data;
    }
    @Override
    public RecyclerViewAdapter.ViewHolder onCreateViewHolder(ViewGroup parent, int viewType) {
        View v;
        v = LayoutInflater.from(parent.getContext()).inflate(android.R.layout.simple_selectable_list_item, parent, false);
        return new ViewHolder(v);
    }
    @Override
    public void onBindViewHolder(RecyclerViewAdapter.ViewHolder holder, int position) {
        Answer answer = ((Answer) data.get(position));
        holder.text.setText(answer.toString());
        holder.itemView.setTag(answer.answerId);
    }
    @Override
    public int getItemCount() {
        return data.size();
    }
}
Modify the MainActivity class as follows:
package com.vogella.android.stackoverflow;
import android.app.Activity;
import android.content.Intent;
import android.os.Bundle;
import android.support.v7.widget.LinearLayoutManager;
import android.support.v7.widget.RecyclerView;
import android.util.Log;
import android.view.View;
import android.widget.AdapterView;
import android.widget.ArrayAdapter;
import android.widget.Button;
import android.widget.Spinner;
import android.widget.Toast;
import java.util.ArrayList;
import java.util.List;
public class MainActivity extends Activity implements View.OnClickListener {
    private String token;
    private Button authenticateButton;
    private Spinner questionsSpinner;
    private RecyclerView recyclerView;
    protected void onCreate(Bundle savedInstanceState) {
        super.onCreate(savedInstanceState);
        setContentView(R.layout.activity_main);
        questionsSpinner = (Spinner) findViewById(R.id.questions_spinner);
        questionsSpinner.setOnItemSelectedListener(new AdapterView.OnItemSelectedListener() {
            @Override
            public void onItemSelected(AdapterView parent, View view, int position, long id) {
                Toast.makeText(MainActivity.this, "Spinner item selected", Toast.LENGTH_LONG).show();
            }
            @Override
            public void onNothingSelected(AdapterView parent) {
            }
        });
        authenticateButton = (Button) findViewById(R.id.authenticate_button);
        recyclerView = (RecyclerView) findViewById(R.id.list);
        recyclerView.setHasFixedSize(true);
        recyclerView.setLayoutManager(new LinearLayoutManager(MainActivity.this));
    }
    @Override
    protected void onResume() {
        super.onResume();
        if (token != null) {
            authenticateButton.setEnabled(false);
        }
    }
    @Override
    public void onClick(View v) {
        switch (v.getId()) {
            case android.R.id.text1:
                if (token != null) {
                    // TODO
                } else {
                    Toast.makeText(this, "You need to authenticate first", Toast.LENGTH_LONG).show();
                }
                break;
            case R.id.authenticate_button:
                // TODO
                break;
        }
    }
    @Override
    protected void onActivityResult(int requestCode, int resultCode, Intent data) {
        if (resultCode == RESULT_OK && requestCode == 1) {
            token = data.getStringExtra("token");
        }
    }
}
8.4. Using a fake data provider
Create a fake data provider and fill the spinner with fake questions and recyclerview with fake answers (after changing the selection in spinner).
package com.vogella.android.stackoverflow;
import java.util.ArrayList;
import java.util.List;
public class FakeDataProvider {
    public static List getQuestions(){
        List questions = new ArrayList<>();
        for (int i = 0; i<10; i++) {
            Question question = new Question();
            question.questionId = String.valueOf(i);
            question.title = String.valueOf(i);
            question.body = String.valueOf(i) + "Body";
            questions.add(question);
        }
        return questions;
    }
    public static List getAnswers(){
        List answers = new ArrayList<>();
        for (int i = 0; i<10; i++) {
            Answer answer = new Answer();
            answer.answerId = i;
            answer.accepted = false;
            answer.score = i;
            answers.add(answer);
        }
        return answers;
    }
}
Now configure spinner and recyclerview to use this fake data.
package com.vogella.android.stackoverflow;
import android.app.Activity;
import android.content.Intent;
import android.os.Bundle;
import android.support.v7.widget.LinearLayoutManager;
import android.support.v7.widget.RecyclerView;
import android.view.View;
import android.widget.AdapterView;
import android.widget.ArrayAdapter;
import android.widget.Button;
import android.widget.Spinner;
import android.widget.Toast;
import java.util.List;
public class MainActivity extends Activity implements View.OnClickListener {
    private String token;
    private Button authenticateButton;
    private Spinner questionsSpinner;
    private RecyclerView recyclerView;
    protected void onCreate(Bundle savedInstanceState) {
        super.onCreate(savedInstanceState);
        setContentView(R.layout.activity_main);
        questionsSpinner = (Spinner) findViewById(R.id.questions_spinner);
        questionsSpinner.setOnItemSelectedListener(new AdapterView.OnItemSelectedListener() {
            @Override
            public void onItemSelected(AdapterView parent, View view, int position, long id) {
                Toast.makeText(MainActivity.this, "Spinner item selected", Toast.LENGTH_LONG).show();
            }
            @Override
            public void onNothingSelected(AdapterView parent) {
            }
        });
        List questions = FakeDataProvider.getQuestions();
        ArrayAdapter arrayAdapter = new ArrayAdapter(MainActivity.this, android.R.layout.simple_spinner_dropdown_item, questions);
        questionsSpinner.setAdapter(arrayAdapter);
        authenticateButton = (Button) findViewById(R.id.authenticate_button);
        recyclerView = (RecyclerView) findViewById(R.id.list);
        recyclerView.setHasFixedSize(true);
        recyclerView.setLayoutManager(new LinearLayoutManager(MainActivity.this));
        List answers = FakeDataProvider.getAnswers();
        RecyclerViewAdapter adapter = new RecyclerViewAdapter(answers);
        recyclerView.setAdapter(adapter);
    }
    @Override
    protected void onResume() {
        super.onResume();
        if (token != null) {
            authenticateButton.setEnabled(false);
        }
    }
    @Override
    public void onClick(View v) {
        switch (v.getId()) {
            case android.R.id.text1:
                if (token != null) {
                    // TODO
                } else {
                    Toast.makeText(this, "You need to authenticate first", Toast.LENGTH_LONG).show();
                }
                break;
            case R.id.authenticate_button:
                // TODO
                break;
        }
    }
    @Override
    protected void onActivityResult(int requestCode, int resultCode, Intent data) {
        if (resultCode == RESULT_OK && requestCode == 1) {
            token = data.getStringExtra("token");
        }
    }
}
8.5. Adding Gradle Dependencies and Permissions
Add the following dependencies to the build.gradle file.
implementation 'com.squareup.retrofit2:retrofit:2.1.0'
implementation 'com.squareup.retrofit2:converter-gson:2.1.0'
Add permission to access the Internet in the manifest.
8.6. Defining an API and Retrofit Adapter
The Stackoverflow API wraps answers or questions in a JSON object named items. To handle this, create the following data class called ListWrapper. This is necessary in order to process the wrapper of Stackoverflow elements. This class takes a type parameter and simply packs a list of objects of this type.
package com.vogella.android.stackoverflow;
import java.util.List;
public class ListWrapper {
    List items;
}
Define the REST API for Retrofit through the following interface.
package com.vogella.android.stackoverflow;
import java.util.List;
import okhttp3.ResponseBody;
import retrofit2.http.Field;
import retrofit2.http.FormUrlEncoded;
import retrofit2.http.GET;
import retrofit2.http.POST;
import retrofit2.http.Path;
import retrofit2.Call;
public interface StackOverflowAPI {
    String BASE_URL = "https://api.stackexchange.com/";
    @GET("/2.2/questions?order=desc&sort=votes&site=stackoverflow&tagged=android&filter=withbody")
    Call> getQuestions();
    @GET("/2.2/questions/{id}/answers?order=desc&sort=votes&site=stackoverflow")
    Call> getAnswersForQuestion(@Path("id") String questionId);
}
8.7. Activity setting
Change the MainActivity code as follows.
package com.vogella.android.stackoverflow;
import android.app.Activity;
import android.content.Intent;
import android.os.Bundle;
import android.support.v7.widget.LinearLayoutManager;
import android.support.v7.widget.RecyclerView;
import android.util.Log;
import android.view.View;
import android.widget.AdapterView;
import android.widget.ArrayAdapter;
import android.widget.Button;
import android.widget.Spinner;
import android.widget.Toast;
import com.google.gson.Gson;
import com.google.gson.GsonBuilder;
import java.util.ArrayList;
import java.util.List;
import okhttp3.ResponseBody;
import retrofit2.Call;
import retrofit2.Callback;
import retrofit2.Response;
import retrofit2.Retrofit;
import retrofit2.converter.gson.GsonConverterFactory;
public class MainActivity extends Activity implements View.OnClickListener {
    private StackOverflowAPI stackoverflowAPI;
    private String token;
    private Button authenticateButton;
    private Spinner questionsSpinner;
    private RecyclerView recyclerView;
    protected void onCreate(Bundle savedInstanceState) {
        super.onCreate(savedInstanceState);
        setContentView(R.layout.activity_main);
        questionsSpinner = (Spinner) findViewById(R.id.questions_spinner);
        questionsSpinner.setOnItemSelectedListener(new AdapterView.OnItemSelectedListener() {
            @Override
            public void onItemSelected(AdapterView parent, View view, int position, long id) {
                Question question = (Question) parent.getAdapter().getItem(position);
                stackoverflowAPI.getAnswersForQuestion(question.questionId).enqueue(answersCallback);
            }
            @Override
            public void onNothingSelected(AdapterView parent) {
            }
        });
        authenticateButton = (Button) findViewById(R.id.authenticate_button);
        recyclerView = (RecyclerView) findViewById(R.id.list);
        recyclerView.setHasFixedSize(true);
        recyclerView.setLayoutManager(new LinearLayoutManager(MainActivity.this));
        createStackoverflowAPI();
        stackoverflowAPI.getQuestions().enqueue(questionsCallback);
    }
    @Override
    protected void onResume() {
        super.onResume();
        if (token != null) {
            authenticateButton.setEnabled(false);
        }
    }
    private void createStackoverflowAPI() {
        Gson gson = new GsonBuilder()
                .setDateFormat("yyyy-MM-dd'T'HH:mm:ssZ")
                .create();
        Retrofit retrofit = new Retrofit.Builder()
                .baseUrl(StackOverflowAPI.BASE_URL)
                .addConverterFactory(GsonConverterFactory.create(gson))
                .build();
        stackoverflowAPI = retrofit.create(StackOverflowAPI.class);
    }
    @Override
    public void onClick(View v) {
        switch (v.getId()) {
            case android.R.id.text1:
                if (token != null) {
                    //TODO
                } else {
                    Toast.makeText(this, "You need to authenticate first", Toast.LENGTH_LONG).show();
                }
                break;
            case R.id.authenticate_button:
                // TODO
                break;
        }
    }
    @Override
    protected void onActivityResult(int requestCode, int resultCode, Intent data) {
        if (resultCode == RESULT_OK && requestCode == 1) {
            token = data.getStringExtra("token");
        }
    }
    Callback> questionsCallback = new Callback>() {
        @Override
        public void onResponse(Call> call, Response> response) {
            if (response.isSuccessful()) {
                ListWrapper questions = response.body();
                ArrayAdapter arrayAdapter = new ArrayAdapter(MainActivity.this, android.R.layout.simple_spinner_dropdown_item, questions.items);
                questionsSpinner.setAdapter(arrayAdapter);
            } else {
                Log.d("QuestionsCallback", "Code: " + response.code() + " Message: " + response.message());
            }
        }
        @Override
        public void onFailure(Call> call, Throwable t) {
            t.printStackTrace();
        }
    };
    Callback> answersCallback = new Callback>() {
        @Override
        public void onResponse(Call> call, Response> response) {
            if (response.isSuccessful()) {
                List data = new ArrayList<>();
                data.addAll(response.body().items);
                recyclerView.setAdapter(new RecyclerViewAdapter(data));
            } else {
                Log.d("QuestionsCallback", "Code: " + response.code() + " Message: " + response.message());
            }
        }
        @Override
        public void onFailure(Call> call, Throwable t) {
            t.printStackTrace();
        }
    };
    Callback upvoteCallback = new Callback() {
        @Override
        public void onResponse(Call call, Response response) {
            if (response.isSuccessful()) {
                Toast.makeText(MainActivity.this, "Upvote successful", Toast.LENGTH_LONG).show();
            } else {
                Log.d("QuestionsCallback", "Code: " + response.code() + " Message: " + response.message());
                Toast.makeText(MainActivity.this, "You already upvoted this answer", Toast.LENGTH_LONG).show();
            }
        }
        @Override
        public void onFailure(Call call, Throwable t) {
            t.printStackTrace();
        }
    };
}
8.8. Optional: getting a user profile image
Change the layout of the lines in the recycler view to also display the user profile image. Extend your data model to get a profile picture of the user who answered the question. Add an ImageView to the layout lines and use the Glide library to load the image.
8.9. Optional: use different layouts for even and odd lines
Change the adapter implementation to use different layouts for even and odd lines.
This requires the creation of different layouts based on the data type. Use getItemViewType () in the adapter.
8.10. Optional: Network Error Handling
If you experience a network failure, show the re-request button instead of the main user interface.
9. Exercise: Using Retrofit to Access the GitHub API on Android
This exercise describes how to list all GitHub repositories for a user in an Android app using Retrofit. You can select the repository from the drop-down list and specify the discussions related to the user for the selected repository.
Then you can select a discussion from the additional drop-down field and post a comment on it. DialogFragment will be used to enter credentials for authentication.
Make sure you have a Github account, as this is necessary for this exercise. Since Retrofit will be used with RxJava2 during this exercise, also pay attention to the RxJava2 Tutorial .
9.1. Project setup
Create an Android app called Retrofit Github. Use com.vogella.android.retrofitgithub as the name of the top-level package and use an empty template. Make sure the “Backwards Compatibility” flag is checked.
To use Retrofit and RxJava2 CallAdapter , add the following dependencies to the build.gradle file
implementation 'com.squareup.retrofit2:retrofit:2.3.0'
implementation 'com.squareup.retrofit2:converter-gson:2.3.0'
implementation 'com.squareup.retrofit2:adapter-rxjava2:2.3.0'
implementation 'io.reactivex.rxjava2:rxandroid:2.0.1'
Add permission to access the Internet in the manifest.
9.2. API Definition
Create the following two data classes: GithubIssue and GithubRepo.
package com.vogella.android.retrofitgithub;
import com.google.gson.annotations.SerializedName;
public class GithubIssue {
    String id;
    String title;
    String comments_url;
    @SerializedName("body")
    String comment;
    @Override
    public String toString() {
        return id +  " - " + title;
    }
}
package com.vogella.android.retrofitgithub;
public class GithubRepo {
String name;
String owner;
String url;
@Override
public String toString() {
return(name + " " + url);
}
}From the repository information, only the repository name and URL will be displayed in the drop-down list. We also add the owner to the data class, as the name of the owner is needed in order to request discussions later.
We show only the id and the title of the discussion in the drop-down field, so we create a field for each of them. In addition, the response from Github contains a URL for posting a comment, which is stored in the comments_url field. To post a new comment on the Github API later, add a field called comment. Github apiindicates that the contents of the comment should be bound to a field named body in the JSON request. Since Retrofit (de) serializes all fields based on their name, and since we do not want to use the body as the field name in our GithubIssue class, we use the @SerializedName annotation. With this annotation, we can change the name with which the field is (de) serialized to JSON.
Unfortunately, the GithubRepo class is not enough to request all the necessary information about the repository. As you see here, the owner of the repository is a separate JSON object in the repository response, and therefore usually needs the appropriate Java class to (de) serialize. Fortunately, Retrofit allows you to add your own typed JSONDeserializer to control the deserialization of a specific type. Each time an object of a certain type needs to be deserialized, this custom deserializer is used.
To do this, add the following GithubRepoDeserialzer class.
package com.vogella.android.retrofitgithub;
import com.google.gson.JsonDeserializationContext;
import com.google.gson.JsonDeserializer;
import com.google.gson.JsonElement;
import com.google.gson.JsonObject;
import com.google.gson.JsonParseException;
import java.lang.reflect.Type;
public class GithubRepoDeserializer implements JsonDeserializer {
    @Override
    public GithubRepo deserialize(JsonElement json, Type typeOfT, JsonDeserializationContext context) throws JsonParseException {
        GithubRepo githubRepo = new GithubRepo();
        JsonObject repoJsonObject =  json.getAsJsonObject();
        githubRepo.name = repoJsonObject.get("name").getAsString();
        githubRepo.url = repoJsonObject.get("url").getAsString();
        JsonElement ownerJsonElement = repoJsonObject.get("owner");
        JsonObject ownerJsonObject = ownerJsonElement.getAsJsonObject();
        githubRepo.owner = ownerJsonObject.get("login").getAsString();
        return githubRepo;
    }
}
Define the REST API for Retrofit through the following interface:
package com.vogella.android.retrofitgithub;
import java.util.List;
import io.reactivex.Single;
import okhttp3.ResponseBody;
import retrofit2.http.Body;
import retrofit2.http.GET;
import retrofit2.http.POST;
import retrofit2.http.Path;
import retrofit2.http.Url;
public interface GithubAPI {
    String ENDPOINT = "https://api.github.com";
    @GET("user/repos?per_page=100")
    Single> getRepos();
    @GET("/repos/{owner}/{repo}/issues")
    Single> getIssues(@Path("owner") String owner, @Path("repo") String repository);
    @POST
    Single postComment(@Url String url, @Body GithubIssue issue);
}
You may have a question about @ Url annotation. Using this annotation, we can specify the URL for this request. This allows us to change the URL for each request dynamically. We need this for the comments_url field of the GithubIssue class.
@ Path annotations bind the parameter value to the corresponding variable (curly braces) in the request URL. This is necessary to indicate the owner and name of the repository for which discussions should be requested.
9.3. Create Credential Dialog Box
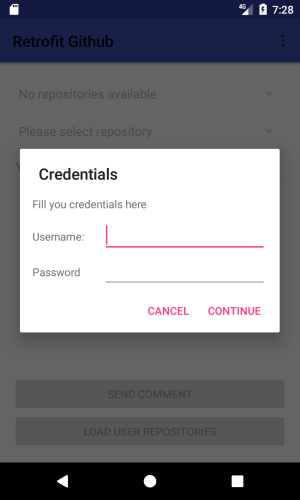
To give the user the ability to store their credentials in the application, DialogFragment is used. So create the following class called CredentialsDialog, and also add a layout file called dialog_credentials.xml to the resources layout folder.
The result should look something like the following screenshot.
package com.vogella.android.retrofitgithub;
import android.app.Dialog;
import android.content.Context;
import android.content.DialogInterface;
import android.os.Bundle;
import android.support.annotation.NonNull;
import android.support.v4.app.DialogFragment;
import android.support.v7.app.AlertDialog;
import android.view.View;
import android.widget.EditText;
import okhttp3.Credentials;
public class CredentialsDialog extends DialogFragment {
    EditText usernameEditText;
    EditText passwordEditText;
    ICredentialsDialogListener listener;
    public interface ICredentialsDialogListener {
        void onDialogPositiveClick(String username, String password);
    }
    @Override
    public void onAttach(Context context) {
        super.onAttach(context);
        if (getActivity() instanceof ICredentialsDialogListener) {
            listener = (ICredentialsDialogListener) getActivity();
        }
    }
    @NonNull
    @Override
    public Dialog onCreateDialog(Bundle savedInstanceState) {
        View view = getActivity().getLayoutInflater().inflate(R.layout.dialog_credentials, null);
        usernameEditText = (EditText) view.findViewById(R.id.username_edittext);
        passwordEditText = (EditText) view.findViewById(R.id.password_edittext);
        usernameEditText.setText(getArguments().getString("username"));
        passwordEditText.setText(getArguments().getString("password"));
        AlertDialog.Builder builder = new AlertDialog.Builder(getActivity())
                .setView(view)
                .setTitle("Credentials")
                .setNegativeButton("Cancel", null)
                .setPositiveButton("Continue", new DialogInterface.OnClickListener() {
                    @Override
                    public void onClick(DialogInterface dialog, int which) {
                        if (listener != null) {
                            listener.onDialogPositiveClick(usernameEditText.getText().toString(), passwordEditText.getText().toString());
                        }
                    }
                });
        return builder.create();
    }
}
9.4. Create Activity
Modify activity_main.xml as follows.
Two buttons (for downloading repositories and sending comments), two Spinner (drop-down field for displaying repositories and discussions) and EditText (for writing comments). To launch CredentialsDialog, use the menu on the Android toolbar. To create it, add a menu xml file named menu_main.xml to the menu resources folder (create a folder if it does not exist).
Since we use the Toolbar widget, you need to disable the action bar by default. To do this, modify the xml style file as shown below.
Change your activity code to the following.
package com.vogella.android.retrofitgithub;
import android.os.Bundle;
import android.support.v7.app.AppCompatActivity;
import android.support.v7.widget.Toolbar;
import android.view.Menu;
import android.view.MenuItem;
import android.view.View;
import android.widget.AdapterView;
import android.widget.ArrayAdapter;
import android.widget.Button;
import android.widget.EditText;
import android.widget.Spinner;
import android.widget.Toast;
import com.google.gson.Gson;
import com.google.gson.GsonBuilder;
import java.io.IOException;
import java.util.List;
import io.reactivex.android.schedulers.AndroidSchedulers;
import io.reactivex.disposables.CompositeDisposable;
import io.reactivex.observers.DisposableSingleObserver;
import io.reactivex.schedulers.Schedulers;
import okhttp3.Credentials;
import okhttp3.Interceptor;
import okhttp3.OkHttpClient;
import okhttp3.Request;
import okhttp3.ResponseBody;
import retrofit2.Call;
import retrofit2.Retrofit;
import retrofit2.adapter.rxjava2.RxJava2CallAdapterFactory;
import retrofit2.converter.gson.GsonConverterFactory;
public class MainActivity extends AppCompatActivity implements CredentialsDialog.ICredentialsDialogListener {
    GithubAPI githubAPI;
    String username;
    String password;
    Spinner repositoriesSpinner;
    Spinner issuesSpinner;
    EditText commentEditText;
    Button sendButton;
    Button loadReposButtons;
    private CompositeDisposable compositeDisposable = new CompositeDisposable();
    @Override
    protected void onCreate(Bundle savedInstanceState) {
        super.onCreate(savedInstanceState);
        setContentView(R.layout.activity_main);
        Toolbar toolbar = (Toolbar) findViewById(R.id.my_toolbar);
        setSupportActionBar(toolbar);
        sendButton = (Button) findViewById(R.id.send_comment_button);
        repositoriesSpinner = (Spinner) findViewById(R.id.repositories_spinner);
        repositoriesSpinner.setEnabled(false);
        repositoriesSpinner.setAdapter(new ArrayAdapter<>(MainActivity.this, android.R.layout.simple_spinner_dropdown_item, new String[]{"No repositories available"}));
        repositoriesSpinner.setOnItemSelectedListener(new AdapterView.OnItemSelectedListener() {
            @Override
            public void onItemSelected(AdapterView parent, View view, int position, long id) {
                if (parent.getSelectedItem() instanceof GithubRepo) {
                    GithubRepo githubRepo = (GithubRepo) parent.getSelectedItem();
                    compositeDisposable.add(githubAPI.getIssues(githubRepo.owner, githubRepo.name)
                            .subscribeOn(Schedulers.io())
                            .observeOn(AndroidSchedulers.mainThread())
                            .subscribeWith(getIssuesObserver()));
                }
            }
            @Override
            public void onNothingSelected(AdapterView parent) {
            }
        });
        issuesSpinner = (Spinner) findViewById(R.id.issues_spinner);
        issuesSpinner.setEnabled(false);
        issuesSpinner.setAdapter(new ArrayAdapter<>(MainActivity.this, android.R.layout.simple_spinner_dropdown_item, new String[]{"Please select repository"}));
        commentEditText = (EditText) findViewById(R.id.comment_edittext);
        loadReposButtons = (Button) findViewById(R.id.loadRepos_button);
        createGithubAPI();
    }
    @Override
    protected void onStop() {
        super.onStop();
        if (compositeDisposable != null && !compositeDisposable.isDisposed()) {
            compositeDisposable.dispose();
        }
    }
    @Override
    public boolean onCreateOptionsMenu(Menu menu) {
        getMenuInflater().inflate(R.menu.menu_main, menu);
        return true;
    }
    @Override
    public boolean onOptionsItemSelected(MenuItem item) {
        switch (item.getItemId()) {
            case R.id.menu_credentials:
                showCredentialsDialog();
                return true;
        }
        return super.onOptionsItemSelected(item);
    }
    private void showCredentialsDialog() {
        CredentialsDialog dialog = new CredentialsDialog();
        Bundle arguments = new Bundle();
        arguments.putString("username", username);
        arguments.putString("password", password);
        dialog.setArguments(arguments);
        dialog.show(getSupportFragmentManager(), "credentialsDialog");
    }
    private void createGithubAPI() {
        Gson gson = new GsonBuilder()
                .setDateFormat("yyyy-MM-dd'T'HH:mm:ssZ")
                .registerTypeAdapter(GithubRepo.class, new GithubRepoDeserializer())
                .create();
        OkHttpClient okHttpClient = new OkHttpClient.Builder()
                .addInterceptor(new Interceptor() {
                    @Override
                    public okhttp3.Response intercept(Chain chain) throws IOException {
                        Request originalRequest = chain.request();
                        Request.Builder builder = originalRequest.newBuilder().header("Authorization",
                                Credentials.basic(username, password));
                        Request newRequest = builder.build();
                        return chain.proceed(newRequest);
                    }
                }).build();
        Retrofit retrofit = new Retrofit.Builder()
                .baseUrl(GithubAPI.ENDPOINT)
                .client(okHttpClient)
                .addCallAdapterFactory(RxJava2CallAdapterFactory.create())
                .addConverterFactory(GsonConverterFactory.create(gson))
                .build();
        githubAPI = retrofit.create(GithubAPI.class);
    }
    public void onClick(View view) {
        switch (view.getId()) {
            case R.id.loadRepos_button:
                compositeDisposable.add(githubAPI.getRepos()
                        .subscribeOn(Schedulers.io())
                        .observeOn(AndroidSchedulers.mainThread())
                        .subscribeWith(getRepositoriesObserver()));
                break;
            case R.id.send_comment_button:
                String newComment = commentEditText.getText().toString();
                if (!newComment.isEmpty()) {
                    GithubIssue selectedItem = (GithubIssue) issuesSpinner.getSelectedItem();
                    selectedItem.comment = newComment;
                    compositeDisposable.add(githubAPI.postComment(selectedItem.comments_url, selectedItem)
                            .subscribeOn(Schedulers.io())
                            .observeOn(AndroidSchedulers.mainThread())
                            .subscribeWith(getCommentObserver()));
                } else {
                    Toast.makeText(MainActivity.this, "Please enter a comment", Toast.LENGTH_LONG).show();
                }
                break;
        }
    }
    private DisposableSingleObserver> getRepositoriesObserver() {
        return new DisposableSingleObserver>() {
            @Override
            public void onSuccess(List value) {
                if (!value.isEmpty()) {
                    ArrayAdapter spinnerAdapter = new ArrayAdapter<>(MainActivity.this, android.R.layout.simple_spinner_dropdown_item, value);
                    repositoriesSpinner.setAdapter(spinnerAdapter);
                    repositoriesSpinner.setEnabled(true);
                } else {
                    ArrayAdapter spinnerAdapter = new ArrayAdapter<>(MainActivity.this, android.R.layout.simple_spinner_dropdown_item, new String[]{"User has no repositories"});
                    repositoriesSpinner.setAdapter(spinnerAdapter);
                    repositoriesSpinner.setEnabled(false);
                }
            }
            @Override
            public void onError(Throwable e) {
                e.printStackTrace();
                Toast.makeText(MainActivity.this, "Can not load repositories", Toast.LENGTH_SHORT).show();
            }
        };
    }
    private DisposableSingleObserver> getIssuesObserver() {
        return new DisposableSingleObserver>() {
            @Override
            public void onSuccess(List value) {
                if (!value.isEmpty()) {
                    ArrayAdapter spinnerAdapter = new ArrayAdapter<>(MainActivity.this, android.R.layout.simple_spinner_dropdown_item, value);
                    issuesSpinner.setEnabled(true);
                    commentEditText.setEnabled(true);
                    sendButton.setEnabled(true);
                    issuesSpinner.setAdapter(spinnerAdapter);
                } else {
                    ArrayAdapter spinnerAdapter = new ArrayAdapter<>(MainActivity.this, android.R.layout.simple_spinner_dropdown_item, new String[]{"Repository has no issues"});
                    issuesSpinner.setEnabled(false);
                    commentEditText.setEnabled(false);
                    sendButton.setEnabled(false);
                    issuesSpinner.setAdapter(spinnerAdapter);
                }
            }
            @Override
            public void onError(Throwable e) {
                e.printStackTrace();
                Toast.makeText(MainActivity.this, "Can not load issues", Toast.LENGTH_SHORT).show();
            }
        };
    }
    private DisposableSingleObserver getCommentObserver() {
        return new DisposableSingleObserver() {
            @Override
            public void onSuccess(ResponseBody value) {
                commentEditText.setText("");
                Toast.makeText(MainActivity.this, "Comment created", Toast.LENGTH_LONG).show();
            }
            @Override
            public void onError(Throwable e) {
                e.printStackTrace();
                Toast.makeText(MainActivity.this, "Can not create comment", Toast.LENGTH_SHORT).show();
            }
        };
    }
    @Override
    public void onDialogPositiveClick(String username, String password) {
        this.username = username;
        this.password = password;
        loadReposButtons.setEnabled(true);
    }
}
Here we added the previously created GithubRepoDeserializer as a TypeAdapter in GsonBuilder. To handle authentication for each call, an Interceptor was added to OkHttpClient. In order for the API methods to return the RxJava2 types, we added the RxJava2 CallAdapter to our client.
10. Exercise: Using Retrofit with OAuth to Request User Information from Twitter on Android
This exercise describes how to access Twitter using Retrofit on Android. We will write an application that can request and display user data for the provided username. In this exercise, we use Twitter authentication application-only with OAuth 2 for authorization. To do this exercise, you need to have a Twitter account. In addition, you need to go to Twitter apps and create a new app to get your consumer key and consumer secret. We will need this later to request our OAuth token.
10.1. Project setup
Create an Android app called Retrofit Twitter. Use com.vogella.android.retrofittwitter as the name of a top-level package.
To use Retrofit, add the following lines to the build.gradle file
implementation 'com.squareup.retrofit2:retrofit:2.1.0'
implementation 'com.squareup.retrofit2:converter-gson:2.1.0'
Add permission to access the Internet in the manifest.
10.2. API Definition
Create the following two data classes, called OAuthToken and UserDetails.
package com.vogella.android.retrofittwitter;
import com.google.gson.annotations.SerializedName;
public class OAuthToken {
    @SerializedName("access_token")
    private String accessToken;
    @SerializedName("token_type")
    private String tokenType;
    public String getAccessToken() {
        return accessToken;
    }
    public String getTokenType() {
        return tokenType;
    }
    public String getAuthorization() {
        return getTokenType() + " " + getAccessToken();
    }
}
package com.vogella.android.retrofittwitter;
public class UserDetails {
private String name;
private String location;
private String description;
private String url;
public String getName() {
return name;
}
public void setName(String name) {
this.name = name;
}
public String getLocation() {
return location;
}
public void setLocation(String location) {
this.location = location;
}
public String getDescription() {
return description;
}
public void setDescription(String description) {
this.description = description;
}
public String getUrl() {
return url;
}
public void setUrl(String url) {
this.url = url;
}
}The OAuthToken class is used to store the bearer token that we request from Twitter, with our key and secret. We use the @ SerializedName annotation to set the name Retrofit to (de) serialize fields.
The UserDetails class simply saves several fields from the Twitter response when requesting user information. We do not show all the user data that was contained in the response, only the name, location, URL and description.
Define the REST API for Retrofit through the following interface:
package com.vogella.android.retrofittwitter;
import retrofit2.Call;
import retrofit2.http.Field;
import retrofit2.http.FormUrlEncoded;
import retrofit2.http.GET;
import retrofit2.http.POST;
import retrofit2.http.Query;
public interface TwitterApi {
    String BASE_URL = "https://api.twitter.com/";
    @FormUrlEncoded
    @POST("oauth2/token")
    Call postCredentials(@Field("grant_type") String grantType);
    @GET("/1.1/users/show.json")
    Call getUserDetails(@Query("screen_name") String name);
}
10.3. Create Activity
Modify the activity_main.xml file and the corresponding MainActivity class as follows:
package com.vogella.android.retrofittwitter;
import android.os.Bundle;
import android.support.v7.app.AppCompatActivity;
import android.util.Log;
import android.view.View;
import android.widget.Button;
import android.widget.EditText;
import android.widget.TextView;
import android.widget.Toast;
import java.io.IOException;
import okhttp3.Credentials;
import okhttp3.Interceptor;
import okhttp3.OkHttpClient;
import okhttp3.Request;
import retrofit2.Call;
import retrofit2.Callback;
import retrofit2.Response;
import retrofit2.Retrofit;
import retrofit2.converter.gson.GsonConverterFactory;
public class MainActivity extends AppCompatActivity {
    private String credentials = Credentials.basic("aConsumerKey", "aSecret");
    Button requestTokenButton;
    Button requestUserDetailsButton;
    EditText usernameEditText;
    TextView usernameTextView;
    TextView nameTextView;
    TextView locationTextView;
    TextView urlTextView;
    TextView descriptionTextView;
    TwitterApi twitterApi;
    OAuthToken token;
    @Override
    protected void onCreate(Bundle savedInstanceState) {
        super.onCreate(savedInstanceState);
        setContentView(R.layout.activity_main);
        requestTokenButton = (Button) findViewById(R.id.request_token_button);
        requestUserDetailsButton = (Button) findViewById(R.id.request_user_details_button);
        usernameEditText = (EditText) findViewById(R.id.username_edittext);
        usernameTextView = (TextView) findViewById(R.id.username_textview);
        nameTextView = (TextView) findViewById(R.id.name_textview);
        locationTextView = (TextView) findViewById(R.id.location_textview);
        urlTextView = (TextView) findViewById(R.id.url_textview);
        descriptionTextView = (TextView) findViewById(R.id.description_textview);
        createTwitterApi();
    }
    private void createTwitterApi() {
        OkHttpClient okHttpClient = new OkHttpClient.Builder().addInterceptor(new Interceptor() {
            @Override
            public okhttp3.Response intercept(Chain chain) throws IOException {
                Request originalRequest = chain.request();
                Request.Builder builder = originalRequest.newBuilder().header("Authorization",
                        token != null ? token.getAuthorization() : credentials);
                Request newRequest = builder.build();
                return chain.proceed(newRequest);
            }
        }).build();
        Retrofit retrofit = new Retrofit.Builder()
                .baseUrl(TwitterApi.BASE_URL)
                .client(okHttpClient)
                .addConverterFactory(GsonConverterFactory.create())
                .build();
        twitterApi = retrofit.create(TwitterApi.class);
    }
    public void onClick(View view) {
        switch (view.getId()) {
            case R.id.request_token_button:
                twitterApi.postCredentials("client_credentials").enqueue(tokenCallback);
                break;
            case R.id.request_user_details_button:
                String editTextInput = usernameEditText.getText().toString();
                if (!editTextInput.isEmpty()) {
                    twitterApi.getUserDetails(editTextInput).enqueue(userDetailsCallback);
                } else {
                    Toast.makeText(this, "Please provide a username", Toast.LENGTH_LONG).show();
                }
                break;
        }
    }
    Callback tokenCallback = new Callback() {
        @Override
        public void onResponse(Call call, Response response) {
            if (response.isSuccessful()) {
                requestTokenButton.setEnabled(false);
                requestUserDetailsButton.setEnabled(true);
                usernameTextView.setEnabled(true);
                usernameEditText.setEnabled(true);
                token = response.body();
            } else {
                Toast.makeText(MainActivity.this, "Failure while requesting token", Toast.LENGTH_LONG).show();
                Log.d("RequestTokenCallback", "Code: " + response.code() + "Message: " + response.message());
            }
        }
        @Override
        public void onFailure(Call call, Throwable t) {
            t.printStackTrace();
        }
    };
    Callback userDetailsCallback = new Callback() {
        @Override
        public void onResponse(Call call, Response response) {
            if (response.isSuccessful()) {
                UserDetails userDetails = response.body();
                nameTextView.setText(userDetails.getName() == null ? "no value" : userDetails.getName());
                locationTextView.setText(userDetails.getLocation() == null ? "no value" : userDetails.getLocation());
                urlTextView.setText(userDetails.getUrl() == null ? "no value" : userDetails.getUrl());
                descriptionTextView.setText(userDetails.getDescription().isEmpty() ? "no value" : userDetails.getDescription());
            } else {
                Toast.makeText(MainActivity.this, "Failure while requesting user details", Toast.LENGTH_LONG).show();
                Log.d("UserDetailsCallback", "Code: " + response.code() + "Message: " + response.message());
            }
        }
        @Override
        public void onFailure(Call call, Throwable t) {
            t.printStackTrace();
        }
    };
}
Replace aConsumerKey and aSecret with the consumer key and secret received from Twitter.
Also take a look at the interceptor that we add to our Retrofit client. Because we use OAuth, our credentials are different for each call. The postCredentials method must post the credentials (consumer key and secret) in the Basic Twitter Schema. As a result, this call returns a bearer token, which Retrofit deserializes into our OAuthToken class, which is then stored in the token field. Any other request can (and should) now use this token as credentials for authorization. User information is also requested.
11. Retrofit Resources
Consuming APIs with Retrofit tutorial
In dept blog series about Retrofit
Consuming APIs with Retrofit