Configuring TP-Link TL-ER6020 VPN Router for 3CX Phone System
- Tutorial
- Recovery mode
TP-Link wireless routers have earned well-deserved recognition, especially among home users and small companies. However, TP-Link also produces a line of powerful and fairly functional routers and enterprise-level access points. In particular, the business class router TL-ER6020 at a very affordable price has a number of interesting features:

A detailed description of the features and settings of the TL-ER6020 is available here . In this article, we restrict ourselves to the description of the TP-Link TL-ER6020 router settings for working with 3CX Phone System.
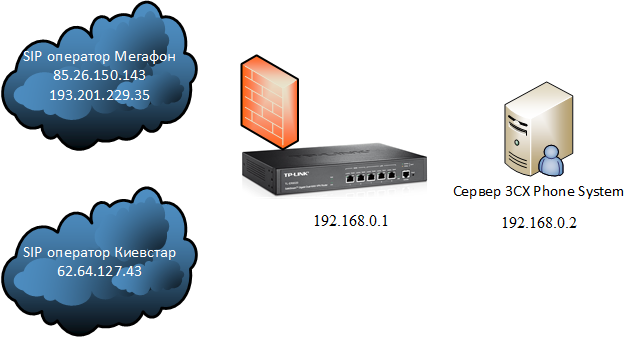
The network diagram provides for the location of the 3CX server on the router's NAT in the network 192.168.0.0 / 24. The IP address of the router is 192.168.0.1, and the IP address of the 3CX server is 192.168.0.2
First of all, it is necessary to update the firmware of TL-ER6020, because, as it turned out , even the latest firmware from the official TP-Link website has an error that does not allow you to disable SIP ALG . Disabling SIP ALG is critical for the correct operation of various SIP operators with 3CX.
Configuring a router consists of three steps:
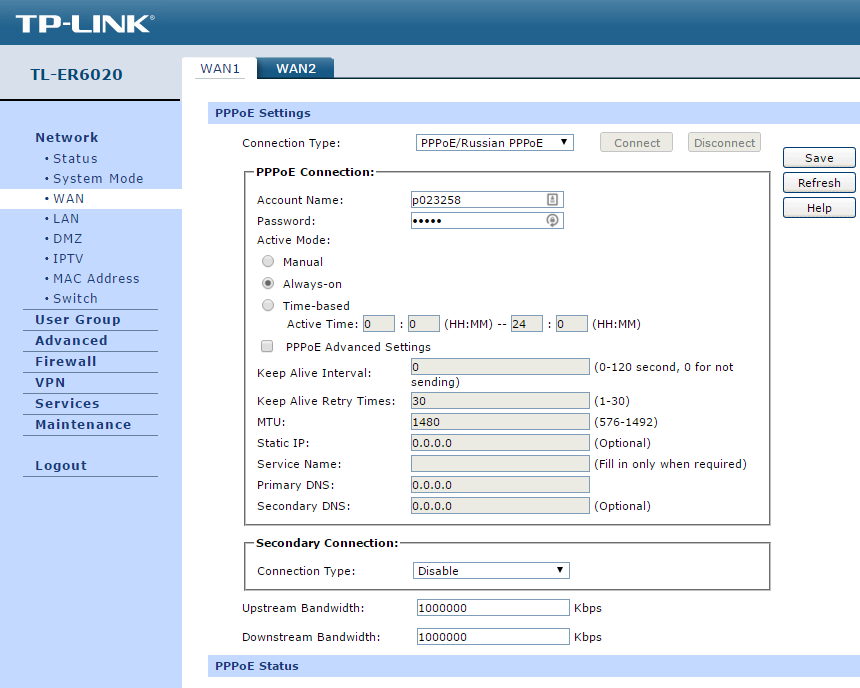
Connection of one (or both) WAN ports to the Internet is done in the Network - WAN section . At the bottom of the interface, you can check the connection status. This example uses a PPPoE connection.
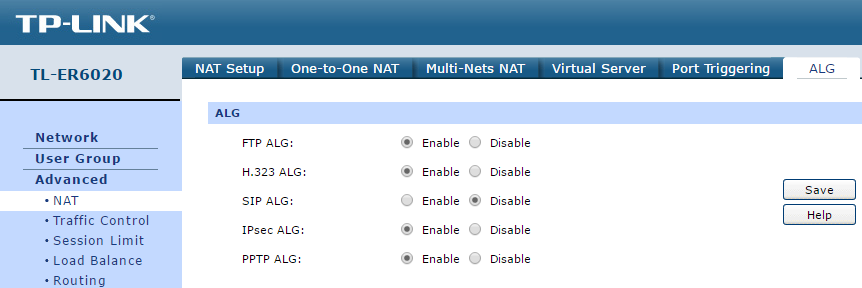
Disable SIP ALG in the Advanced - NAT - ALG section .
For the external SIP trunks to work correctly, it is necessary to publish a number of ports of the 3CX Phone System server :
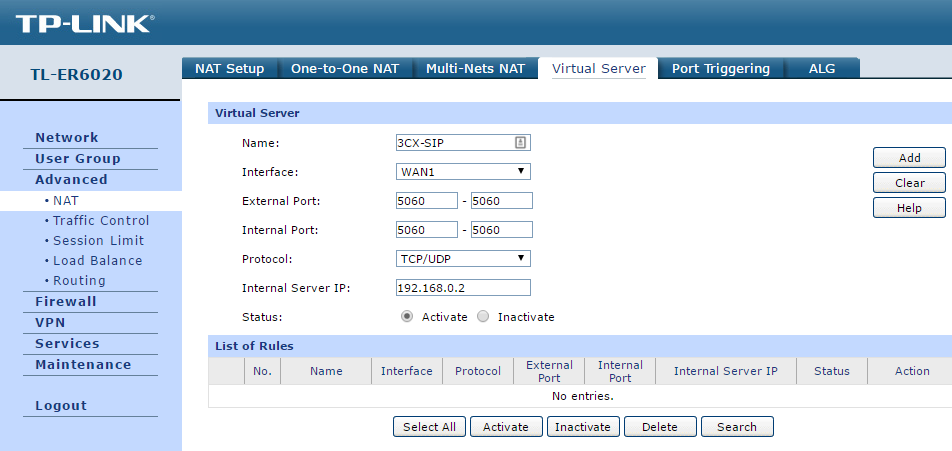
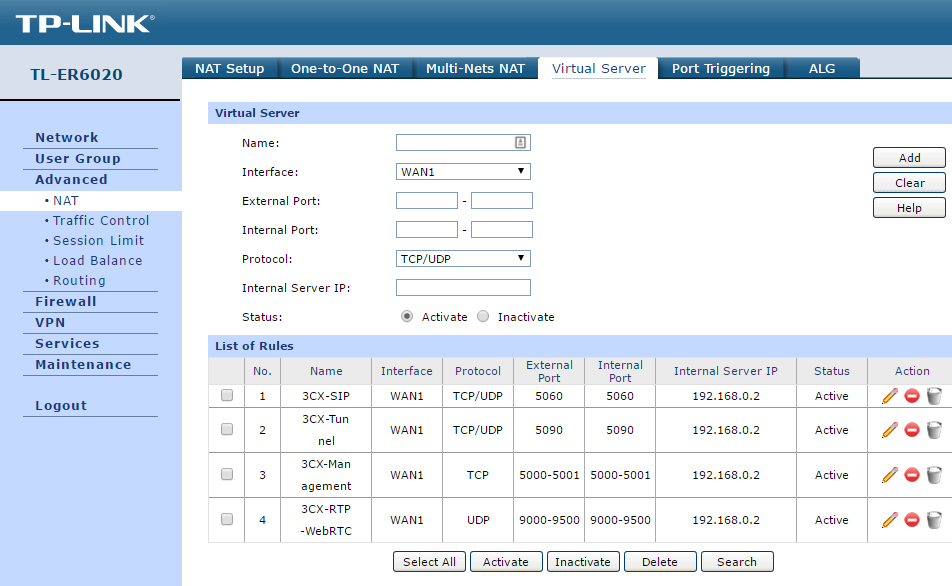
Services are published in the Advanced - NAT - Virtual Server section . Let's start with the SIP server. After publishing all services, the interface should look something like this.
Publication of services as implemented in TL-ER6020 raises fair concerns: we are opening the SIP port 5060, which hackers like so much, in fact, for the whole world. There is no way in the publishing interface to specify for which IP addresses the SIP port of the 3CX server should be opened.
Our strong recommendation: open port 5060 only for SIP addresses of telecom operators / SIP providers your system works with.
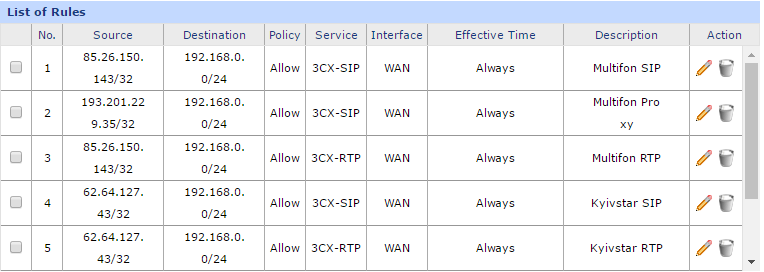
In our example, the system works with the Russian operator Megafon (Multifon service) and the Ukrainian operator Kyivstar, while Megafon uses different IP addresses for the SIP server and SIP proxy , and Kyivstar is the only SIP server.
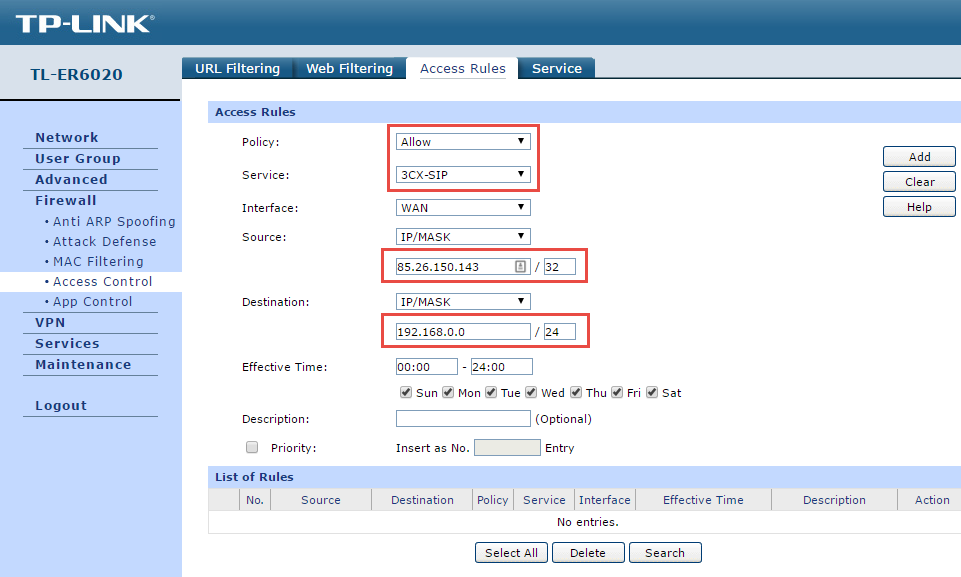
First, we define the services / port ranges, access to which should be limited in the sectionFirewall - Access Control - Service . Here we have identified only SIP port 5060 and RTP ports 9000-9255 . Since the rest of the 3CX services should be available for any IP address on the Internet and there is no need to restrict access to them. In the Firewall - Access Control - Access Rules section, add firewall rules that allow access to certain 3CX services only from certain SIP addresses. It is also necessary to add one general prohibitory rule restricting access to the specified ports to all Internet addresses. Please note - this rule should be the last in the list. The final list of rules should look like this. The second part of the list with a general prohibiting rule.


To check the correct operation of the firewall, make outgoing and incoming calls. The call must be successful, the audibility must be two-way and there should be no disconnection after 32 seconds .
Configuring the TP-Link TL-ER6020 VPN router to work with the 3CX Phone System is a fairly simple process, but it requires some features that we have encountered. It is also desirable to have an understanding of the basic principles of VoIP technology.
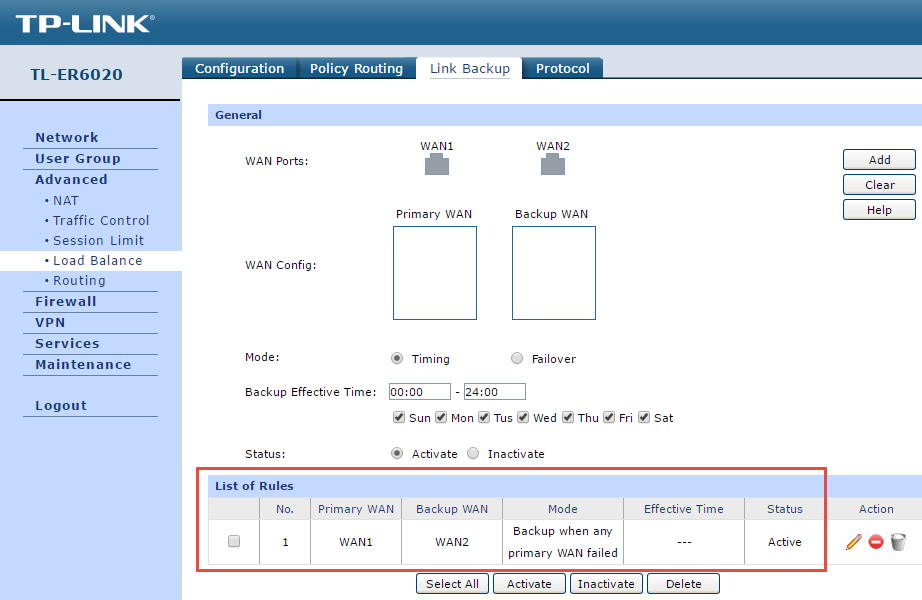
In this guide, we did not consider such an interesting TL-ER6020 feature as WAN link redundancy. This feature allows you to ensure uninterrupted VoIP connection even in the event of a “drop” in the main Internet connection. However, keep in mind that such redundancy places certain requirements on the SIP connections used:
- 2 gigabit WAN ports with redundant switching capability, 2 gigabit LAN ports, 1 gigabit LAN / DMZ port and 1 console port
- Support for multiple VPN protocols, including IPsec / PPTP / L2TP servers
- Support for up to 50 IPsec VPN tunnels with a hardware VPN handler
- Advanced security features, including inspection of ARP packets, protection against DoS attacks, filtering by URL and domain name keyword, and access control

A detailed description of the features and settings of the TL-ER6020 is available here . In this article, we restrict ourselves to the description of the TP-Link TL-ER6020 router settings for working with 3CX Phone System.
The network diagram provides for the location of the 3CX server on the router's NAT in the network 192.168.0.0 / 24. The IP address of the router is 192.168.0.1, and the IP address of the 3CX server is 192.168.0.2

Router Preparation
First of all, it is necessary to update the firmware of TL-ER6020, because, as it turned out , even the latest firmware from the official TP-Link website has an error that does not allow you to disable SIP ALG . Disabling SIP ALG is critical for the correct operation of various SIP operators with 3CX.
- Go to the router interface at 192.168.0.1 (the default address) with the username and password admin / admin
- Download firmware and upgrade router

- After the update, it is recommended that you reset the device to the default settings.
Router setup
Configuring a router consists of three steps:
- Connection of at least one WAN port to the Internet
- Disabling SIP ALG Service
- Publishing services (port forwarding) through NAT, necessary for the full operation of 3CX Phone System
- Advanced firewall setup for added security
- Testing the correctness of the TL-ER6020 setup by an incoming and outgoing SIP call
Connecting the router to the Internet
Connection of one (or both) WAN ports to the Internet is done in the Network - WAN section . At the bottom of the interface, you can check the connection status. This example uses a PPPoE connection.

Disabling SIP ALG Service
Disable SIP ALG in the Advanced - NAT - ALG section .

Services publishing (port forwarding) through NAT
For the external SIP trunks to work correctly, it is necessary to publish a number of ports of the 3CX Phone System server :
- 5060 TCP / UDP - SIP
- 5090 TCP / UDP - 3CX Tunnel
- 5000, 5001 (for the Abyss web server) or 80 and 443 (for the IIS server) TCP - 3CXPhone advanced management and IP phones auto-tuning
- 9000-9500 UDP - RTP and WebRTC media stream
Services are published in the Advanced - NAT - Virtual Server section . Let's start with the SIP server. After publishing all services, the interface should look something like this.


Configuring a firewall for enhanced security
Publication of services as implemented in TL-ER6020 raises fair concerns: we are opening the SIP port 5060, which hackers like so much, in fact, for the whole world. There is no way in the publishing interface to specify for which IP addresses the SIP port of the 3CX server should be opened.
Our strong recommendation: open port 5060 only for SIP addresses of telecom operators / SIP providers your system works with.
In our example, the system works with the Russian operator Megafon (Multifon service) and the Ukrainian operator Kyivstar, while Megafon uses different IP addresses for the SIP server and SIP proxy , and Kyivstar is the only SIP server.
First, we define the services / port ranges, access to which should be limited in the sectionFirewall - Access Control - Service . Here we have identified only SIP port 5060 and RTP ports 9000-9255 . Since the rest of the 3CX services should be available for any IP address on the Internet and there is no need to restrict access to them. In the Firewall - Access Control - Access Rules section, add firewall rules that allow access to certain 3CX services only from certain SIP addresses. It is also necessary to add one general prohibitory rule restricting access to the specified ports to all Internet addresses. Please note - this rule should be the last in the list. The final list of rules should look like this. The second part of the list with a general prohibiting rule.


Testing Settings
To check the correct operation of the firewall, make outgoing and incoming calls. The call must be successful, the audibility must be two-way and there should be no disconnection after 32 seconds .
Conclusion
Configuring the TP-Link TL-ER6020 VPN router to work with the 3CX Phone System is a fairly simple process, but it requires some features that we have encountered. It is also desirable to have an understanding of the basic principles of VoIP technology.
In this guide, we did not consider such an interesting TL-ER6020 feature as WAN link redundancy. This feature allows you to ensure uninterrupted VoIP connection even in the event of a “drop” in the main Internet connection. However, keep in mind that such redundancy places certain requirements on the SIP connections used:

- It is recommended to use SIP connections with authorization by username and password. In this case, when you disconnect the main Internet channel, the SIP connection is automatically re-registered through the second operator.
- If you are using a SIP line with authorization by IP address (SIP trunk), ask the operator to authorize the IP address of the backup Internet connection. After that, the operator will be able to receive and route calls through this connection.
Additional Information
- Ports Used in 3CX Phone System
- SIP and RTP traffic passing
- Guidelines for Configuring Various Firewalls for 3CX Phone System
- TP-Link Technical Support Forum
- 3CX Remote Firewall Checker Utility to Detect Firewall Issues
