Intercepting everything with CoordinatorLayout Behavior
I bring to your attention a translation of the article Ian Lake Intercepting everything with Coordinator Layout Behaviors .
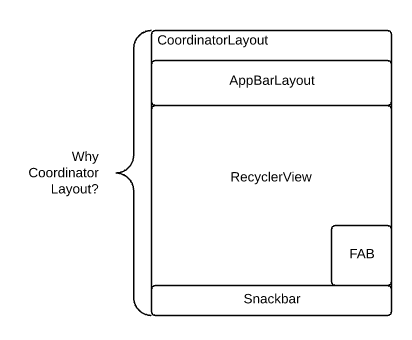
You will not go far in learning the Android Design Support Library without having to deal with CoordinatorLayout . Many View from Design Library require CoordinatorLayout. But why? CoordinatorLayout itself does not do much, if you use it with View, which is part of the Android framework, it will work like a regular FrameLayout. So where does all his magic come from? This is where CoordinatorLayout.Behavior enters the scene.. By connecting Behavior to a child View of CoordinatorLayout, you can capture touches, window insets, resizing and layout (measurement and layout), as well as nested scrolling. Design Library makes extensive use of Behavior to add strength to most of the functionality you see.
Creating Behavior is quite simple: we inherit our class from Behavior:
Note the generic type specified in this class. In this case, we indicate that we can connect FancyBehavior to any View. However, if you want to allow your Behavior to be connected to a specific View type, you can write this:
This can save you from casting a large number of parameters in methods to the View subtype you need - simply and conveniently.
There are methods to save both temporary Behavior.setTag () / Behavior.getTag () data and save the state of a Behavior instance using onSaveInstanceState () / onRestoreInstanceState () . I urge you to create Behavior as easy as possible, but these methods allow you to create Behavior with the ability to save state.
Of course, Behavior does not do anything on its own, so that we can use it, it must be connected to a child View of CoordinatorLayout. There are three main ways to do this: programmatically, in XML, or automatically using annotation.
When you think of Behavior as something additionally connected to each View inside CoordinatorLayout, it should not surprise you (if you read our post about layouts ) that Behavior is actually stored in LayoutParams of each View - that’s why Behavior should be declared View has a CoordinatorLayout inside, since only these View have a specific subtype of LayoutParams that can store Behavior.
As you can see, in this case we use the usual empty constructor. But this does not mean that you cannot create a constructor that takes as many parameters as you want. When you do something through code, there is no limit to possibilities.
Of course, if you constantly do everything through code, it can cause a mess. As with most custom LayoutParams, there is a corresponding layout_ attribute to do the same. In our case, this is the layout_behavior attribute:
Here, unlike the programming method, the FancyBehavior constructor (Context context, AttributeSet attrs) will always be called . But, as a bonus, you can declare any other custom attributes and extract them from the XML AttributeSet, this is important if you want (and you want to) let other developers customize the functionality of your Behavior through XML.
Note : similar to the naming convention for layout_ attributes that the parent class must be able to analyze and understand, use the behavior_ prefix for any attributes used inside Behavior.
If you create your own View, which needs its own Behavior (as was the case with most components in the Design Library), then you most likely want to enable Behavior by default, without constant manual connection via code or XML. To do this, you just need to add a simple annotation on top of the class of your View:
You will notice that your Behavior will be called using the standard empty constructor, making this method similar to the Behavior programmatic connection. Note that any layout_behavior attribute will override DefaultBehavior .
Once you plug in Behavior, you are ready for action. One of Behavior's abilities is intercepting touches.
Without a CoordinatorLayout , this usually involved subclassing each ViewGroup, as said in Managing Touch Events training . However, in the case of CoordinatorLayout , he will pass method calls onInterceptTouchEvent () method onInterceptTouchEvent () Your Behavior, allowing your Behavior intercept touch . If you return true in this method , then your Behavior will receive all subsequent touches using the onTouchEvent () method - all this happens in secret from View. For example, this is how SwipeDismissBehavior works .with any view.
There is another, more complicated case of intercepting touches - blocking any interaction. It is enough to return true in the blocksInteractionBelow () method . Most likely, you will want to somehow visually show that the interaction is blocked (so that users do not think that the application is broken) - this is why the standard blocksInteractionBelow () functionality depends on the value of getScrimOpacity () . Returning a non-zero value, draw a color ( getScrimColor () , black by default) on top of the View at once and turn off touch interactions. Conveniently.
Say you read the blog Why would I want to fitsSystemWindows? . There we discussed in detail what fitsSystemWindows does , but it all came down to presenting window insets necessary to avoid drawing under system windows (such as the status bar and navigation bar). Behavior can prove itself here. If your View fitsSystemWindows = “true” , then any connected Behavior will receive a call to the onApplyWindowInsets () method , in priority over the View itself.
Note : in most cases, if your Behavior does not handle the entire window inserts, it should pass these inserts using ViewCompat.dispatchApplyWindowInsets ()to make sure that all children of the View will be able to see WindowInsets.
These are two key components in how Android draws View . Therefore, it makes sense that Behavior, as an interceptor of all events, is also the first to receive notifications about resizing and layout by calling the onMeasureChild () and onLayoutChild () methods .
For example, let's take any generic ViewGroup and add maxWidth to it. As shown in the MaxWidthBehavior.java class .
Creating a generic Behavior that can work with any View is quite convenient. But remember that you can simplify your life by considering whether Behavior will be used only inside your application (not all Behavior must be generic!).
Everything described above requires one single View. But the real power of Behavior is manifested in building dependencies between the View, that is, when one View changes, your Behavior receives a notification about it and changes its functionality depending on external conditions.
Behavior can make View dependent on each other in two different ways: when the View is anchor to another View (implied dependency) or when you explicitly return true in the layoutDependsOn () method .
A bundle occurs when your View inside the CoordinatorLayout uses the layout_anchor attribute. This attribute combined with layout_anchorGravity, allows you to effectively link the position of two View together. For example, you can associate a FloatingActionButton with an AppBarLayout , then FloatingActionButton.Behavior will use an implicit dependency to hide the FAB if the AppBarLayout is scrolled off the screen.
In any case, your Behavior will receive calls to the onDependentViewRemoved () method when the dependent View has been deleted and onDependentViewChanged () , each time the dependent View has been resized (size or position changed).
Most of the cool Design Library functionality works thanks to the ability to bundle View together. Take for example the interaction betweenFloatingActionButton and Snackbar . The FAB's Behavior depends on the Snackbar instances added to the CoordinatorLayout , then, using the onDependentViewChanged () method call , moves the FAB higher to prevent Snackbar from overlapping . Note : when you add a dependency, the View will always be placed after the dependent View, regardless of the sequence in the markup.
Oh, nested scroll. I will only touch on this topic in a post. There are a few things to keep in mind:
Nested scroll events start with the onStartNestedScroll () method . You will get the scroll axis (horizontal or vertical - we can easily ignore scrolling in a certain direction) and must return true in order to receive further scroll events .
After you return true in the onStartNestedScroll () method , nested scrolling works in two stages:
There are similar methods for fast scrolling (but the pre-fling processing method should either handle all scrolling or not at all).
When the nested (or fast) scroll ends, you will receive a call to the onStopNestedScroll () method . This indicates the end of the scroll and the expectation of a new call to the onStartNestedScroll () method before starting a new scroll.
Take for example the case when you want to hide a FloatingActionButton , when we scroll down and show FAB when we scroll up. To do this, you need to override the onStartNestedScroll () and onNestedScroll () methods , as seen in ScrollAwareFABBehavior .
If every single part of Behavior is only interesting, then when they are all together, magic begins. I highly recommend looking at the Design Library source code for more features. The Chrome Extension for Android SDK Search is still one of my favorite resources for researching AOSP code (Android Open Source Project). Other than that, you can find the latest source code versions along the way./ extras / android / m2repository .
Let me know how you use the basics about what the Behavior hashtag #BuildBetterApps can do.
Join the discussion on Google+ and subscribe to the Android Development Patterns Collection for even more information!
You will not go far in learning the Android Design Support Library without having to deal with CoordinatorLayout . Many View from Design Library require CoordinatorLayout. But why? CoordinatorLayout itself does not do much, if you use it with View, which is part of the Android framework, it will work like a regular FrameLayout. So where does all his magic come from? This is where CoordinatorLayout.Behavior enters the scene.. By connecting Behavior to a child View of CoordinatorLayout, you can capture touches, window insets, resizing and layout (measurement and layout), as well as nested scrolling. Design Library makes extensive use of Behavior to add strength to most of the functionality you see.
Behavior Creation
Creating Behavior is quite simple: we inherit our class from Behavior:
Behavior Creation Example
public class FancyBehavior
    extends CoordinatorLayout.Behavior {
  /**
   * Конструктор для создания экземпляра FancyBehavior через код.
   */
  public FancyBehavior() {
  }
  /**
   * Конструктор для создания экземпляра FancyBehavior через разметку.
   *
   * @param context The {@link Context}.
   * @param attrs The {@link AttributeSet}.
   */
  public FancyBehavior(Context context, AttributeSet attrs) {
    super(context, attrs);
    // Извлекаем любые пользовательские атрибуты
    // в идеале с префиксом behavior_
    // чтобы обозначить принадлежность атрибута к Behavior
  }
}
Note the generic type specified in this class. In this case, we indicate that we can connect FancyBehavior to any View. However, if you want to allow your Behavior to be connected to a specific View type, you can write this:
public class FancyFrameLayoutBehavior
    extends CoordinatorLayout.Behavior
This can save you from casting a large number of parameters in methods to the View subtype you need - simply and conveniently.
There are methods to save both temporary Behavior.setTag () / Behavior.getTag () data and save the state of a Behavior instance using onSaveInstanceState () / onRestoreInstanceState () . I urge you to create Behavior as easy as possible, but these methods allow you to create Behavior with the ability to save state.
Behavior Connection
Of course, Behavior does not do anything on its own, so that we can use it, it must be connected to a child View of CoordinatorLayout. There are three main ways to do this: programmatically, in XML, or automatically using annotation.
Software Connection Behavior
When you think of Behavior as something additionally connected to each View inside CoordinatorLayout, it should not surprise you (if you read our post about layouts ) that Behavior is actually stored in LayoutParams of each View - that’s why Behavior should be declared View has a CoordinatorLayout inside, since only these View have a specific subtype of LayoutParams that can store Behavior.
FancyBehavior fancyBehavior = new FancyBehavior();
CoordinatorLayout.LayoutParams params =
    (CoordinatorLayout.LayoutParams) yourView.getLayoutParams();
params.setBehavior(fancyBehavior);
As you can see, in this case we use the usual empty constructor. But this does not mean that you cannot create a constructor that takes as many parameters as you want. When you do something through code, there is no limit to possibilities.
Connecting Behavior via XML
Of course, if you constantly do everything through code, it can cause a mess. As with most custom LayoutParams, there is a corresponding layout_ attribute to do the same. In our case, this is the layout_behavior attribute:
Here, unlike the programming method, the FancyBehavior constructor (Context context, AttributeSet attrs) will always be called . But, as a bonus, you can declare any other custom attributes and extract them from the XML AttributeSet, this is important if you want (and you want to) let other developers customize the functionality of your Behavior through XML.
Note : similar to the naming convention for layout_ attributes that the parent class must be able to analyze and understand, use the behavior_ prefix for any attributes used inside Behavior.
Automatic Behavior Connection
If you create your own View, which needs its own Behavior (as was the case with most components in the Design Library), then you most likely want to enable Behavior by default, without constant manual connection via code or XML. To do this, you just need to add a simple annotation on top of the class of your View:
@CoordinatorLayout.DefaultBehavior(FancyFrameLayoutBehavior.class)
public class FancyFrameLayout extends FrameLayout {
}
You will notice that your Behavior will be called using the standard empty constructor, making this method similar to the Behavior programmatic connection. Note that any layout_behavior attribute will override DefaultBehavior .
Touch interception
Once you plug in Behavior, you are ready for action. One of Behavior's abilities is intercepting touches.
Without a CoordinatorLayout , this usually involved subclassing each ViewGroup, as said in Managing Touch Events training . However, in the case of CoordinatorLayout , he will pass method calls onInterceptTouchEvent () method onInterceptTouchEvent () Your Behavior, allowing your Behavior intercept touch . If you return true in this method , then your Behavior will receive all subsequent touches using the onTouchEvent () method - all this happens in secret from View. For example, this is how SwipeDismissBehavior works .with any view.
There is another, more complicated case of intercepting touches - blocking any interaction. It is enough to return true in the blocksInteractionBelow () method . Most likely, you will want to somehow visually show that the interaction is blocked (so that users do not think that the application is broken) - this is why the standard blocksInteractionBelow () functionality depends on the value of getScrimOpacity () . Returning a non-zero value, draw a color ( getScrimColor () , black by default) on top of the View at once and turn off touch interactions. Conveniently.
Interception of window inserts
Say you read the blog Why would I want to fitsSystemWindows? . There we discussed in detail what fitsSystemWindows does , but it all came down to presenting window insets necessary to avoid drawing under system windows (such as the status bar and navigation bar). Behavior can prove itself here. If your View fitsSystemWindows = “true” , then any connected Behavior will receive a call to the onApplyWindowInsets () method , in priority over the View itself.
Note : in most cases, if your Behavior does not handle the entire window inserts, it should pass these inserts using ViewCompat.dispatchApplyWindowInsets ()to make sure that all children of the View will be able to see WindowInsets.
Interception Measurement and Layout
These are two key components in how Android draws View . Therefore, it makes sense that Behavior, as an interceptor of all events, is also the first to receive notifications about resizing and layout by calling the onMeasureChild () and onLayoutChild () methods .
For example, let's take any generic ViewGroup and add maxWidth to it. As shown in the MaxWidthBehavior.java class .
Creating a generic Behavior that can work with any View is quite convenient. But remember that you can simplify your life by considering whether Behavior will be used only inside your application (not all Behavior must be generic!).
Understanding Dependencies Between View
Everything described above requires one single View. But the real power of Behavior is manifested in building dependencies between the View, that is, when one View changes, your Behavior receives a notification about it and changes its functionality depending on external conditions.
Behavior can make View dependent on each other in two different ways: when the View is anchor to another View (implied dependency) or when you explicitly return true in the layoutDependsOn () method .
A bundle occurs when your View inside the CoordinatorLayout uses the layout_anchor attribute. This attribute combined with layout_anchorGravity, allows you to effectively link the position of two View together. For example, you can associate a FloatingActionButton with an AppBarLayout , then FloatingActionButton.Behavior will use an implicit dependency to hide the FAB if the AppBarLayout is scrolled off the screen.
In any case, your Behavior will receive calls to the onDependentViewRemoved () method when the dependent View has been deleted and onDependentViewChanged () , each time the dependent View has been resized (size or position changed).
Most of the cool Design Library functionality works thanks to the ability to bundle View together. Take for example the interaction betweenFloatingActionButton and Snackbar . The FAB's Behavior depends on the Snackbar instances added to the CoordinatorLayout , then, using the onDependentViewChanged () method call , moves the FAB higher to prevent Snackbar from overlapping . Note : when you add a dependency, the View will always be placed after the dependent View, regardless of the sequence in the markup.
Nested scroll
Oh, nested scroll. I will only touch on this topic in a post. There are a few things to keep in mind:
- You should not declare dependencies on View with nested scroll. Each View inside CoordinatorLayout can receive nested scroll events.
- Nested scrolling can occur not only in the View inside the CoordinatorLayout , but also in any child View (for example, the “child” of the “child” of the “child” of the CoordinatorLayout ).
- I will call this nested scrolling, but in fact it will mean simply scrolling and fast scrolling (fling).
Nested scroll events start with the onStartNestedScroll () method . You will get the scroll axis (horizontal or vertical - we can easily ignore scrolling in a certain direction) and must return true in order to receive further scroll events .
After you return true in the onStartNestedScroll () method , nested scrolling works in two stages:
- onNestedPreScroll () is called before the scrollable View receives a scroll event and allows your Behavior to process part or all of the scroll (the last int [] parameter is an “outgoing” parameter where you can specify which part of the scroll Behavior processed).
- onNestedScroll () is called as soon as the scrollable View has been scrolled. You will get a value as far as View has been scrolled and raw values.
There are similar methods for fast scrolling (but the pre-fling processing method should either handle all scrolling or not at all).
When the nested (or fast) scroll ends, you will receive a call to the onStopNestedScroll () method . This indicates the end of the scroll and the expectation of a new call to the onStartNestedScroll () method before starting a new scroll.
Take for example the case when you want to hide a FloatingActionButton , when we scroll down and show FAB when we scroll up. To do this, you need to override the onStartNestedScroll () and onNestedScroll () methods , as seen in ScrollAwareFABBehavior .
And this is just the beginning
If every single part of Behavior is only interesting, then when they are all together, magic begins. I highly recommend looking at the Design Library source code for more features. The Chrome Extension for Android SDK Search is still one of my favorite resources for researching AOSP code (Android Open Source Project). Other than that, you can find the latest source code versions along the way.
Let me know how you use the basics about what the Behavior hashtag #BuildBetterApps can do.
Join the discussion on Google+ and subscribe to the Android Development Patterns Collection for even more information!