What's New in Veeam Backup & Replication 9.0: Improving Backup Creation and Storage Efficiency
In this post, I’ll talk about new features that you can enable by upgrading your version of Veeam Backup & Replication to 9.0. Among the variety of new products, I admit, I have several favorites - and although in appearance they may seem inconspicuous, but they bring great benefit, for which I appreciate. Of course, you won’t describe the whole mass within one post, so I’ll immediately give you a link to a full review of new products on the official website: What's New in Veeam Backup & Replication v9 .
Here's what awaits you under the cut:

(The picture shows an exclusive set of cakes that we had on the release day. Thanks to TheRealGostev - I managed to take a picture before everyone grabbed it.)
Last post already had an overview of this new component. I remind you that the console allows you to connect to remote Veeam backup servers; it can be set as a separate setup, there is also an automatic installation (see the description in the User Guide ). Thus, Veeam now supports a fully distributed architecture. In previous versions, the components Veeam.Backup.Service.exe and VeeamShell.exe lived exclusively together, and in v9, the efforts of our engineers managed to finally defeat their interdependence - that is, as TheRealGostev put it , "to separate Siamese twins."

New possibilities have appeared in working with backup repositories.
First, you can now assign a mount server to any repository. This is a Windows server that plays a role in the backup infrastructure - when restoring at the file level (FLR, file-level restore), such a server mounts VM files directly from the backup to its file system, as if "connecting" them to itself. The connection server can be set at the appropriate step ( Mount Server ) of the repository configuration wizard.

There are various options for enabling the mount operation:
Enterprise and Enterprise Plus licensees have the option of creating a scalable repository. This was described in sufficient detail in an article on Habr " about the" infinitely "scalable backup repository ." This repository is easier to manage (since the routine task of selecting the target storage from the pool is automated), in addition, the fuelconsumption of storage space on the storage in the pool is optimized , and performance is improved, because the “per-VM backup chains” mode is enabled by default.

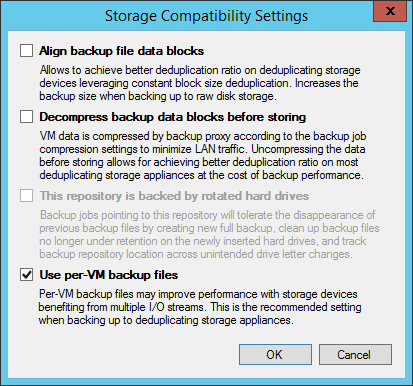
For regular repositories, the option of storing backup copies "per machine" (per-VM backup files) is also offered. When using this option, a recording stream will be generated for each VM (and not for each task). As a result, the queue depth increases, which improves performance, since servicing a single thread (queue depth = 1) is a limiting factor for most storage systems. Creating multiple threads (queue depth ~ = N, that is, the number of tasks on the repository) is very helpful.
In addition, it became possible to create tasks of a larger volume without reservations about the difficulties with controlling large backups. With the release of v9, our system architects are preparing to revise recommendations on the number of VMs included in one task - for example, bringing it to 250-300. In any case, our own testing confirmed the possibility of processing tasks containing 5,000 virtual machines.
Of course, when planning and setting up backup tasks, you need to remember that a number of operations - for example, creating a synthetic backup, Backup Copy Jobs tasks (transferring a backup to a backup site), etc. - will wait for all VMs to complete a backup. For this reason, giant jobs are not recommended.
Important! After you have selected the option of storing backupsUse per VM-backup files , it must be activated by performing the operation of creating an active full backup (Active Full) either in manual mode or after waiting for the scheduled operation.
A couple more points: remember that deduplication on the source side will not go anywhere. And the second - when creating new repositories on storage systems EMC DataDomain (with DDBoost), HP StoreOnce (with Catalyst) and ExaGrid (with Accelerated Data Mover) this option is enabled by default, but just in case, it is recommended to check this, as well as other recommended ones these storage settings.
After the upgrade, new Veeam Backup & Replication features will be disabled by default. To start using them, you must reconfigure existing backup jobs. I note that the first two options from the list below were previously available only for backup copy jobs (Backup Copy Jobs). Now they can be used to create other types of tasks. These new features are:
Defragmentation and compression.Using this option will be useful if your backup job does not include the periodic creation of a full backup (active full backup), and the data storage policy involves periodically combining the full copy file with the nearest incremental backup. Such a transformation leads to the fact that the backup file becomes fragmented and “voids” form in it. Voids are also formed when part of the VM was deleted from the backup job (after they are deleted from the backup, the file itself does not become smaller). To reduce the file size, as well as slightly increase the speed of working with it, you can enable the Defragment and compact full backup file option. It works as follows: at the specified time, Veeam Backup & Replication will create an empty VBK file and copy only the necessary blocks from the backup file resulting from the transformations there. There are restrictions for this option, which are described in the User Guide .
Health check and self-healing. To make sure that the backups are not corrupted, in addition to SureBackup, you can activate the Perform backup files health check option.. In this case, when creating each backup, Veeam Backup & Replication will calculate the hash and checksum of the created file. Then, before starting the next backup, Veeam Backup & Replication will recalculate the hash and checksum of the file and compare it with the previously saved values. If it is found that the file data has been corrupted, Veeam Backup & Replication will replace the corrupted blocks by copying the required data from the original VM or from the previous backup.

Exclude blocks marked as deleted.When deleting files in NTFS, you do not actually clear the data blocks that contain the file, but mark them as deleted. Therefore, when creating a backup image of a VM image (image-based backup), the size of the backup file can greatly exceed the size displayed in the file system. Until recently, the only way to avoid copying “deleted” data was to use the sdelete utility (SysInternals) before starting the backup. In Veeam Backup & Replication v9, you can enable the BitLooker option so that before starting a backup, Veeam analyzes the MFT partition and does not copy blocks marked as deleted.

In article “ Veeam Backup FREE Edition: New Version Released: Overview»Describes in more detail how BitLooker works. This technology is currently pending patent.
Important! In the commercial version of Veeam Backup & Replication, after upgrade this option is disabled by default - it is convenient to activate it using PowerShell commands:
Optimization of interaction with guest OS. In the backup infrastructure built on the basis of Veeam Backup & Replication v9, a new component has appeared - Guest Interaction Proxy. It is intended for the interaction of the backup server with the guest OS (earlier this interaction was carried out by the backup server itself, which greatly increased the load on it). If you configure automatic machine selection for the Guest Interaction Proxy role, Veeam will select a less loaded machine located on the same site as the VM for which you plan to back up. This approach simplifies backups at remote offices and branches (components interact faster when they are on the same site) and does not require the use of VMware VIX.

Exclusion of unnecessary files during backup. This feature is part of BitLooker technology: when backing up, Veeam also analyzes the MFT partition and creates a cache in the proxy server’s memory, in which it marks which files and folders to exclude. During the backup, data is read simultaneously from the source VM and from the cache. It is important to note that file exclusion is only possible if you have activated the backup option taking into account the state of applications (application-aware image processing). Moreover, the exclusion of many small files is processed more slowly than the exclusion of several large files of the same size, because the exception handling increases the load on the proxy server. For example, to exclude 100,000 files from a backup, you will need 400 MB of memory on the proxy server.

Well, another operation is now automated - earlier, to create a full backup for the backup copy job, users used the PowerShell script, and now you can simply check the Read the entire restore point from source backup instead of synthesizing it from increments step Target when setting up a job.
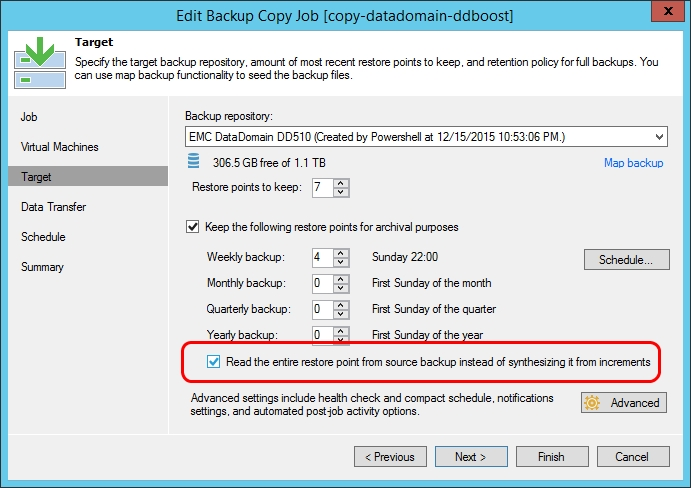
This option is useful for storage systems with low performance, on which converting files, synthesizing a full backup from incremental ones, is inefficient, and much more convenient to copy a full backup.
In addition to the above links, I recommend reading it (so far in English):
Resources in Russian:
Here's what awaits you under the cut:
- Remote Management Console
- New repository features
- New data storage features
- Optimization of work with guest OS
- Configure full backup copying in transfer job
(The picture shows an exclusive set of cakes that we had on the release day. Thanks to TheRealGostev - I managed to take a picture before everyone grabbed it.)
Remote Management Console
Last post already had an overview of this new component. I remind you that the console allows you to connect to remote Veeam backup servers; it can be set as a separate setup, there is also an automatic installation (see the description in the User Guide ). Thus, Veeam now supports a fully distributed architecture. In previous versions, the components Veeam.Backup.Service.exe and VeeamShell.exe lived exclusively together, and in v9, the efforts of our engineers managed to finally defeat their interdependence - that is, as TheRealGostev put it , "to separate Siamese twins."
New repository features
New possibilities have appeared in working with backup repositories.
First, you can now assign a mount server to any repository. This is a Windows server that plays a role in the backup infrastructure - when restoring at the file level (FLR, file-level restore), such a server mounts VM files directly from the backup to its file system, as if "connecting" them to itself. The connection server can be set at the appropriate step ( Mount Server ) of the repository configuration wizard.
There are various options for enabling the mount operation:
- So, to restore the files or objects of the application, the installation is first performed on the machine where the console is running - so that the user can view the contents of the backup and select the files / objects necessary for recovery, because the viewing tools are launched from the console (it doesn’t matter whether it is offline or combined with the server), be it Veeam Backup Browser or any of the Veeam Explorers tools.
- After the command to restore the selected files / objects is given (usually to the machine in production), the connection server will start working with the repository and the traffic will go between it and the target machine. This will accelerate recovery in distributed infrastructures.
- If you perform recovery using Enterprise Manager and do it for machines whose guest OS files were indexed during backup, then only one connection will be involved (both for viewing and for recovery), so in this case traffic will always go between connection server and target VM.
Enterprise and Enterprise Plus licensees have the option of creating a scalable repository. This was described in sufficient detail in an article on Habr " about the" infinitely "scalable backup repository ." This repository is easier to manage (since the routine task of selecting the target storage from the pool is automated), in addition, the fuel
For regular repositories, the option of storing backup copies "per machine" (per-VM backup files) is also offered. When using this option, a recording stream will be generated for each VM (and not for each task). As a result, the queue depth increases, which improves performance, since servicing a single thread (queue depth = 1) is a limiting factor for most storage systems. Creating multiple threads (queue depth ~ = N, that is, the number of tasks on the repository) is very helpful.
In addition, it became possible to create tasks of a larger volume without reservations about the difficulties with controlling large backups. With the release of v9, our system architects are preparing to revise recommendations on the number of VMs included in one task - for example, bringing it to 250-300. In any case, our own testing confirmed the possibility of processing tasks containing 5,000 virtual machines.
Of course, when planning and setting up backup tasks, you need to remember that a number of operations - for example, creating a synthetic backup, Backup Copy Jobs tasks (transferring a backup to a backup site), etc. - will wait for all VMs to complete a backup. For this reason, giant jobs are not recommended.
Important! After you have selected the option of storing backupsUse per VM-backup files , it must be activated by performing the operation of creating an active full backup (Active Full) either in manual mode or after waiting for the scheduled operation.
A couple more points: remember that deduplication on the source side will not go anywhere. And the second - when creating new repositories on storage systems EMC DataDomain (with DDBoost), HP StoreOnce (with Catalyst) and ExaGrid (with Accelerated Data Mover) this option is enabled by default, but just in case, it is recommended to check this, as well as other recommended ones these storage settings.
New data storage features
After the upgrade, new Veeam Backup & Replication features will be disabled by default. To start using them, you must reconfigure existing backup jobs. I note that the first two options from the list below were previously available only for backup copy jobs (Backup Copy Jobs). Now they can be used to create other types of tasks. These new features are:
Defragmentation and compression.Using this option will be useful if your backup job does not include the periodic creation of a full backup (active full backup), and the data storage policy involves periodically combining the full copy file with the nearest incremental backup. Such a transformation leads to the fact that the backup file becomes fragmented and “voids” form in it. Voids are also formed when part of the VM was deleted from the backup job (after they are deleted from the backup, the file itself does not become smaller). To reduce the file size, as well as slightly increase the speed of working with it, you can enable the Defragment and compact full backup file option. It works as follows: at the specified time, Veeam Backup & Replication will create an empty VBK file and copy only the necessary blocks from the backup file resulting from the transformations there. There are restrictions for this option, which are described in the User Guide .
Health check and self-healing. To make sure that the backups are not corrupted, in addition to SureBackup, you can activate the Perform backup files health check option.. In this case, when creating each backup, Veeam Backup & Replication will calculate the hash and checksum of the created file. Then, before starting the next backup, Veeam Backup & Replication will recalculate the hash and checksum of the file and compare it with the previously saved values. If it is found that the file data has been corrupted, Veeam Backup & Replication will replace the corrupted blocks by copying the required data from the original VM or from the previous backup.
Exclude blocks marked as deleted.When deleting files in NTFS, you do not actually clear the data blocks that contain the file, but mark them as deleted. Therefore, when creating a backup image of a VM image (image-based backup), the size of the backup file can greatly exceed the size displayed in the file system. Until recently, the only way to avoid copying “deleted” data was to use the sdelete utility (SysInternals) before starting the backup. In Veeam Backup & Replication v9, you can enable the BitLooker option so that before starting a backup, Veeam analyzes the MFT partition and does not copy blocks marked as deleted.
In article “ Veeam Backup FREE Edition: New Version Released: Overview»Describes in more detail how BitLooker works. This technology is currently pending patent.
Important! In the commercial version of Veeam Backup & Replication, after upgrade this option is disabled by default - it is convenient to activate it using PowerShell commands:
asnp VeeamPSSnapin; Foreach ($job in Get-VBRJob) {

$job.Options.ViSourceOptions.DirtyBlocksNullingEnabled = $true;

$job.SetOptions($job.Options) }
New features for working with guest OS
Optimization of interaction with guest OS. In the backup infrastructure built on the basis of Veeam Backup & Replication v9, a new component has appeared - Guest Interaction Proxy. It is intended for the interaction of the backup server with the guest OS (earlier this interaction was carried out by the backup server itself, which greatly increased the load on it). If you configure automatic machine selection for the Guest Interaction Proxy role, Veeam will select a less loaded machine located on the same site as the VM for which you plan to back up. This approach simplifies backups at remote offices and branches (components interact faster when they are on the same site) and does not require the use of VMware VIX.
Exclusion of unnecessary files during backup. This feature is part of BitLooker technology: when backing up, Veeam also analyzes the MFT partition and creates a cache in the proxy server’s memory, in which it marks which files and folders to exclude. During the backup, data is read simultaneously from the source VM and from the cache. It is important to note that file exclusion is only possible if you have activated the backup option taking into account the state of applications (application-aware image processing). Moreover, the exclusion of many small files is processed more slowly than the exclusion of several large files of the same size, because the exception handling increases the load on the proxy server. For example, to exclude 100,000 files from a backup, you will need 400 MB of memory on the proxy server.
Configure full backup copying in transfer job
Well, another operation is now automated - earlier, to create a full backup for the backup copy job, users used the PowerShell script, and now you can simply check the Read the entire restore point from source backup instead of synthesizing it from increments step Target when setting up a job.
This option is useful for storage systems with low performance, on which converting files, synthesizing a full backup from incremental ones, is inefficient, and much more convenient to copy a full backup.
Instead of a conclusion
In addition to the above links, I recommend reading it (so far in English):
- Description of the backup process per VM-backup
- What is a mount server and how does it work
- About optimization of work with guest OS
Resources in Russian: