Creating a 2D tile map in QML. Part 1
- Tutorial

The first thought that visited me was: “what, in fact, is this difficult?”
Well, it seems, nothing:
• you create an array of textures,
• indicate the size of the map,
• you cycle through the array, creating objects.
That's exactly what I did from the very beginning ...
Small digression
I don’t want to go into the details of what tiles are, and the article is not about that. It is assumed that the reader already has some idea of what isometrics in games are, what are tiles, what are they and how are they drawn. I only recall that an elementary isometric tile is created in a ratio of 2 to 1, that is, if the width of the tile is 2 units, then its height should be 1 unit.
I want to note that my project will use pseudo-3D tiles with dimensions of 1 to 1. They look like this:
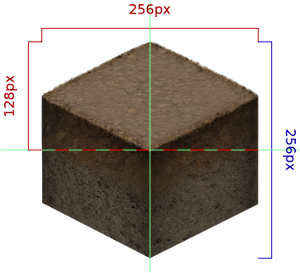
but only half of this “cube” will be used (highlighted in red). So far, I have not come up with the use of the clipped bottom, but most likely in the future it will be used for mountains, recesses or banal cliffs of maps. Then you probably have to use the z-index ... but that's another story
ps. at the end of the article there is a project source
First steps
This is how the code looked at the very beginning of my path:
property int mapcols: 4 // кол-во тайлов по x (столбцы)
property int maprows: mapcols * 3 // кол-во тайлов по y (строки)
// число 3 выбрано не случайно: таким образом
// визуально можно создать более-менее квадратный кусочек карты
function createMap() {
  // для того чтобы не использовать цикл в цикле - по столбцам и строкам
  // (ну не нравятся они мне!),
  // считаем сколько всего предстоит создать тайлов
  var tilecount = mapcols * maprows
  // а теперь создаем их
  for(var tileid = 0; tileid < tilecount; tileid++) {
    // узнаем к какой колонке и строке относится тайл
    var col = tileid % mapcols
    var row = Math.floor(tileid / mapcols)
    // определяем чётность строки
    // необходимо для того, чтобы правильно расположить нечетные тайлы
    // так как рисуются они не друг под другом, а по диагонали
    var iseven = !(row&1)
    // вычисляем позицию тайла
    var tx = iseven ? col * tilesizew : col * tilesizew + tilesizew/2
    var ty = iseven ? row * tilesizeh : row * tilesizeh - tilesizeh/2
    ty -= Math.floor(row/2) * tilesizeh
    // создаем компонент, передав ему все полученные параметры
    var component = Qt.createComponent("Tile.qml");
    var tile = component.createObject(mapitem, {
                                        "x": tx,
                                        "y": ty,
                                        "z": tileid,
                                        "col": col,
                                        "row": row,
                                        "id": tileid
                                    });
  }
}
That's all. With a minimum of effort, I managed to create such a nice map: I will not write the

contents of Tile.qml , because in the future we will not need this component at all. And all because doing so is completely not worth it!
Let me explain: by drawing a 4x12 map ( mapcols * maprows ) 48 objects were created. But such a playing field is obviously too small. If you draw a larger field, for example, with a width of 20 tiles, then its height will be 60 tiles, and this is 1200 visual objects ! It is not difficult to imagine how much memory will be used to store so many objects. In a word - a lot.
Reflections
We did not have to think long about a new method for creating a map. First of all, the main parameters of the map that were to be achieved in the new method were identified:
1. the map must be movable (the player can scroll the map in any direction);
2. objects located outside the window should not be drawn;
3. the method should be as simple as possible to implement%)
The first Wishlist is very easy to implement using the Flickable element . Why not? You won’t need to bother with scrolling, catching events and ... in general, you don’t have to bother at all, which fully satisfies the third point :-) the element will be named map_area - map_area.
To give flickablethe ability to move the map, you must create an element in the flick, with dimensions equal to the full size of the map in pixels. For this, the usual Item is suitable - this element is not visual, so its size does not affect the amount of memory consumed. He will bear the key name map - map.
To draw textures, you must use an additional element, which should be located inside the map element . At the same time, its size must correspond to the size of map_area , and in order for this element to always be "in sight", it must be moved to the side opposite to the map scroll. Those. if the user moves the map to the left, this element should move to the right and redraw.
To implement this idea, the Image bundle with QQuickImageProvider could be suitable , but their capabilities are rather scarce, so you will have to create your own component, resorting to the dark side - C ++ . The future item will be the descendant of QQuickPaintedItem and it will be named MapProvider .
From simple to ... simple
In my view, it looked something like this:

In the code, it looks like this:
Window {
    id: root
    visible: true
    width: 600
    height: 600
    // размеры тайла
    // все помнят, что он квадратный? Именно поэтому необходимо уточнить
    // "видимую" часть тайла, а именно размер по ширине и по высоте
    property double tilesize: 128
    property double tilesizew: tilesize
    property double tilesizeh: tilesizew / 2
    // количество тайлов по X и по Y (столбцы и строки соотв.)
    property int mapcols: 20
    property int maprows: mapcols * 3
    Flickable {
        id: maparea
        width: root.width
        height: root.height
        contentWidth: map.width
        contentHeight: map.height
        Item {
            id: map
            width: mapcols * tilesizew
            height: maprows * tilesizeh
            Item /*MapProvider*/ {
                id: mapprovider
            }
        }
    }
}
This code will be the skeleton for further work. The next step is to create the MapProvider element . To do this, create a new C ++ class in the project:
class MapProvider : public QQuickPaintedItem {
    Q_OBJECT
public:
    MapProvider(QQuickItem *parent = 0);
    void paint(QPainter *painter) {
        // вся магия будет происходить тут
    }
};
Immediately register this element in QML , for this we correct main.cpp . Its contents should be something like this:
#include
#include
#include "mapprovider.h"
int main(int argc, char *argv[])
{
    QGuiApplication app(argc, argv);
    // добавлена эта строка:
    qmlRegisterType("game.engine", 1, 0, "MapProvider");
    QQmlApplicationEngine engine;
    engine.load(QUrl(QStringLiteral("qrc:/main.qml")));
    return app.exec();
}
After saving the changes, this element can be used in QML .
To do this, add the module import to main.qml :
import game.engine 1.0
and replace the line
Item /*MapProvider*/ {
on the
MapProvider {
In order to clearly show how the method will work, I created 2 additional elements on the form: inside the window I designated a special area game_area , into which I moved the map_area element . I intentionally made the size of the game area smaller than the size of the form, and to display the boundaries of this area I created a regular Rectangle :
    // количество тайлов по X и по Y (столбцы и строки соотв.)
    property int mapcols: 20
    property int maprows: mapcols * 3
    Item {
        id: gamearea
        width: root.width / 2
        height: root.height / 2
        x: width / 2
        y: height / 2
        clip: false
        Flickable {
            id: maparea
            width: root.width
            height: root.height
            contentWidth: map.width
            contentHeight: map.height
            Item {
                id: map
                width: mapcols * tilesizew
                height: maprows * tilesizeh
                MapProvider {
                    id: mapprovider
                }
            }
        }
    }
    Rectangle {
        id: gameareaborder
        width: gamearea.width
        height: gamearea.height
        x: gamearea.x
        y: gamearea.y
        border.width: 1
        border.color: "red"
        color: "transparent"
    }
}
Wet calculations - a section in which a lot of water
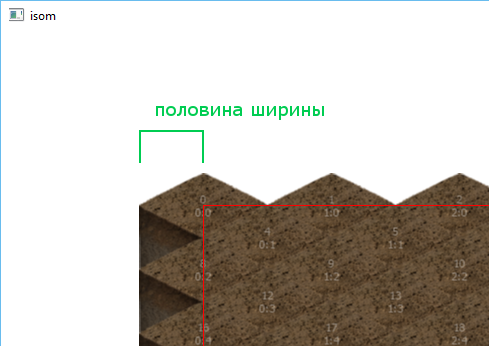
We are almost close to drawing the map, but there are some nuances that are worth paying attention to. And the first candidate to consider is the edges of the map. At us they turn out " toothy ". This could be observed in the previous project, but in the new one it is necessary to get rid of it. To hide toothiness from the left and top, just shift the map ( Item: map ) to the left and up half the width and height of the tile:
            Item {
                id: map
                width: mapcols * tilesizew
                height: maprows * tilesizeh
                x: -tilesizew / 2
                y: -tilesizeh / 2
To hide toothiness on the right and bottom, you just need to limit scrolling by changing the contentWidth and contentHeight parameters . Here it is necessary to take into account the fact that we have already shifted the card to the left and up by half the size, which means that the content size must be reduced by the full tile size:
        Flickable {
            id: maparea
            contentWidth: map.width - tilesizew
            contentHeight: map.height - tilesizeh
The implementation of moving the MapProvider element while scrolling looks like this:
                MapProvider {
                    id: mapprovider
                    width: gamearea.width + tilesizew * 2
                    height: gamearea.height + tilesizeh * 2
                    x: maparea.contentX + (tilesizew/2 - maparea.contentX%tilesizew + map.x)
                    y: maparea.contentY + (tilesizeh/2 - maparea.contentY%tilesizeh + map.y)
creepy :) now I will explain what is happening here.
In fact, our map consists of rectangular blocks in which diamond-shaped tiles are inscribed. Due to this, there is no need to redraw the visible area of the map with the slightest scroll, you can simply select the “ protection zone ” (did not come up with a suitable name) outside the visible area, which will also be drawn together with the entire map, and you will need to redraw the entire map only when scrolling will exceed the size of this zone. Due to this, the number of necessary redraws of the map will decrease by hundreds of times (depending on the size of the tile).
In this code, this “protection zone” is calculated by adding MapProvider to the width and heightdoubled tile size. Thus, we will expand the rendered area to the right and down by exactly 2 tiles. To spread half of this area up and to the left, you need to adjust the content sizes of map_area and the size of the map map :
        Flickable {
            id: maparea
            contentWidth: map.width - tilesizew * 1.5
            contentHeight: map.height - tilesizeh / 2
            /* ... */
            Item {
                id: map
                width: mapcols * tilesizew + tilesizew
                height: maprows * tilesizeh / 2
The formula for calculating the X and Y of the MapProvider element provides it with jump-like movement only when scrolling goes beyond the "protective zone". In the future, a map redraw event will be attached to these jumps.
Closer to the body
So, the calculations on the QML side are over, now you need to decide on a set of additional parameters that will be necessary for the correct rendering of the " body " of the MapProvider element :
1. Actual position of the content in map_area - you will need to calculate the column and line numbers from which the map begins (rendering starts from the top left, so we will find the index of the upper left tile). I gave the names cx and cy to these parameters .
2. Sizes of tiles - necessary for drawing pictures.
3. Dimensions of the map - needed to calculate the real tile index.
4. Actually, the description of the texture map. I have this usual one-dimensional array with the name of the resources.
                MapProvider {
                    id: mapprovider
                    width: gamearea.width + tilesizew*2
                    height: gamearea.height + tilesizeh*2
                    x: maparea.contentX + (tilesizew/2 - maparea.contentX%tilesizew + map.x)
                    y: maparea.contentY + (tilesizeh/2 - maparea.contentY%tilesizeh + map.y)
                    cx: maparea.contentX
                    cy: maparea.contentY
                    tilesize: root.tilesize
                    tilesizew: root.tilesizew
                    tilesizeh: root.tilesizeh
                    mapcols: root.mapcols
                    maprows: root.maprows
                    mapdata: [
                        "0004","0004","0004","0004","0004","0004","0004","0004",
                        "0004","0004","0004","0004","0004","0004","0004","0004",
                        "0004","0004","0004","0004","0004","0004","0004","0004",
                        "0004","0004","0004","0004","0004","0004","0004","0004",
                        "0004","0004","0004","0004","0004","0004","0004","0004",
                        "0004","0004","0004","0004","0004","0004","0004","0004",
                        "0004","0004","0004","0004","0004","0004","0004","0004",
                        "0004","0004","0004","0004","0004","0004","0004","0004",
                        "0004","0004","0004","0004","0004","0004","0004","0004",
                        "0004","0004","0004","0004","0004","0004","0004","0004",
                        "0004","0004","0004","0004","0004","0004","0004","0004",
                        "0004","0004","0004","0004","0004","0004","0004","0004",
                        "0004","0004","0004","0004","0004","0004","0004","0004",
                        "0004","0004","0004","0004","0004","0004","0004","0004",
                        "0004","0004","0004","0004","0004","0004","0004","0004",
                        "0004","0004","0004","0004","0004","0004","0004","0004",
                        "0004","0004","0004","0004","0004","0004","0004","0004",
                        "0004","0004","0004","0004","0004","0004","0004","0004",
                        "0004","0004","0004","0004","0004","0004","0004","0004",
                        "0004","0004","0004","0004","0004","0004","0004","0004",
                        "0004","0004","0004","0004","0004","0004","0004","0004",
                        "0004","0004","0004","0004","0004","0004","0004","0004",
                        "0004","0004","0004","0004","0004","0004","0004","0004",
                        "0004","0004","0004","0004","0004","0004","0004","0004",
                        "0004","0004","0004","0004","0004","0004","0004","0004",
                        "0004","0004","0004","0004","0004","0004","0004","0004",
                        "0004","0004","0004","0004","0004","0004","0004","0004",
                        "0004","0004","0004","0004","0004","0004","0004","0004",
                        "0004","0004","0004","0004","0004","0004","0004","0004",
                        "0004","0004","0004","0004","0004","0004","0004","0004",
                        "0004","0004","0004","0004","0004","0004","0004","0004",
                        "0004","0004","0004","0004","0004","0004","0004","0004"
                    ]
                }
ps here "0004" is the name of the picture resource without extension.
Of course, all these parameters must be declared on the C ++ side, all this is done using the Q_PROPERTY macro :
class MapProvider : public QQuickPaintedItem {
    Q_OBJECT
    Q_PROPERTY(double tilesize READ tilesize WRITE setTilesize NOTIFY tilesizeChanged)
    Q_PROPERTY(double tilesizew READ tilesizew WRITE setTilesizew NOTIFY tilesizewChanged)
    Q_PROPERTY(double tilesizeh READ tilesizeh WRITE setTilesizeh NOTIFY tilesizehChanged)
    Q_PROPERTY(double mapcols READ mapcols WRITE setMapcols NOTIFY mapcolsChanged)
    Q_PROPERTY(double maprows READ maprows WRITE setMaprows NOTIFY maprowsChanged)
    Q_PROPERTY(double cx READ cx WRITE setCx NOTIFY cxChanged)
    Q_PROPERTY(double cy READ cy WRITE setCy NOTIFY cyChanged)
    Q_PROPERTY(QVariantList mapdata READ mapdata WRITE setMapdata NOTIFY mapDatachanged)
public:
/* ... */
}
The power of QtCreator 'a will allow you to easily and without hesitate to create all these parameters with a couple of clicks (for those who are not in the know: call the context menu on each line Q_PROPERTY -> Refactor -> Generate Missing Q_PROPERTY Members ... )
The final
Finally, we got to the implementation of the paint method . In fact, it is not much different from the createMap () function from the previous project, except that it has added image caching:
void MapProvider::paint(QPainter *painter) {
    // получаем номера колонки и строки, с которых начинается отрисовка
    int startcol = qFloor(m_cx / m_tilesizew);
    int startrow = qFloor(m_cy / m_tilesizeh);
    // рассчитываем количество видимых тайлов
    int tilecountw = qFloor(width() / m_tilesize);
    int tilecounth = qFloor(height() / m_tilesize) * 4;
    int tilecount = tilecountw * tilecounth;
    int col, row, globcol, globrow, globid = 0;
    double tx, ty = 0.0f;
    bool iseven;
    QPixmap tile;
    QString tileSourceID;
    for(int tileid = 0; tileid < tilecount; tileid++) {
        // узнаем к какой колонке и строке относится тайл
        col = tileid % tilecountw;
        row = qFloor(tileid / tilecountw) ;
        // узнаем реальные колонку, строку и индекс тайла
        globcol = col + startcol;
        globrow = row + startrow * 2;
        globid = m_mapcols * globrow + globcol;
        // если вдруг описание карты было заполнено неправильно
        // то на карте появится белая дыра
        if(globid >= m_mapdata.size()) {
            return;
        }
        // не рисуем то, что осталось за пределами видимости
        else if(globcol >= m_mapcols || globrow >= m_maprows) {
            continue;
        }
        // определяем чётность строки
        iseven = !(row&1);
        // вычисляем позицию тайла
        tx = iseven ? col * m_tilesizew : col * m_tilesizew + m_tilesizew/2;
        ty = iseven ? row * m_tilesizeh : row * m_tilesizeh - m_tilesizeh/2;
        ty -= qFloor(row/2) * m_tilesizeh;
        // вытягиваем название ресурса по его индексу
        tileSourceID = m_mapdata.at(globid).toString();
        // достаем картинку из кеша, если она там есть
        if(tileCache.contains(tileSourceID)) {
            tile = tileCache.value(tileSourceID);
        }
        // либо создаем картинку нужного размера и скидываем в массив
        else {
            tile = QPixmap(QString(":/assets/texture/%1.png").arg(tileSourceID))
                    .scaled(QSize(m_tilesize, m_tilesize),
                            Qt::IgnoreAspectRatio,
                            Qt::SmoothTransformation);
            tileCache.insert(tileSourceID, tile);
        }
        // рисуем тайл
        painter->drawPixmap(tx, ty, tile);
        // подписываем информацию о тайле
        painter->setFont(QFont("Helvetica", 8));
        painter->setPen(QColor(255, 255, 255, 100));
        painter->drawText(QRectF(tx, ty, m_tilesizew, m_tilesizeh),
                          Qt::AlignCenter,
                          QString("%1\n%2:%3").arg(globid).arg(globcol).arg(globrow));
    }
}
Caching is necessary in order not to redraw the image each time, but it is redrawn due to the fact that the size of the original image is much larger than the tile size (this was done to implement future scaling). Redrawing eats up a lot of resources, especially since Qt :: SmoothTransformation is used when changing the picture .
By the way, theoretically scaling can be implemented now, just add an increase factor for the root.tilesize parameter. The tileCache
variable is declared in the MapProvider class :
private:
    QMap tileCache;
And the final touch is adding a map redraw event by creating a pair of connections:
MapProvider::MapProvider(QQuickItem *parent) :
    QQuickPaintedItem(parent) {
    connect(this, SIGNAL(xChanged()), this, SLOT(update()));
    connect(this, SIGNAL(yChanged()), this, SLOT(update()));
}
Release date
Well, that’s all, now you can start the project and see such a picture:
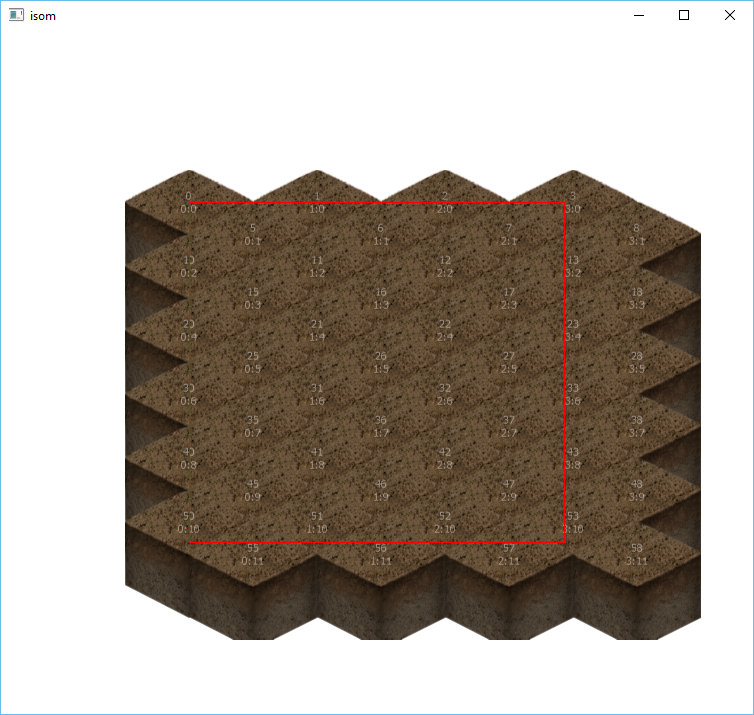
which is not very different from the picture in the first project, but it is less voracious.
In order to see how the map is drawn in motion, you need to increase the value of the root.mapcols variable , setting it, for example, to 8 (this value multiplied by root.maprows corresponds to the number of elements in the mapprovider.mapdata variable , for large values you need to add elements )
In order to hide the “protection zone” behind the curtains, leaving only the useful part of the map visible, just change the gamearea.clip parameter from false to true
The next part will describe the process of creating a map editor based on the current project. The editor will need to be able to save the map and load it.