Simple classroom management system
This article is written for computer science teachers who are tired of constantly restoring order in the classroom and on student computers. For those who value time and health.
We will need:
1. Install on all computers class OS Linux. Choose a distributor to your taste.
2. Install packages on all student computers: openbox, tint2, pcmanfm, gxkb, x11vnc (server and client), vlc
3. In addition, the RuleUser program must be installed on the teacher’s computer, more on this below.
4. Create guest on student computers.
5. Install and configure the sshd package on all computers.
6. Copy the attached configuration files to student and teacher computers.
Note.In this example, the teacher’s computer has an IP address: 192.168.1.100/24. Student computers have addresses starting at 192.168.1.101/24.
1. We exclude the possibility of changing the desktop settings of student computers.
To do this, we use the openbox bundle (for managing windows) + tint2 (taskbar) + pcmanfm (for displaying desktop icons) + gxkb (for displaying the status of the input language).
Desktop icons of student computers will be located on the teacher’s machine. In this way, the teacher will control what is available to the students. On student machines, you need to add a line to the / etc / fstab file for mounting nfs folders from the teacher’s machine:
2. We make it possible to switch the input language by means of the X server, for this on student computers we create the file /etc/X11/xorg.conf.d/10-keymap.conf with the following contents:
Switching by Ctrl + Shift.
3. Download the configs for: openbox , tint2 , pcmanfm , gxkb . We copy them where it should. Usually this is ~ / .config.
I draw your attention to the fact that in the openbox configs there is an autostart script through which the x11vnc server is launched. And also there is a refresh desktop update script that is launched by pressing the F7 key. Just in case, the terminal is called by Ctrl + Shift + T. Students can not talk about these opportunities, this is done primarily for the convenience of the teacher.
4. Using the tools of a specific Linux distributor, or manually, install openbox by default window manager. To do this, just change the value of the Session parameter in the ~ / .dmrc file like this:
5. Verify that the sshd service is installed and starts when the OS boots.
6. To enable students to connect their flash drives, I use the udevmon script , which automatically mounts them in the / media directory. This script must be loaded at startup as a daemon. I have it done through /etc/rc.d/rc.local.
1. In most Linux distributions, nfsd is installed by default, so go straight to setting it up:
- create a folder / mnt / nfs and give it full access rights for everyone (command chmod 777 / mnt / nfs)
- add to the file / etc / exports line:
- see that the following lines are in the /etc/hosts.allow file:
- check that the rpc and nfsd services start when the OS boots.
2. Install the RuleUser program . This program is a copyrighted development of Alt Linux, and you will not find it in other distributions. But in essence it is a python script using the pygtk, gtkvnc libraries. Install these libraries if they are not available on your system.
3. We configure remote connections in the RuleUser program. This can be done using the graphical configurator, but you can simply edit the ~ / .ruleuser / config.cfg file.
Here is the part of the configuration file regarding student machines:
Line “g1 = standalone, 10.” Here g1 is the group of computers 1, the number of computers in the group is 10. Next is a description of the individual computers in the group. To simplify the configuration, you can copy the description lines of computers by changing the computer numbers, ip addresses and a unique identifier in them (for the first computer in this config, this is 1418361570). In the graphical configurator, this will be a little longer.
4. Configure ssh to access students' computers without entering a password:
- enter the command ssh-keygen -t rsa
it will create two keys in the user's home directory, one of them needs to be copied to remote machines that you need access to.
- copy the keys to all student computers:
After that, it will be possible to enter and control the computer through the root and guest users. You do not need to enter a password.
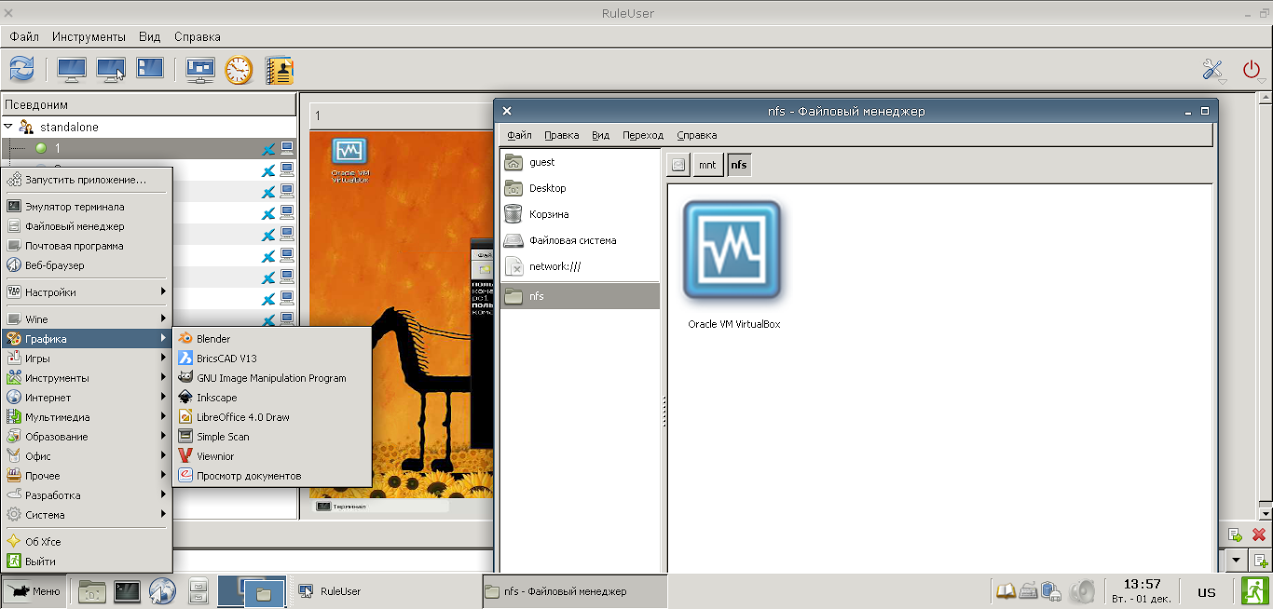
The teacher has full access to students' computers via ssh. Through the RuleUser program, you can monitor students' activities, take control of their computers, block input, etc. The teacher gives students access to only those programs that are necessary for a particular lesson. To do this, just drag the icon of an application into the / mnt / nfs folder from the Gnome, XFCE or KDE menu and update the students' desktop (using F7, or run the update script via ssh).
It looked like this for me:
Student:

Teacher:
We will need:
1. Install on all computers class OS Linux. Choose a distributor to your taste.
2. Install packages on all student computers: openbox, tint2, pcmanfm, gxkb, x11vnc (server and client), vlc
3. In addition, the RuleUser program must be installed on the teacher’s computer, more on this below.
4. Create guest on student computers.
5. Install and configure the sshd package on all computers.
6. Copy the attached configuration files to student and teacher computers.
Note.In this example, the teacher’s computer has an IP address: 192.168.1.100/24. Student computers have addresses starting at 192.168.1.101/24.
Student computers
1. We exclude the possibility of changing the desktop settings of student computers.
To do this, we use the openbox bundle (for managing windows) + tint2 (taskbar) + pcmanfm (for displaying desktop icons) + gxkb (for displaying the status of the input language).
Desktop icons of student computers will be located on the teacher’s machine. In this way, the teacher will control what is available to the students. On student machines, you need to add a line to the / etc / fstab file for mounting nfs folders from the teacher’s machine:
192.168.1.100:/mnt/nfs /home/guest/Desktop nfs ro,nolock,nocto,actimeo=3600 0 0
2. We make it possible to switch the input language by means of the X server, for this on student computers we create the file /etc/X11/xorg.conf.d/10-keymap.conf with the following contents:
Section "InputClass"
	Identifier "Keyboard settings"
	MatchIsKeyboard "yes"
	Driver  "evdev"
	Option  "XkbLayout" "us,ru"
	Option  "XkbVariant" ""
	Option  "XkbOptions" "grp:ctrl_shift_toggle"
EndSection]
Switching by Ctrl + Shift.
3. Download the configs for: openbox , tint2 , pcmanfm , gxkb . We copy them where it should. Usually this is ~ / .config.
I draw your attention to the fact that in the openbox configs there is an autostart script through which the x11vnc server is launched. And also there is a refresh desktop update script that is launched by pressing the F7 key. Just in case, the terminal is called by Ctrl + Shift + T. Students can not talk about these opportunities, this is done primarily for the convenience of the teacher.
4. Using the tools of a specific Linux distributor, or manually, install openbox by default window manager. To do this, just change the value of the Session parameter in the ~ / .dmrc file like this:
Session=openbox
5. Verify that the sshd service is installed and starts when the OS boots.
6. To enable students to connect their flash drives, I use the udevmon script , which automatically mounts them in the / media directory. This script must be loaded at startup as a daemon. I have it done through /etc/rc.d/rc.local.
Teacher computer
1. In most Linux distributions, nfsd is installed by default, so go straight to setting it up:
- create a folder / mnt / nfs and give it full access rights for everyone (command chmod 777 / mnt / nfs)
- add to the file / etc / exports line:
/mnt/nfs 192.168.1.0/24(ro,sync)
- see that the following lines are in the /etc/hosts.allow file:
nfsd: 192.168.1.0/255.255.255.0
rpcbind: 192.168.1.0/255.255.255.0
mountd: 192.168.1.0/255.255.255.0
- check that the rpc and nfsd services start when the OS boots.
2. Install the RuleUser program . This program is a copyrighted development of Alt Linux, and you will not find it in other distributions. But in essence it is a python script using the pygtk, gtkvnc libraries. Install these libraries if they are not available on your system.
3. We configure remote connections in the RuleUser program. This can be done using the graphical configurator, but you can simply edit the ~ / .ruleuser / config.cfg file.
Here is the part of the configuration file regarding student machines:
[group]
group_list = 1
g1 = standalone,10
g1_1 = 1,guest,pc2,192.168.1.101,192.168.1.101,standalone,1418361570,,xfce,standalone,22,22,guest,guest,static,,/home/guest/.vnc/passwd,vncviewer -geometry 1366x768,vncviewer -fullscreen -MenuKey none,False,True,False,100,x11vnc -noxdamage -scale 1024x768,5900,$HOME/.ssh/authorized_keys,$HOME/.ssh/authorized_keys,,:0,,,,$HOME/.ssh/authorized_keys,/tmp,False,default,False,True,False,False,False,False,,x11vnc -noxdamage -scale 640x480,vncviewer -MenuKey none,False,x11vnc -noxdamage -defer 3000,False,False,True,,,,,,,,,,,,,,,,default,True,,,,,,,,,,,,,,False,10,mpgv,800x600,640x480,False,300,False,False,,False,vlc --network-caching=100 --qt-minimal-view --no-qt-error-dialogs --no-qt-privacy-ask,,,,,,,,
g1_2 = 2,guest,pc3,192.168.1.102,192.168.1.102,standalone,1418361573,,xfce,standalone,22,22,guest,guest,static,,/home/guest/.vnc/passwd,vncviewer -geometry 1366x768,vncviewer -fullscreen -MenuKey none,False,True,False,100,x11vnc -noxdamage -scale 1024x768,5900,$HOME/.ssh/authorized_keys,$HOME/.ssh/authorized_keys,,:0,,,,$HOME/.ssh/authorized_keys,/tmp,False,default,False,True,False,False,False,False,,x11vnc -noxdamage -scale 640x480,vncviewer -MenuKey none,False,x11vnc -noxdamage -defer 3000,False,False,True,,,,,,,,,,,,,,,,default,True,,,,,,,,,,,,,,False,10,mpgv,800x600,640x480,False,300,False,False,,False,vlc --network-caching=100 --qt-minimal-view --no-qt-error-dialogs --no-qt-privacy-ask,,,,,,,,
Line “g1 = standalone, 10.” Here g1 is the group of computers 1, the number of computers in the group is 10. Next is a description of the individual computers in the group. To simplify the configuration, you can copy the description lines of computers by changing the computer numbers, ip addresses and a unique identifier in them (for the first computer in this config, this is 1418361570). In the graphical configurator, this will be a little longer.
4. Configure ssh to access students' computers without entering a password:
- enter the command ssh-keygen -t rsa
it will create two keys in the user's home directory, one of them needs to be copied to remote machines that you need access to.
- copy the keys to all student computers:
for i in 101..110; do ssh-copy-id -i ~/.ssh/id_rsa.pub guest@192.168.1.$i ; done
for i in 101..110; do ssh-copy-id -i ~/.ssh/id_rsa.pub root@192.168.1.$i ; done
After that, it will be possible to enter and control the computer through the root and guest users. You do not need to enter a password.
Total
The teacher has full access to students' computers via ssh. Through the RuleUser program, you can monitor students' activities, take control of their computers, block input, etc. The teacher gives students access to only those programs that are necessary for a particular lesson. To do this, just drag the icon of an application into the / mnt / nfs folder from the Gnome, XFCE or KDE menu and update the students' desktop (using F7, or run the update script via ssh).
It looked like this for me:
Student:
Teacher: