How video analytics works
Recently, I read an article in which the author, using a simple example, tells how the motion recognition algorithm works. It reminded me of my own research into video stream analytics algorithms. Many people know that there is an excellent OpenCV project . This is an extensive cross-platform library of computer vision, containing many different algorithms. However, understanding it is not so simple. You can find many publications and examples on how and where to use machine vision, but not how it works. Namely, this is often not enough to understand the process, especially when you are just starting to study this topic.
In this article I will talk about the architecture of video analytics.
The general scheme of video image analysis is presented below.
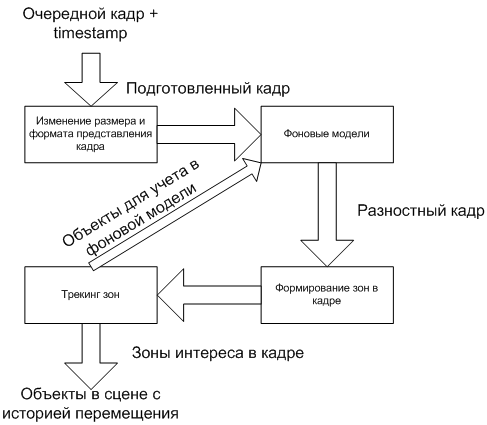
The process is divided into several successive stages. At the output of each of them, information about what is happening in the frame is supplemented with ever greater details. There may also be feedbacks between steps to more finely respond to changes in the frame.
Consider the scheme in more detail.
What is a video stream
First you need to decide what a video stream is. Although there are many formats of video data, their essence boils down to one thing: a sequence of frames with a certain frequency per second. A frame is an image characterized by resolution and format (the number of bits per pixel and their interpretation: which bits correspond to which color component). Inside the stream, frame compression can be used to reduce the amount of transmitted data, but when displayed on the screen, the frames are always expanded to the initial state. Directly, analytics algorithms always work the same with uncompressed frames.
Thus, the video stream is characterized by the frame rate, their format and resolution.
It is important to note that analytics always deals with only one frame at a time. That is, they are processed sequentially. In addition, during the next processing, it is important to know how much time has passed since the previous frame. This value can be calculated from the frequency, but a more practical approach is to track the frame with a timestamp - timestamp.
Change the size and format of the frame
The first step is training. As a rule, it is significantly reduced in size. The fact is that each pixel of the image will participate in further processing. Accordingly, the smaller the frame, the faster everything will work. Naturally, during compression, some of the information in the frame is lost. But this is not critical, but even useful. The objects with which analytics works are mostly large enough not to disappear from the frame during compression. But all kinds of “noise” associated with the quality of the camera, lighting, environmental factors, will be reduced.
Resolution change occurs by combining several pixels of the original image into one. The part of the information that will be stored depends on the method of integration.
For example, a 3x3 square pixel of the original image should be converted to one pixel of the result. You can summarize all 9 pixels, you can take the sum of only 4 corner pixels, or you can only have one central.
4 corner pixels:

Sum of all pixels:

Central pixel:
The result will be slightly different everywhere in speed and quality. But sometimes it happens that a method that loses more information gives a more even picture than one that uses all the pixels.
Another action at this stage is to change the image format. Color images, as a rule, are not used, as this also increases the processing time of the frame. For example, RGB24 contains 3 bytes per pixel. And Y8 is only one, while not much inferior to the first in information content.
Y8 = (R + G + B) / 3.
The result is the same image, but in grayscale:
Background Models
This is the most important processing step. The purpose of this stage is to form the background of the scene and obtain the difference between the background and the new frame. The quality of the entire circuit as a whole will depend on the algorithms of this stage. If some object is accepted as a background or vice versa a part of the background is selected as an object, then something will be difficult to fix further.
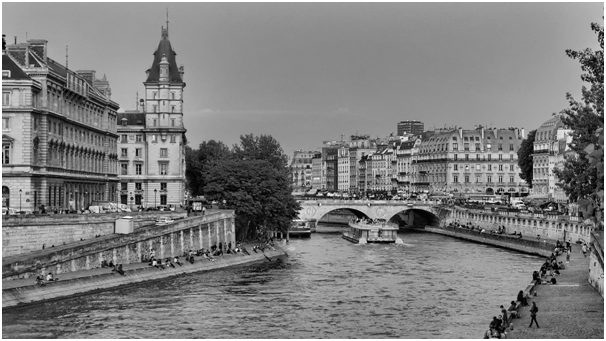
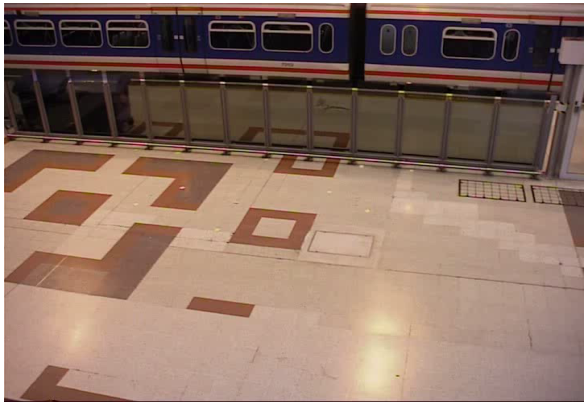
In the simplest case, as a background, you can take a frame with an empty scene:
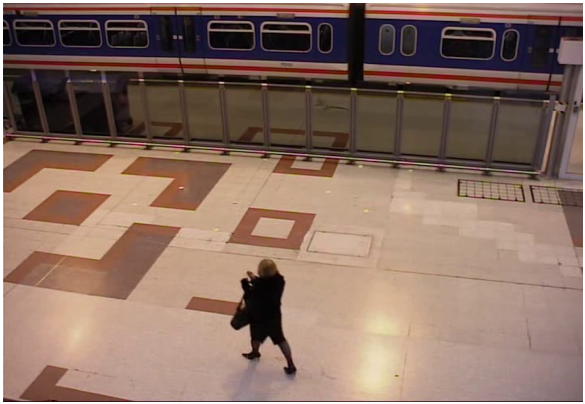
Choose a frame with an object:
If you transfer these frames to Y8 and subtract the background from the frame with the object, we get the following:

For convenience, you can binarize: replace the value of all pixels with large 0 by 255 As a result, from the gradation of gray we will move on to the black and white image:

Everything seems to be fine, the object is separated from the background, has clear boundaries. But, firstly, the shadow of the object stood out. And secondly, artifacts from image noise are visible at the top of the frame.
In practice, this approach is no good. Any shadow, light flare, change in camera brightness will spoil the whole result. This is precisely the complexity of the task. Objects should be separated from the background, while ignoring natural factors and image noise: light flare, shadows from buildings and clouds, vibrating plant branches, frame compression artifacts, etc. Moreover, if you are looking for an abandoned item, on the contrary, it should not become part of the background.
There are many algorithms.solving these problems with different effectiveness. From simple averaging of the background to the use of probabilistic models and machine learning. Many of them are in OpenCV. Moreover, it is possible to combine several approaches, which will give an even better result. But the more complex the algorithm, the more time it takes to process the next frame. With live video at least 12.5 frames per second, the system has only 80 ms to process. Therefore, the choice of the optimal solution will depend on the task and the resources allocated for its implementation.
Zone formation
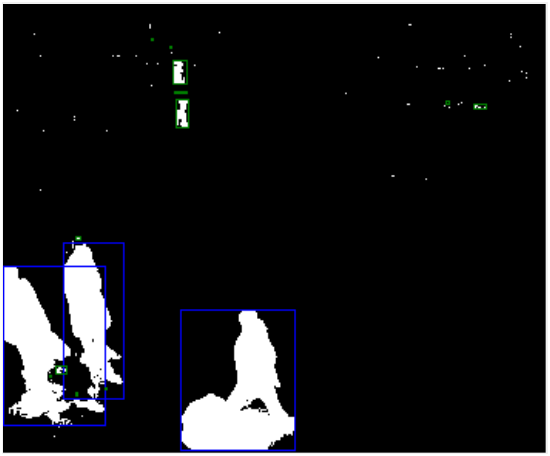
The difference frame is formed. We see white objects on it on a black background:


Now we need to separate the objects from each other and form zones that combine the pixels of the objects:
This can be done using, for example, connected component labeling .
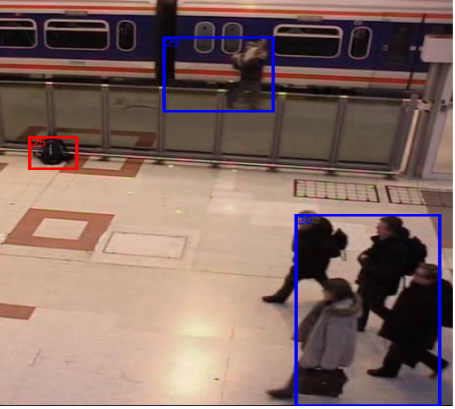
Here, all the flaws of the background model immediately become visible. The man from above is divided into several parts, many artifacts, shadows from people. However, some of these deficiencies can be corrected at this stage. Knowing the area of the object, its height and width, pixel density, you can filter out excess objects.
In the frame above, blue frames indicate objects that are involved in further processing, and green ones indicate filtered ones. Errors are also possible here. As you can see, the man on top, divided into several parts, was also filtered due to its size. This problem can be solved, for example, by using the perspective.
Other errors are possible. For example, several objects can be combined into one. So at this stage there is a large field for experiments.
Tracking zones
Finally, at the last stage, the zones turn into objects. Here the result of processing the last few frames is used. The main task is to determine that the zone on two adjacent frames is the same object. Signs can be very diverse: size, pixel density, color characteristics, prediction of direction of movement, etc. This is where the timestamps of frames are important. They allow you to calculate the speed of the object and the distance traveled by it.
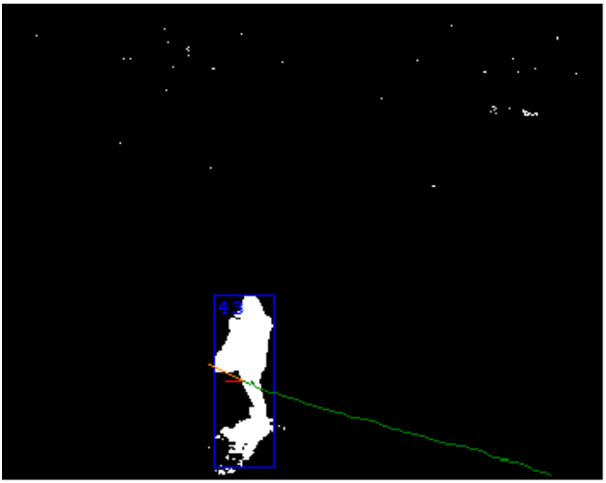
At this stage, you can fix one-time errors of the previous one. For example, glued objects can be divided, given their history of movement. On the other hand, there may be problems. The most important of them is the intersection of 2 objects. A special case of this problem, when a larger object for a long time obscures a smaller one.
Objects for accounting in the background model
Feedback may be present in the architecture to improve the performance of previous steps. The first thing that comes to mind is to use information about objects in the scene when forming the background.
For example, this way you can distinguish a retarded object and not make it part of the background. Or fight with “ghosts”: if there was a person on the stage when creating the background, then when he leaves, an object “ghost” will appear in his place. Understanding that the trajectory of the object begins in this place, you can quickly remove the “ghost” in the background.
Result
The result of all stages is a list of objects in the scene. Each of them is characterized by size, density, speed, trajectory, direction of movement and other parameters.
This list is also used in scene analytics. You can determine if the object is crossing a line or moving in the wrong direction. You can count the number of objects in a given zone, idle reeling, falling and many other events.
Conclusion
Modern video analytics systems have achieved very good results, but so far they remain a complex multi-stage process. Moreover, knowledge of the theory does not always give a good practical result.
In my opinion, creating a good machine vision system is a very complicated process. Algorithm tuning is a very time-consuming and lengthy business, in which the subtleties of the software implementation also interfere. It takes a lot of experimentation. And, although OpenCV is priceless in this matter, it is not a guarantor of the result, because the tools that it contains must also be able to be used correctly.
I hope that this article will help you understand how it all works and what OpenCV tools can be applied at what stages.