5 + 1 case where the REST API specification plays a huge role
- Transfer
- Tutorial

This article focuses on writing and maintaining a useful and relevant specification for a REST API project, which will save a lot of unnecessary code, as well as significantly improve the integrity, reliability and transparency of the project as a whole.
What is the RESTful API?

It is a myth.
Seriously, if you think that your project is a RESTful API, you are almost certainly mistaken. The idea of RESTful is to build an API that would in all respects the architectural rules and restrictions described by the REST style, but in real conditions it turns out to be almost impossible .
On the one hand, REST contains too many vague and ambiguous definitions. For example, some terms from HTTP dictionaries of methods and status codes are used in practice for other than their intended purpose, and many of them are not used at all.
On the other hand, REST creates too many restrictions. For example, atomic use of resources in the real world is not rational for APIs used by mobile applications. A complete failure to store state between requests is essentially a ban on the mechanism of user sessions used in many APIs.
But wait, not everything is so bad!
Why is the REST API specification necessary?
Despite these shortcomings with a reasonable approach, REST still remains an excellent basis for designing really cool APIs. Such an API should have internal consistency, clear structure, convenient documentation and good coverage with unit tests. All this can be achieved by developing a high-quality specification for your API.
Most often the REST API specification is associated with its documentation . Unlike the first (which is the formal description of your API), the documentation is intended to be read by people: for example, developers of a mobile or web application using your API.
However, besides the actual creation of the documentation, the correct description of the API can bring a lot more benefit. In the article, I want to share examples of how using competent specification, you can:
- make unit testing more simple and reliable;
- set up preprocessing and validation of input data;
- automate serialization and ensure the integrity of responses;
- and even take advantage of static typing.
Openapi

The common format for describing the REST API today is OpenAPI , which is also known as Swagger . This specification is a single file in JSON or YAML format, consisting of three sections:
- a header containing the name, description, and version of the API, as well as additional information;
- a description of all resources, including their identifiers, HTTP methods, all input parameters, as well as codes and formats of the response body, with links to definitions;
- all object definitions in the JSON Schema format that can be used both in the input parameters and in the responses.
OpenAPI has a serious drawback - the complexity of the structure and, often, redundancy . For a small project, the contents of a JSON file specification can quickly grow to several thousand lines. In this form, it is impossible to maintain this file manually. This is a serious threat to the very idea of maintaining the current specification as the API evolves.
There are many visual editors that allow you to describe the API and form as a result the OpenAPI specification. They, in turn, are based on additional services and cloud solutions, such as Swagger , Apiary , Stoplight , Restlet and others.
However, for me, such services were not very convenient due to the complexity of quickly editing the specification and combining with the process of writing code. Another disadvantage is the dependence on the feature set of each specific service. For example, to implement a full-fledged unit-testing only using cloud service is almost impossible. Code generation and even the creation of stubs for endpoints, although they seem to be very possible, are practically useless in practice.
Tinyspec
In this article I will use examples based on the RYS API's own description format, tinyspec . The format is a small file that intuitively describes the endpoints and data models used in the project. Files are stored next to the code, which allows you to check with them and edit them right in the process of writing it. At the same time tinyspec is automatically compiled into a full OpenAPI, which can be immediately used in the project. It's time to tell exactly how.
In this article, I will give examples from Node.js (koa, express) and Ruby on Rails, although these practices apply to most technologies, including Python, PHP, and Java.
When else is the specification incredibly useful?
1. Unit tests endpoint
Behavior-driven development (BDD) is ideal for developing a REST API. The most convenient way to write unit tests is not for individual classes, models and controllers, but for specific endpoints. In each test, you emulate a real HTTP request and check the server response. The Node.js for emulation test queries have supertest and chai-http , in the Rails on the Ruby - airborne .
Suppose we have a schema Userand an endpoint GET /usersthat returns all users. Here is the tinyspec syntax that describes it:
- User.models.tinyspec file :
User {name, isAdmin: b, age?: i}- File users.endpoints.tinyspec :
GET /users
    => {users: User[]}
This is what our test will look like:
Node.js
describe('/users', () => {
  it('List all users', async () => {
    const { status, body: { users } } = request.get('/users');
    expect(status).to.equal(200);
    expect(users[0].name).to.be('string');
    expect(users[0].isAdmin).to.be('boolean');
    expect(users[0].age).to.be.oneOf(['boolean', null]);
  });
});
Ruby on rails
describe 'GET /users'do
  it 'List all users'do
    get '/users'
    expect_status(200)
    expect_json_types('users.*', {
      name::string,
      isAdmin::boolean,
      age::integer_or_null,
    })
  endend
When we have a specification that describes the response formats of the server, we can simplify the test and simply check the answer for compliance with this specification . To do this, we use the fact that our tinyspec models are turned into OpenAPI definitions, which in turn correspond to the JSON Schema format.
Any literal object in JS (or Hashin Ruby, dictin Python, an associative array in PHP, and even Mapin Java) can be tested for consistency with the JSON schema. And even there are corresponding plugins for testing frameworks, for example jest-ajv (npm), chai-ajv-json-schema (npm) and json_matchers (rubygem) for RSpec.
Before using schemes, you need to connect them to the project. First, we will generate a specification file based on the tinyspec openapi.json(this action can be automatically performed before each test run):
tinyspec -j -o openapi.jsonNode.js
Now we can use the received JSON in the project and take from it the key definitionscontaining all the JSON schemes. Schemas may contain cross-references ( $ref), therefore, if we have nested schemes (for example, Blog {posts: Post[]}), then we need to "expand" them in order to use them in validations. For this we will use json-schema-deref-sync (npm).
import deref from'json-schema-deref-sync';
const spec = require('./openapi.json');
const schemas = deref(spec).definitions;
describe('/users', () => {
  it('List all users', async () => {
    const { status, body: { users } } = request.get('/users');
    expect(status).to.equal(200);
    // Chai
    expect(users[0]).to.be.validWithSchema(schemas.User);
    // Jest
    expect(users[0]).toMatchSchema(schemas.User);
  });
});
Ruby on rails
json_matcherscan process $reflinks, but requires the presence of separate files with schemes in the file system along a certain path, so you first have to "split" swagger.jsoninto many small files (more on this here ):
# ./spec/support/json_schemas.rbrequire'json'require'json_matchers/rspec'
JsonMatchers.schema_root = 'spec/schemas'# Fix for json_matchers single-file restriction
file = File.read 'spec/schemas/openapi.json'
swagger = JSON.parse(file, symbolize_names:true)
swagger[:definitions].keys.each do|key|
  File.open("spec/schemas/#{key}.json", 'w') do|f|
    f.write(JSON.pretty_generate({
      '$ref': "swagger.json#/definitions/#{key}"
    }))
  endend
After that, we can write our test like this:
describe 'GET /users'do
  it 'List all users'do
    get '/users'
    expect_status(200)
    expect(result[:users][0]).to match_json_schema('User')
  endend
Please note: writing tests in this way is incredibly convenient. Especially if your IDE supports running tests and debugging (for example, WebStorm, RubyMine and Visual Studio). Thus, you can not use any other software at all, and the whole API development cycle is reduced to 3 successive steps:
- specification design (for example, in tinyspec);
- writing a complete set of tests for added / modified endpoints;
- developing code that satisfies all tests.
2. Validation of input data
OpenAPI describes the format of not only responses, but also input data. This allows us to validate the data that came from the user right at the time of the request .
Suppose we have the following specification, which describes the update of user data, as well as all the fields that can be changed:
# user.models.tinyspec
UserUpdate !{name?, age?: i}
# users.endpoints.tinyspec
PATCH /users/:id {user: UserUpdate}
    => {success: b}
Earlier we considered plug-ins for validation inside tests, however for more general cases there are validation modules ajv (npm) and json-schema (rubygem), let's use them and write a controller with validation.
Node.js (Koa)
This is an example for Koa , the successor to Express, but for Express, the code will look similar.
import Router from'koa-router';
import Ajv from'ajv';
import { schemas } from'./schemas';
const router = new Router();
// Standard resource update action in Koa.
router.patch('/:id', async (ctx) => {
  const updateData = ctx.body.user;
  // Validation using JSON schema from API specification.await validate(schemas.UserUpdate, updateData);
  const user = await User.findById(ctx.params.id);
  await user.update(updateData);
  ctx.body = { success: true };
});
asyncfunctionvalidate(schema, data) {
  const ajv = new Ajv();
  if (!ajv.validate(schema, data)) {
    const err = newError();
    err.errors = ajv.errors;
    throw err;
  }
}
In this example, if the input data does not meet the specification, the server will return a response to the client 500 Internal Server Error. To avoid this, we can intercept the validator error and form our own response, which will contain more detailed information about specific fields that have not passed the test, and also comply with the specification .
Add a description of the model FieldsValidationErrorin the file error.models.tinyspec :
Error {error: b, message}
InvalidField {name, message}
FieldsValidationError < Error {fields: InvalidField[]}
And now we will indicate it as one of the possible answers of our endpoint:
PATCH /users/:id {user: UserUpdate}
    => 200 {success: b}
    => 422 FieldsValidationError
This approach will allow you to write unit-tests that verify the correctness of the formation of an error when incorrect data came from the client.
3. Serialization of models
Almost all modern server frameworks somehow use ORM . This means that most of the resources used in the API within the system are represented as models, their instances and collections.
The process of forming the JSON representation of these entities for transmission in an API response is called serialization . There are a number of plugins for different frameworks that perform the functions of a serializer, for example: sequelize-to-json (npm), acts_as_api (rubygem), jsonapi-rails (rubygem). In fact, these plugins allow for a particular model to specify a list of fields that need to be included in the JSON object, as well as additional rules, for example, to rename them or dynamically calculate values.
Difficulties begin when we need to have several different JSON representations of the same model, or when an object contains nested entities — associations. There is a need to inherit, reuse and bind serializers .
Different modules solve these problems in different ways, but let's think about whether the specification can help us again? After all, in fact, all the information about the requirements for JSON representations, all possible combinations of fields, including nested entities, are already in it. So we can write an automatic serializer.
I bring to your attention a small module sequelize-serialize (npm) that allows you to do this for Sequelize models. It takes as input a model instance or an array, as well as the required schema, and iteratively builds a serialized object, taking into account all the required fields and using nested schemas for the associated entities.
So, suppose we have to return from the API all users who have blog posts, including comments on these posts. We describe this with the following specification:
# models.tinyspec
Comment {authorId: i, message}
Post {topic, message, comments?: Comment[]}
User {name, isAdmin: b, age?: i}
UserWithPosts < User {posts: Post[]}
# blogUsers.endpoints.tinyspec
GET /blog/users
    => {users: UserWithPosts[]}
Now we can construct a query using Sequelize and return a serialized object that corresponds exactly to the specification just described above:
import Router from'koa-router';
import serialize from'sequelize-serialize';
import { schemas } from'./schemas';
const router = new Router();
router.get('/blog/users', async (ctx) => {
  const users = await User.findAll({
    include: [{
      association: User.posts,
      required: true,
      include: [Post.comments]
    }]
  });
  ctx.body = serialize(users, schemas.UserWithPosts);
});
It's almost magic, right?
4. Static typing
If you are so cool that you are using TypeScript or Flow, you may have already wondered "What about my dear static types ?!" . Using the sw2dts or swagger-to-flowtype modules, you can generate all the necessary definitions based on JSON schemes and use them for static typing of tests, input data and serializers.
tinyspec -j
sw2dts ./swagger.json -o Api.d.ts --namespace Api
Now we can use types in controllers:
router.patch('/users/:id', async (ctx) => {
  // Specify typefor request data object
  const userData: Api.UserUpdate = ctx.request.body.user;
  // Run spec validation
  await validate(schemas.UserUpdate, userData);
  // Query the database
  const user = await User.findById(ctx.params.id);
  await user.update(userData);
  // Return serialized result
  const serialized: Api.User = serialize(user, schemas.User);
  ctx.body = { user: serialized };
});
And in the tests:
it('Update user', async () => {
  // Static check for test input data.
  const updateData: Api.UserUpdate = { name: MODIFIED };
  const res = await request.patch('/users/1', { user: updateData });
  // Type helper for request response:
  const user: Api.User = res.body.user;
  expect(user).to.be.validWithSchema(schemas.User);
  expect(user).to.containSubset(updateData);
});
Please note that the generated type definitions can be used not only in the API project itself, but also in client application projects to describe the types of functions in which the work with the API takes place. Developers of clients on Angular will be especially pleased with this gift.
5. Type casting query string
If for some reason your API accepts requests with the MIME type application/x-www-form-urlencodedand not application/json, the request body will look like this:
param1=value¶m2=777¶m3=falseThe same applies to query parameters (for example, in GET requests). In this case, the web server will not be able to automatically recognize the types - all data will be in the form of strings ( here is a discussion in the qs npm module repository), so after parsing you will receive such an object:
{ param1: 'value', param2: '777', param3: 'false' }In this case, the request will not be validated according to the scheme, which means it will be necessary to manually ensure that each parameter has the correct format and bring it to the required type.
As you might guess, this can be done using all the same schemes from our specification. Imagine that we have such an endpoint and scheme:
# posts.endpoints.tinyspec
GET /posts?PostsQuery
# post.models.tinyspec
PostsQuery {
  search,
  limit: i,
  offset: i,
  filter: {
    isRead: b
  }
}
Here is an example request for such an endpoint.
GET /posts?search=needle&offset=10&limit=1&filter[isRead]=trueLet's write a function castQuerythat will lead all parameters to the necessary types for us. It will look something like this:
functioncastQuery(query, schema) {
  _.mapValues(query, (value, key) => {
    const { type } = schema.properties[key] || {};
    if (!value || !type) {
      return value;
    }
    switch (type) {
      case'integer':
        returnparseInt(value, 10);
      case'number':
        returnparseFloat(value);
      case'boolean':
        return value !== 'false';
      default:
        return value;
    }
 });
}
Its more complete implementation with support for nested schemas, arrays and null-types is available in cast-with-schema (npm). Now we can use it in our code:
router.get('/posts', async (ctx) => {
  // Cast parameters to expected typesconst query = castQuery(ctx.query, schemas.PostsQuery);
  // Run spec validationawait validate(schemas.PostsQuery, query);
  // Query the databaseconst posts = await Post.search(query);
  // Return serialized result
  ctx.body = { posts: serialize(posts, schemas.Post) };
});
Notice how, of the four lines of endpoint code, three use schemas from the specification.
Best practics
Separate schemes for creating and modifying
Typically, the schemes that describe the response of the server are different from those that describe the input data used to create and modify models. For example, the list of available fields for POST- and - PATCHqueries must be strictly limited, while in the - PATCHqueries, usually all fields of the scheme are made optional. Schemes that determine the answer may be more free.
In the automatic generation of tinyspec CRUDL endpoints, postfixes Newand are used Update. Schemes User*can be defined as follows:
User {id, email, name, isAdmin: b}
UserNew !{email, name}
UserUpdate !{email?, name?}
Try not to use the same schemes for different types of actions to avoid accidental security problems due to the reuse or inheritance of old schemes.
Semantics in schema names
The contents of the same models may differ in different endpoints. Use the postfix With*and For*in the names of schemes to show how they differ and what is intended. The tinyspec models can also be inherited from each other. For example:
User {name, surname}
UserWithPhotos < User {photos: Photo[]}
UserForAdmin < User {id, email, lastLoginAt: d}
Postfixes can be varied and combined. The main thing is that their name reflects the essence and simplifies familiarity with the documentation.
Endpoint separation by client type
Often the same endpoints return different data depending on the type of client or the role of the user accessing the endpoint. For example, endpointy GET /usersand GET /messagescan be very different for the users of your mobile applications and back-office managers. In this case, changing the very name of the endpoint may be too great a complication.
To describe the same endpoint several times, you can add its type in brackets after the path. In addition, it is useful to use tags: it will help to divide the documentation of your endpoints into groups, each of which will be intended for a specific group of clients of your API. For example:
Mobile app:
    GET /users (mobile)
        => UserForMobile[]
CRM admin panel:
    GET /users (admin)
        => UserForAdmin[]
REST API documentation
Once you have the tinyspec or OpenAPI specification, you can generate beautiful HTML documentation and publish it to the delight of developers using your API.
In addition to the cloud services mentioned earlier, there are CLI-tools that convert OpenAPI 2.0 to HTML and PDF, after which you can upload it to any static hosting. Examples:
- bootprint-openapi (npm, used by default in tinyspec)
- swagger2markup-cli (jar, there is an example of use , will be used in the tinyspec Cloud )
- redoc-cli (npm)
- widdershins (npm)
Do you know more examples? Share them in the comments.
Unfortunately, OpenAPI 3.0, released a year ago, is still poorly supported and I could not find decent examples of documentation based on it: neither among cloud solutions nor among CLI tools. For the same reason, OpenAPI 3.0 is not yet supported in tinyspec.
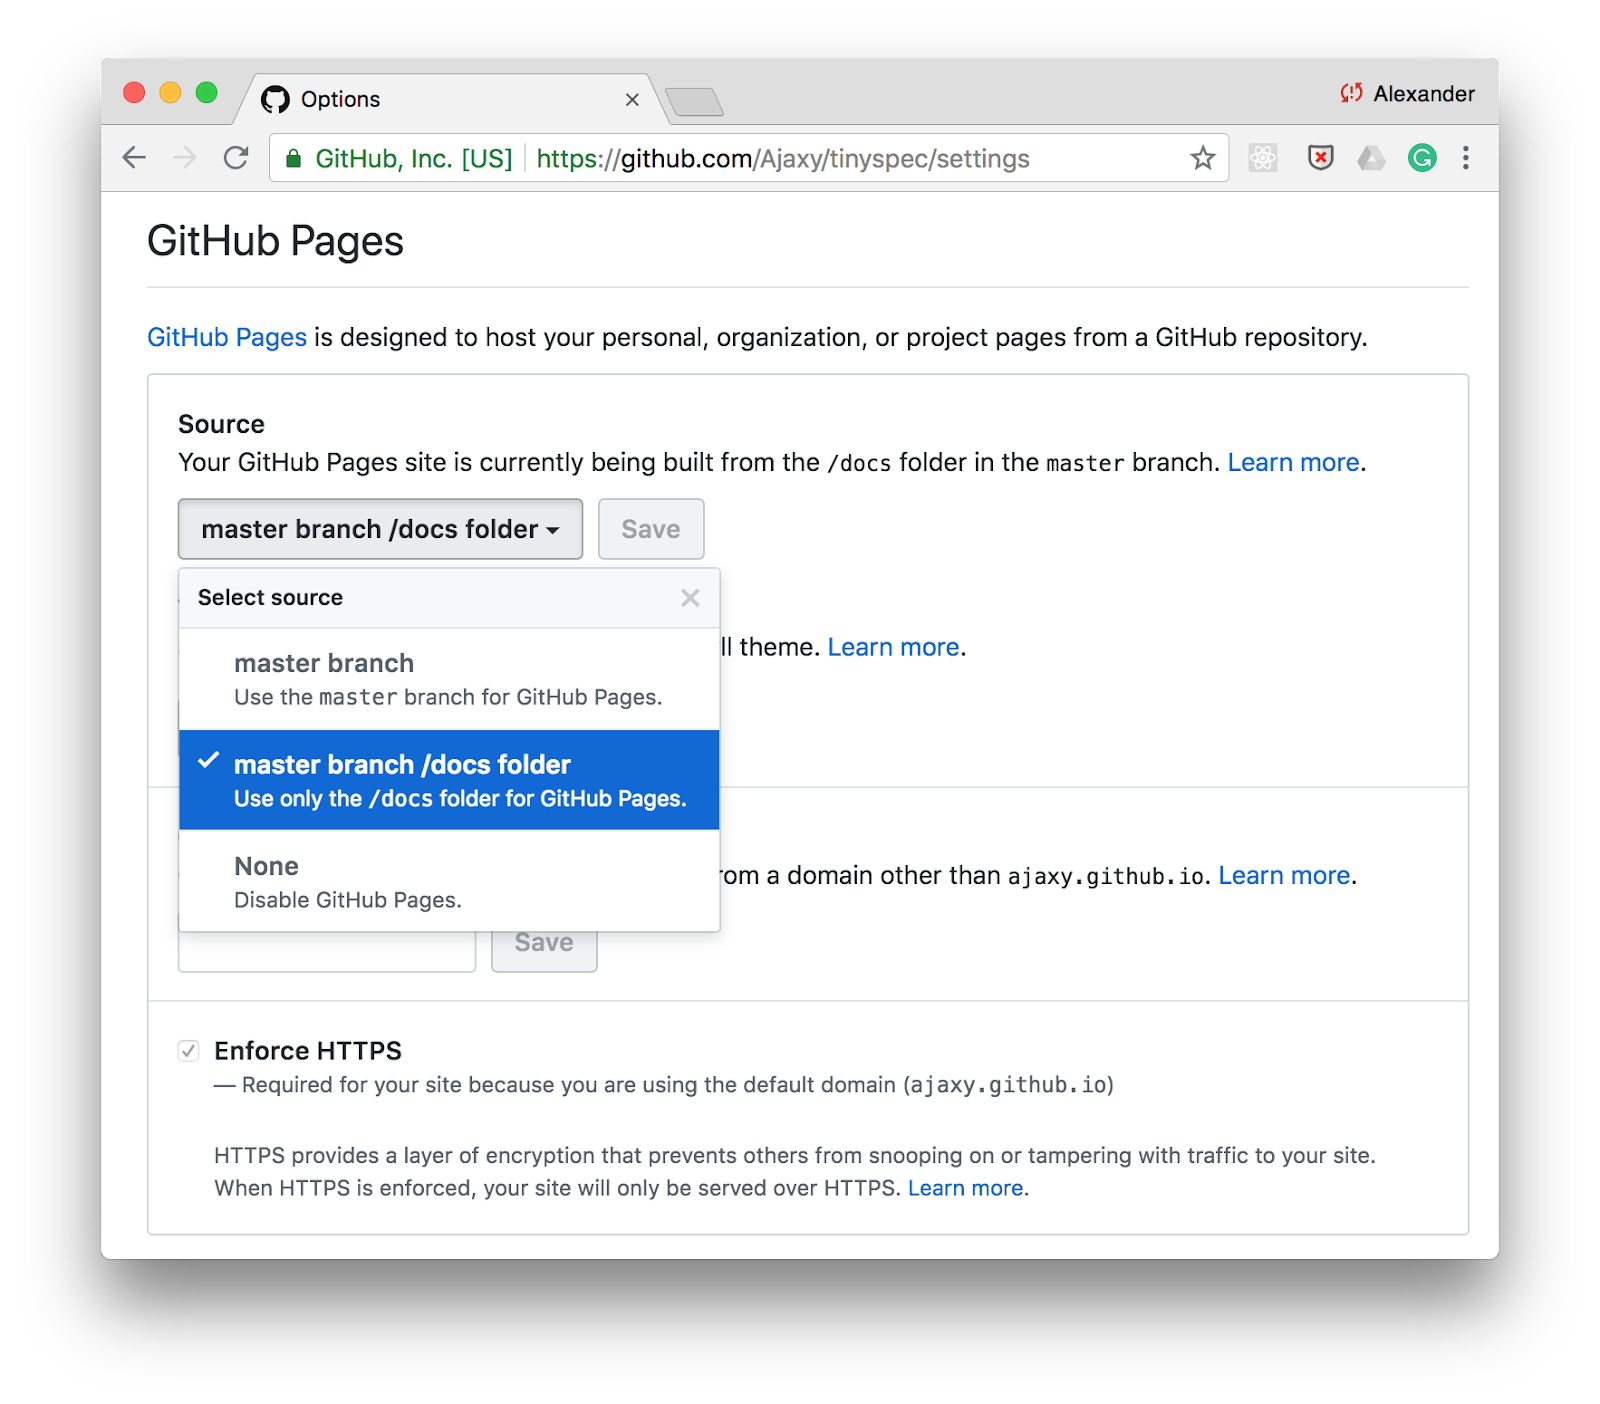
Posting to GitHub
One of the easiest ways to publish documentation is GitHub Pages . Just turn on the support of static pages for the directory /docsin the settings of your repository and store the HTML documentation in this folder.
You can add a command to generate documentation via tinyspec or another CLI tool in scriptsin package.jsonand update the documentation with each commit:
"scripts": {
    "docs": "tinyspec -h -o docs/",
    "precommit": "npm run docs"
}
Continuous integration
You can enable the generation of documentation in the CI cycle and publish it, for example, Amazon S3 at different addresses depending on the environment or version of the API you, for example: /docs/2.0, /docs/stable, /docs/staging.
Tinyspec cloud
If you like the tinyspec syntax, you can register as an early adopter on tinyspec.cloud . We are going to build on its basis a cloud service and a CLI for automatic publication of documentation with a wide choice of templates and the ability to develop our own templates.
Conclusion
Development of the REST API is perhaps the most enjoyable thing that exists in the process of working on modern web and mobile services. There is no browser zoo, operating systems and screen sizes, everything is completely under our control - "at your fingertips."
Maintaining the current specifications and bonuses in the form of various automations, which are provided at the same time, make this process more enjoyable. Such an API becomes structured, transparent and reliable.
After all, in fact, if we are doing what we create a myth, then why don't we make it beautiful?